
There’s something about watching a little girl’s face light up when she walks into her very own fairy bedroom for the first time — eyes wide, mouth open, the whole thing. It’s the kind of moment that makes all the measuring, painting, and Amazon-box-opening completely worth it.
Whether you’re decorating a nursery for a soon-to-arrive baby girl, refreshing a toddler’s room, or finally giving your school-aged daughter the enchanted space she’s been begging for, a fairy themed bedroom is one of those design choices that just works.
The best part? You don’t need a fairy godmother’s budget to pull it off.
From subtle touches that whisper “enchanted forest” to full-on magical immersions with canopies and twinkling lights, there’s a fairy bedroom idea here for every style, space, and spending limit.
Let’s make some magic. ✨
1. The Enchanted Forest Canopy Bed
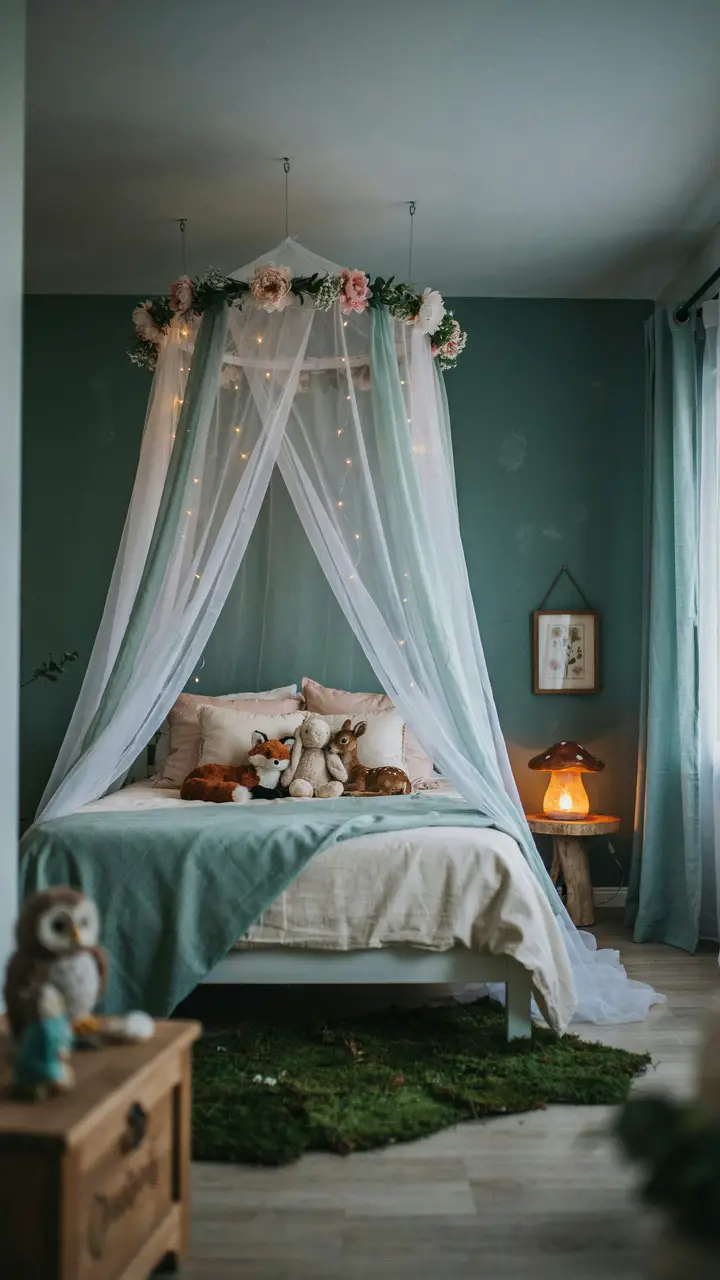
How to Recreate This Look
A forest canopy bed is probably the centerpiece fairy bedroom move, and honestly, it’s more achievable than it looks. The key is layering — bed frame, canopy, lighting, and accessories working together.
Shopping List:
- White or natural wood bed frame (IKEA HEMNES, $299 or thrifted from Facebook Marketplace for $40–80)
- Ceiling-mounted canopy ring (Amazon, $15–25)
- Sheer curtain panels in white or sage ($10–30 per panel, IKEA or Target)
- Warm white LED fairy lights, battery-operated or plug-in ($8–20, Amazon)
- Faux moss rug or green shag rug (Target or Ruggable, $40–150)
- Toadstool/mushroom lamp (Amazon, $25–60)
- Woodland animal plush toys (IKEA DJUNGELSKOG, or Jellycat, $10–50 each)
- Faux flower garland for canopy ($12–30, Amazon or Hobby Lobby)
Step-by-Step Styling Instructions:
- Mount the canopy ring to the ceiling using a ceiling hook rated for your ceiling type — drywall anchors for hollow walls, or screw directly into a stud.
- Thread 4–6 sheer panels through the canopy ring and let them drape to the floor or pool gently.
- Weave fairy lights through the canopy fabric before hanging for a seamless, built-in glow effect.
- Position the bed directly under the canopy ring so the drape frames the headboard symmetrically.
- Layer the bed with a neutral duvet base, then add forest-tone throw pillows in greens, creams, and soft blushes.
- Place the mushroom lamp on a small bedside table so it provides a warm, low nightlight glow.
- Arrange plush woodland animals across the pillow stack for that “inhabited by forest creatures” look.
Budget Breakdown:
- Under $100: Use sheer panels from IKEA ($10 each), a $6 ceiling hook, battery fairy lights, and one anchor plush animal. Skip the canopy ring and instead drape fabric from a curtain rod mounted above the headboard.
- $100–$500: Full canopy ring setup, quality sheer fabric, a proper mushroom lamp, a moss-tone rug, and a curated set of woodland plush toys.
- $500+: Custom wooden canopy bed frame with built-in posts, high-quality linen bedding, handmade felt woodland animals, and a statement hand-painted forest mural on the accent wall.
Style Compatibility: Pairs beautifully with Cottagecore, Scandinavian nursery aesthetics, and nature-inspired bohemian styles. Works well alongside existing natural wood furniture and muted, earthy color palettes.
Space Requirements: Works best in rooms at least 10×10 feet. In smaller rooms, opt for a ceiling-mounted half-canopy behind the headboard instead of a full surround drape.
Difficulty Level: Beginner to Intermediate. The trickiest part is finding your ceiling stud or using appropriate drywall anchors. Everything else is genuinely simple.
Durability with Kids: Sheer fabrics will need occasional washing — choose machine-washable panels from the start. Battery-operated lights are safer than plug-in versions for young children. Skip real dried florals (too fragile) and stick to faux.
Seasonal Swaps: In winter, swap sheer mint panels for warm cream or blush velvet for a more hygge, cozy feel. Swap woodland plush animals for a polar bear and snow fox to create a “winter forest” vibe without changing the entire setup.
Common Mistakes to Avoid: Don’t drape too many fabric panels — it starts to look like a ghost costume rather than a canopy. Four panels maximum. Also avoid hanging lights where tiny fingers can easily reach the plug.
2. Twinkle Light Ceiling That Looks Like a Night Sky
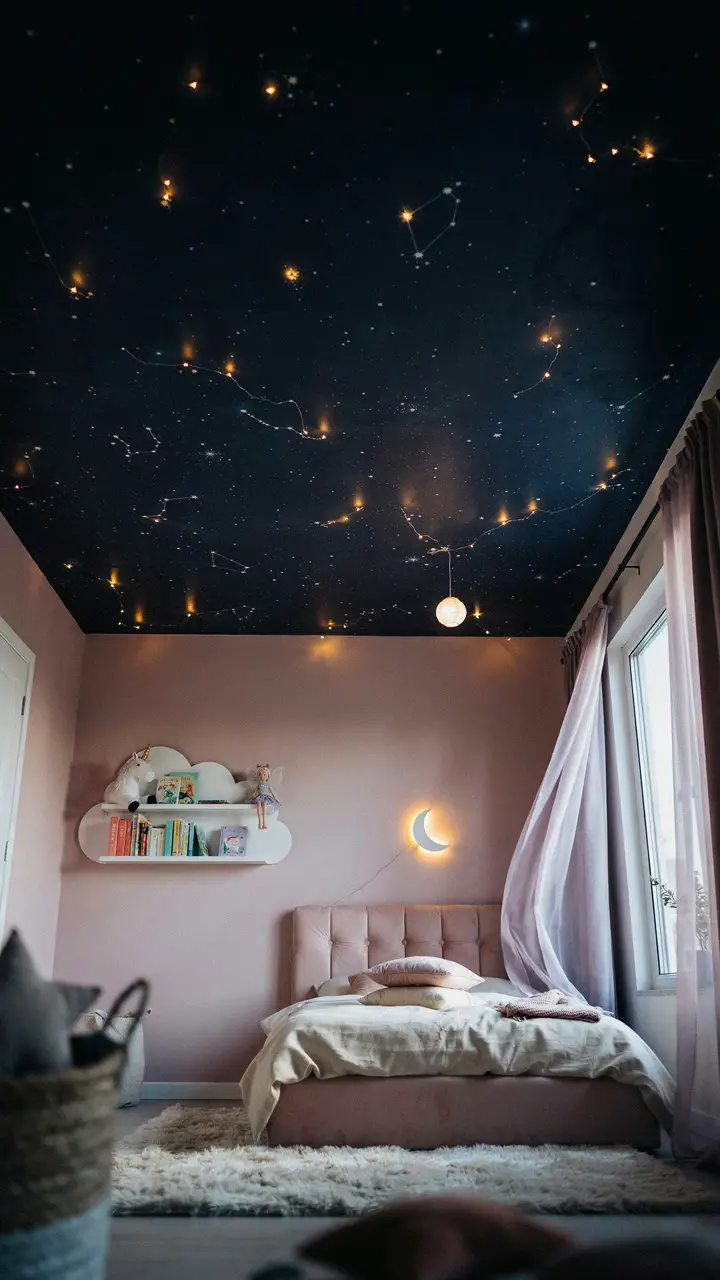
How to Recreate This Look
This one feels like a lot but is genuinely one of the most impactful fairy bedroom upgrades you can make. The secret is committing to one dark ceiling in an otherwise light room — it creates the “stepping outside under the stars” effect without making the whole room feel cave-like.
Shopping List:
- Navy or dark midnight blue ceiling paint (Sherwin-Williams Naval SW6244, $45–60/gallon)
- Warm white LED string lights, multiple strands ($8–15 per strand, Amazon — buy at least 5–8 strands)
- Removable adhesive clips for mounting lights to ceiling (Command strips for lights, $8 a pack)
- Cloud-shaped bookshelf (Amazon or Wayfair, $35–75)
- Blush pink or lavender wall paint for remaining walls ($40–55/gallon)
- White crescent moon wall sconce ($25–60, Amazon)
Step-by-Step Styling Instructions:
- Paint only the ceiling in navy — roll on two coats and let dry fully before touching it.
- Plan your light arrangement loosely before committing — a constellation map printed from Pinterest helps create an intentional pattern versus random scattering.
- Use removable adhesive cable clips to attach each light strand in arching, organic patterns across the ceiling. Don’t use staples — they can nick the wire casing.
- Cluster lights more densely in one area to create a “Milky Way” effect and leave some areas sparser to mimic natural sky depth.
- Mount the cloud bookshelf at child-accessible height — roughly 2.5 to 3 feet from the floor for toddlers, 3.5 feet for older kids.
- Style bookshelf with a mix of books (spines out, colors facing forward alternating) and a few small plush fairies or unicorns.
Budget Breakdown:
- Under $100: Use peel-and-stick glow-in-the-dark star stickers instead of lights for a rental-friendly, budget version. Totally effective and kids go absolutely wild for them.
- $100–$500: Full paint job, 6–8 strands of LED lights, cloud bookshelf, and moon sconce.
- $500+: Fiber optic star ceiling kit that creates a truly seamless, professional starry sky with zero visible wiring ($200–800 depending on size).
Rental-Friendly Alternative: Skip the paint entirely. A peel-and-stick navy wallpaper panel behind the bed creates a stunning accent without touching the ceiling. Add removable glow stars and battery string lights on command hooks.
For more creative kids’ room design inspiration, check out these kids’ room design ideas for girls that cover everything from wall colors to furniture layouts.
3. A Fairy Door Wall Installation
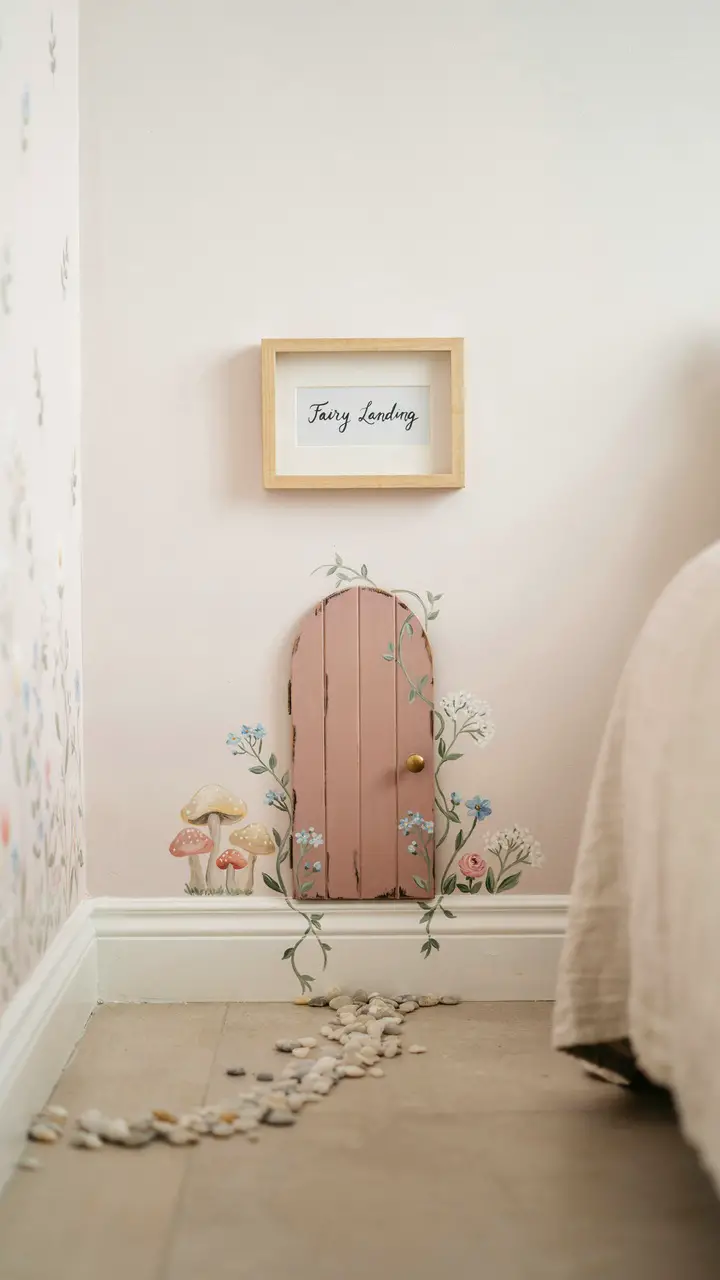
How to Recreate This Look
The fairy door idea works in any bedroom, any size, any budget — and it genuinely sparks imaginative play for years. Kids get invested in the story of “who lives behind there,” and parents, honestly, you will too. I’ve seen moms leaving tiny “fairy notes” beside the door for their daughters to find in the morning, and the look on those kids’ faces? Priceless.
Shopping List:
- Wooden fairy door kit (Etsy handmade, $15–45; or craft store DIY kit, $8–15)
- Acrylic craft paint in dusty rose, gold, and forest green ($2–4 per bottle, Hobby Lobby)
- Small adhesive mushroom and flower embellishments ($6–12, Amazon or craft stores)
- Miniature fairy accessories — tiny mailbox, lantern, flower pots (Etsy, $10–30 for a set)
- Shadow box frame, small (IKEA RIBBA or similar, $8–15)
- Hand-lettered sign — DIY with cardstock and a fine marker, or order on Etsy ($5–20)
Step-by-Step Styling Instructions:
- Choose a wall section at baseboard level that gets noticed when your daughter is playing on the floor — not one behind furniture.
- Paint and decorate the wooden fairy door before mounting. Let dry completely.
- Attach the fairy door with removable mounting tape (3M Command) so it can come off cleanly. Do not glue directly to painted walls if renting.
- Use a fine-tipped paint pen or small brushes to add painted details directly onto the wall around the door: tiny mushroom caps, trailing vines, pebble paths. If renting, use removable vinyl wall decals in similar motifs instead.
- Arrange miniature accessories beside the door — a tiny lantern, a flower pot the size of a thimble.
- Mount the shadow box above at adult eye level so parents can appreciate it too.
Budget Breakdown:
- Under $100: A $10 craft store fairy door kit, $15 in paint and embellishments, removable vinyl decals for wall details. Complete look for around $30–40.
- $100–$500: Handcrafted Etsy fairy door, full miniature fairy garden accessory set, framed sign, and some painted wall details.
- $500+: Commission a local muralist to paint an entire fairy village scene around the door — breathtaking results that last the entire childhood.
Difficulty Level: Beginner. Seriously, even if you haven’t touched a paintbrush since third grade art class, this is manageable. Imperfect, slightly wobbly mushrooms just look more charming anyway.
4. Dreamy Floral Accent Wall with Peel-and-Stick Wallpaper
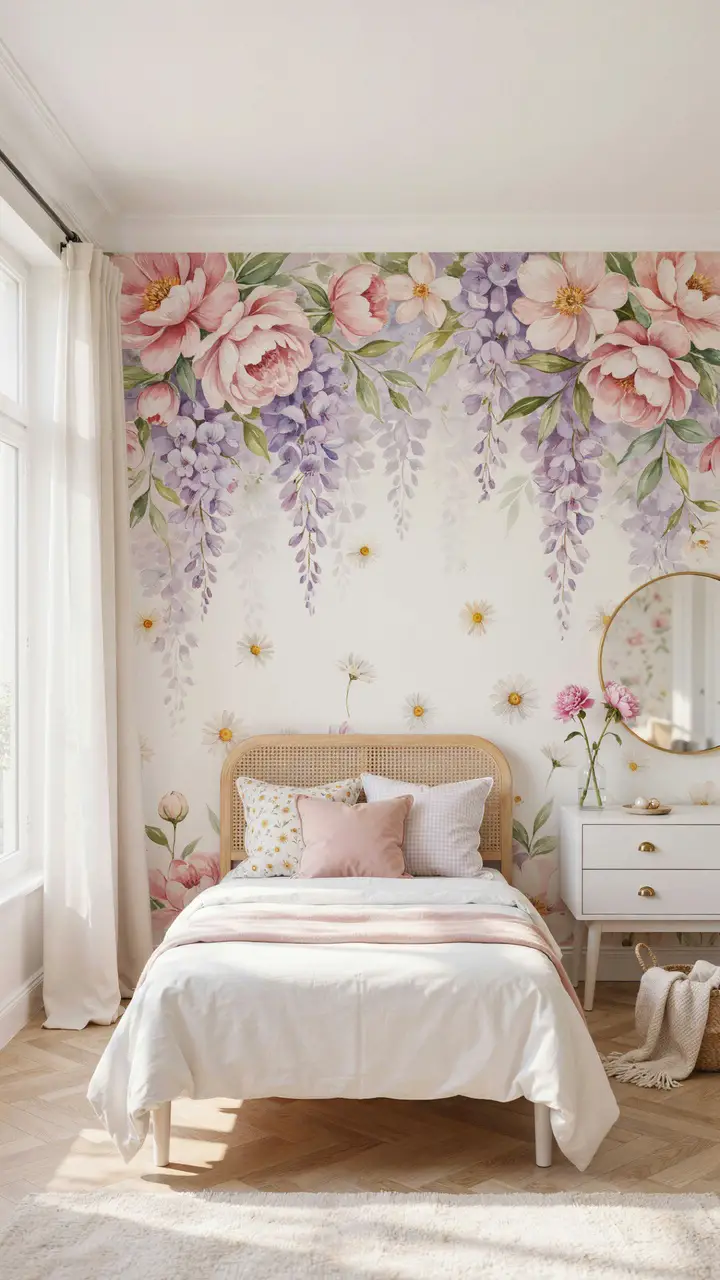
How to Recreate This Look
Peel-and-stick wallpaper has genuinely changed the game for renters and commitment-phobes alike. (I once spent three weeks researching wallpaper only to find it discontinued. Peel-and-stick means you can actually change your mind.) For a fairy bedroom, floral wallpaper on a single accent wall gives maximum impact with minimum effort.
Shopping List:
- Peel-and-stick floral wallpaper (Spoonflower, Chasing Paper, or Amazon — $25–60 per roll, most accent walls need 2–4 rolls depending on room size)
- Rattan or white wooden headboard ($80–250, Amazon, IKEA, or Wayfair)
- Coordinating floral throw pillows ($15–45 each, Target or H&M Home)
- Round gold-frame mirror (Amazon or TJ Maxx, $25–80)
- White wooden dresser (IKEA HEMNES, $250 or thrifted for $40–80)
- Fresh or faux peonies in a simple white ceramic vase ($5–30)
Step-by-Step Styling Instructions:
- Measure your accent wall carefully and order 10–15% more wallpaper than you think you need — pattern matching always uses more than expected. FYI: this is the most common peel-and-stick mistake.
- Clean and dry the wall surface thoroughly before applying — any dust or moisture causes lifting.
- Start in a top corner and work panel by panel, smoothing outward with a credit card or wallpaper smoother to eliminate bubbles.
- Match the pattern at seams before pressing each panel permanently.
- Position the bed to sit directly in front of the accent wall — centered is most impactful.
- Style the dresser with just a few items: the mirror, a small plant or fresh flowers, and one perfume bottle or jewelry tray. Resist the urge to fill every inch.
Budget Breakdown:
- Under $100: Target or Amazon peel-and-stick in a simpler floral print, one accent pillow, and existing furniture refreshed with new hardware.
- $100–$500: Quality peel-and-stick from Chasing Paper, new rattan headboard, coordinating pillow set, and a thrifted dresser with gold drawer pulls.
- $500+: Premium removable wallpaper, new bedroom furniture set, quality bedding, and framed botanical prints to carry the floral theme through the whole room.
Seasonal Adaptability: Swap pillow covers from spring florals to soft plaid or velvet in winter without touching the wallpaper. The floral wall becomes even more dramatic against cozy winter textiles.
If you love imaginative, story-driven room designs, you’ll also enjoy these whimsical playroom ideas for blending play spaces with fairy-tale magic.
5. Fairy Wing Gallery Wall
How to Recreate This Look
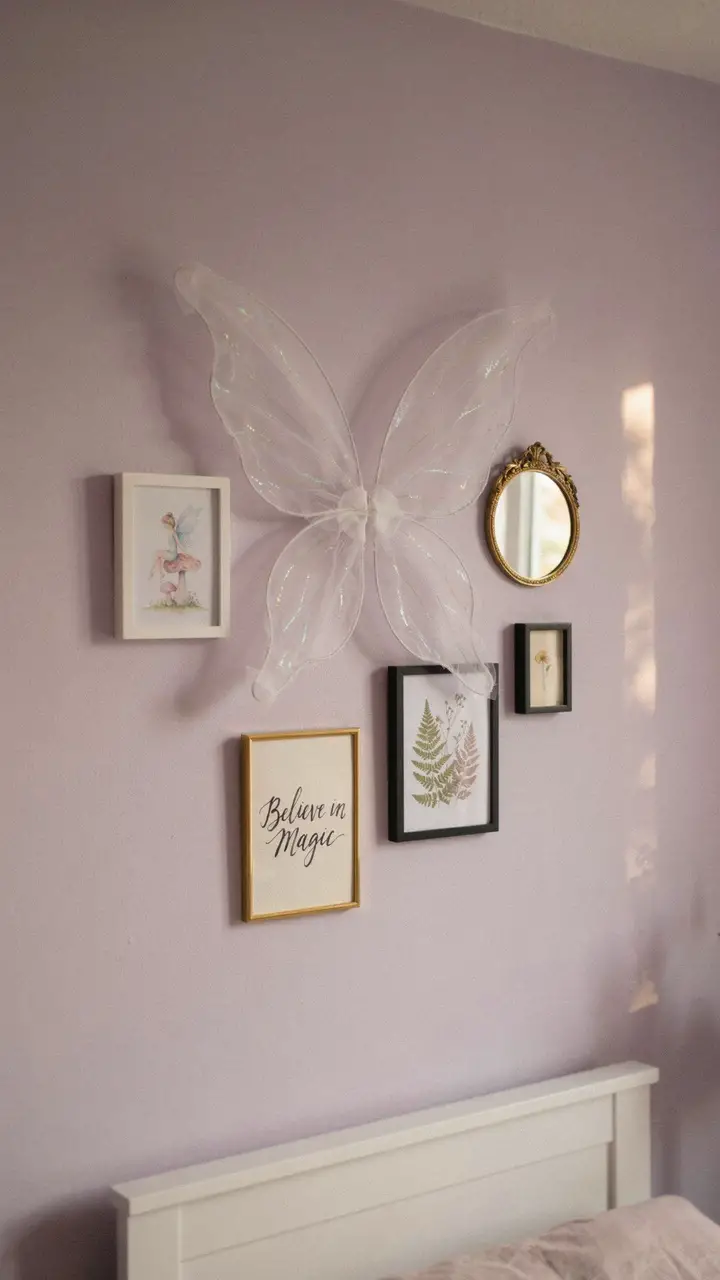
Gallery walls tend to intimidate people — there’s a lot of “what if I put the nail in the wrong place” anxiety. Here’s my advice: lay everything out on the floor first, photograph it, then transfer it to the wall using painter’s tape outlines. The fairy wings as a centerpiece anchor piece make this particularly easy because you’re always arranging around one clear focal point.
Shopping List:
- Decorative display fairy wings (Amazon or Etsy, $20–60)
- Watercolor fairy art prints (Etsy printable downloads, $3–8 each — print at home or at Staples)
- Simple white or gold frames in varying sizes (IKEA RIBBA frames, $3–15 each)
- Hand-lettered “Believe in Magic” art print (Etsy, $5–15 or DIY with cardstock)
- Small round gold mirror ($15–40, TJ Maxx or Amazon)
- Picture hanging strips (3M Command, $8–12)
Step-by-Step Styling Instructions:
- Mount the fairy wings first, centered on the wall at roughly adult chest height — high enough to be out of little-hands-reach, low enough to be visually connected to the bed.
- Lay all frames on the floor and arrange them around the wings until you find a grouping you love. Photograph this arrangement.
- Use painter’s tape to outline each frame’s position on the wall before hammering anything.
- Hang frames using Command picture strips for a damage-free gallery wall — weight limits are listed on the package.
- The “rule” for gallery walls is that there are no rules, but keep 2–3 inches of consistent spacing between pieces for a cohesive rather than cluttered look.
Budget Breakdown:
- Under $100: Print Etsy digital downloads at home, use IKEA RIBBA frames ($3 each), and find inexpensive costume wings to repurpose as wall art. Total: under $60 for a full gallery wall.
- $100–$500: Higher-quality frames, a few original art prints, and a statement round mirror.
- $500+: Commission original watercolor fairy portraits featuring your daughter as the subject. Genuinely heirloom-worthy.
Rental-Friendly Note: 3M Command strips hold most lightweight frames without wall damage. For the wings, two large Command hooks side by side create a secure mounting solution that removes cleanly.
6. Mushroom and Toadstool Decor Accents
How to Recreate This Look
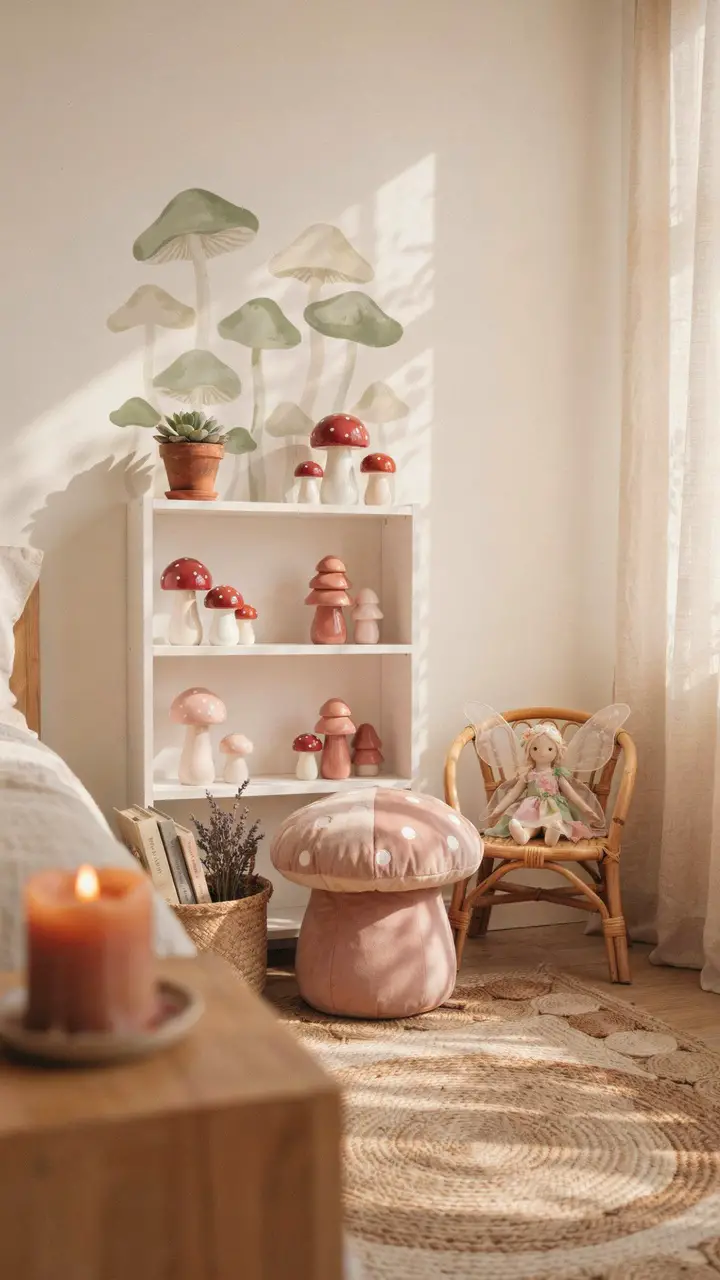
Mushrooms are having a major moment in kids’ decor right now, and honestly, it makes complete sense. They’re magical-looking in real life, endlessly represented in fairy tales, and the color palette — earthy reds, creamy whites, dusty roses — works beautifully in a girl’s room without leaning too hard into pink-overload territory.
Shopping List:
- Ceramic mushroom figurines set (Amazon or Target, $15–40 for a set)
- Mushroom floor pouf in dusty pink or terracotta (Amazon or Urban Outfitters, $45–120)
- Mushroom wall decals, removable (Etsy, $12–30 per set)
- Child-sized rattan or wooden accent chair ($50–150, Amazon or IKEA)
- Fairy plush doll ($15–40, Amazon or specialty toy stores)
- Small white bookshelf (IKEA KALLAX, $40–80)
Step-by-Step Styling Instructions:
- Choose a natural corner or reading nook area — the mushroom vignette works best contained in a specific zone rather than spread across a whole room.
- Apply mushroom wall decals first, arranging them in an organic cluster rather than a straight line.
- Place the bookshelf and style it in layers: books at the back, mushroom figurines at the front, varying heights for visual interest.
- Position the mushroom pouf nearby as both a functional seat and a decor piece.
- Add the rattan chair with the fairy doll to create a sense of “occupied space” — like someone’s been sitting there reading stories.
Budget Breakdown:
- Under $100: Removable wall decals ($20), a set of Amazon mushroom figurines ($20), and a simple cushion floor pouf from Target ($35).
- $100–$500: Full corner setup with bookshelf, quality pouf, ceramic mushroom collection, and rattan chair.
- $500+: Custom hand-painted mushroom mural in the corner, artisan ceramic mushroom collection, and a bespoke wooden toadstool stool.
Durability with Kids: Ceramic figurines on a high shelf are fine; at kid height, swap to silicone or plush mushroom accents that can withstand enthusiastic little hands. The plush mushroom pouf is genuinely indestructible and doubles as a great projectile (no judgment — it’s a soft one).
7. Soft Pink and Lilac Color Palette Bedroom
How to Recreate This Look
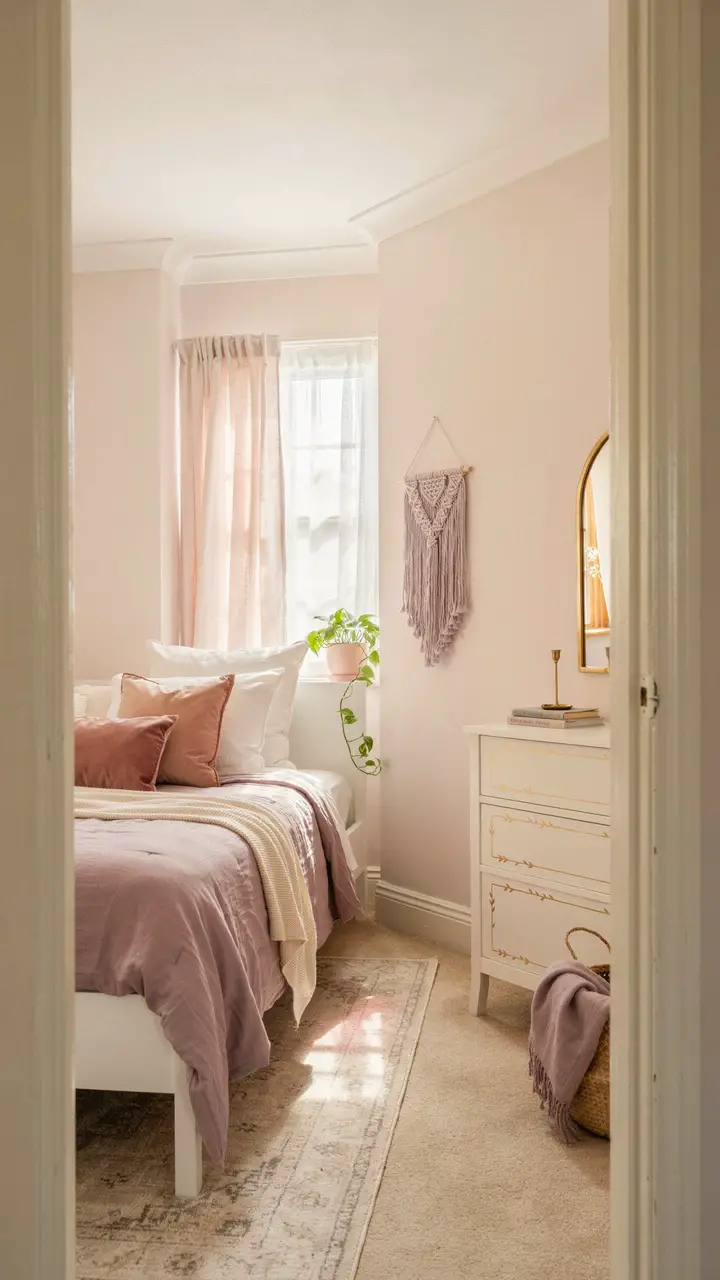
Worried about choosing the right pink? You’re not alone — pink is genuinely one of the most deceptive paint colors. The one that looks like a soft blush in the store will surprise you by reading almost orange in afternoon light or aggressively bubblegum in morning sun. Always test your paint color on the actual wall and observe it at different times of day before committing.
The sweet spot for a fairy bedroom pink: look for shades described as “blush,” “petal,” or “rose white” rather than “pink.” Benjamin Moore’s Blush (2173-70) and Sherwin-Williams Lullaby (SW6547) are both gorgeous without veering into Pepto-Bismol territory.
Shopping List:
- Blush pink wall paint (Benjamin Moore Blush or SW Lullaby, $50–65/gallon)
- White wooden twin bed frame (IKEA HEMNES or similar, $200–350)
- Lilac quilt or duvet cover (Target Threshold or H&M Home, $40–80)
- Dusty rose velvet throw pillows (2 pack, Amazon or TJ Maxx, $25–45)
- White wooden dresser (IKEA HEMNES or thrifted and painted, $0–250)
- Gold-frame oval mirror (Amazon or HomeGoods, $30–80)
- Lilac macramé wall hanging (Etsy handmade, $25–70)
- Trailing pothos plant in a blush ceramic pot ($10–25 total)
Step-by-Step Styling Instructions:
- Paint walls first — even one shade off can make your entire furniture and textile plan feel wrong.
- Build your bedding in layers: start with a fitted sheet, then the duvet, then fold the quilt across the lower two-thirds of the bed.
- Arrange euro pillows (large square) against the headboard first, then standard pillows in front, then accent pillows in front of those.
- Bold tip: Limit your pillow stack to 3–4 pieces total in a kids’ room. More than that and half end up on the floor every single night anyway.
- Place the dresser on the wall with the best natural light so the mirror catches and bounces it.
- Style the dresser top with just the mirror, one small plant, and one jewelry dish. Keep it simple.
Budget Breakdown:
- Under $100: Use existing furniture, buy new pillow covers only, add one can of paint for an accent wall, and find a $10 macramé at a thrift store.
- $100–$500: Paint full room, new bedding, pillow set, and at least one new furniture piece.
- $500+: Full furniture refresh with quality pieces in coordinating white and natural wood tones, premium bedding, and framed botanical art.
Common Mistakes to Avoid: Don’t mix too many shades of pink in the same room — pick two (blush wall + dusty rose accents, for example) and use lilac and white as the supporting neutrals. More than three pinks starts to feel chaotic rather than dreamy.
Pairing this bedroom style with thoughtful kids’ room wall design ideas can take the fairy palette from pretty to completely enchanting.
8. Fairy Light Reading Nook Under the Stairs or in a Corner
How to Recreate This Look
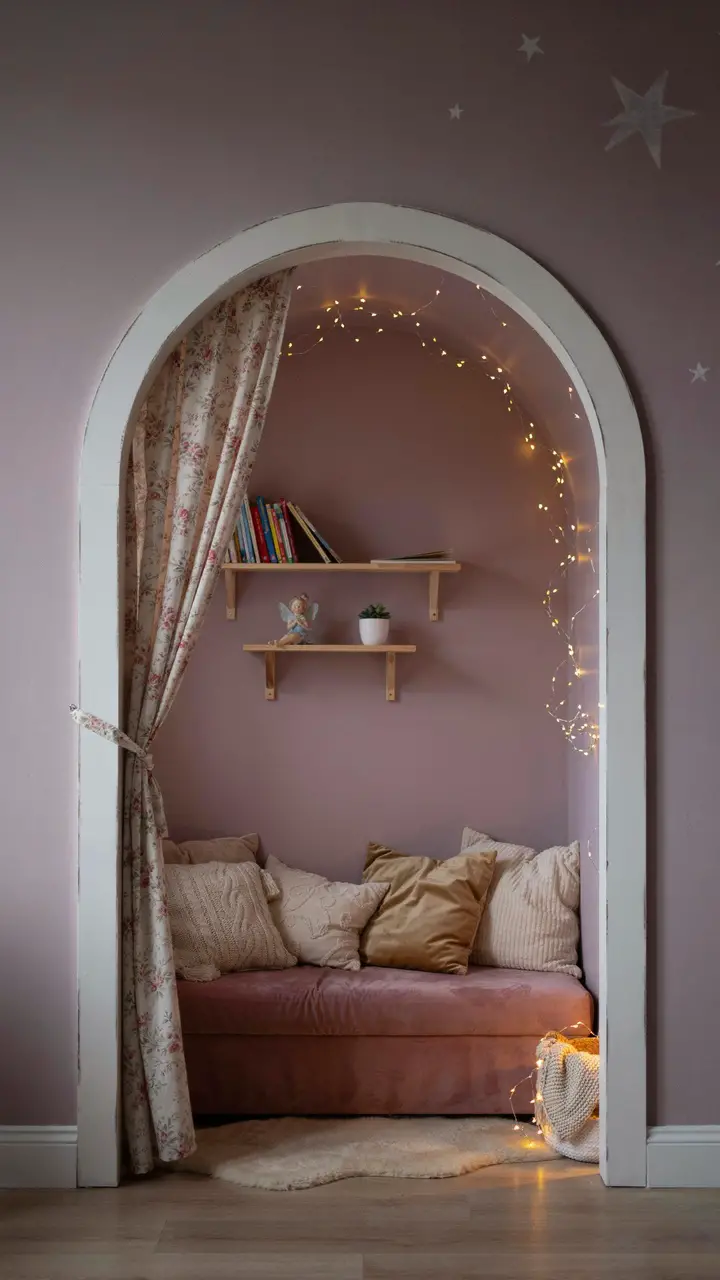
Reading nooks are the one thing every child and honestly most adults respond to with pure, immediate “I want to be IN there” energy. The good news: you absolutely don’t need stairs or a built-in alcove. A corner of the bedroom, a large bookshelf positioned as a partial wall, or even a curtained section can create that same enclosed, secret-space magic.
Shopping List:
- Wooden arch frame or corner curtain rod setup (IKEA KURA bed hack for under-bed nook; or freestanding arch frame from Amazon, $40–120)
- Cushion bench or floor cushion in dusty rose velvet (Amazon or Wayfair, $35–90)
- Throw pillows in gold, cream, and blush ($15–35 each, Target or IKEA)
- Warm white fairy lights, 2–3 strands ($8–15 each)
- Short floating shelves, 2 (IKEA LACK, $8 each)
- Sheer floral curtain panel ($15–30, Amazon or Target)
- Command hooks for lights and curtain ($8–12)
Step-by-Step Styling Instructions:
- Define the nook corner with the arch or curtain rod setup first — even a simple tension rod with a sheer curtain creates a defined “room within a room.”
- Start with the cushion as your foundation — choose one that fits the space snugly for a built-in feel.
- Layer pillows from largest at back to smallest at front, mixing textures (velvet, cotton, faux fur for a tiny pop).
- String fairy lights along the top edge of the arch or curtain rod, looping them inward for maximum cozy-cave effect.
- Mount two small floating shelves inside the nook at a height your daughter can reach — this is her private space and should be accessible to her.
- Keep the nook decor minimal — three books she loves, one small fairy figure, one tiny plant. The magic is in the space itself, not in filling every inch of it.
Budget Breakdown:
- Under $100: Floor cushion from IKEA ($25), a tension rod and sheer curtain ($20), two strands of fairy lights ($16), and two throw pillows ($25). Total: around $86 for a genuinely magical reading nook.
- $100–$500: Freestanding arch, quality cushion bench, coordinating pillow set, floating shelves, and quality fairy lights.
- $500+: Custom built-in wooden nook with upholstered bench and integrated shelving — the ultimate childhood memory maker.
Rental-Friendly: This entire nook can be built without a single nail or permanent fixture using a freestanding arch frame, tension rods, and Command hooks. Completely deposit-safe.
9. Magical DIY Fairy Lanterns and Glow Decor
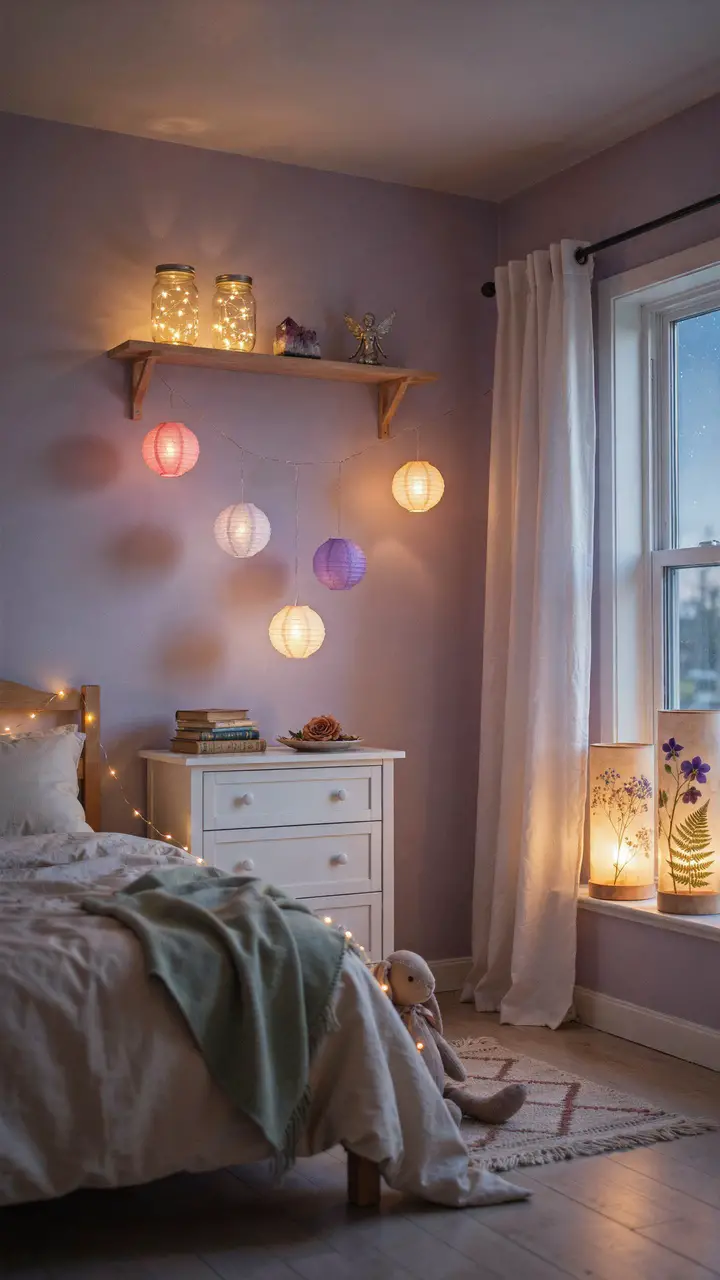
How to Recreate This Look
Here’s a decorating truth: a room with multiple light sources at varying heights always feels more magical than a room with one overhead light. Fairy bedrooms live and die by their lighting, and DIY lanterns are one of the most satisfying, budget-friendly projects you can tackle in an afternoon while your daughter “helps” (read: plays with the string lights you haven’t deployed yet).
DIY Mason Jar Lantern Instructions:
You’ll need: mason jars (any size), battery-operated string lights (the kind with the pack that hides at the bottom), optional: dried pressed flowers, adhesive gems, or frosted glass spray.
- If using pressed flowers, adhere them to the outside of the jar with a thin layer of Mod Podge. Let dry.
- Curl the string light strand loosely and stuff it into the jar — don’t compress it too tightly or the glow becomes uneven.
- Tuck the battery pack against the inside bottom of the jar or under a small piece of felt at the jar’s opening.
- Place jars in clusters of odd numbers — three or five looks more intentional than two or four.
Shopping List:
- Mason jars, various sizes ($8–15 for a set, craft stores or Amazon)
- Battery string lights, multiple packs ($6–12 each, Amazon)
- Paper lanterns in fairy palette colors ($10–20 for a pack of 10, Amazon)
- Floating shelf for lantern display (IKEA LACK, $8)
- Crystal geode or amethyst cluster for display ($5–20, Amazon or local crystal shops)
- Pressed dried flowers for DIY jars (buy pre-pressed on Amazon, $8–15, or press your own over 2–3 weeks)
Budget Breakdown:
- Under $100: Three DIY mason jar lanterns ($10 for jars, $18 for three light packs), a pack of paper lanterns ($15), and one floating shelf ($8). Total: around $51 for a room fully transformed by light.
- $100–$500: Quality glass lanterns, a fairy light canopy above the bed, paper lantern mobile, and a crystal collection for the shelf.
- $500+: Fiber optic lantern installation, a statement crystal chandelier for the room, and custom pressed-flower jar lanterns from an Etsy maker.
Safety Note: Always use battery-operated lights in children’s bedrooms. Position any plug-in lanterns well out of reach and ensure cords are not accessible to young children. LED lights don’t produce heat, making them the safest choice for enclosed lanterns.
10. Fairy Princess Dress-Up Corner with Mirror and Storage
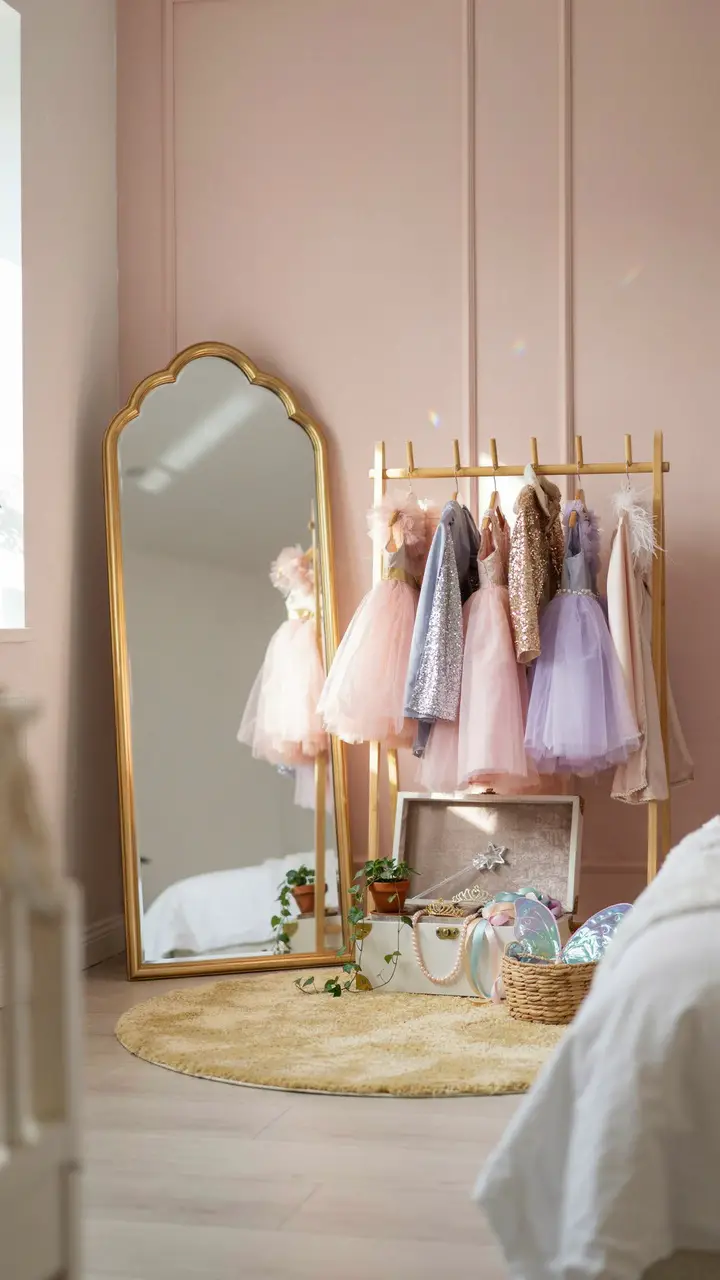
How to Recreate This Look
Every fairy bedroom needs a place where the magic actually happens — and a dress-up corner is it. The key to a dress-up area that stays organized longer than 24 hours: make putting things away as easy as taking them out. Open clothing racks and lidded-but-easy-access trunks beat drawers and closets every single time for kids’ self-tidying.
Shopping List:
- Small freestanding clothing rack (Amazon, $25–60)
- Arch mirror with gold scalloped frame (Amazon or Wayfair, $40–120 — always anchor mirrors to the wall for child safety)
- Small wooden trunk or blanket chest (Amazon, HomeGoods, or thrifted, $30–100)
- Fairy costumes and dress-up pieces (Target, Amazon, or Maileg for higher-end — $10–40 per costume; budget $60–100 for a starter collection)
- Pale gold or cream round rug ($25–60, Amazon or Target)
- Small hooks on clothing rack for wands and accessories (S-hooks from Amazon, $6 for a pack)
Step-by-Step Styling Instructions:
- Safety first: Anchor the mirror to the wall using a furniture strap ($8–12, Amazon). This is non-negotiable for any mirror in a child’s room.
- Position the clothing rack beside the mirror — the “see your reflection while trying things on” experience is genuinely magical for kids.
- Hang costumes by category: tutus together, capes together, dresses together. Even a five-year-old can “put the cape with the capes.”
- Use S-hooks on the rack’s horizontal bar to hang wands, headbands with ears, and necklaces.
- Place the trunk below the rack for accessories — keep the lid unlocked and easy to open.
- Limit the collection to what fits the rack. The rule in our house: one new item in means one item to the donation box. It maintains the magic without the chaos.
Budget Breakdown:
- Under $100: A thrifted full-length mirror (freshen the frame with gold spray paint, $6), a $25 Amazon clothing rack, and a mix of Target and thrifted dress-up pieces.
- $100–$500: Quality arch mirror, new clothing rack, small wooden trunk, and a curated starter costume collection.
- $500+: Custom built-in dress-up wardrobe with a framed mirror panel, drawer storage below, and a selection of high-quality, durable costumes (Maileg, Meri Meri, and similar brands last years).
Durability with Kids: Choose costumes with machine-washable fabric — sequins are durable but hand-wash only can be a pain. Cotton-blend tutus survive significantly more than polyester satin ones. Wands with wooden handles outlast plastic ones dramatically.
For even more storage and organization inspiration for kids’ spaces, these playroom storage ideas offer creative solutions that keep magical spaces from dissolving into chaos.
Bringing Your Fairy Bedroom to Life: Final Thoughts
Here’s what every fairy bedroom idea in this list has in common: they all work because they create layers — layers of light, texture, color, and story. You don’t need all ten ideas. You don’t even need five. Pick two or three that feel true to your daughter’s personality and your home’s existing style, and build from there.
A fairy bedroom isn’t about perfection. It’s about creating a space where your daughter feels like the magic was made specifically for her. Where she looks at her bedroom door and feels a little flutter of excitement before she even opens it. Where she invites every single friend over specifically to show them her room.
The throw pillows will end up on the floor. The fairy lights will occasionally need new batteries at the most inconvenient possible moment. The dress-up clothes will migrate to the living room. And all of that is absolutely, completely fine — it means the room is being lived in and loved, which is the whole point.
Trust your daughter’s enthusiasm and your own instincts. You know her better than any Pinterest board does. And whatever you create — elaborate canopy and all, or a single string of fairy lights and a special mushroom lamp — it will be magical because you made it for her <3.

Greetings, I’m Alex – an expert in the art of naming teams, groups or brands, and businesses. With years of experience as a consultant for some of the most recognized companies out there, I want to pass on my knowledge and share tips that will help you craft an unforgettable name for your project through TeamGroupNames.Com!