
There’s something so freeing about designing a playroom that belongs to everyone — a space where dragons and fairies coexist, where astronauts can befriend mermaids, and where every child who walks in immediately feels like the room was made just for them.
Gender neutral whimsical indoor playroom ideas let you skip the pink-versus-blue debate entirely and land somewhere far more interesting: a world of mushroom forests, cloud canopies, golden meadows, and storybook villages that spark imagination regardless of who’s playing.
I’ve seen a lot of playrooms. Some lean so heavily into a single theme that they almost feel limiting — the child grows out of it emotionally before the decor does.
The most magical spaces I’ve encountered tend to be the gender neutral ones, because they stay flexible. The forest can be enchanted or prehistoric.
The cloud ceiling can belong to a weather wizard or a sky explorer. When you design without the pink-blue binary, you actually end up with richer, more layered storytelling environments.
Whether you’re setting up a dedicated playroom, carving out a corner of a shared bedroom, or converting a living room nook, these ten ideas will help you build something genuinely enchanting.
And yes — most of them work on a range of budgets, which is exactly the kind of information you actually need.
1. Enchanted Mushroom Forest Floor with Cozy Nook
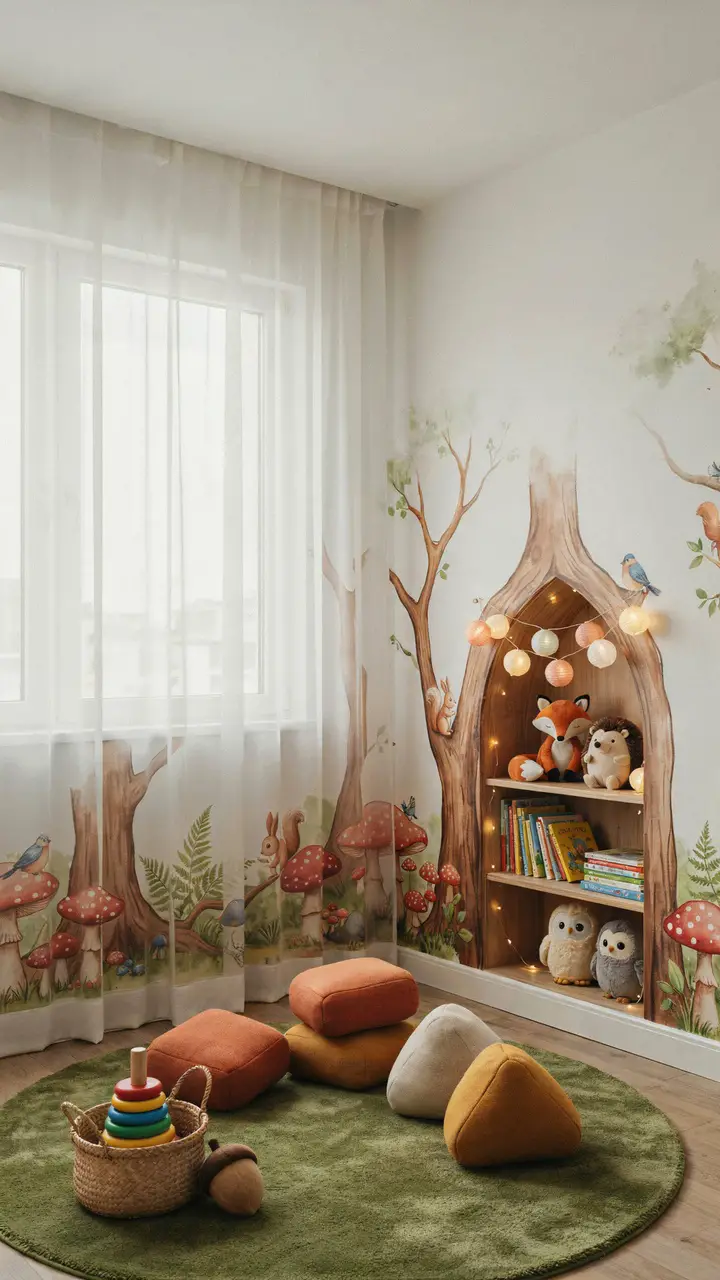
How to Recreate This Look
- Shopping list: Peel-and-stick woodland mural wallpaper ($40–$120 from Etsy or Amazon), plush round rug in sage or moss green ($35–$150), foam floor cushions in earthy tones ($12–$25 each), fairy lights on a timer ($15–$30), low wooden bookshelves ($40–$200 from IKEA or thrift stores), woodland stuffed animals ($10–$40 each)
- Step-by-step styling: Start with the mural — install peel-and-stick panels along the lower 36 inches of one or two walls. Place the round rug in the center and anchor it with the reading nook corner. String fairy lights inside the nook archway and fill low shelves with books facing outward. Layer floor cushions loosely around the rug for casual gathering spots.
- Style compatibility: Works beautifully with cottagecore, Montessori-inspired, and boho-neutral aesthetics. Pairs well with natural wood furniture and linen textiles.
- Budget breakdown: Under $100 — peel-and-stick mural panels for one wall, two foam cushions, and string lights from a dollar store. $100–$300 — add the plush rug, a small wooden shelf, and three or four stuffed animals. $300+ — custom mural painted by a local artist, high-quality furniture, and professional fairy light installation.
- Space requirements: Works in rooms as small as 8×8 feet. The nook fits in any corner at least 3 feet wide.
- Difficulty level: Beginner. Peel-and-stick murals are forgiving — align slowly, smooth as you go, and trim edges with a craft knife.
- Durability: Foam cushions can be wiped clean or have removable covers. Stuffed animals are easy to toss in the wash. The mural is rental-safe if you use peel-and-stick varieties.
- Seasonal adaptability: Swap cushion covers to deeper burgundy and gold for autumn, and cool sage and sky blue for spring. Add a lightweight knit throw in winter.
- Common mistakes: Placing the mural too high — keep it at child eye level (starting from the floor up to about 4 feet) so the immersion actually works. Don’t skip the rug; hard floors break the cozy forest illusion immediately.
- Maintenance tips: Wipe peel-and-stick murals with a damp cloth. Rotate stuffed animals on shelves every few months to keep the display feeling fresh without buying anything new.
2. Floating Cloud Ceiling with Rainbow Arch Wall
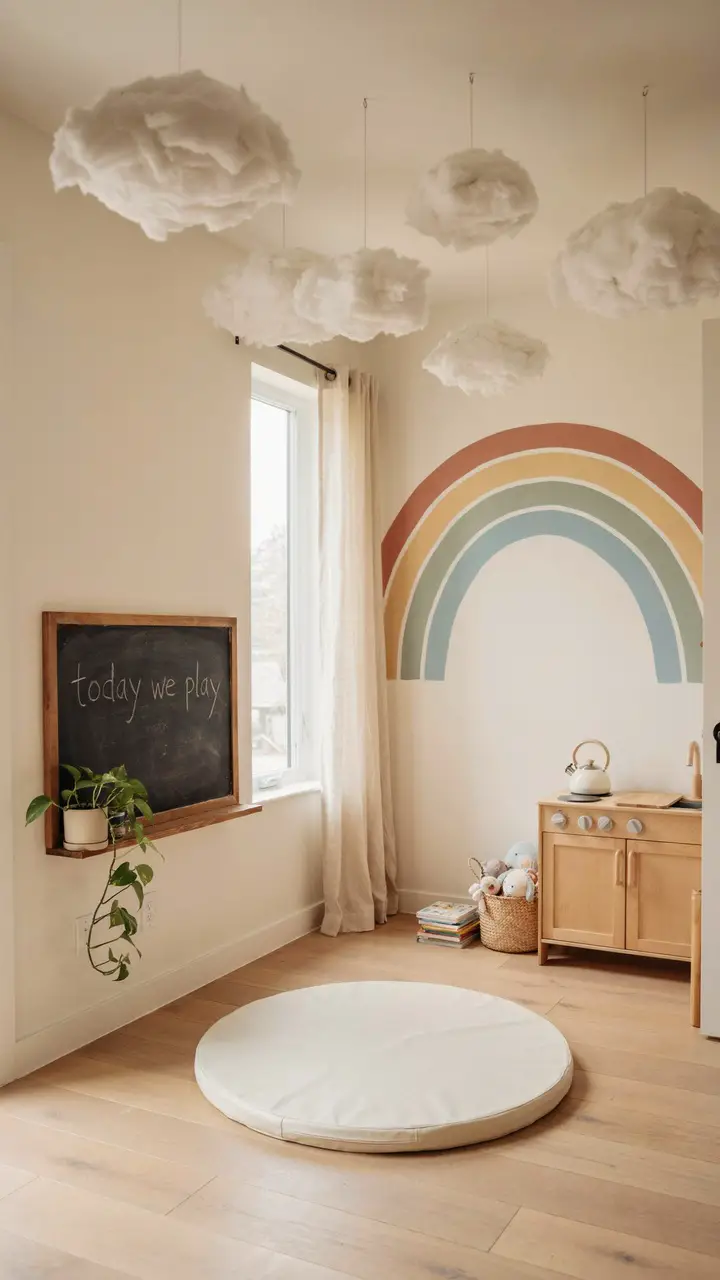
How to Recreate This Look
- Shopping list: Cotton batting or polyester fiberfill for clouds ($10–$25 per bag, craft stores), clear fishing line and ceiling hooks ($5–$10), paint for rainbow arch in muted tones ($15–$30 per quart), round foam play mat ($30–$100), Montessori-style wooden play kitchen ($80–$350), wall-mounted chalkboard ($30–$80)
- Step-by-step styling: Paint the rainbow arch first — tape the curves with flexible painter’s tape and work from the widest arch inward. Once dry, hang ceiling hooks in staggered positions and suspend cloud shapes at varying heights using fishing line. Place the play mat centered under the cloud installation.
- Style compatibility: Works with Scandinavian, modern neutral, and boho-minimal aesthetics. Pairs beautifully with natural wood and cream-colored furniture.
- Budget breakdown: Under $100 — DIY clouds from batting, painted rainbow arch, and a budget play mat from Target. $100–$300 — add a wooden play kitchen, chalkboard, and more detailed cloud shapes. $300+ — include a loft play platform, professional painting, and high-end storage furniture.
- Space requirements: The cloud installation works best in rooms with ceilings at least 8 feet high. The rainbow arch needs a wall at least 5 feet wide to look proportional.
- Difficulty level: Intermediate. The cloud hanging is straightforward, but painting smooth arch lines requires patience and good tape technique.
- Durability: Cotton batting clouds are dust magnets — shake them outdoors every few months. The chalkboard surface is endlessly resettable.
- Seasonal adaptability: Add gold star cutouts to the clouds for a holiday feel. Swap the chalkboard drawings seasonally — autumn leaves, spring flowers, winter snowflakes.
- Common mistakes: Making all the clouds the same size and height creates a flat, unconvincing sky. Vary the scale and hang depth dramatically for the most believable cloud effect.
- Maintenance tips: Dust clouds with a lint roller. Touch up the rainbow arch annually — muted paints can fade more noticeably than darker shades in sunny rooms.
3. Storybook Village with Painted Rooftop Shelves
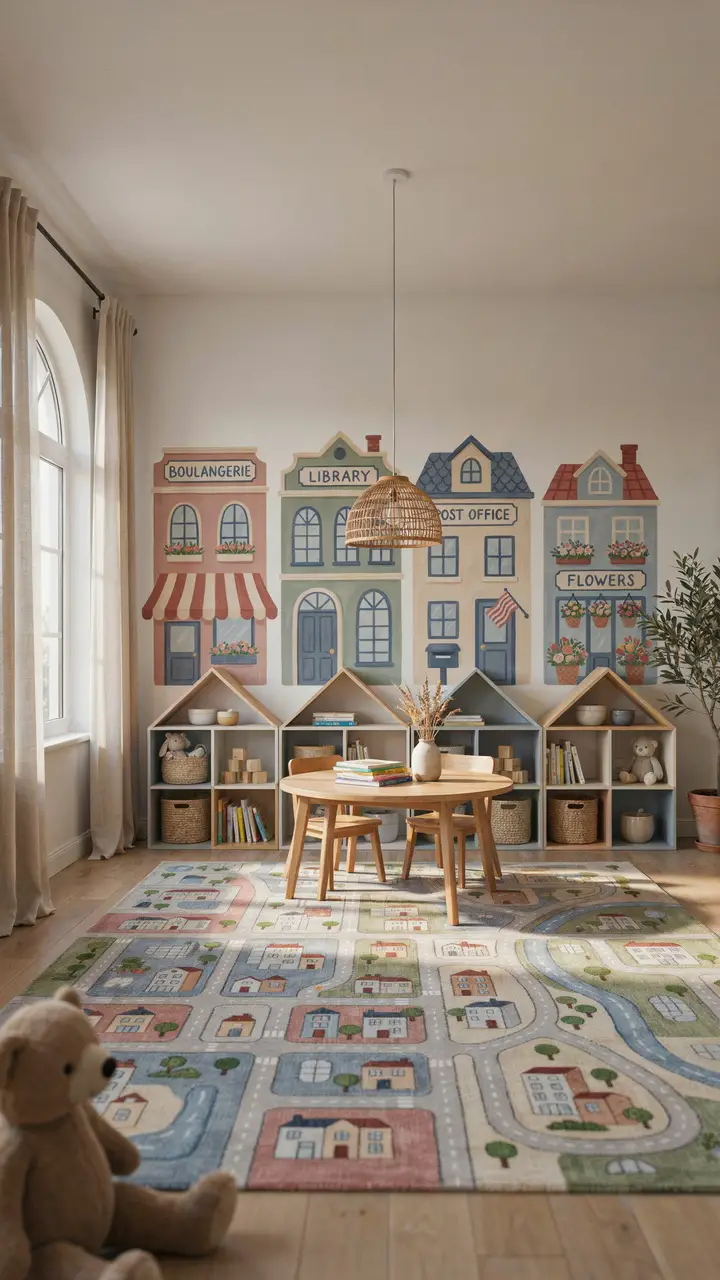
How to Recreate This Look
- Shopping list: Cube storage shelving ($50–$180 from IKEA or Target), plywood cut into rooftop shapes ($20–$40 cut at hardware store), craft paint in village colors ($5–$10 per color), city-map area rug ($40–$150), small round table and chairs ($60–$200), rattan pendant light ($30–$90), fabric storage bins ($5–$15 each)
- Step-by-step styling: Paint the wall sections first, then position shelving against them. Cut rooftop shapes from plywood (simple triangular profiles work beautifully), paint them to match, and attach with L-brackets or heavy-duty adhesive to the top edges of shelving units. Fill cubes with coordinating storage bins.
- Style compatibility: Suits Scandinavian, vintage-inspired, and modern farmhouse aesthetics. Pairs well with wooden toys and minimal clutter on surfaces.
- Budget breakdown: Under $100 — paint the wall village scene and add rooftop cutouts to existing shelving. $100–$300 — add new cube shelving, a city rug, and fabric bins. $300+ — include custom-built shelving with professionally painted facades, pendant lighting, and solid wood furniture.
- Space requirements: Best in rooms at least 10×10 feet. The shelving village works along one or two walls.
- Difficulty level: Intermediate. The painting requires planning the building layout in advance on paper before committing to the wall. Rooftop attachments need basic woodworking confidence.
- Durability: Cube shelving handles heavy toy loads well. Painted walls may need touch-ups if children draw on them (use a washable paint finish).
- Seasonal adaptability: Add window box flower decals in spring, tiny painted wreaths on the buildings for the holidays, or frost-effect window clings in winter.
- Common mistakes: Making all the buildings the same height eliminates the charming roofline variation. Plan for three or four different heights, from shorter storefronts to slightly taller buildings.
- Maintenance tips: Wipe cube shelving with a damp cloth monthly. Keep a small pot of matching paint for wall touch-ups after inevitable crayon encounters.
4. Golden Meadow with Teepee and Butterfly Canopy
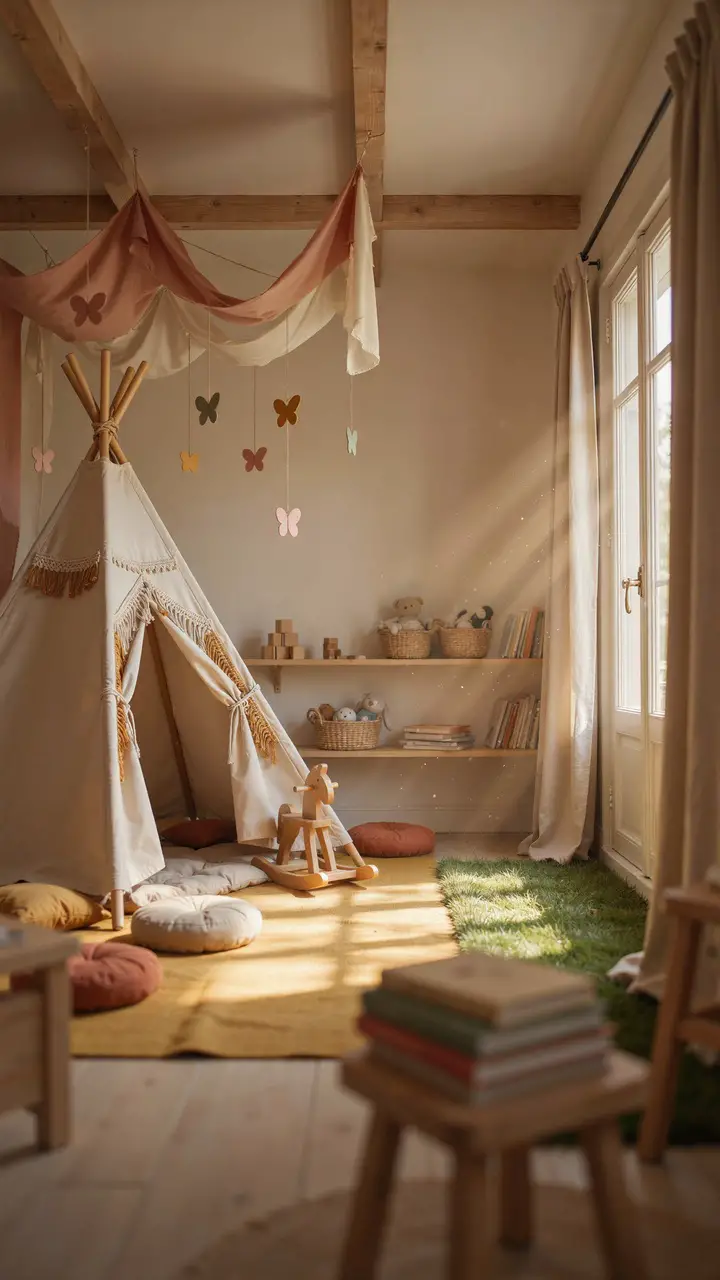
How to Recreate This Look
- Shopping list: Natural canvas teepee ($50–$200), golden play mat ($35–$100), assorted floor cushions ($15–$40 each), sheer fabric for canopy ($15–$40 per yard), paper butterfly decorations ($10–$25 from craft stores or Etsy), faux grass mat ($20–$50), low wooden shelves ($40–$180), wicker storage baskets ($10–$30 each)
- Step-by-step styling: Position the teepee in a corner or against a wall. Gather sheer fabric at the ceiling above it using a ceiling hook and fan it outward like a canopy. Hang paper butterflies from the fabric at varying lengths using invisible thread. Lay the play mat nearby and arrange cushions loosely.
- Style compatibility: Works with boho, Montessori, and cottagecore aesthetics. Pairs beautifully with natural materials — wood, rattan, jute.
- Budget breakdown: Under $100 — a simple canvas teepee and DIY paper butterflies, with pillows repurposed from elsewhere. $100–$300 — add the play mat, wicker baskets, and sheer canopy fabric. $300+ — custom macramé teepee, professional fabric canopy installation, and solid wood shelving.
- Space requirements: The teepee needs at least a 4×4 foot footprint. The canopy installation works best with 8+ foot ceilings.
- Difficulty level: Beginner to intermediate. The teepee assembly is typically straightforward. The fabric canopy requires one ceiling hook and some patience with draping.
- Durability: Canvas teepees hold up well to active play. Keep the paper butterflies higher than grabbing range if you want them to last — at toddler height they won’t survive a week.
- Seasonal adaptability: Swap butterfly decorations for felt snowflakes in winter, leaf shapes in autumn, and star shapes for a nighttime version of the look.
- Common mistakes: Buying a teepee that’s too small — children grow fast and a teepee that barely fits a toddler will feel disappointing within a year. Size up.
- Maintenance tips: Spot clean the canvas teepee with mild soap. Fluff and rotate floor cushions regularly so they maintain their shape.
5. Outer Space Adventure Zone with Cosmic Mural
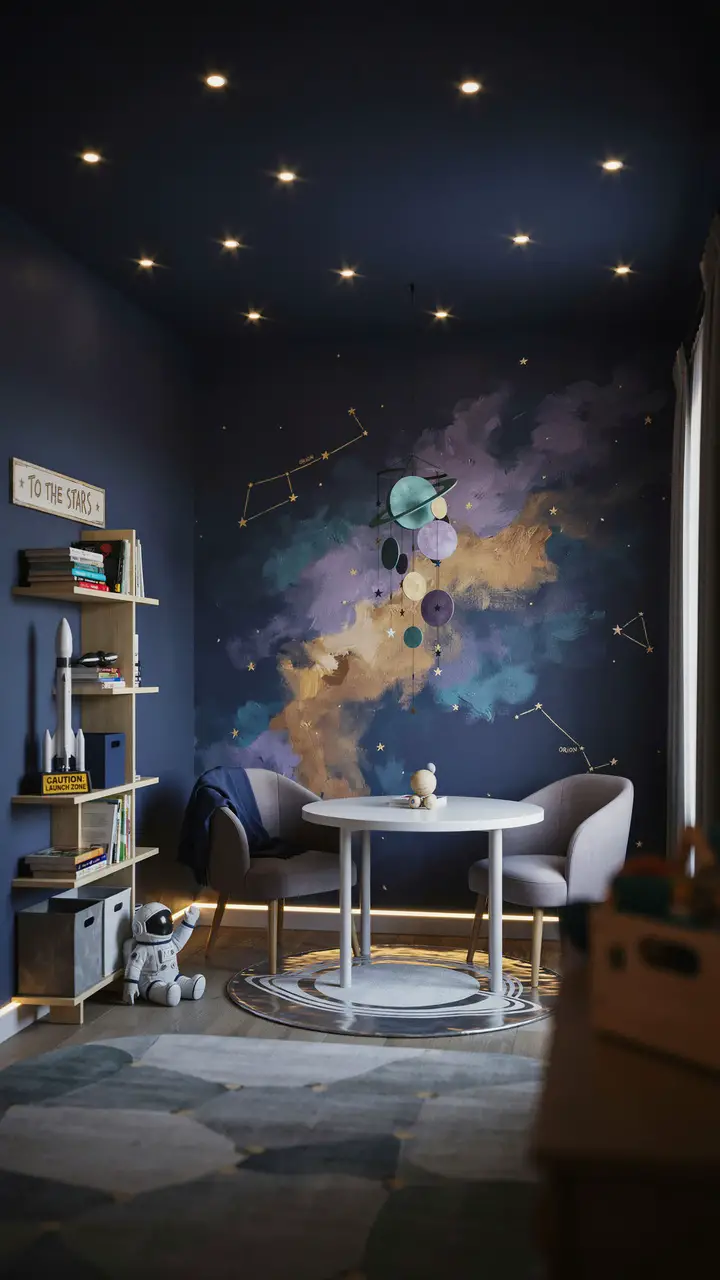
How to Recreate This Look
- Shopping list: Space mural wallpaper or navy/charcoal paint ($30–$150), gold star stickers ($8–$15), constellation string lights ($15–$40), planet-print floor mat ($30–$90), metallic silver storage bins ($10–$25 each), space-themed mobile ($20–$60), model rocket for decor ($15–$40)
- Step-by-step styling: Start with the mural or painted accent wall. Apply star stickers in loose constellation patterns while the wall is dry. Install string lights across the ceiling in a scattered pattern. Place the mat in the center and position shelving and table once the lighting is done — good galaxy rooms are built from ceiling down.
- Style compatibility: Works with modern, Scandinavian-minimal, and STEM-inspired aesthetics. Pairs well with clean-lined furniture in white, silver, or navy.
- Budget breakdown: Under $100 — navy paint, star stickers, string lights, and one or two space props. $100–$300 — add the floor mat, storage bins, mobile, and a few space-themed books. $300+ — full mural installation, custom shelving, LED star projector, and quality furniture.
- Space requirements: The accent wall impact works even in small rooms — this theme suits spaces as compact as 7×8 feet.
- Difficulty level: Beginner. Dark paint is forgiving, star stickers are instant, and string lights do most of the atmosphere-building work.
- Durability: Star stickers may peel at edges over time — press firmly during installation. LED string lights last thousands of hours.
- Seasonal adaptability: The cosmic look is timeless and doesn’t need seasonal swapping. Add a moon phase garland for a subtle seasonal shift in autumn/winter.
- Common mistakes: Painting only one wall too small to feel immersive. Consider carrying the deep navy at least partially around two walls for a more enveloping space effect.
- Maintenance tips: Dust string lights gently with a soft cloth. Touch up the wall paint annually, particularly around corners and shelving edges where scuffing happens most.
6. Enchanted Library with Rolling Ladder and Nook
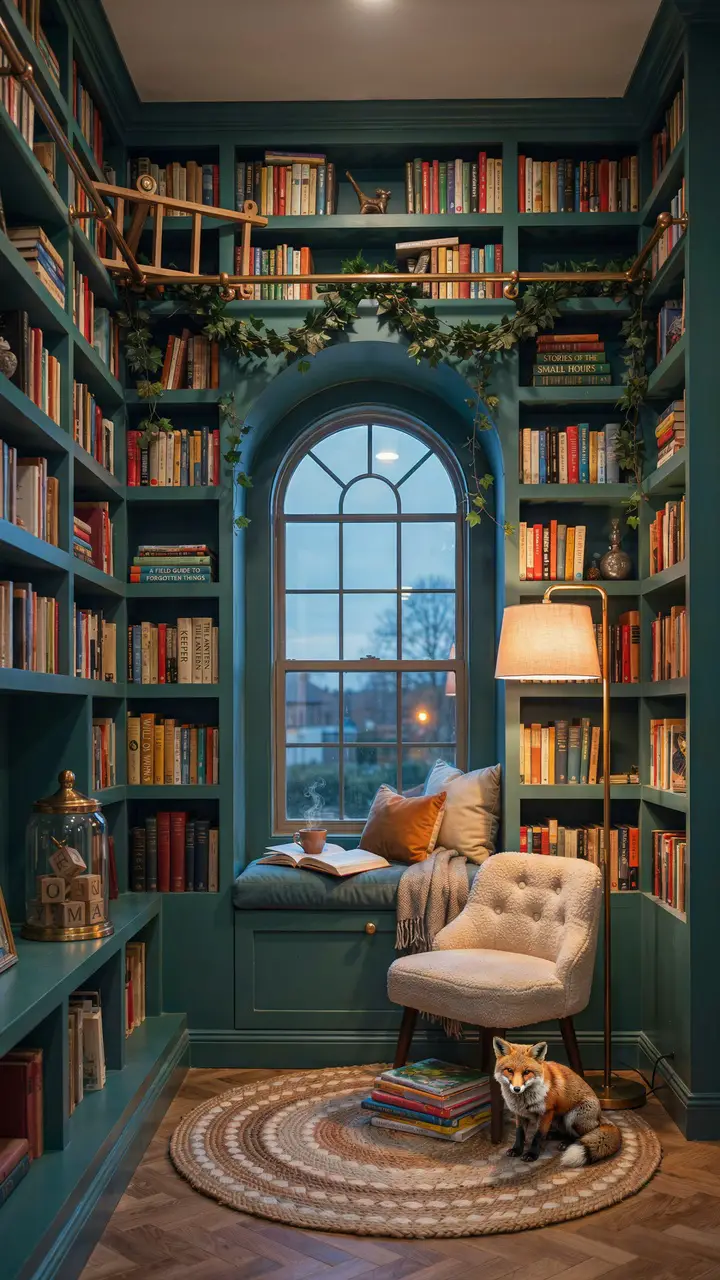
How to Recreate This Look
- Shopping list: IKEA BILLY bookcases painted in forest green ($50–$100 each), child-friendly rolling ladder system ($150–$400), velvet window seat cushion ($40–$120), braided area rug ($45–$200), small upholstered reading chair ($80–$300), brass floor lamp ($40–$150), faux ivy garland ($10–$25 per strand)
- Step-by-step styling: Install painted bookcases first, ensuring they’re wall-anchored for safety. Add the rolling ladder rail system. Dress the window seat with the velvet cushion and pillows. Lay the rug, position the reading chair, and drape ivy across the upper shelving last — it should feel like the room grew into the greenery naturally.
- Style compatibility: Perfect for dark academia, cottagecore, and vintage-inspired aesthetics. Works with rich jewel tones and warm wood furniture.
- Budget breakdown: Under $100 — paint existing shelves green, add faux ivy and a new cushion cover for a window seat. $100–$300 — add a BILLY bookcase, braided rug, and floor lamp. $300+ — full bookcase wall with rolling ladder, custom cushioning, and quality upholstered seating.
- Space requirements: The full rolling ladder setup needs at least 8 feet of continuous wall space. The window seat alcove works in any deep windowsill of at least 18 inches.
- Difficulty level: Advanced for the full build (ladder installation requires precise hardware). Beginner for the painted-shelves-and-ivy version.
- Durability: Books organize themselves — kids will pull them off and return them constantly, which keeps the space actively used. Velvet cushions show wear; use a washable slipcover underneath.
- Seasonal adaptability: Swap throw pillow colors seasonally — plum and burgundy for autumn, ivory and silver for winter, pale yellow for spring.
- Common mistakes: Skipping the wall anchors on tall bookcases. This is non-negotiable for safety, especially in a children’s space. Anchor every unit.
- Maintenance tips: Dust the faux ivy monthly with a hair dryer on cool setting. Re-organize books by color every few months to refresh the visual without spending anything.
7. Treehouse Loft with Rope Ladder and Slide
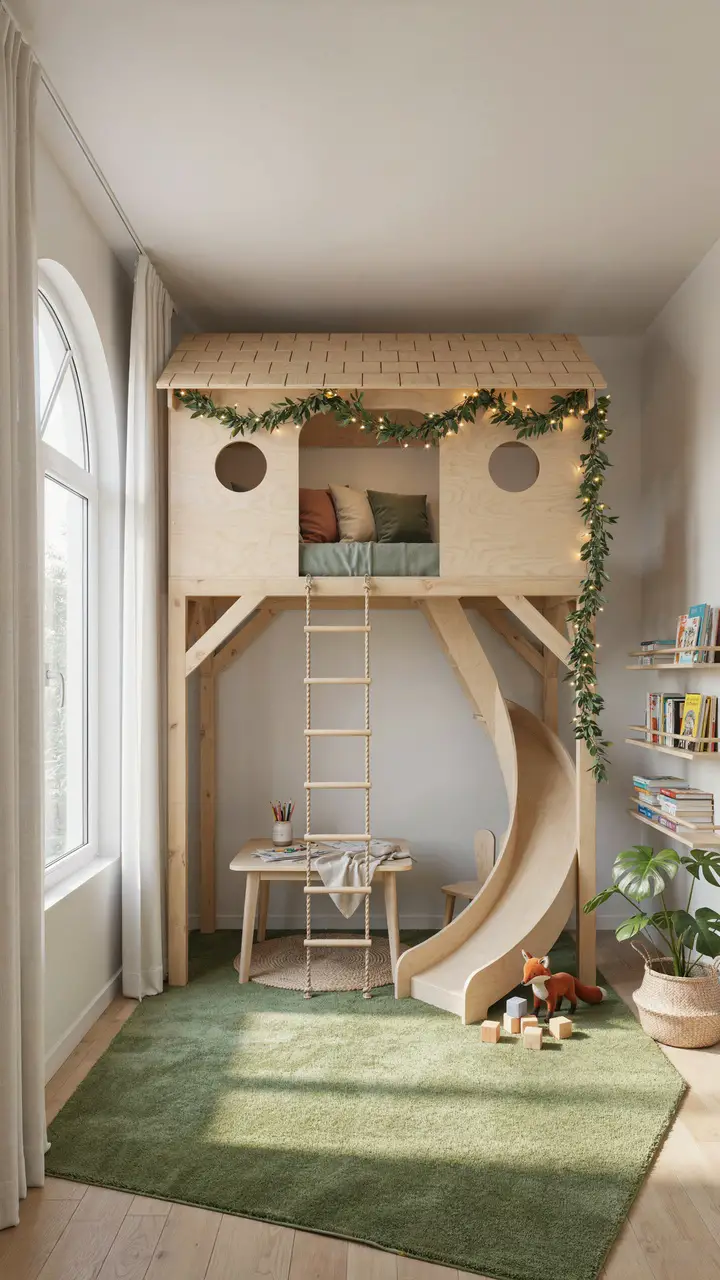
How to Recreate This Look
- Shopping list: Pre-built indoor loft/platform bed with slide ($400–$1,200 from IKEA or specialty retailers), rope ladder ($30–$80), faux leaf garland ($15–$35), fairy lights ($15–$30), faux grass floor mat for under-loft area ($25–$60), child art table and stools ($60–$200), sage bedding for loft ($30–$80)
- Step-by-step styling: The loft unit is the anchor — install it per manufacturer instructions (always anchor to wall studs). Dress the loft sleeping area with cozy, simple bedding. Weave garland and lights through the structure. Furnish the under-loft space as a creative station — art supplies, a low table, and good lighting.
- Style compatibility: Works with nature-inspired, adventure, and Montessori aesthetics. Pairs with natural wood tones, muted greens, and earthy textures.
- Budget breakdown: Under $100 — impossible for the loft itself. This is a splurge category. Budget for it by prioritizing it over other furniture. $100–$300 — cover accessories: garland, lights, bedding, art station. $300+ — the loft itself, with full accessory styling.
- Space requirements: Requires at least a 10×10 foot room and 9+ foot ceilings for a full loft with slide. Lower ceilings suit a half-loft or platform-only version.
- Difficulty level: Advanced. Installation of a structural play loft is not a one-person job and should follow manufacturer guidelines precisely.
- Durability: Built well, a solid wood loft will last from toddlerhood through adolescence. Check all bolts and connections every six months.
- Seasonal adaptability: Change the garland with seasons — autumn leaves, winter pine branches, spring flowers. The rope ladder and slide are timeless.
- Common mistakes: Underestimating the ceiling clearance needed. A child on top of the loft needs at least 3 feet of headroom to sit comfortably. Measure twice before ordering.
- Maintenance tips: Tighten all fasteners twice yearly. Sand any splinters as they appear and apply child-safe wood oil annually to keep the pine looking fresh.
8. Underwater Ocean Adventure Play Space
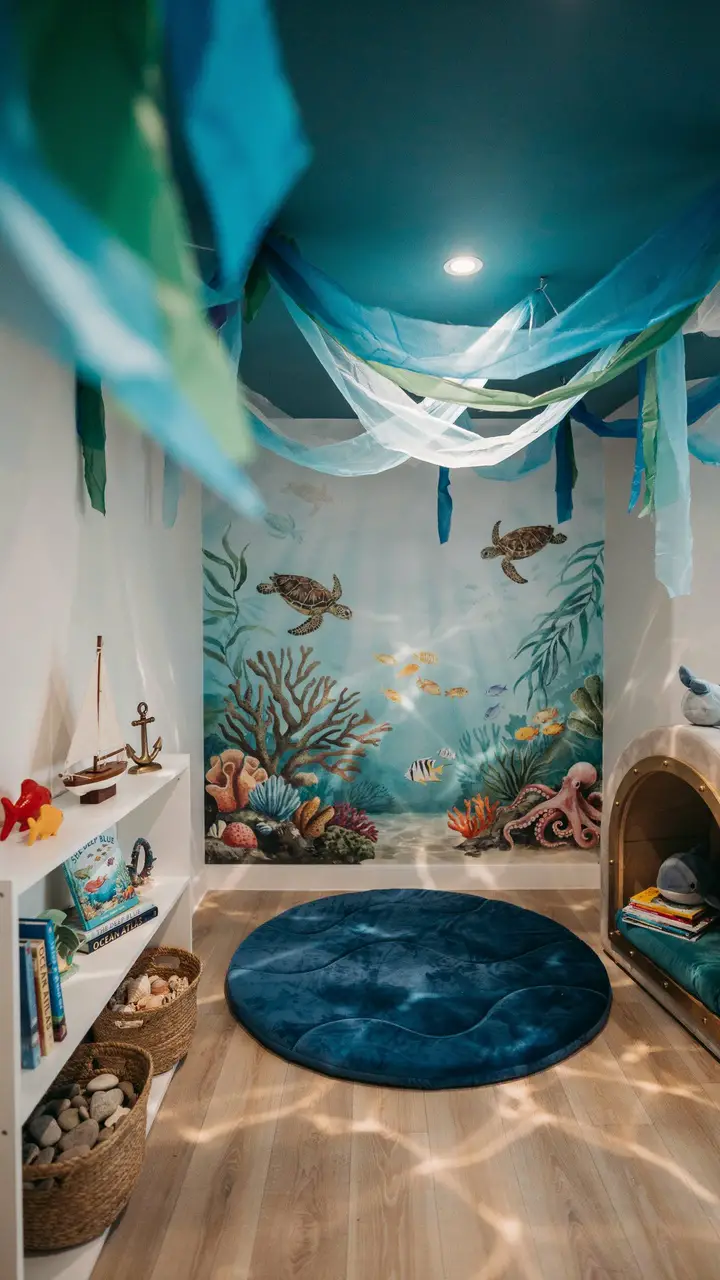
How to Recreate This Look
- Shopping list: Ocean mural wallpaper or paint in teal and navy ($30–$150), blue/green fabric streamers for ceiling ($15–$35), round play mat in ocean blue ($35–$120), white storage shelving ($50–$200), wicker baskets ($10–$25 each), submarine nook materials or repurposed cabinet ($40–$150)
- Step-by-step styling: Paint or hang the mural wall first. Apply teal to the ceiling. Hang fabric streamers from the ceiling in varying lengths, anchored near the center and fanning outward. Place the round mat in the center of the room. Position shelving along a non-mural wall and fill with ocean-themed items and baskets.
- Style compatibility: Works with nature-inspired, coastal, and adventurous aesthetics. Pairs with white, sandy beige, and warm wood tones.
- Budget breakdown: Under $100 — paint the accent wall teal, hang blue streamers, and use existing shelving. $100–$300 — add ocean mural wallpaper, the round mat, and a few ocean-themed toy accessories. $300+ — full custom mural, ceiling installation, submarine nook build, and quality furniture.
- Space requirements: The fabric ceiling installation works best in rooms with ceilings between 8 and 10 feet. The round mat works in rooms as small as 8×8 feet.
- Difficulty level: Intermediate. Ceiling painting and fabric installation require time and a helper. The mural portion can be simplified with wallpaper panels.
- Durability: Fabric streamers may become frayed over time — replace as needed. The mural holds well if sealed with a child-safe clear coat.
- Seasonal adaptability: Swap the fabric streamers from cool blue-greens to warmer coral and gold tones for autumn. Add a paper jellyfish mobile that changes colors each season.
- Common mistakes: Painting the ceiling the same intense teal as the walls — this makes the space feel darker and smaller than intended. Go a half-shade lighter on the ceiling.
- Maintenance tips: Dust the fabric ceiling streamers with a hair dryer on cool. Spot clean the play mat with mild soap and water. Check ceiling hook anchors every few months.
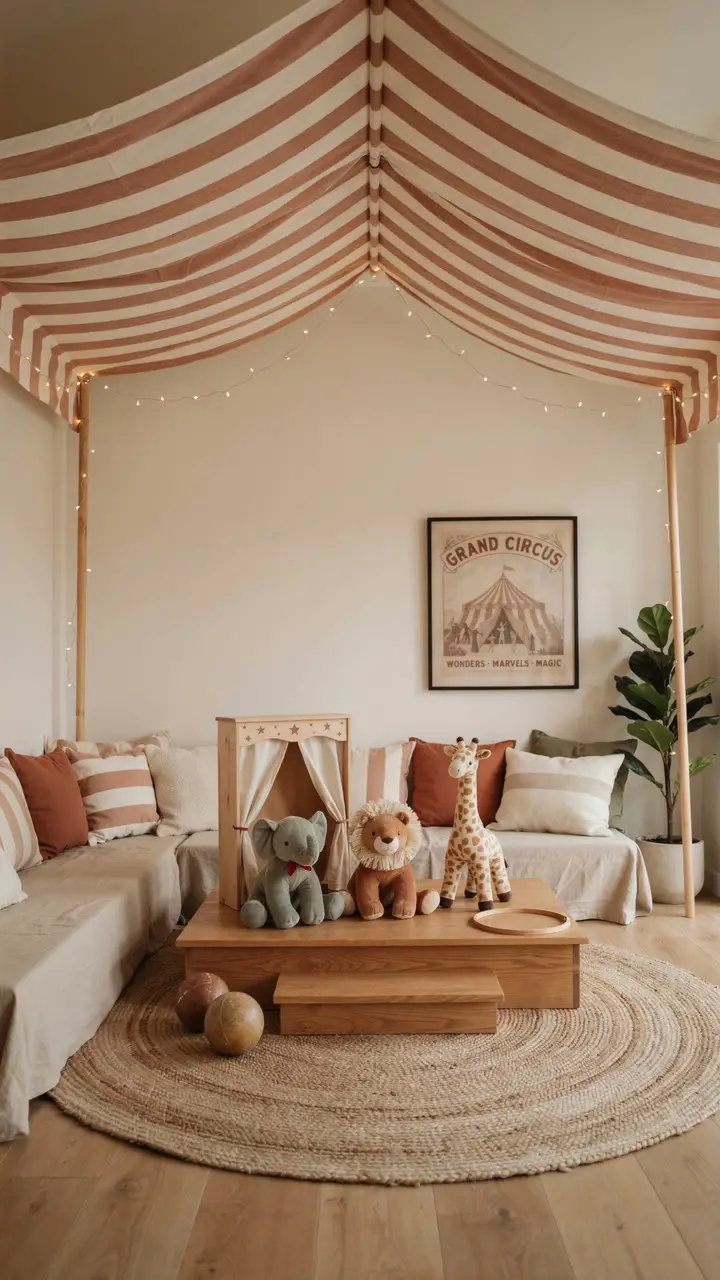
9. Vintage Circus Tent Play Corner with Striped Canopy
How to Recreate This Look
- Shopping list: Striped cotton fabric for canopy in cream and terracotta (3–5 yards at $8–$15 per yard), tension poles or ceiling hooks ($15–$30), jute rug ($40–$120), low wooden puppet theater ($40–$120), circus animal stuffed toys ($15–$35 each), string lights ($15–$30), vintage circus poster print ($15–$40), low wooden bench or cube seating ($30–$100 each)
- Step-by-step styling: Install four ceiling hooks in a square or rectangular formation. Gather the striped fabric at each corner using rope or ribbon tied to each hook. Let the center of the fabric droop naturally to create the tent effect. Place the jute rug beneath and arrange the play stage and puppet theater within the tent zone.
- Style compatibility: Works with vintage, cottagecore, and boho-neutral aesthetics. Pairs well with natural wood tones, warm neutrals, and handmade-feeling accessories.
- Budget breakdown: Under $100 — DIY the canopy from inexpensive cotton, use existing pillows, and print circus art at home. $100–$300 — add the jute rug, puppet theater, and circus stuffed animals. $300+ — include a custom-built play stage, bench seating, and professional fabric installation.
- Space requirements: The tent canopy works best in a zone of at least 8×8 feet. The ceiling hooks need 9+ foot ceilings for proper draping effect.
- Difficulty level: Intermediate. The ceiling hook installation is the trickiest part — into drywall with proper anchors, not just stud-finding.
- Durability: Cotton fabric canopies hold up well but accumulate dust. Shake them outdoors seasonally. Jute rugs are highly durable.
- Seasonal adaptability: Swap the fabric colors seasonally — deep burgundy and forest green for winter holidays, soft yellow and white for spring, rich autumn tones for fall.
- Common mistakes: Hanging the canopy too low — the center drape should be at least 6 feet from the floor so adults can move through the space without ducking.
- Maintenance tips: Spot clean the canopy fabric with a damp cloth. Vacuum the jute rug weekly. Wipe the puppet theater with a damp cloth and wood-safe spray monthly.
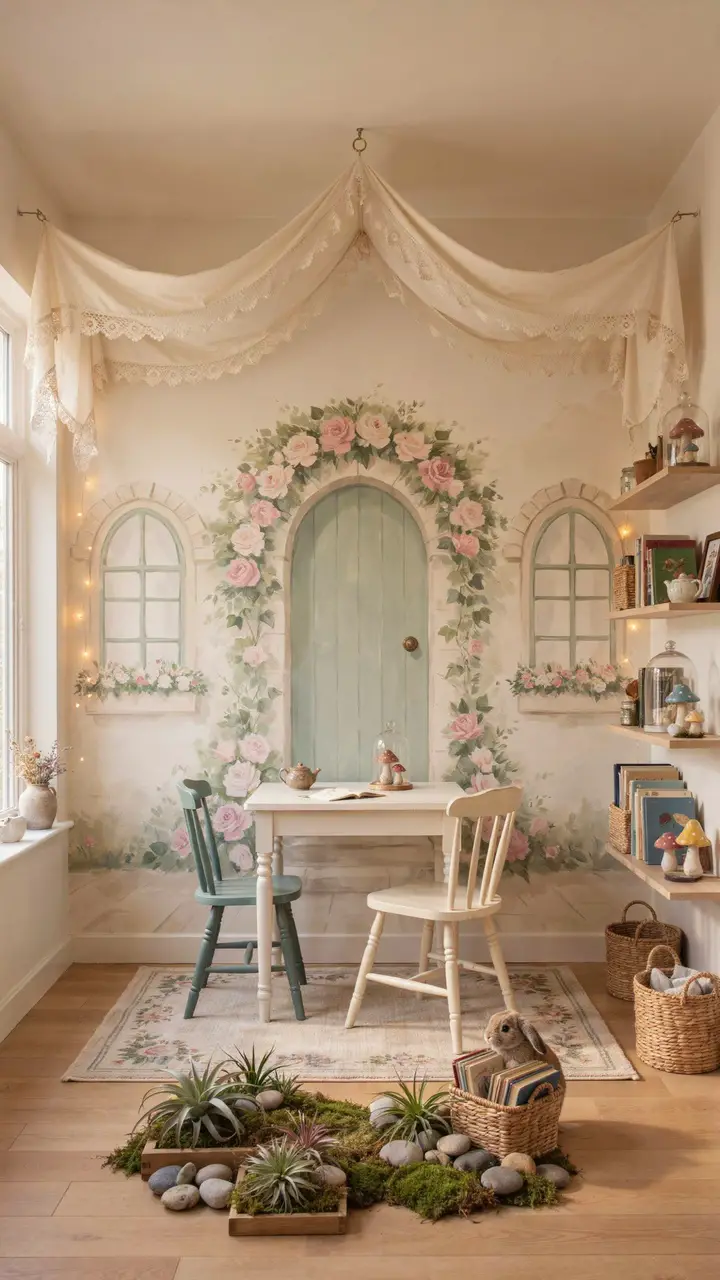
10. Fairy Tale Cottage with Door Mural and Miniature Garden
How to Recreate This Look
- Shopping list: Cottage door and window mural wallpaper panels or paint ($40–$150), air plants ($5–$15 each), wooden shallow garden trays ($15–$35), smooth river stones ($10–$20 per bag), white wooden table and chairs ($80–$250), wicker storage bins ($10–$25 each), ivory fabric for canopy ($20–$50), string lights ($15–$30)
- Step-by-step styling: Install the cottage mural on your focal wall. Arrange the miniature garden below it — place the wooden tray, layer moss and stones, and tuck in a few air plants. Set the white table and chairs in the main area, hang the canopy above, and string lights along the window painting frames.
- Style compatibility: Works beautifully with cottagecore, fairy tale, and boho-nature aesthetics. Pairs with white furniture, natural wood, and muted floral textiles.
- Budget breakdown: Under $100 — paint the cottage door yourself using reference images, DIY the miniature garden with moss and stones from a garden center. $100–$300 — add a mural wallpaper panel, table set, and fairy garden accessories. $300+ — full mural installation, quality furniture, custom canopy, and extensive fairy garden.
- Space requirements: The mural focal wall needs at least 6 feet of width to feel proportional. The miniature garden tray can be as small as 12 inches wide. The table setup works in rooms 9×9 feet or larger.
- Difficulty level: Beginner to intermediate. The painting requires planning but no special skills. Air plants are among the easiest plants to maintain.
- Durability: Air plants need only a weekly misting — they’re genuinely hard to kill. Wooden furniture holds up extremely well and can be repainted as needed.
- Seasonal adaptability: Swap air plants for seasonal flowers — small potted pansies in spring, dried lavender in summer, mini gourds in autumn. The basic structure stays the same.
- Common mistakes: Placing the miniature garden too close to the main play area where it will get knocked over constantly. Position it against the mural wall where it acts as decor rather than an obstacle.
- Maintenance tips: Mist air plants weekly and give them a 30-minute soak monthly. Dust the wicker bins and tray seasonally. Wipe the table and chairs weekly — chalk and paint will happen.
Building a gender neutral whimsical playroom isn’t about erasing personality — it’s actually about amplifying it. When you remove the shorthand of blue-for-boys and pink-for-girls, you’re left with a genuinely open creative canvas where mushroom forests, cosmic adventures, fairy tale cottages, and circus tents can coexist beautifully. The best part? These spaces grow with your children rather than aging out of them. A child who played in the enchanted library corner at three will use it differently at six, and differently again at nine. That flexibility is the real magic.
Start with one idea that genuinely excites you — the one you found yourself lingering on just a little longer than the others. That enthusiasm translates into the choices you make and the care you put into it, and children absolutely feel that. Your playroom doesn’t need to be Instagram-perfect to be genuinely magical. It just needs to feel like it was made with love and a real understanding of the child who’ll play there. That’s the formula, and it works every time. <3

Greetings, I’m Alex – an expert in the art of naming teams, groups or brands, and businesses. With years of experience as a consultant for some of the most recognized companies out there, I want to pass on my knowledge and share tips that will help you craft an unforgettable name for your project through TeamGroupNames.Com!