
If you’ve scrolled through enough playroom inspiration boards, you’ve noticed they start to blur together — the same rainbow shelf, the same canopy, the same teepee in the corner.
There’s nothing wrong with any of that, but if you’re craving something genuinely different, something that makes visitors stop and say “wait, how did you even think of this?” — this is the list for you.
These ten playroom ideas lean into the unexpected: the whimsical in a more imaginative, surprising direction.
They’re personal, unconventional, and genuinely memorable. And most of them are far more achievable than they look.
1. Enchanted Library with Hidden Book Passages
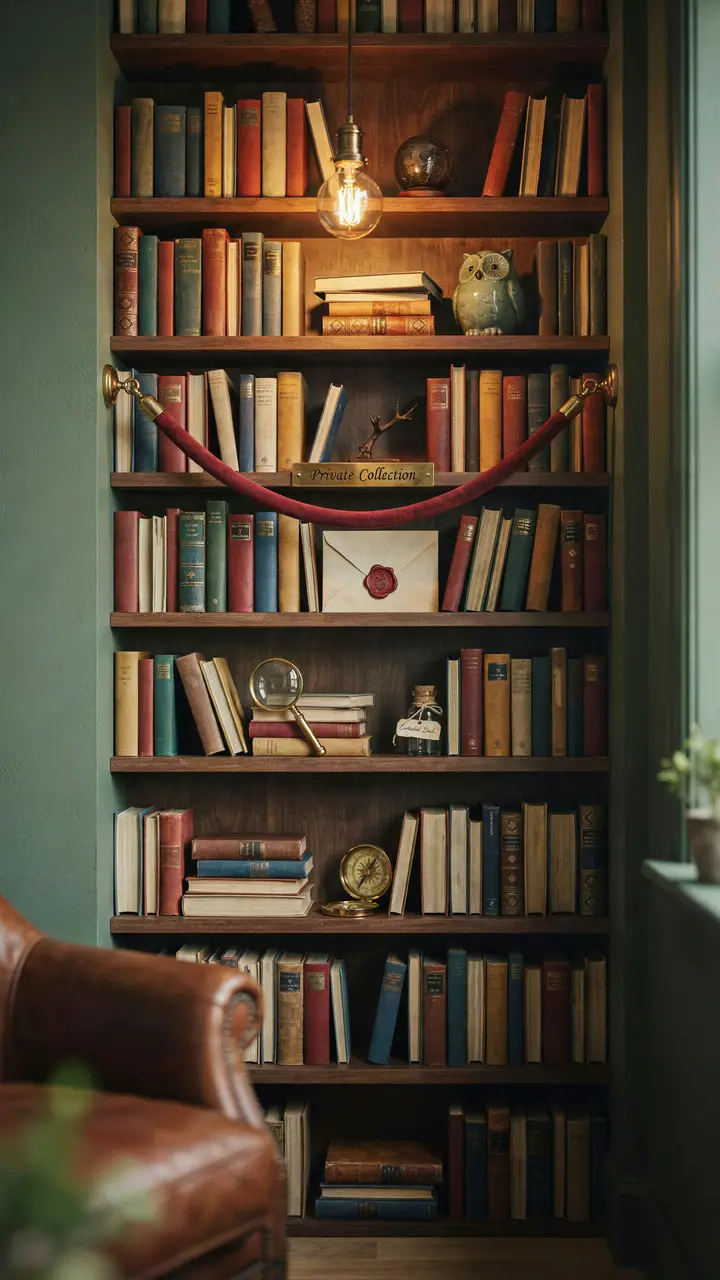
Transform your playroom bookshelf into an enchanted library by adding a hidden element — a false panel that “opens” to reveal a small secret nook behind the bookshelf, accessible through pulling a specific book. The mechanism can be as simple as a hinged panel attached to the back of a KALLAX unit, or as elaborate as a sliding bookcase door with a real magnetic latch.
Even without the functional mechanism, the suggestion of hidden magic does the trick: add a velvet rope “Private Collection” sign over one shelf section, place a mysterious sealed envelope marked “Open Only If You Dare,” and use vintage-looking book spines (printable or bought cheaply) to create the atmosphere of an ancient, magical library.
How to Recreate This Look
- Shopping list: Large bookcase in dark wood or paint ($80–$250), jewel-tone paint or contact paper for back panel ($15–$40), velvet rope with brass stand ends ($15–$30), wax seal kit for envelope ($10–$20), “enchanted” prop accessories — magnifying glass, compass, small glass bottles ($20–$50 total), Edison bulb string lights for above-shelf lighting ($20–$40), vintage-look printable book spines ($free–$10 on Etsy), ceramic owl figurine ($15–$35)
- Step-by-step: Paint or contact paper the bookcase back panel in a deep jewel tone. Arrange books by color in warm tones. Create a dedicated “mystery” section with velvet rope. Prop envelope between books. Add curiosity objects throughout shelves for detail. String Edison lights above the unit.
- Style compatibility: Works in eclectic, fairy tale, “dark academia,” and adventure styles; beautiful alongside deep wall colors
- Budget breakdown: Budget ($30–$70) — existing bookcase + paint + DIY props; Mid-range ($70–$200) — quality bookcase + full prop collection; Investment ($200–$800) — custom sliding bookcase door with real hidden nook
- Space requirements: Works on any wall with enough space for a bookcase
- Difficulty: Beginner (styled version) to Advanced (real hidden door mechanism)
- Durability: Styled elements last indefinitely; refresh prop collection annually
- Seasonal adaptability: Rotate “mysterious envelope” contents seasonally for ongoing discovery
- Common mistakes: Don’t over-accessorize — 3–5 carefully chosen props beat a cluttered collection. Don’t use real candles even for the aesthetic; Edison bulbs achieve the same look safely.
- Maintenance: Dust shelf and props weekly; replace any accessories that get damaged
2. Under-the-Stairs Hobbit Hole Play Space
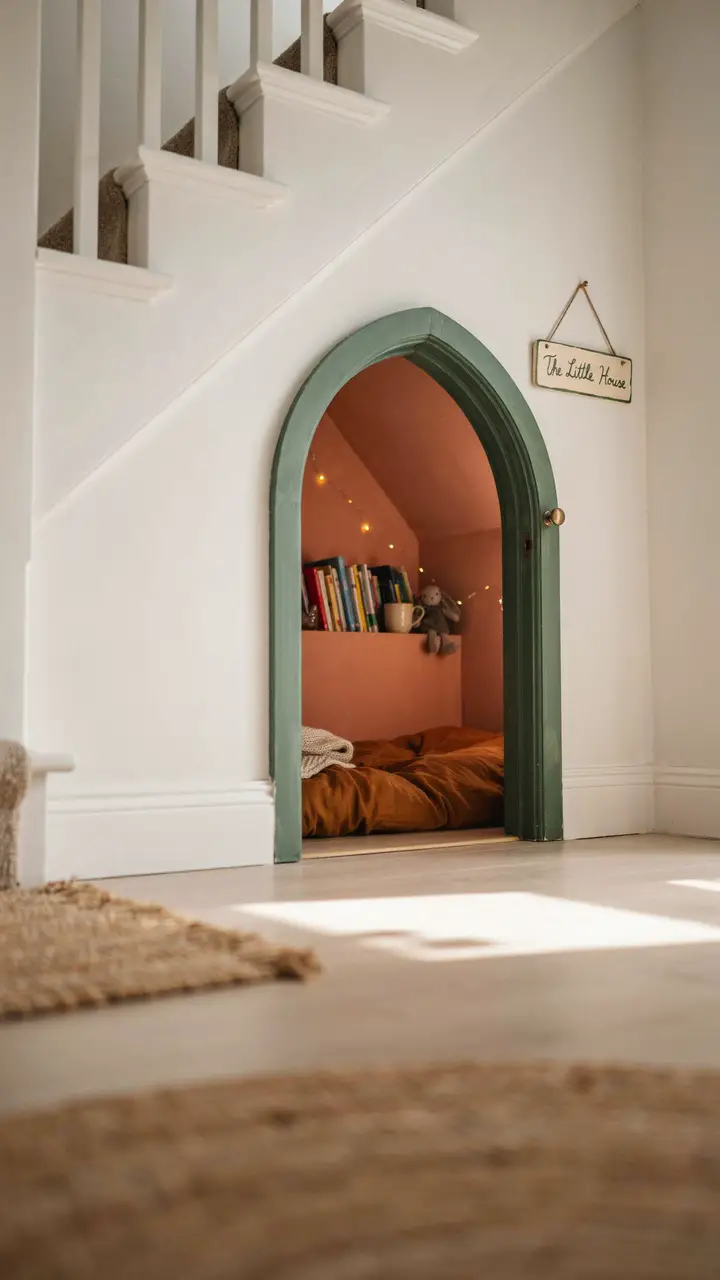
If you have a staircase with accessible space underneath, you have the bones for one of the most genuinely magical small playroom spaces possible. Enclose the space under the stairs with a small arched doorway (a simple half-arch framing works beautifully), paint the interior in a warm earthy tone, add built-in shelving along the sloped ceiling side, and furnish the floor with a thick cushion, fairy lights, and a few beloved toys.
The arched doorway is the key detail — it transforms a practical storage space into a genuine hobbit hole, a mouse house, a fairy cottage. Children go absolutely feral (in the best way) for tiny rooms with small doorways. The slight crouch required to enter makes it feel like entering another world.
How to Recreate This Look
- Shopping list: MDF sheets for arch framing ($20–$50), wood screws and construction adhesive ($10–$20), forest green exterior arch paint ($15–$25), small round brass doorknob ($15–$35), terracotta interior paint ($15–$30), thick floor cushion or mattress topper ($30–$80), fairy lights for interior ($12–$25), small built-in shelf boards ($20–$50), handpainted wood sign ($15–$30 or DIY)
- Step-by-step: Frame the arch opening with MDF cut to an arch shape. Sand smooth and paint green. Install the brass knob. Paint interior walls in warm terracotta. Install a simple floating shelf along the interior sloped wall. Add cushion, fairy lights, and a small selection of the child’s most beloved books and toys.
- Style compatibility: Works in eclectic, fairy tale, nature-inspired, and cottage styles; the arch doorway works alongside almost any exterior decor
- Budget breakdown: Budget ($50–$120) — basic framing + paint + cushion + lights; Mid-range ($120–$300) — quality arch framing + full interior treatment + built-in shelf; Investment ($300–$1500) — custom carpentry with arched door, integrated lighting, and built-in storage
- Space requirements: Requires stairs with accessible underside space — typically works in homes with a half-story or full second floor
- Difficulty: Intermediate to Advanced (framing requires basic carpentry skills)
- Durability: Excellent once built; refresh paint every 3–5 years
- Seasonal adaptability: Add seasonal decor at the arch exterior: tiny wreath for winter, tiny flower garland for spring
- Common mistakes: Don’t make the doorway opening so small that a 10-year-old can’t comfortably enter — kids grow. Don’t omit lighting inside; a dark under-stair space feels scary, not cozy.
- Maintenance: Repaint arch touch-ups as needed; check fairy light wiring annually
Looking for even more unique and creative playroom concepts? These amazing whimsical playroom ideas are full of truly one-of-a-kind ideas!
3. Upside-Down Room Element (Ceiling as Floor)
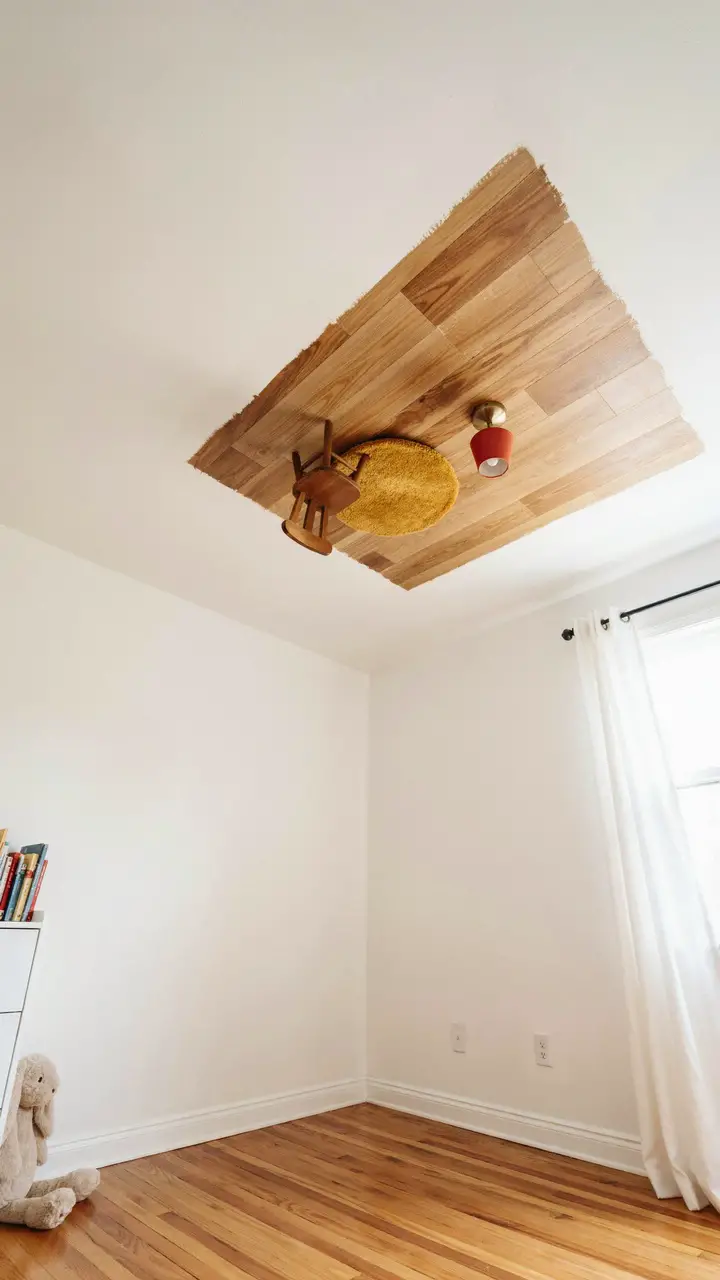
Here’s one that is genuinely unusual and absolutely delightful: create a small section of the room where the “ceiling” mirrors the floor below it, giving the visual impression of a room turned upside down. This works beautifully as an accent wall + ceiling corner treatment: paint the ceiling section above one corner the same color as the floor below, then mount a miniature toy furniture arrangement upside-down directly onto the ceiling — a tiny chair, a tiny rug, a tiny lamp — as if gravity ran the wrong direction there.
It’s an optical illusion, a conversation piece, and the most interesting thing children and adults will see in any playroom, ever. Kids spend an impressive amount of time staring up at it and narrating stories about the people who live in the upside-down world.
How to Recreate This Look
- Shopping list: Ceiling paint in floor-matching tone ($15–$35), miniature doll’s house furniture in relevant pieces — chair, rug, lamp ($20–$60), construction adhesive rated for ceiling weight ($8–$15), small L-brackets for heavier pieces ($10–$20)
- Step-by-step: Paint the ceiling above the chosen corner in a warm wood or floor-matching tone — approximately a 4×4 foot section. Allow to dry fully. Apply construction adhesive to the base of each miniature furniture piece. Press firmly onto ceiling and allow to cure per adhesive instructions. Use small L-brackets for any piece over 200g for safety.
- Style compatibility: Works in eclectic, whimsical, modern, and surrealist-inspired spaces
- Budget breakdown: Budget ($30–$60) — ceiling paint + basic doll house furniture + adhesive; Mid-range ($60–$120) — quality miniature pieces + premium adhesive + full installation; Investment ($120–$300) — custom scale miniature scene with integrated ceiling lighting
- Space requirements: Works in any corner of any size room; the installation itself needs only a 4×4 foot ceiling section
- Difficulty: Intermediate (ceiling adhesive work requires care; some mini furniture may be heavy)
- Durability: When properly adhered, this installation lasts years
- Seasonal adaptability: Swap miniature seasonal accessories into the upside-down room for holidays
- Common mistakes: Don’t use miniature pieces that are too heavy for ceiling adhesive without L-bracket backup. Don’t paint too large a section — the focal point works because it’s contained and contrasting.
- Maintenance: Check adhesion of ceiling pieces every 6 months; re-adhere any loose pieces immediately
4. Vintage Map Wall with Discovery Box
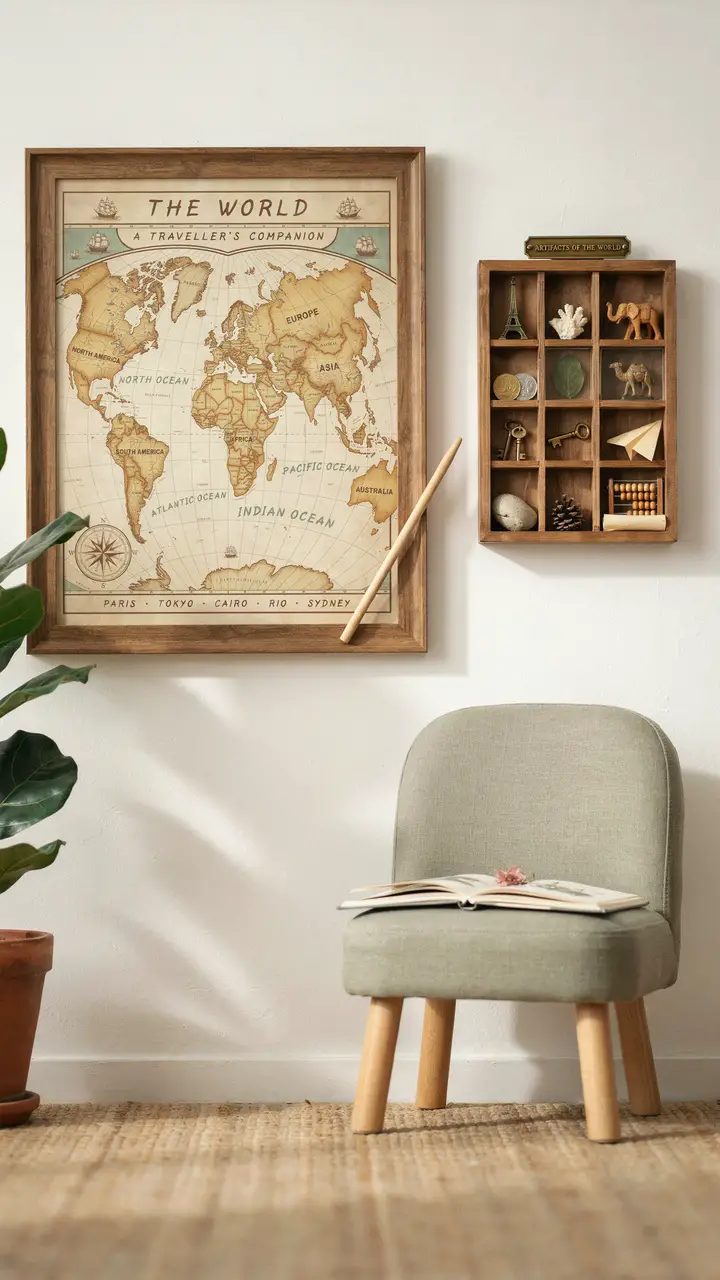
Mount a large vintage world map (or fantasy world map) as the room’s primary feature wall, then create a “Discovery Box” system that ties to the map: a wooden box divided into compartments, each containing a small artifact or treasure representing a different place on the map — a tiny Eiffel Tower, a small carved wooden elephant, a piece of coral, a foreign coin, a pressed flower from a botanical garden.
Children can pull out the artifact, find its place on the map, and “travel” there through books, stories, and imaginative play. It’s part decoration, part educational tool, part catalyst for the best kind of open-ended play: curiosity-driven exploration.
How to Recreate This Look
- Shopping list: Large vintage world map poster ($20–$60), wide oak or dark wood frame ($40–$100), divided wooden shadow box for artifacts ($25–$60), collection of small world artifacts — miniature landmarks, foreign coins, pressed botanicals, small carvings ($30–$80 total), wooden pointer stick ($5–$15), reading chair ($80–$300)
- Step-by-step: Mount framed map as the wall centerpiece. Install shadow box beside it at reachable height. Curate 8–12 small artifacts that represent specific points on the map. Label each compartment with the location name using small printed cards. Set up the pointer for children to use independently.
- Style compatibility: Works in adventure, eclectic, vintage, and classic explorer styles
- Budget breakdown: Budget ($50–$100) — printed map + basic shadow box + gathered artifact collection; Mid-range ($100–$250) — framed quality map + wooden shadow box + curated artifact set; Investment ($250–$600) — custom world map installation + custom artifact cabinet
- Space requirements: Map wall works best on a wall 5 feet wide or more; shadow box needs 18×24 inches
- Difficulty: Beginner
- Durability: Map and frame last indefinitely; artifacts accumulate over time as gifts and souvenirs
- Seasonal adaptability: Add seasonal travel items — a small ornament from each holiday destination, for instance
- Common mistakes: Don’t mount the shadow box too high for children to reach into — the whole point is hands-on exploration. Don’t fill compartments with breakable items.
- Maintenance: Dust map frame monthly; check shadow box compartments for any damaged artifacts
Ready to explore even more unique playroom ideas? Check out these incredible creative playroom setups for kids for fresh inspiration!
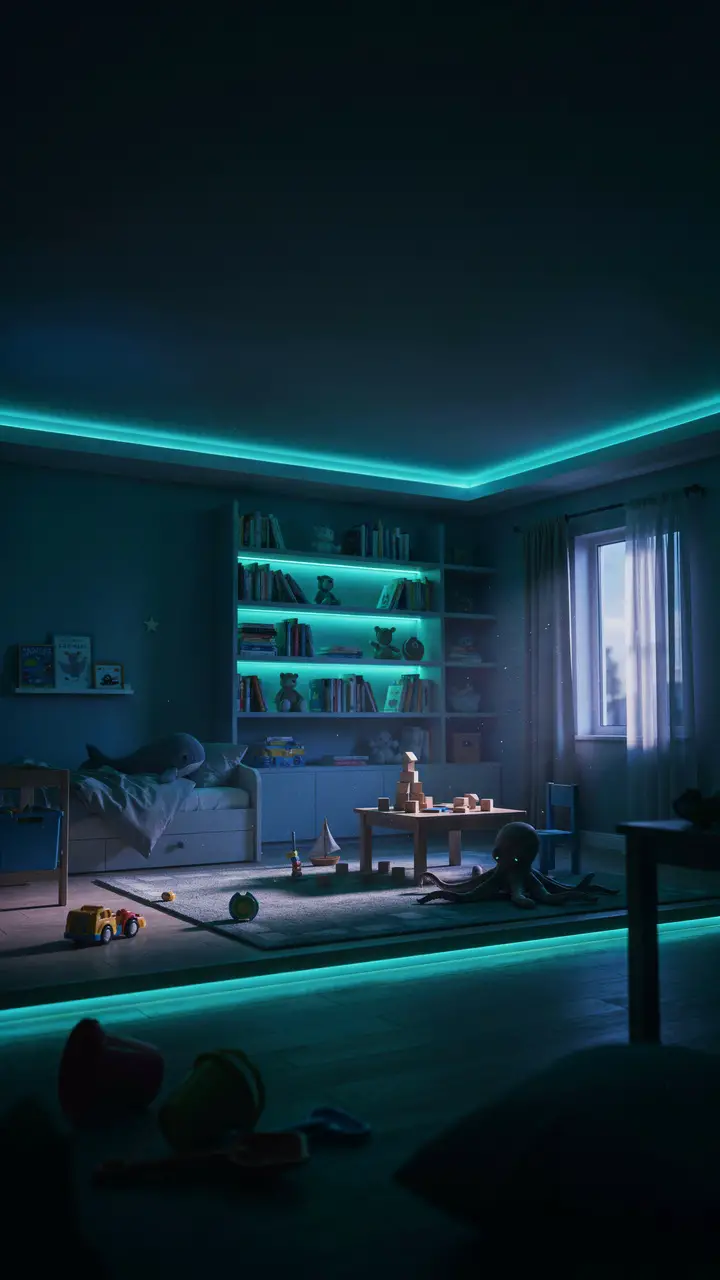
5. Color-Changing LED Environment Room
Smart LED lighting is genuinely one of the most transformative and underused tools in a playroom designer’s kit. A set of Govee or Philips Hue smart LED strips installed along the ceiling cove, baseboard, and behind the bookshelf creates a room that changes mood with a single app command — or even with a voice command to a smart speaker.
Imagine: “alien planet mode” (deep green and purple), “underwater world” (aqua and deep blue), “sunset” (orange and warm pink), “space station” (cold white and soft blue). Each color environment completely reframes the room’s imaginative potential. One room becomes ten different worlds.
How to Recreate This Look
- Shopping list: Smart LED strip light set for ceiling cove ($30–$80), second LED strip set for behind bookshelf ($25–$60), optional third strip for baseboard ($25–$60), smart speaker (Alexa or Google, $30–$100) for voice control, app control setup (free, via phone)
- Step-by-step: Install LED strip lights along ceiling cove using the adhesive backing — clean surface first for best adhesion. Run second strip along back of bookshelf. Connect all to the same smart home app. Create preset color “scenes” for different play modes. Name them something fun: “Alien World,” “Under the Sea,” “Disco Dance Party.”
- Style compatibility: Works in modern, eclectic, and sci-fi styles; LED strips are subtle when off and invisible during daytime
- Budget breakdown: Budget ($50–$100) — one set of smart LED strips + app control; Mid-range ($100–$200) — three-zone LED installation + smart speaker; Investment ($200–$500) — professional smart home lighting system with integrated dimming and scene control
- Space requirements: Works in rooms of any size
- Difficulty: Beginner — most smart LED systems are peel-and-stick with app pairing
- Durability: LED strips last 5–10 years; adhesive backing may need re-taping after 2–3 years
- Seasonal adaptability: Create seasonal preset scenes — red and green for Christmas, orange for Halloween, pastel for spring
- Common mistakes: Don’t install LED strips on surfaces that get hot. Don’t use maximum brightness for sleep-adjacent rooms; LED strips should be on a dimmer or smart schedule.
- Maintenance: Wipe strip casings with dry cloth monthly; check app connectivity after any router changes
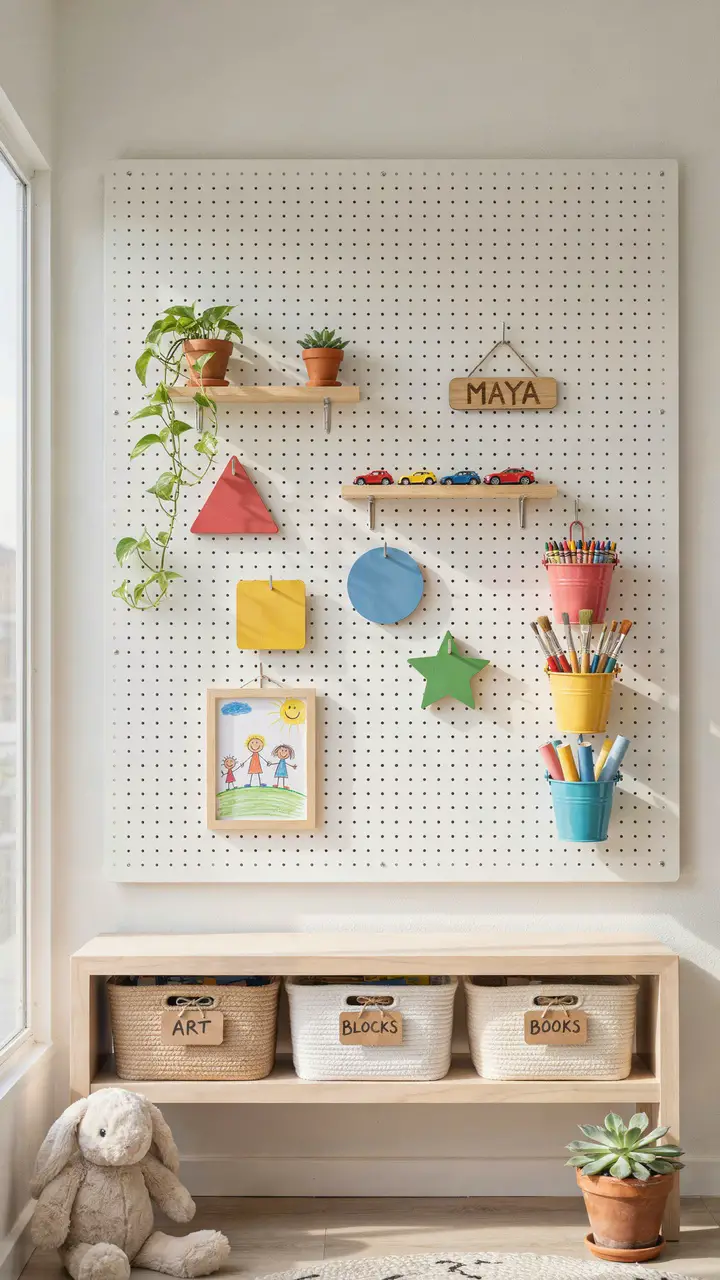
6. Interactive Pegboard Feature Wall
A giant pegboard wall sounds utilitarian until you see what it can become: a fully reconfigurable, interactive feature wall where kids move, rearrange, add, and remove elements constantly. Install a 4×8-foot white or colored pegboard directly to the wall, then stock it with an evolving collection of hooks, shelves, baskets, and display pieces.
Add a mix of organizational items (for storing art supplies, building pieces, small toys) and purely decorative elements (hanging plants, mini frames, colorful geometric shapes). The key is giving children permission to rearrange it themselves — a pegboard that a child has personally curated becomes one of the room’s most used and beloved elements.
How to Recreate This Look
- Shopping list: 4×8 foot pegboard panel in white ($20–$50), pegboard hardware for wall mounting ($15–$30), pegboard hook variety pack ($15–$30), small pegboard shelves ($15–$35 for a set), mini baskets for hooks ($10–$25), wooden geometric shape decorations ($10–$25), small plant pots for shelf display ($5–$12 each), mini frames ($5–$15 each)
- Step-by-step: Mount pegboard to wall with 1-inch standoffs behind it (necessary for hooks to work — pegboard needs space behind it). Paint if desired before mounting. Install hook variety pack. Load initial configuration with mix of storage and decor. Invite the child to rearrange to their liking.
- Style compatibility: Works in modern, Scandinavian, eclectic, and Montessori styles; white pegboard suits almost any color scheme
- Budget breakdown: Budget ($30–$70) — pegboard + basic hooks + existing accessories repurposed; Mid-range ($70–$180) — quality pegboard + full hook set + baskets + decor; Investment ($180–$400) — custom colored or painted pegboard wall with professional mounting
- Space requirements: Works on any wall 4 feet wide or more
- Difficulty: Intermediate (proper wall mounting with standoffs)
- Durability: Pegboard is extremely durable; hooks and accessories can be updated indefinitely
- Seasonal adaptability: Swap seasonal accessories and decorations easily since everything is hook-mounted
- Common mistakes: Don’t mount without the 1-inch standoffs behind the pegboard — without them, the hooks can’t engage. Don’t overload every hook at launch — leave room for evolution.
- Maintenance: Dust pegboard monthly; tighten any loose hooks quarterly
Looking for more one-of-a-kind playroom inspiration? These incredible playroom design ideas are filled with truly unique concepts!
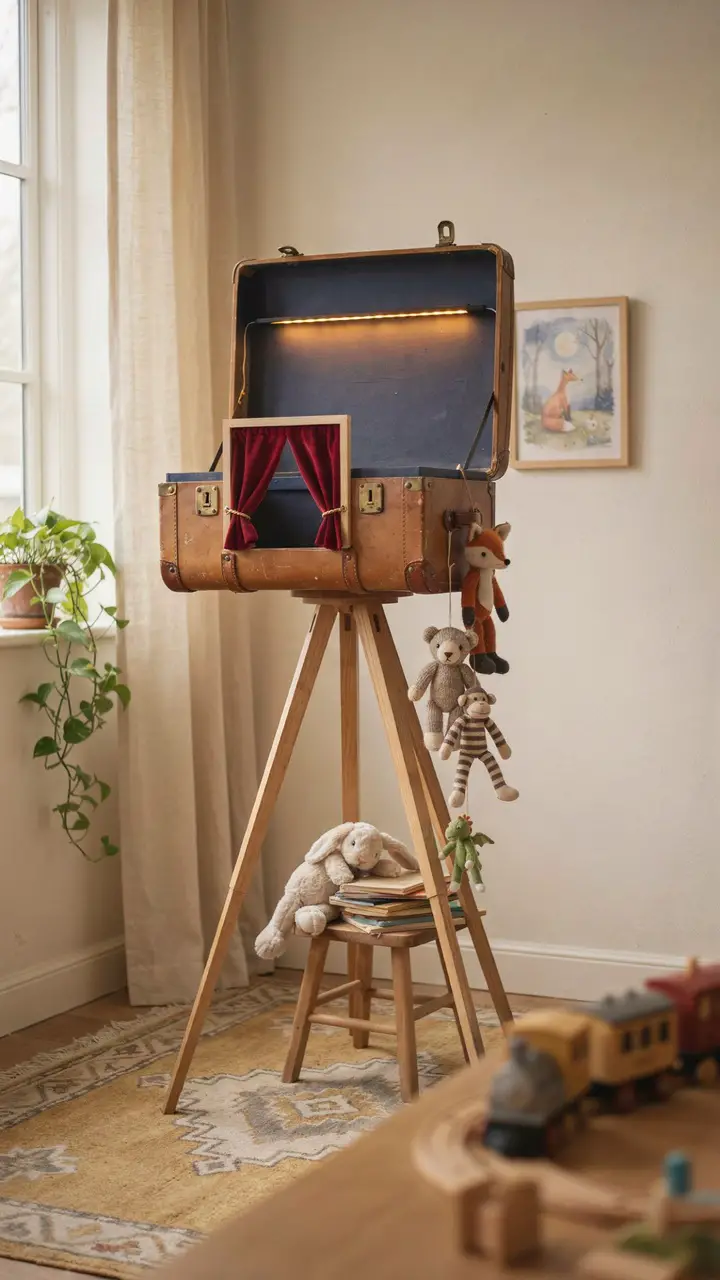
7. Vintage Toy Theater with Modern Twist
A converted vintage suitcase puppet theater or a retro-style toy theater made from reclaimed wood delivers a totally unique aesthetic that’s part mid-century playroom, part Victorian toy room, and part modern maker’s space. Source a large vintage suitcase at a thrift store, cut out a stage opening, add velvet curtains and a light strip inside the lid, and mount it on a custom stand at child height.
The vintage aesthetic makes this a genuinely singular piece — every visitor will ask about it. And because it’s self-contained, it folds shut when not in use and becomes a piece of vintage decor in the process.
How to Recreate This Look
- Shopping list: Large vintage suitcase ($15–$60 at thrift stores), jigsaw or Dremel for cutting stage opening ($0 if borrowing, $30–$80 to buy), wood tripod stand or custom built from 2x2s ($20–$60), deep navy interior paint ($10–$20), warm LED strip light ($15–$30), miniature velvet curtain fabric ($10–$25), hand puppet collection ($15–$40), side hooks for puppet storage ($5–$10)
- Step-by-step: Find a vintage suitcase with good structural integrity. Mark and cut the stage opening using a jigsaw. Sand all cut edges smooth. Paint interior lid in deep navy. Install LED strip along the interior stage top edge. Sew or hot-glue miniature velvet curtains to the stage sides. Mount suitcase open on the tripod stand. Add puppet hooks to the stand legs.
- Style compatibility: Works in eclectic, vintage, boho, and “curated” modern styles; genuinely unique in any context
- Budget breakdown: Budget ($30–$80) — thrifted suitcase + DIY stand + basic interior; Mid-range ($80–$180) — quality suitcase + proper tripod stand + velvet curtains + lighting; Investment ($180–$400) — professionally converted and mounted vintage theater
- Space requirements: Stand footprint of approximately 2×2 feet; works in rooms 8×8 feet or larger
- Difficulty: Intermediate (jigsaw cutting, painting, curtain installation)
- Durability: Excellent when properly converted; vintage suitcases are built to last
- Seasonal adaptability: Add seasonal puppet characters; keep the theater year-round
- Common mistakes: Don’t use a suitcase with a compromised structure — check hinges carefully. Don’t skip the LED lighting inside; the stage needs illumination to work theatrically.
- Maintenance: Wipe leather exterior with leather conditioner annually; check LED connection monthly
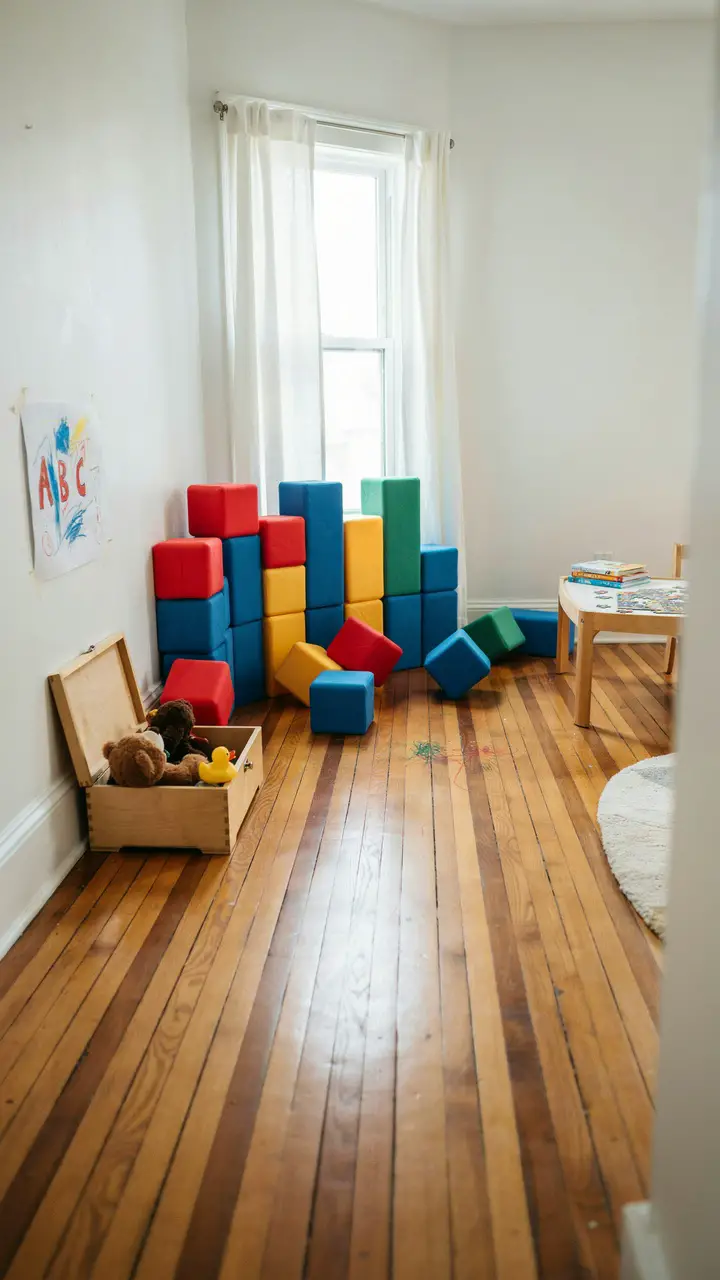
8. Giant Foam Building Block Room Divider
Floor-to-ceiling foam or cardboard giant building blocks serve as both a playroom divider and a completely interactive architectural element. Stack them to create a castle wall, a pyramid, a maze. Knock them down and rebuild something entirely different. The “room divider” function is secondary to the play value, which is what makes this idea genuinely unique.
Use lightweight foam giant blocks (available affordably online) or construct DIY versions from large cardboard boxes covered in contact paper. The child-made architecture changes constantly, making the room itself a living, evolving creative project.
How to Recreate This Look
- Shopping list: Giant foam building block set ($60–$200 for a set of 20–40 pieces), optional DIY alternative: large cardboard boxes + primary color contact paper ($20–$40 total), storage net or bag for blocks when not in use ($15–$30)
- Step-by-step: Unbox the block set and let the child immediately begin building. No instruction needed — the play is intuitive. Establish a simple cleanup rule: all blocks back in the storage bag/net when done, stored in one corner.
- Style compatibility: Works in colorful, modern, and eclectic styles; blocks are a statement in themselves and work against any wall color
- Budget breakdown: Budget ($20–$50) — DIY cardboard box blocks + contact paper; Mid-range ($60–$150) — quality foam block set; Investment ($150–$400) — premium large-scale foam building system with storage unit
- Space requirements: Block play works best in rooms 10×10 feet or larger; building projects can take up substantial floor space
- Difficulty: Beginner — zero installation required
- Durability: Quality foam blocks last 3–5 years; edges may compress over time with heavy use
- Seasonal adaptability: Challenge the child seasonally: “Can you build a snowflake? A spooky castle? A rocket ship?”
- Common mistakes: Don’t store blocks in a deep bin — kids can’t see what’s inside and stop using them. A net bag where all blocks are visible is far more effective. Don’t buy cheap foam that compresses after first use.
- Maintenance: Wipe blocks with a damp cloth monthly; replace any blocks that lose their shape
Discover even more incredible and unique playroom setups with these fantastic kids playroom ideas!
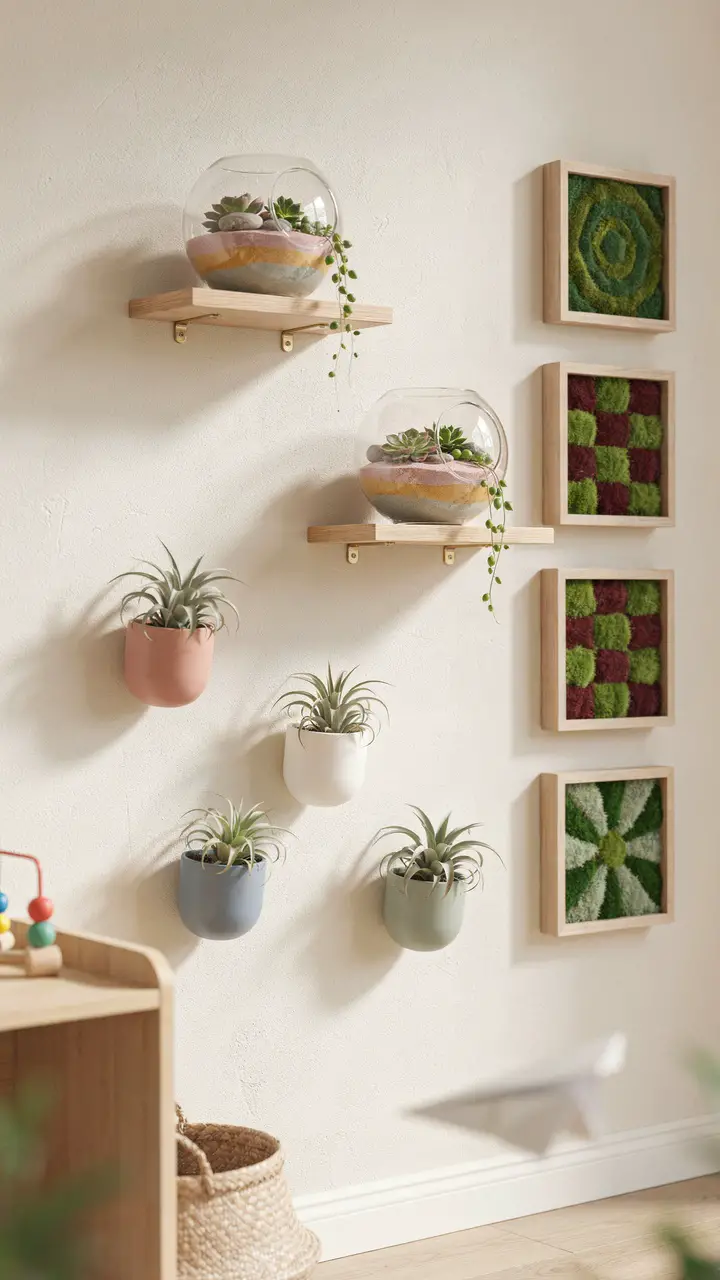
9. Terrarium Wall with Living Plants
A living wall installation in a playroom sounds ambitious, but a scaled version — a collection of framed terrariums, wall-mounted plant pockets, and hanging moss frames — creates a genuinely unique, alive, textural feature wall that changes subtly as the plants grow.
Choose low-maintenance plants: air plants require no soil and minimal water, succulents are almost indestructible, and moss frames need only occasional misting. Arrange them in a gallery-style grouping at child eye level with a mix of glass terrariums, wooden frames with moss backings, and ceramic wall planters. The result is a living art installation that teaches children about plant care while making the wall genuinely extraordinary.
How to Recreate This Look
- Shopping list: Glass globe terrariums ($15–$35 each), floating wooden shelves for terrariums ($20–$40 each), preserved moss frame art ($30–$80 each), ceramic wall pocket planters ($10–$25 each), air plants ($5–$15 each), small succulent plants ($3–$10 each), colored sand for terrarium layering ($5–$12)
- Step-by-step: Plan the gallery layout on the floor first. Install floating shelves for heavy glass terrariums. Mount ceramic wall pockets directly into wall studs. Mount moss frames with appropriate picture hooks. Plant terrariums with layered sand and succulents. Place air plants in ceramic pockets. Add moss frames as art pieces between living elements.
- Style compatibility: Works in Montessori, nature-inspired, boho, and eclectic styles; especially beautiful alongside warm wood tones
- Budget breakdown: Budget ($50–$100) — small terrariums + wall pockets + basic plants; Mid-range ($100–$300) — quality glass terrariums + moss frames + full plant selection; Investment ($300–$800) — custom living wall installation with integrated irrigation
- Space requirements: Works on any wall 4 feet wide or more; shelf weight must be supported by wall studs
- Difficulty: Intermediate
- Durability: Preserved moss requires no maintenance; succulents and air plants are low-maintenance; replace any plants that don’t thrive
- Seasonal adaptability: Rotate air plant varieties seasonally; add seasonal small decorations to terrarium scenes
- Common mistakes: Don’t mount heavy glass terrariums on drywall anchors alone — use studs. Don’t overwater succulents or air plants; less is genuinely more.
- Maintenance: Mist air plants twice weekly; water succulents once every 2 weeks; dust moss frames with a dry brush monthly
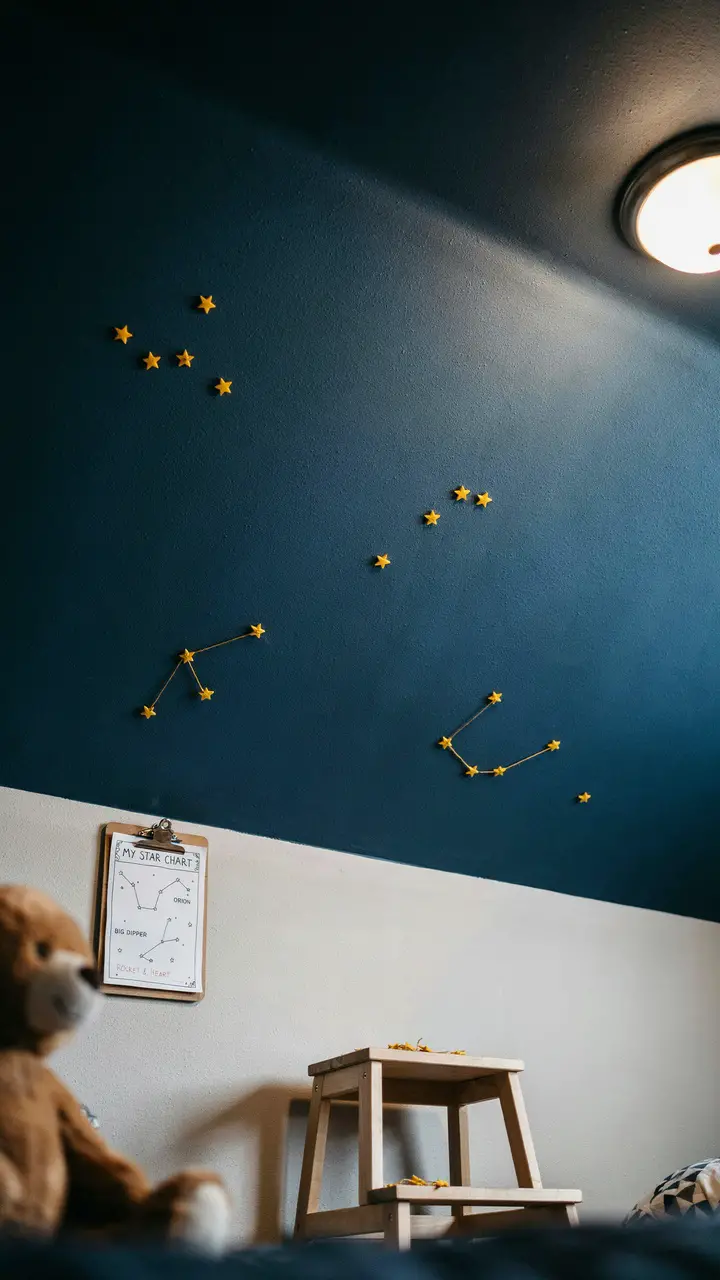
10. Magnetic Constellation Ceiling Map
Instead of (or alongside) glow stars, create an interactive constellation ceiling using a large magnetic ceiling panel and magnetic star markers that children can rearrange. The “constellation map” can be reconfigured to show real constellations, imaginary ones they invent, or patterns that trace out their name or initials.
A properly installed magnetic ceiling tile (they exist for this purpose) or a large sheet of magnetic primer on a section of ceiling creates the base. The stars themselves can be small neodymium magnets inside decorative star-shaped foam covers, each strong enough to stay on the ceiling but light enough for children to reach up and rearrange.
How to Recreate This Look
- Shopping list: Magnetic primer paint ($30–$60 per can — apply 3+ coats for magnetism strength), deep navy topcoat paint ($25–$55), star-shaped foam pieces with neodymium magnets glued to backs ($20–$50 for a set, or DIY with foam sheets + magnets), constellation reference chart printout ($free), small clipboard ($5–$10), step stool ($25–$60)
- Step-by-step: Apply 3–4 coats of magnetic primer to ceiling section, allowing full dry time between each coat. Apply navy topcoat. Let cure for 72 hours before adding magnets. Create star pieces by cutting star shapes from foam and gluing a small neodymium magnet to the back of each. Test adhesion before giving to children.
- Style compatibility: Works in modern, sci-fi, adventure, and eclectic styles; best in rooms with deeper wall tones nearby
- Budget breakdown: Budget ($50–$100) — magnetic primer + paint + DIY foam stars; Mid-range ($100–$200) — quality primer + navy paint + purchased star magnet set; Investment ($200–$500) — custom magnetic tile installation with premium star set
- Space requirements: Magnetic section works at any ceiling size; minimum 3×4 feet for usable constellation space
- Difficulty: Intermediate (multiple primer coats require patience; ceiling work is physically demanding)
- Durability: Magnetic primer and topcoat last indefinitely; star magnets may need replacing as foam wears
- Seasonal adaptability: Add seasonal constellation shapes (holiday themes) to the rotation
- Common mistakes: Don’t apply too few coats of magnetic primer — fewer than 3 won’t hold the magnets. Don’t use magnets strong enough to be a choking hazard or to pinch little fingers; test all magnets for child safety before use.
- Maintenance: Dust ceiling section monthly with a dry mop; replace worn foam stars as needed
Looking for even more unique and imaginative ideas to make your playroom truly one-of-a-kind? These fantastic playroom design ideas will keep the inspiration flowing!
The Playroom That Makes People Stop and Stare
The best thing about genuinely unique playroom ideas is that they’re often the ones children bond with most deeply — not because they’re expensive or elaborate, but because they feel personal, specific, and surprising. The hobbit hole under the stairs. The upside-down ceiling room. The vintage suitcase theater. These aren’t just decor choices; they’re a creative point of view made three-dimensional.
Choose the idea that makes you laugh or makes your child’s eyes go wide when you describe it — that reaction is the north star for every design decision in a room meant for play and imagination. Start there, build from there, and see what kind of magical world you make together.

Greetings, I’m Alex – an expert in the art of naming teams, groups or brands, and businesses. With years of experience as a consultant for some of the most recognized companies out there, I want to pass on my knowledge and share tips that will help you craft an unforgettable name for your project through TeamGroupNames.Com!