
Kids are natural climbers. They scale furniture, shimmy up door frames, and treat any vertical surface as a personal challenge.
So why not channel all of that energy into a climbing wall that’s not only safe and intentional but genuinely magical?
An indoor climbing wall gives children a physical outlet, builds strength and coordination, and—when wrapped in a whimsical theme—transforms a playroom into something that looks like it was pulled straight from the pages of an adventure novel.
The best whimsical climbing walls don’t feel like exercise equipment. They feel like the side of an enchanted mountain, the face of a dragon’s lair, or the rocky cliff above a mermaid cove.
The holds become embedded gems, twisted roots, or stone handholds carved by ancient giants.
Every inch of vertical height becomes part of a story—and suddenly what might have seemed like a simple fitness installation becomes the most talked-about feature at every playdate.
Whether you’re working with a spare wall in a basement playroom or converting an entire feature wall in a dedicated room, these ten ideas will show you exactly how to make a climbing wall feel enchanted rather than athletic.
There are options here for every budget, every skill level, and every square foot of available wall space.
1. Dragon’s Crag Climbing Wall
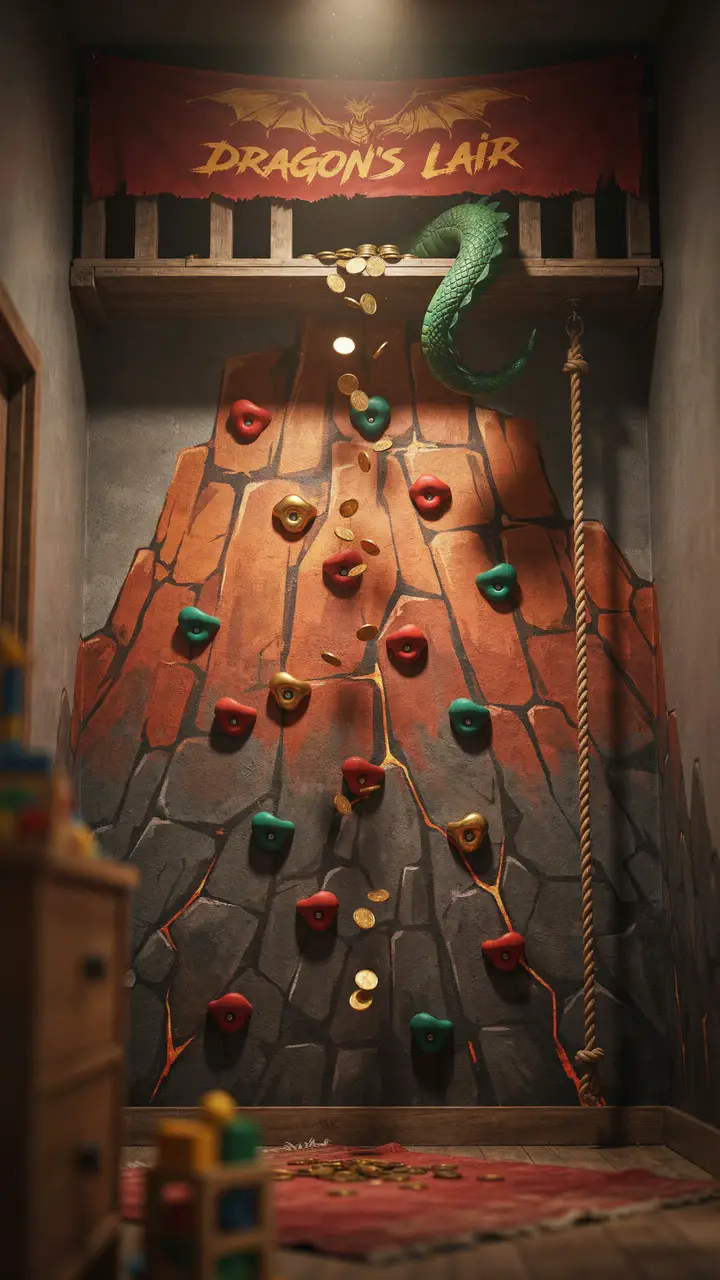
Transform the full height of a playroom wall into a dragon’s cliff face—a volcanic rocky surface painted in deep charcoal, rust orange, and lava red. Embed the climbing holds directly into the wall, but style them as embedded gemstones glinting from the rock face: ruby red, emerald green, and gold. At the summit, build a small loft platform where children can “claim the dragon’s lair,” perhaps with a fabric dragon tail curling over the edge and a hoard of plastic gold coins scattered across the platform floor. Hang a dragon banner above the summit and add a rope descent on the side for a different way down.
How to Recreate This Look
- Shopping list: Climbing holds set in mixed sizes ($40–$150 for a set of 20–50 holds), 3/4-inch plywood panel for wall mounting ($30–$80), charcoal, rust orange, and red paint ($25–$50), metallic gold paint for accents ($10–$20), loft platform materials ($80–$250), green fabric for dragon tail ($10–$20), plastic gold coins ($10–$15), dragon banner ($15–$30), knotted rope ($15–$25)
- Step-by-step: Mount 3/4-inch plywood panels to wall studs across the climbing section. Paint in layered volcanic rock colors—charcoal base, rust dry-brushed over, red accent spots. Drill T-nut holes in a climbing route pattern; install T-nuts from behind. Mount climbing holds in the styled colors (paint uncolored holds with metallic/jewel-tone paint). Build loft platform at the summit. Add dragon tail, gold coins, and banner. Install knotted rope for descent.
- Style compatibility: Dragon, fantasy, medieval, and adventure themes. Works with dark, dramatic color palettes—charcoal, rust, gold.
- Budget breakdown: Under $100 (wall panel + basic hold set + painted finish + rope only) / $100–$500 (full hold set + proper loft + painted mural + accessories) / $500+ (custom sculpted rock texture + premium hold set + fitted loft + professional dragon artwork)
- Space requirements: Full-wall climbing panel works best on a minimum 8-foot-wide, 8-foot-tall wall. Allow 5 feet of clear floor space in front.
- Difficulty: Intermediate. T-nut installation requires drilling precision; loft build requires standard carpentry skills.
- Durability: Climbing walls are built for vigorous, repeated use. T-nuts can loosen over time—check and tighten every 3 months.
- Seasonal adaptability: The dragon theme is timeless and works beautifully year-round. Add metallic gold fairy lights in winter for a fire-glow effect.
- Common mistakes: Mounting the plywood to drywall anchors rather than studs. ALWAYS locate and mount to wall studs—climbing walls bear significant dynamic loads.
- Maintenance: Inspect all holds and bolts monthly. Sand any rough spots that develop on holds. Re-touch paint as needed.
2. Enchanted Beanstalk Climbing Feature
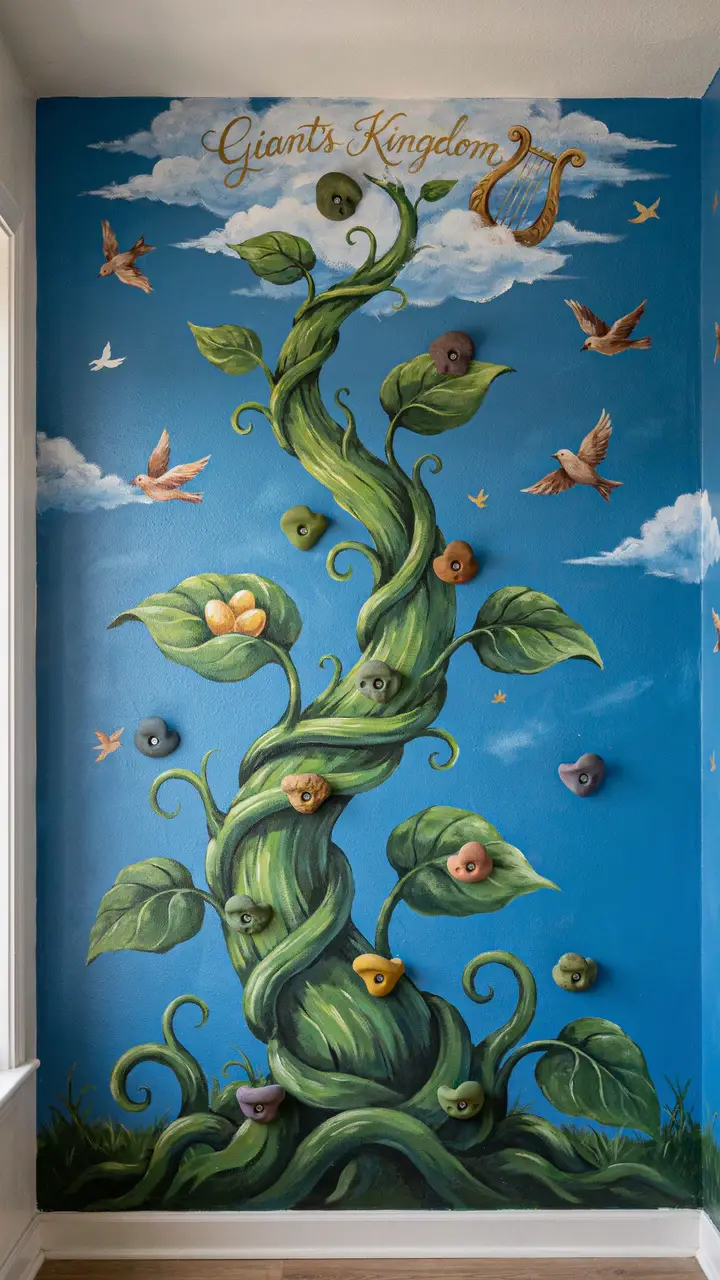
Paint a giant beanstalk winding up the wall in vibrant green—thick, swooping vine strokes with enormous leaves and curling tendrils—and position the climbing holds along the beanstalk stem so children essentially climb the beanstalk itself. At the top, a painted cloud emerges at ceiling level, and a small platform labeled “Giant’s Kingdom” provides the summit reward. Mix climbing holds in natural wood tones and mossy green so they blend into the botanical illustration. Add a few painted golden eggs nestled in the oversized leaves, and a golden harp illustration near the cloud.
How to Recreate This Look
- Shopping list: Vivid green and dark green paint for beanstalk mural ($20–$40), sky blue paint for background ($20–$35), climbing holds in natural wood or painted green ($40–$120), plywood backer panel ($30–$80), gold paint for eggs, harp, and sign ($10–$20), small platform at summit ($80–$200), “Giant’s Kingdom” sign ($10–$20 DIY or purchased)
- Step-by-step: Paint wall background in sky blue. Sketch the beanstalk design lightly in pencil. Fill in with thick green paint strokes for the stem and large leaf shapes. Add tendril curls and golden egg details. Mount plywood backer panel behind the beanstalk section. Install T-nuts and attach green or wood-tone climbing holds along the stem in an ascending route. Build the summit platform at ceiling height with safety rail. Paint cloud at ceiling level.
- Style compatibility: Fairy tale, Jack and the Beanstalk, garden, and nature themes. Works with vivid green, sky blue, and gold palettes.
- Budget breakdown: Under $100 (wall mural only + basic holds + no platform) / $100–$500 (full mural + proper hold set + simple summit platform) / $500+ (professional mural artist + premium holds + custom summit with fitted platform)
- Space requirements: Beanstalk mural works best on a wall at least 6 feet wide and full ceiling height (8 feet minimum). Allow 4 feet of clear floor in front.
- Difficulty: Intermediate. Freehand mural painting may feel intimidating, but the organic nature of a beanstalk is extremely forgiving—imperfect curves look natural.
- Durability: Wall mural is permanent and durable. Seal with a matte clear coat for extra protection in high-traffic areas.
- Seasonal adaptability: Add painted springtime flowers to the beanstalk in spring. Scatter painted autumn leaves among the existing green leaves in fall.
- Common mistakes: Painting the mural AFTER mounting the holds makes touching up around the hardware very difficult. Always paint first, mount holds second.
- Maintenance: Spot-touch the mural as needed. Check hold bolts monthly and retighten any that have worked loose.
3. Mermaid Reef Climbing Cove
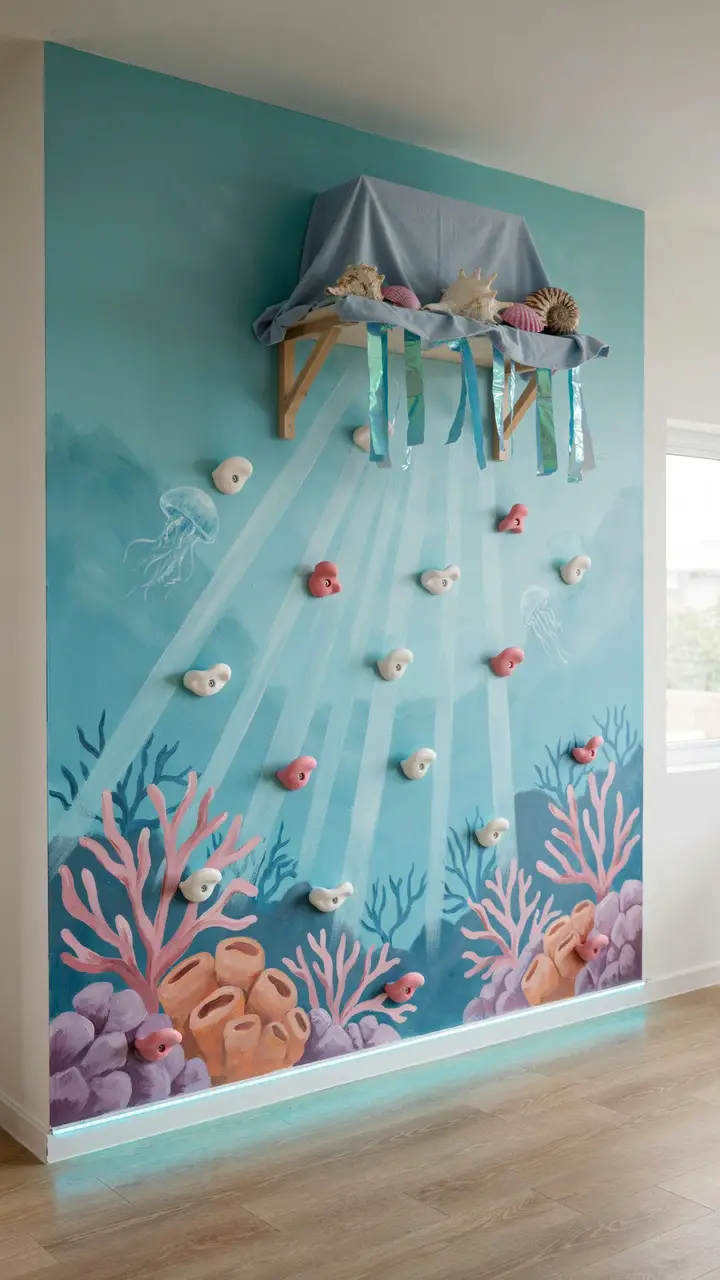
Paint the climbing wall in shades of deep teal, turquoise, and aquamarine with an underwater reef mural—coral formations, sea fans, darting fish, and shafts of light filtering down from above. Mount the climbing holds in coral-pink and pearl white to mimic pieces of the reef that climbers traverse. At the summit, a small platform decorated as a “sea cave” with a blue canopy and seashell accessories serves as the reward. Hang iridescent blue-green fabric strips at the top to flutter like the surface of the ocean above. This concept works especially well for rooms that already have a beach or ocean theme.
How to Recreate This Look
- Shopping list: Teal, turquoise, aquamarine, coral pink, and pearl white paint ($30–$60), climbing holds in pink and white ($40–$120), plywood backer panel ($30–$80), sea cave platform canopy fabric ($15–$30), seashell decorations ($10–$25), iridescent fabric strips ($10–$20), aqua LED strip light ($20–$40), summit platform ($80–$200)
- Step-by-step: Paint background in layered aquatic tones. Add coral formations in the lower wall. Paint light shaft effects in pale aqua using a wide dry brush. Mount plywood panel over the climbing section. Install T-nuts and coral/pearl-tone holds in ascending route. Install LED strip at base. Build summit platform with canopy. Hang iridescent fabric strips from platform edge. Add seashell accessories.
- Style compatibility: Ocean, mermaid, beach, and underwater adventure themes. Works with teal, aqua, coral, and pearl white palettes.
- Budget breakdown: Under $100 (wall mural only + basic holds + no platform) / $100–$500 (full painted reef + proper hold set + summit platform + LED lighting) / $500+ (professional reef mural + premium holds + custom sea cave summit)
- Space requirements: Reef mural works on any full-height wall—minimum 6 feet wide. Allow 4 feet of clear floor in front.
- Difficulty: Intermediate. Layered ocean painting is forgiving and creative. The coral formations can be as impressionistic as you like.
- Durability: Excellent once sealed. LED strips last 25,000+ hours. Check hold bolts monthly.
- Seasonal adaptability: Add painted starfish in summer for a beachier feel. In winter, transition the aqua tones to deeper navy for an “Arctic ocean” mood.
- Common mistakes: Rushing the layered paint technique—each aquatic layer needs to be slightly dry before adding the next for the depth effect to work properly.
- Maintenance: Dust holds and platform monthly. Replace LED strip sections if any portion stops working.
4. Mountain Explorer Climbing Peak
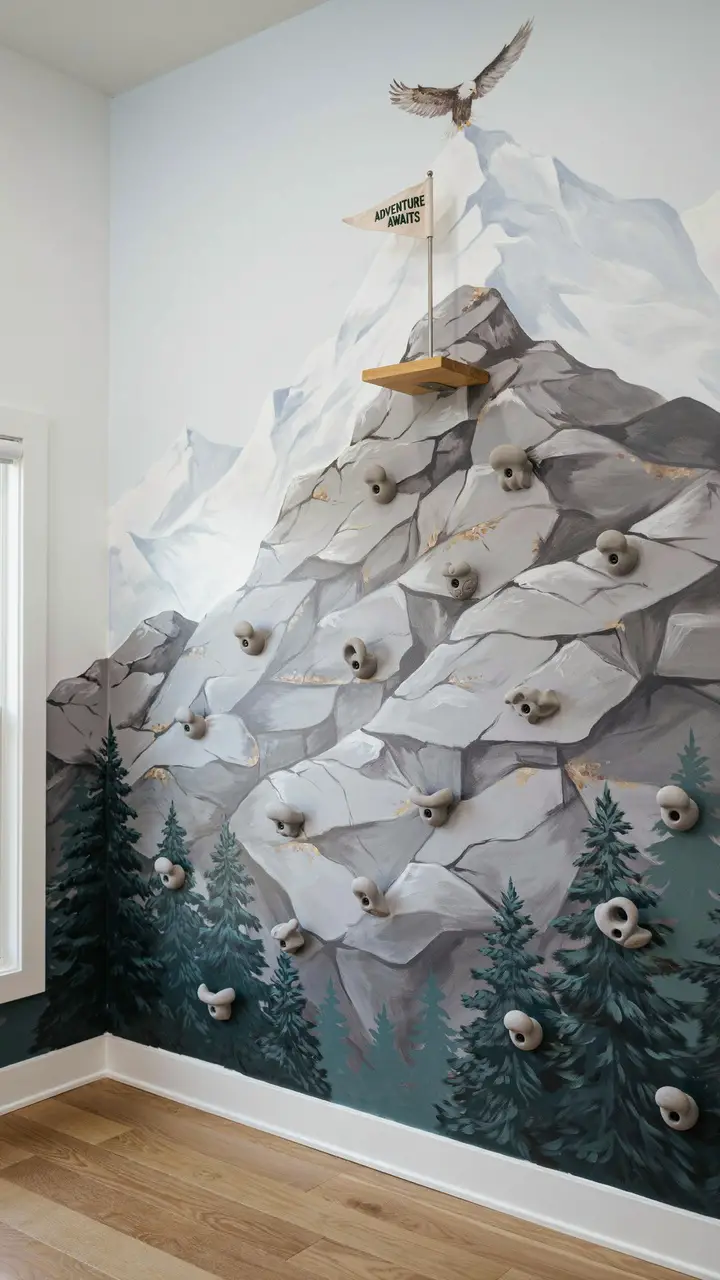
Cover the climbing wall with a mountain-scene mural: a jagged snow-capped summit above, rocky gray slopes in the middle, and a pine forest at the base. Mount climbing holds in natural stone gray tones across the rocky face section. At the peak, a small flag platform allows children to plant their flag (literally—attach a small flagpole holder and provide them with a customizable pennant) at the summit. Add a painted eagle in flight near the top and texture the wall surface with a stone-effect paint technique before mounting the holds.
How to Recreate This Look
- Shopping list: Gray, white, pale blue, and dark green paint ($25–$50), sponge or crumpled foil for stone-texture effect ($5–$10), stone-gray climbing holds ($40–$120), plywood backer ($30–$80), summit platform ($80–$200), small flagpole holder ($10–$20), custom or blank pennant flag ($8–$20), eagle wall decal or painted eagle ($10–$25)
- Step-by-step: Paint the sky section above in pale blue. Paint the mountain silhouette in mid-gray. Use a sponge dipped in dark gray paint to dab stone texture across the climbing section. Add white highlights at the peak. Paint pine tree silhouettes along the wall base in deep green. Mount plywood and install T-nuts and stone-gray holds. Build or mount summit platform. Install flagpole holder and add the pennant. Apply eagle decal near the top.
- Style compatibility: Mountain, explorer, nature, and adventure themes. Works with gray, navy, forest green, and white palettes.
- Budget breakdown: Under $100 (wall mural + basic holds + DIY flag pole) / $100–$500 (full mural + proper hold set + summit platform + accessories) / $500+ (professional mural + premium holds + custom summit with compass decal floor)
- Space requirements: Full-height wall, minimum 6 feet wide. 4 feet of clear floor space in front.
- Difficulty: Intermediate. Stone-texture sponging is a beginner-accessible technique that produces impressive results.
- Durability: Stone-texture paint is very durable when sealed. Check hold bolts monthly.
- Seasonal adaptability: Add falling autumn leaf decals in fall. Build out the snow details at the peak more prominently in winter.
- Common mistakes: Applying too much stone texture paint in one session—it muddy the effect. Apply lightly in two passes for better depth.
- Maintenance: Wipe down holds with a damp cloth monthly. Repaint worn or scuffed sections of the mural as needed.
5. Fairy Forest Stepping Stone Wall
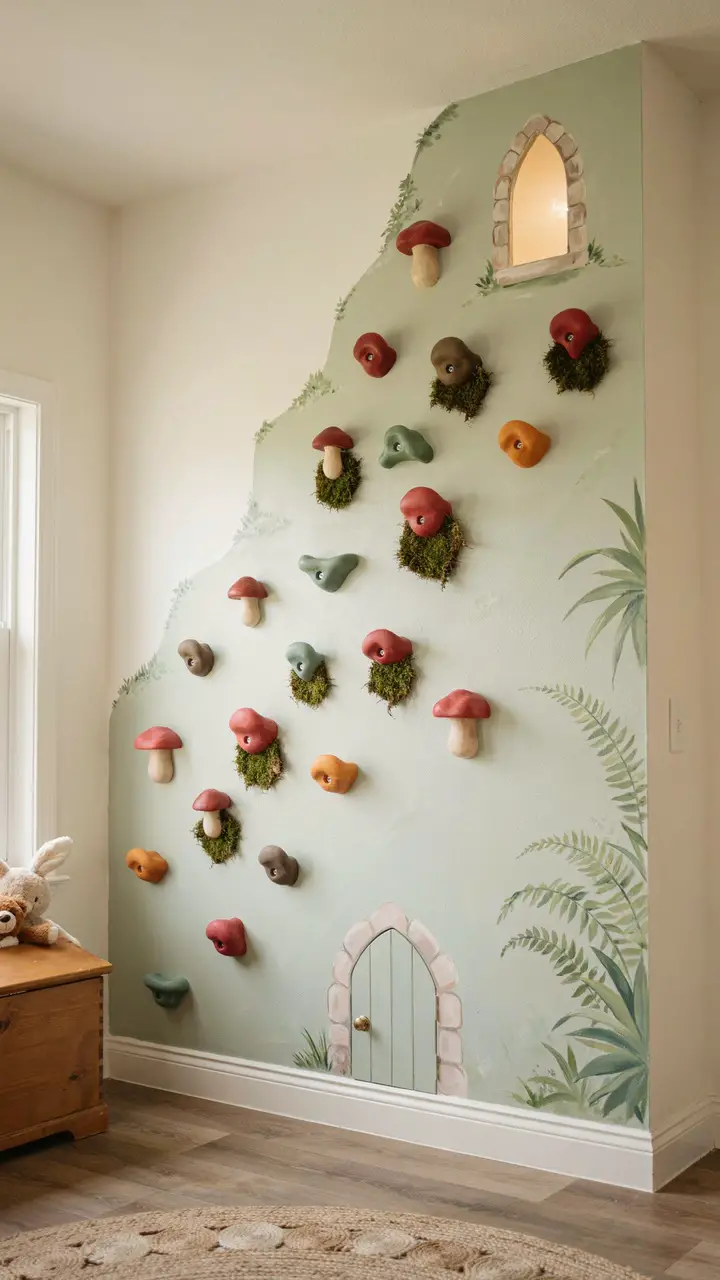
Create a gentle, beginner-friendly climbing wall styled as a fairy forest path—stepping stones across a mossy cliff face, with oversized mushroom holds, toadstool-shaped grips, and leaf-shaped rungs painted in forest greens, earthy browns, and soft mushroom tones. Mount a fairy door at the base of the wall and a fairy window at the top. This version of a climbing wall works especially well for younger children and toddlers because the holds can be positioned closer together and lower on the wall, making the challenge accessible and confidence-building rather than genuinely vertical.
How to Recreate This Look
- Shopping list: Sage green wall paint ($20–$35), mushroom and toadstool shaped holds or standard holds painted in earthy tones ($40–$100), plywood backer ($30–$80), faux moss sheet strips ($10–$25), fairy door prop ($15–$30), fairy window prop or painted version ($10–$20), fern decal ($10–$20), leaf-shaped wooden rungs ($20–$50)
- Step-by-step: Paint wall section in sage green. Apply faux moss patches at irregular intervals with hot glue or construction adhesive. Mount plywood backer. Install T-nuts and mushroom/toadstool holds in a gentle, achievable route (lower and closer together for younger children). Add leaf rungs as hand or foot holds. Attach fairy door at base level. Add fairy window prop near the top. Apply fern decal to one side.
- Style compatibility: Fairy tale, enchanted forest, toddler adventure, and nature themes. Works with soft earthy palettes—sage, mushroom brown, rust, green.
- Budget breakdown: Under $100 (painted holds + faux moss + fairy door + no platform) / $100–$500 (specialty mushroom holds + faux moss + fairy accessories + proper plywood mount) / $500+ (custom sculpted mushroom holds + professional forest mural + fitted toe platform at top)
- Space requirements: This works on a partial wall section as small as 4 feet wide and 5 feet tall—ideal for smaller rooms or for younger children not ready for a full-height wall.
- Difficulty: Beginner. The low height and forgiving organic design make this the most accessible climbing wall on this list.
- Durability: Faux moss may come loose over time with vigorous touching—re-glue as needed. Holds are as durable as standard climbing equipment.
- Seasonal adaptability: Add painted autumn leaves around the moss in fall. Scatter tiny fabric snowflakes between holds in winter for a frost-fairy version.
- Common mistakes: Setting holds too far apart for the intended age group. Always consider your child’s current reach and strength, and start with a closer hold spacing.
- Maintenance: Re-glue any faux moss that loosens. Check holds monthly; replace any cracked mushroom-style holds immediately.
6. Outer Space Asteroid Climbing Wall
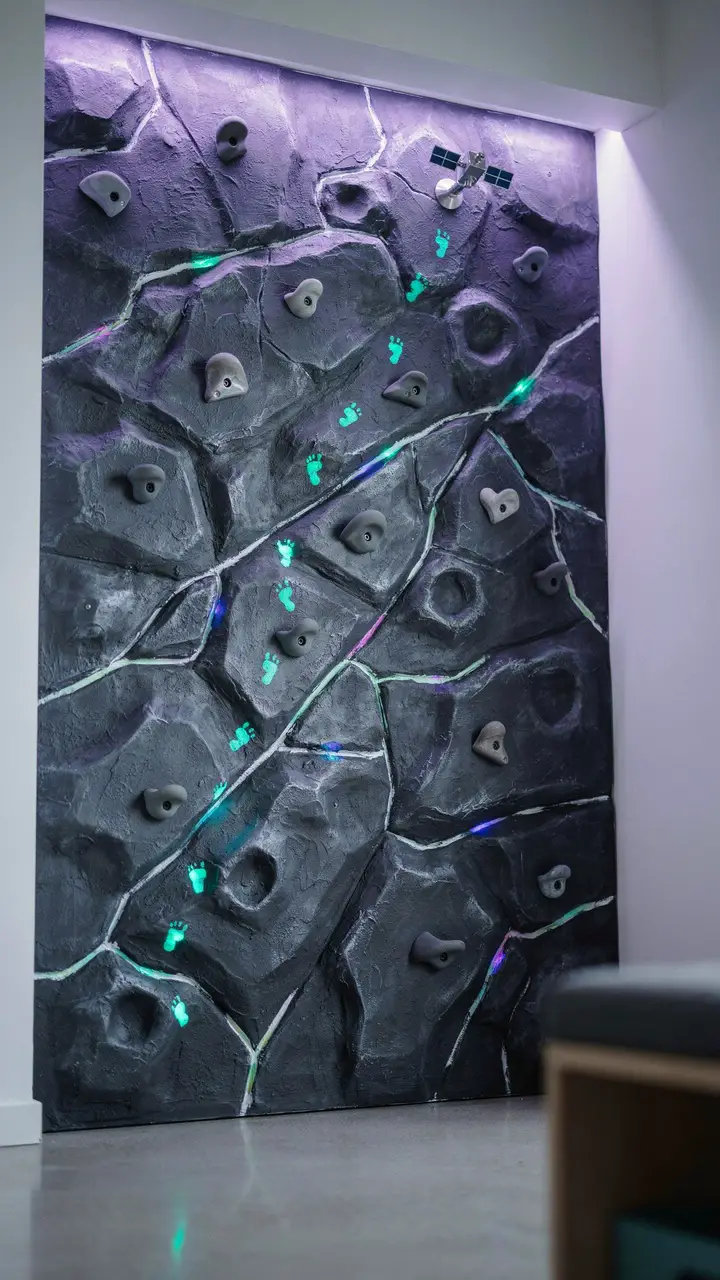
Texture the climbing wall panel with a crumpled-foil technique to create a craggy asteroid surface, then paint in dark charcoal and silver with glowing spots of paint representing mineral veins. Mount climbing holds in metallic silver and gunmetal gray to blend into the asteroid surface. Add UV-reactive paint details that glow under a blacklight—hidden craters, glowing mineral deposits, and an alien footprint trail leading up the wall. Install a small blacklight strip near the wall so children can discover the hidden world of the asteroid as they climb.
How to Recreate This Look
- Shopping list: 3/4-inch plywood panel ($30–$80), joint compound for texture ($15–$25), charcoal and silver paint ($20–$40), metallic silver climbing holds ($40–$120), UV-reactive paint in teal and purple ($15–$30), UV LED strip or blacklight bar ($20–$50), alien footprint decals ($8–$15), small satellite model prop ($10–$25)
- Step-by-step: Apply joint compound to plywood in rough, asteroid-like texture. Let dry fully (48 hours). Paint charcoal base coat. Dry-brush silver over the top for metallic surface effect. Install T-nuts behind panel. Apply UV-reactive paint to hidden spots—craters, mineral veins, alien footprints. Mount panel to wall. Attach metallic climbing holds. Install UV LED strip along wall edge. Mount satellite prop at summit.
- Style compatibility: Space, astronomy, science fiction, and adventure themes. Works with charcoal, silver, and electric accent color palettes.
- Budget breakdown: Under $100 (textured panel + painted finish + basic holds + blacklight strip) / $100–$500 (proper textured and painted panel + metallic holds + quality UV lighting) / $500+ (professional asteroid texture + premium metallic holds + integrated lighting system + sound effects)
- Space requirements: Works on any portion of a wall from 4 feet wide and upward. Allow 4 feet of clear floor in front.
- Difficulty: Intermediate. Joint compound texturing is a learnable skill; the painting technique is straightforward.
- Durability: Joint compound surface needs to be sealed with a clear acrylic varnish for durability. UV paint lasts years under normal use.
- Seasonal adaptability: The space theme is timeless. Swap the UV light color from teal to warm amber for a “lava asteroid” variation.
- Common mistakes: Not sealing the joint compound texture before painting—unsealed compound absorbs paint unevenly and the texture effect gets muddied.
- Maintenance: Wipe down holds with a dry cloth monthly. Replace UV LED elements if any section stops glowing.
7. Rainbow Mountain Peg Board Wall
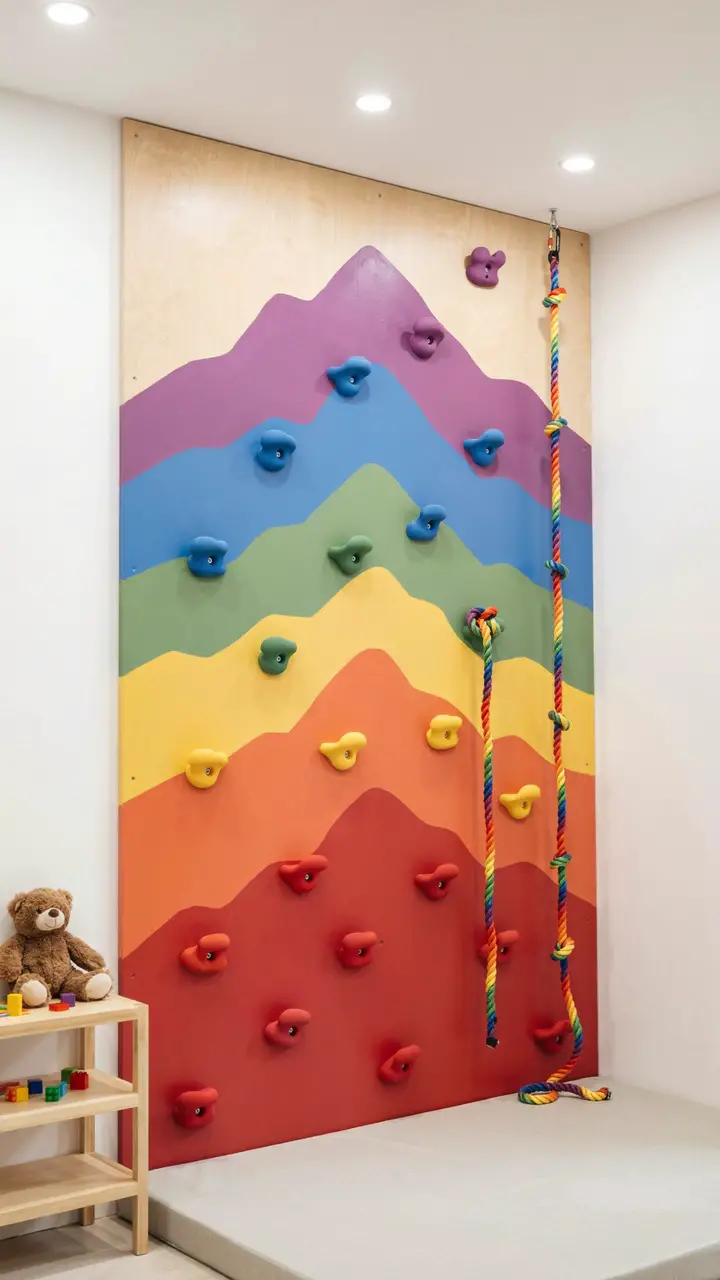
Install a wooden pegboard system (similar to a traditional climbing peg board) along the wall and paint the backing in a dramatic multi-colored mountain silhouette—each mountain ridge a different color of the rainbow. Mount colorful holds in a route that follows the mountain peaks: warm red holds at the base, shifting through orange, yellow, and green as climbers ascend, finishing at purple and violet holds at the summit. This creates a literal “climb the rainbow” experience where the route itself is a visual journey through color.
How to Recreate This Look
- Shopping list: 3/4-inch plywood panel ($30–$80), rainbow paint colors—red, orange, yellow, green, blue, indigo, violet ($30–$60 total for paint pots), matching-color climbing hold sets ($60–$150), rainbow rope ($15–$30), mountain silhouette template or freehand painting, clear sealant for paint protection ($10–$20)
- Step-by-step: Cut the plywood panel and sand edges. Sketch or tape mountain ridge silhouettes at staggered heights across the panel. Paint each mountain band in a rainbow color, working base to summit. Seal with clear acrylic. Install T-nuts in a rising route pattern. Mount matching-color holds in the corresponding color bands. Mount panel to wall. Hang rainbow rope beside the wall.
- Style compatibility: Rainbow, colorful, gender-neutral, and playful maximalist themes. Works beautifully with white walls elsewhere in the room.
- Budget breakdown: Under $100 (rainbow paint + basic holds + rope) / $100–$500 (premium colored hold set + proper panel + quality sealant) / $500+ (custom-painted panel by an artist + premium hold set + integrated floor mat)
- Space requirements: Works on any wall section—even a 4×8 foot panel creates a full route. Allow 4 feet of clear floor in front.
- Difficulty: Intermediate. Color-matching holds to paint sections requires planning, but the execution is straightforward.
- Durability: Sealed paint lasts years. Hold colors may fade slightly—UV-resistant paint extends longevity.
- Seasonal adaptability: The rainbow is universally cheerful year-round. Add metallic gold holds at the summit for a “gold at the end of the rainbow” detail in any season.
- Common mistakes: Not letting each paint color fully dry before taping for the next—wet paint smears create muddy band edges.
- Maintenance: Wipe painted panel with a damp cloth for scuffs. Retighten hold bolts monthly.
8. Ancient Ruins Explorer Climbing Wall
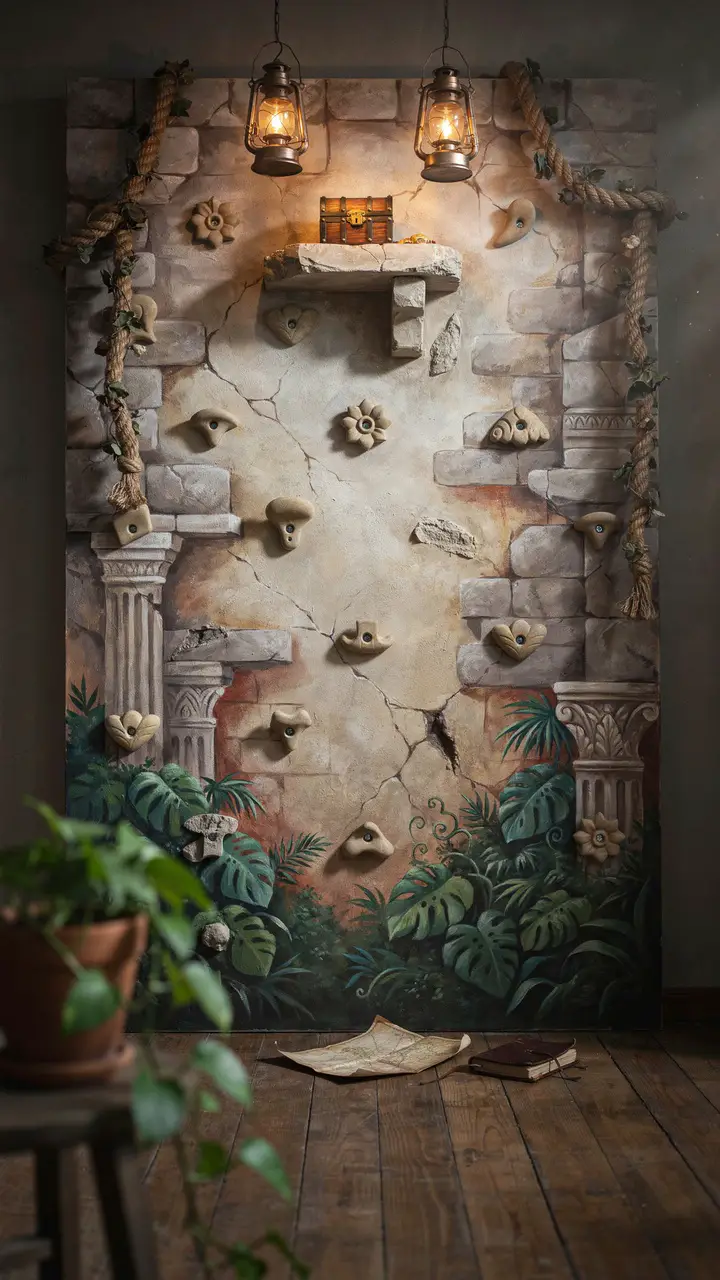
Age and distress the climbing wall panel to look like a crumbling ancient temple wall—using layers of tan, cream, brown, and stone gray paint with sponge-texturing and faux crack details. Embed the climbing holds to look like protruding stone blocks or carved temple relief holds. At the wall base, a painted jungle floor complete with lush green vegetation creeping up suggests the temple is half-reclaimed by nature. At the summit, a treasure chest prop marks the explorer’s reward.
How to Recreate This Look
- Shopping list: Tan, cream, brown, gray, and green paint ($30–$60), sponge for texture ($5–$10), tan and gray climbing holds ($40–$120), plywood backer ($30–$80), faux vine garlands ($20–$40), treasure chest prop ($20–$50), amber lantern-style wall sconce ($25–$60)
- Step-by-step: Paint the base panel in warm tan. Use a sponge to layer cream, gray, and rust tones for stone depth. Freehand painted crack lines across the surface with a fine brush and dark brown. Paint jungle vegetation in deep greens along the lower wall section. Seal. Mount panel to wall. Install T-nuts and tan/gray holds. Drape vine garlands from the top. Position treasure chest on a small summit ledge. Install amber wall sconce nearby.
- Style compatibility: Explorer, Indiana Jones, jungle, and archaeology adventure themes. Works with warm earthy, green, and amber palettes.
- Budget breakdown: Under $100 (painted panel + basic holds + treasure chest prop + vine garland) / $100–$500 (full painted mural + proper hold set + amber sconce lighting) / $500+ (professional aged mural + premium holds + custom treasure chest + atmospheric lighting)
- Space requirements: Full-height wall preferred (8 feet), minimum 6 feet wide. Allow 4 feet of clear floor in front.
- Difficulty: Intermediate. The aged stone painting technique takes practice but is very forgiving—imperfect cracks look more authentic.
- Durability: Excellent when sealed. Vine garlands may need re-positioning over time as they slide with use.
- Seasonal adaptability: Add painted autumn vines in fall. In winter, create a “frost-covered ruins” version with white dry-brushing over the stone sections.
- Common mistakes: Making the cracks too regular and perfectly spaced—real stonework cracks randomly and organically. Vary the lengths, widths, and directions.
- Maintenance: Dust vine garlands monthly. Spot-repaint cracked or scuffed paint sections as needed.
9. Candy Mountain Climbing Wall
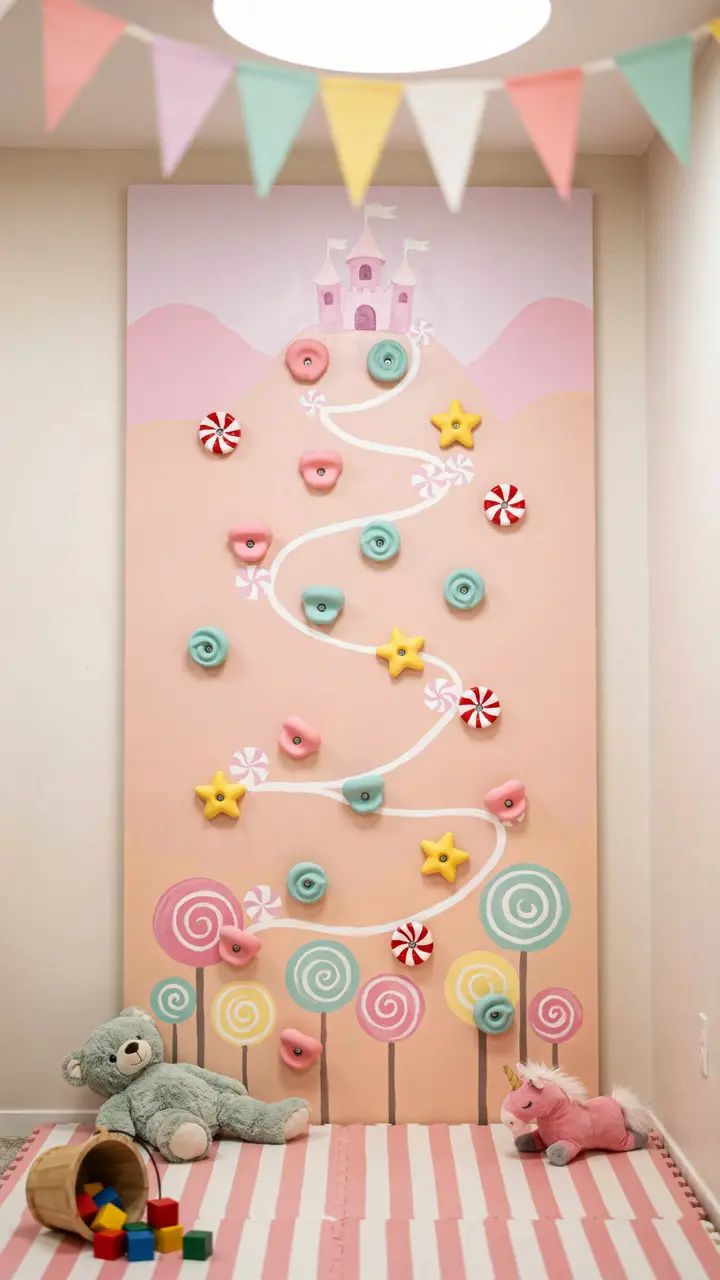
Go completely maximalist and joyful with a candy mountain climbing wall: a plywood panel painted in gradient sherbet tones—peach to pink to lilac—with candy-colored swirl motifs and lollipop trees painted at the base. Mount the climbing holds in candy colors: peppermint striped holds, bubblegum pink, lemon yellow, and mint green. At the summit, a giant painted candy castle marks the peak. Install a slide (if space permits) beside the climbing wall so children can climb up the candy mountain and slide down the other side, creating a full activity loop.
How to Recreate This Look
- Shopping list: Peach, pink, lilac, and mint paint for gradient ($25–$50), candy-color climbing holds in assorted bright colors ($50–$130), plywood backer ($30–$80), candy castle summit prop or painted detail ($20–$50), lollipop tree stencils or freehand painting, pink-and-white striped floor mat ($30–$80)
- Step-by-step: Paint the base panel in a gradient: peach at the bottom, blend to pink in the middle, finish in lilac at the top. Add candy swirl motifs with a fine brush or stencil. Paint lollipop trees in the lower section. Seal. Install T-nuts and mount candy-color holds in a winding route. Build or paint the candy castle summit detail. Lay striped floor mat at the base.
- Style compatibility: Candy, sweets, maximalist color, and fantasy dessert-land themes. Works with sherbet palettes—peach, pink, lilac, mint.
- Budget breakdown: Under $100 (gradient paint + basic colored holds + painted castle) / $100–$500 (full candy mural + proper hold set + striped mat + summit detail) / $500+ (professional candy mural + premium colored hold set + integrated slide + custom mat)
- Space requirements: Works on any wall section from 4 feet wide. Allow 4 feet of clear floor in front. If adding a slide, budget an additional 4 feet.
- Difficulty: Beginner to intermediate. The gradient painting technique is manageable with a wide brush and working quickly between colors.
- Durability: Sealed candy mural is highly durable. The cheerful colors resist looking dated because they’re deliberately playful.
- Seasonal adaptability: Add candy cane motifs in winter. Swap the floor mat for a pastel Easter-egg version in spring.
- Common mistakes: Painting gradient layers too slowly—the colors need to blend while still slightly wet for a seamless transition. Work in sections and keep a damp brush on the blend edges.
- Maintenance: Wipe holds with a damp cloth regularly (candy-color holds show handprints more than neutral tones). Spot-repaint candy castle details as needed.
10. Wizard’s Tower Climbing Spiral
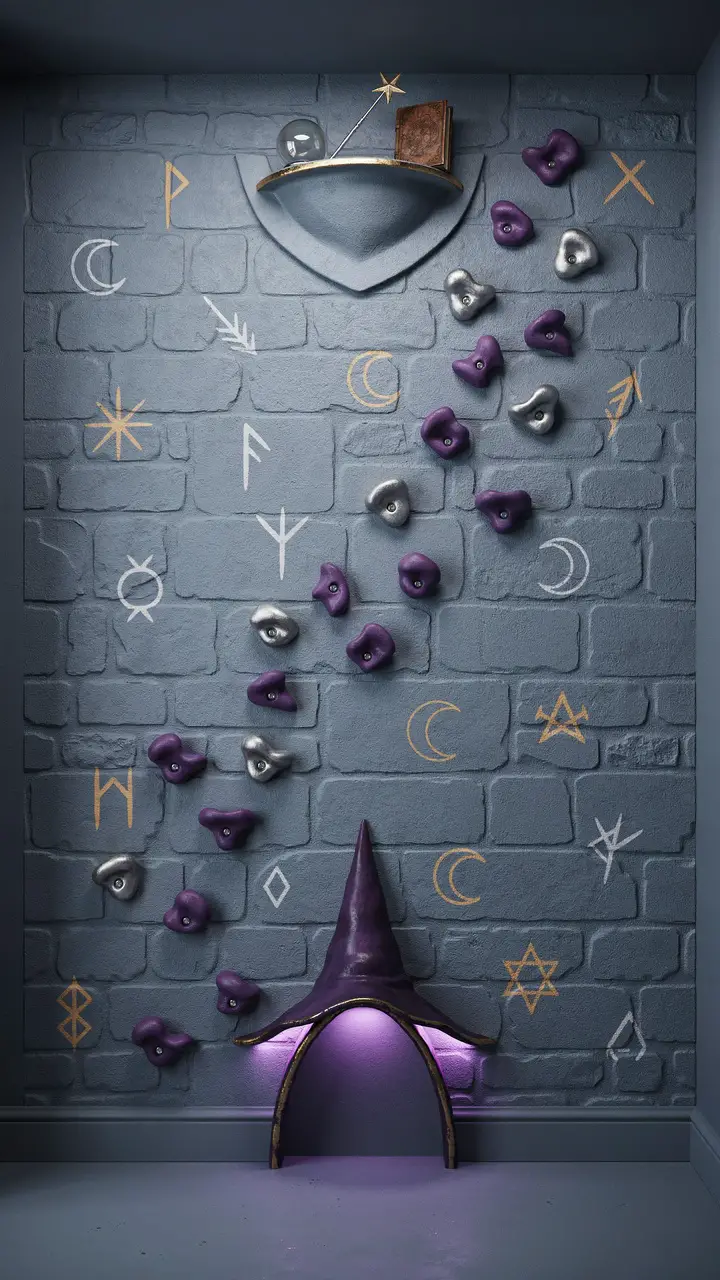
Wrap the climbing wall in a circular turret concept: paint the panel to look like the interior face of a spiral stone wizard’s tower, with carved rune symbols, crescent moon motifs, and star patterns embedded in the stone. Mount the climbing holds in the shape of a spiraling path upward—as if climbers are ascending the tower’s interior staircase. At the base, paint or mount a pointed wizard hat as the entrance arch. At the top, a crescent moon shelf holds a few small magical props: a crystal ball, a wand, a tiny spellbook.
How to Recreate This Look
- Shopping list: Dark slate gray paint ($20–$35), gold and silver paint for rune details ($10–$20), purple and silver climbing holds ($40–$120), plywood backer ($30–$80), wizard hat entrance arch (foam board or MDF, $10–$25), crescent moon shelf ($20–$40), crystal ball prop ($15–$30), wand prop ($8–$15), spellbook prop ($10–$20), purple LED strip ($20–$40)
- Step-by-step: Paint panel in deep slate gray. Sponge texture in a slightly lighter gray. Paint rune symbols, moons, and stars in gold and silver using a fine brush. Seal. Install T-nuts and purple/silver holds in a spiraling route. Cut wizard hat arch from foam board and paint; mount at base of climbing area. Mount crescent moon shelf at summit. Install purple LED strip at the base of the panel. Style summit shelf with magical props.
- Style compatibility: Wizard, fantasy, Harry Potter-inspired, and mystical magic themes. Works with deep purple, gold, silver, and slate palettes.
- Budget breakdown: Under $100 (painted panel + basic holds + DIY arch + props) / $100–$500 (full painted mural + purple holds + crescent shelf + LED strip + styled props) / $500+ (professional wizard tower mural + premium holds + custom crescent shelf + atmospheric lighting system)
- Space requirements: Works on any wall section from 4 feet wide and up to full height. Allow 4 feet of clear floor in front.
- Difficulty: Intermediate. Rune and symbol painting requires a steady hand but the imperfect, aged look means minor wobbles are entirely acceptable.
- Durability: Excellent when sealed. Purple paint tends to fade with strong UV light—use UV-resistant paint or keep the wall away from direct sunlight.
- Seasonal adaptability: The wizard tower is naturally a winter/cozy-season winner. Add stars and snowflake motifs in winter for a “frozen wizard tower” version.
- Common mistakes: Painting the rune symbols too large and evenly spaced—real wizard lore feels ancient and slightly mysterious. Vary symbol sizes and spacing for authenticity.
- Maintenance: Dust holds and shelf monthly. Spot-repaint gold and silver symbols as they wear—they’re the most eye-catching detail and worth keeping crisp.
Climbing Into Magic
A whimsical climbing wall does something no other playroom feature quite manages: it combines real physical challenge with pure imaginative adventure. Children who might not otherwise be drawn to athletic activity will happily attempt the dragon’s crag or the candy mountain because the story calls them forward. And children who love climbing will fall even harder for a space that makes the act of reaching for the next hold feel like part of an epic tale.
The key to a truly successful whimsical climbing wall is letting the theme do the heavy lifting. Once you decide your child is a dragon cave explorer or a fairy forest adventurer or a wizard’s tower student, every design decision becomes obvious. The colors, the hold shapes, the summit reward, the mural details—they all follow naturally from the world you’ve chosen to create.
Start with the wall. Start with one coat of paint and one set of holds. You can always add more magic as you go—and trust me, you will want to. Something about watching a child climb their way into an imaginary world has a way of making even the most paint-averse parent reach for a brush.

Greetings, I’m Alex – an expert in the art of naming teams, groups or brands, and businesses. With years of experience as a consultant for some of the most recognized companies out there, I want to pass on my knowledge and share tips that will help you craft an unforgettable name for your project through TeamGroupNames.Com!