
There’s something genuinely electric about walking into a room and feeling like you’ve stepped into another world — a place where the ceiling has fireflies, the walls are alive with birch trees, and the floor is covered in something that actually crunches like a forest path.
That’s what a nature-inspired playroom can do. And honestly?
Once you’ve seen a child walk into a space like that for the first time, you’ll understand exactly why it’s worth every ounce of effort.
You don’t need a massive budget, a dedicated room, or a contractor on speed dial.
What you need is a little imagination, some honest guidance about what actually works, and the confidence that you can absolutely do this — even if your current playroom is a corner of the living room with a bin of LEGOs and a prayer.
These ten ideas run the full range, from quick weekend wins to more committed weekend projects, but every single one creates genuine magic without requiring a design degree.
Whether you’re starting from zero or refreshing a space your kid has outgrown emotionally (they’re over the dinosaurs, they want the forest now — fair enough), this guide walks you through exactly how to bring each look to life.
Let’s make something your kids will remember.
1. The Enchanted Forest Canopy Corner
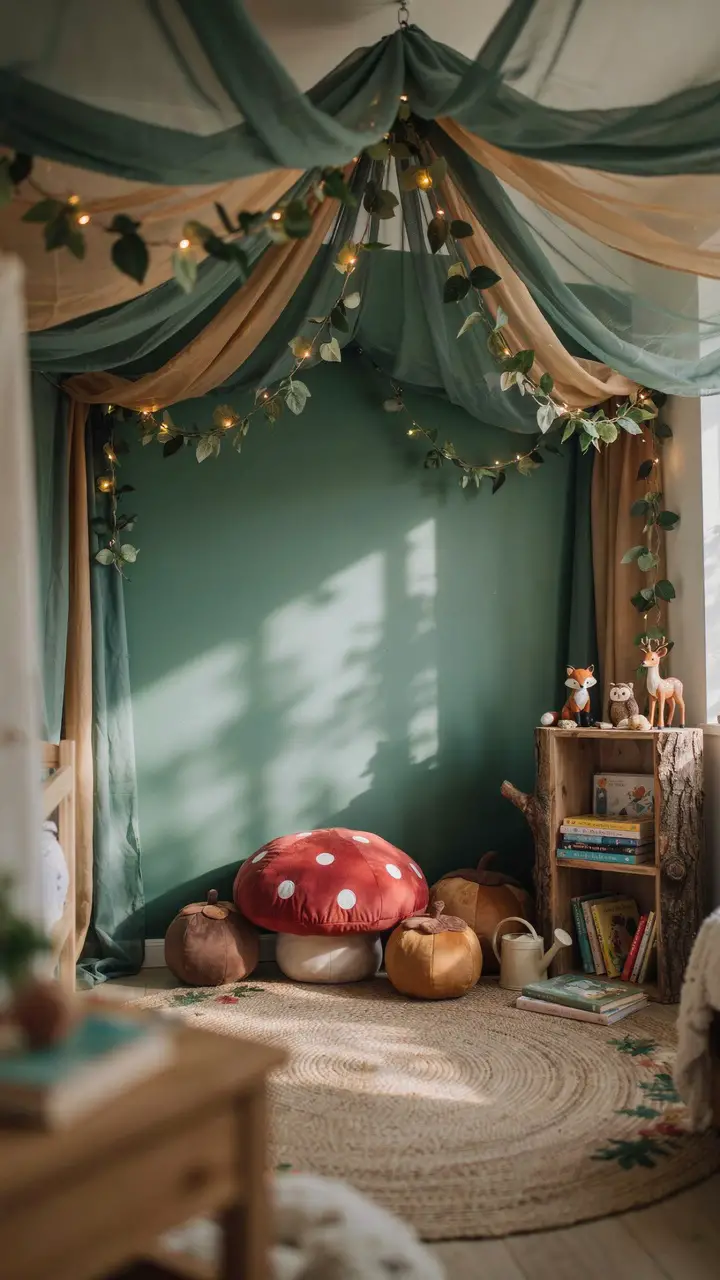
Nothing says “enchanted forest” quite like a canopy corner that makes a child feel like they’ve stepped underneath a real tree canopy. The trick is to layer — you want fabric above, greenery woven through it, warm golden light glowing from within, and something soft and inviting on the floor below.
A ceiling hook (installed into a stud, not just drywall — ask me how I learned that the hard way) lets you drape sheer green and gold fabric outward in a gentle tent shape. Weave a 50-foot artificial vine garland through the fabric for that “leaves filtering sunlight” effect. The mushroom floor cushion becomes the conversation piece — it’s the thing kids immediately migrate toward and adults immediately want to photograph.
How to Recreate This Look
Shopping List:
- Sheer green or gold fabric canopy ($20–$40 at fabric stores or Amazon)
- Artificial vine garland with leaves — 50 ft pack ($15–$30)
- Mushroom floor cushion ($35–$80 depending on size)
- Felt acorn poufs ($25–$45 each)
- Tree-trunk bookshelf ($80–$200 from Amazon or CB2 Kids)
- Warm amber string lights ($12–$25)
- Botanical green wall paint, one accent wall ($30–$50 per gallon)
Step-by-Step Styling:
- Paint one accent wall in your botanical green tone and let it cure fully (48 hours minimum — don’t rush this).
- Install a ceiling hook into a stud, or use an appropriately rated toggle bolt.
- Drape canopy fabric from the hook, letting it fall in a gentle spread toward the walls.
- Weave artificial vines through the fabric, letting loose ends drape naturally.
- Wind amber fairy lights through the vine garland.
- Place the mushroom cushion as your centerpiece directly below the canopy.
- Arrange the acorn poufs at irregular distances around it — resist the urge to space them evenly.
- Style the tree-trunk bookshelf with a mix of books spine-out and figurines in front.
- Style compatibility: Perfectly at home in cottagecore, Montessori-inspired, woodland, and Waldorf spaces. Pairs beautifully with natural wood floors and warm neutral walls.
- Budget breakdown: Under $100 — use an existing corner with a tension rod canopy, dollar-store vine garland, and a thrifted round cushion repainted with fabric paint. $100–$300 — full setup with a quality mushroom cushion and tree-trunk shelf. $300+ — commission custom mushroom seating and add integrated shelf lighting for a truly editorial look.
- Space requirements: A minimum 5×5 ft corner works; the canopy effect actually reads better in a compact space where it fills the full visual field.
- Difficulty level: Beginner. The hardest part is that ceiling hook — everything else is pure styling.
- Durability: Artificial vines last for years. Fabric can be dry-cleaned. Mushroom cushions with removable covers are your best friend with little kids around.
- Seasonal adaptability: Swap vine colors seasonally — rich autumn orange and gold leaves for fall, bare-branch style for winter, bright spring green for warmer months.
- Common mistakes: Using cool white lights instead of warm amber. Cool lights completely destroy the forest illusion. Also: don’t use real plants in the canopy — they get dry and droopy faster than you’d think, and nobody wants a sad forest corner.
- Maintenance: Dust the vine garland monthly with a hair dryer on cool setting. Spot-clean the fabric canopy with a damp cloth. Replace fairy light strands when they start flickering.
[For more magical spaces to inspire your design, explore these whimsical playroom ideas for every style and budget.]
2. Birch Tree Wall Installation with Fairy Light Canopy
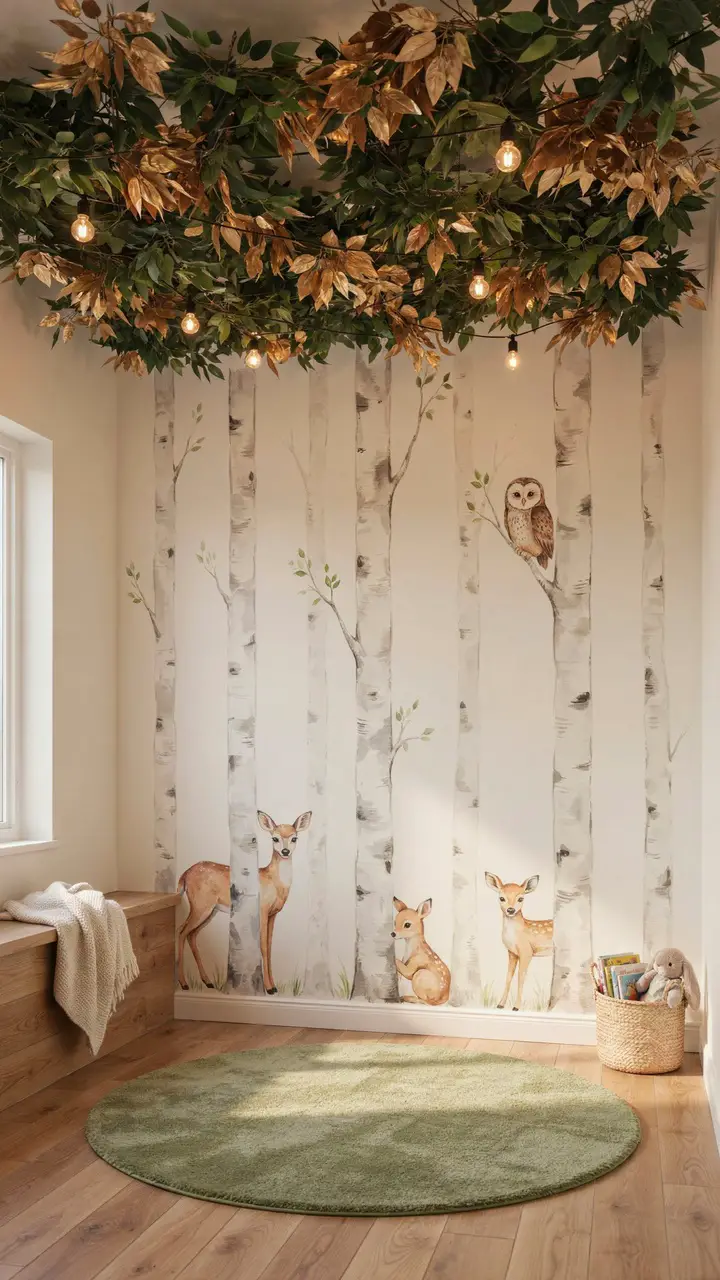
Want a playroom feature that stops every single person who walks in the room? A birch tree wall does exactly that. The distinctive white bark with black horizontal dash markings is the most recognizable forest element in children’s illustration — and it translates stunningly into a real room when done well.
You have three approaches here: painted trees (most permanent, most beautiful), peel-and-stick tree trunk wall decals (renter-friendly and surprisingly convincing), or real birch branches secured vertically to the wall (the most dramatic, but involves some structural thinking). For most families, the painted option delivers the best result. A basic white and black color combination on a cream wall, with five trees of varying widths spaced irregularly, looks genuinely architectural rather than craft-project-y.
How to Recreate This Look
Painted Birch Tree Method:
- White and black wall paint (you likely already have these or close equivalents — cost: $0 to $20)
- A wide flat brush for trunk shapes and a fine brush for the horizontal markings
- Painter’s tape to protect the ceiling and floor trim
- Reference photos of actual birch trees — the markings are organic and irregular, which is the whole point
Step-by-Step:
- Use a pencil to lightly sketch trunk shapes in varying widths (the widest should be about 8 inches, the thinnest about 3 inches).
- Paint trunks white in two coats, letting each dry fully.
- Add black horizontal dash markings freehand — these should be imperfect, slightly curved, and irregular in spacing. Real birch bark doesn’t look like a barcode.
- Attach artificial leaf clusters along the ceiling edge where tree tops would meet, securing with removable adhesive strips for renter-friendly application.
- Weave Edison bulb string lights through the leaf canopy.
- Budget breakdown: Under $50 — paint + decals from Amazon + artificial leaves from a craft store. $50–$200 — full painted installation + quality leaf garlands + Edison string lights. $200+ — add commissioned woodland creature illustrations painted between the trunks for a completely custom, gallery-quality result.
- Difficulty level: Intermediate for the painted version (the freehand painting is the challenge, but remember: imperfection makes birch trees more realistic, not less). Beginner for the decal version.
- Durability: Painted trees last as long as the paint does — potentially years with low-VOC, semi-gloss finish. Decals last 3–5 years before adhesive degrades.
- Common mistakes: Making all trunks the same width and spacing them at perfectly equal intervals. Real forests are irregular — lean into that.
[Discover more stunning playroom wall ideas that transform blank surfaces into storytelling features.]
3. Forest Floor Sensory Play Table
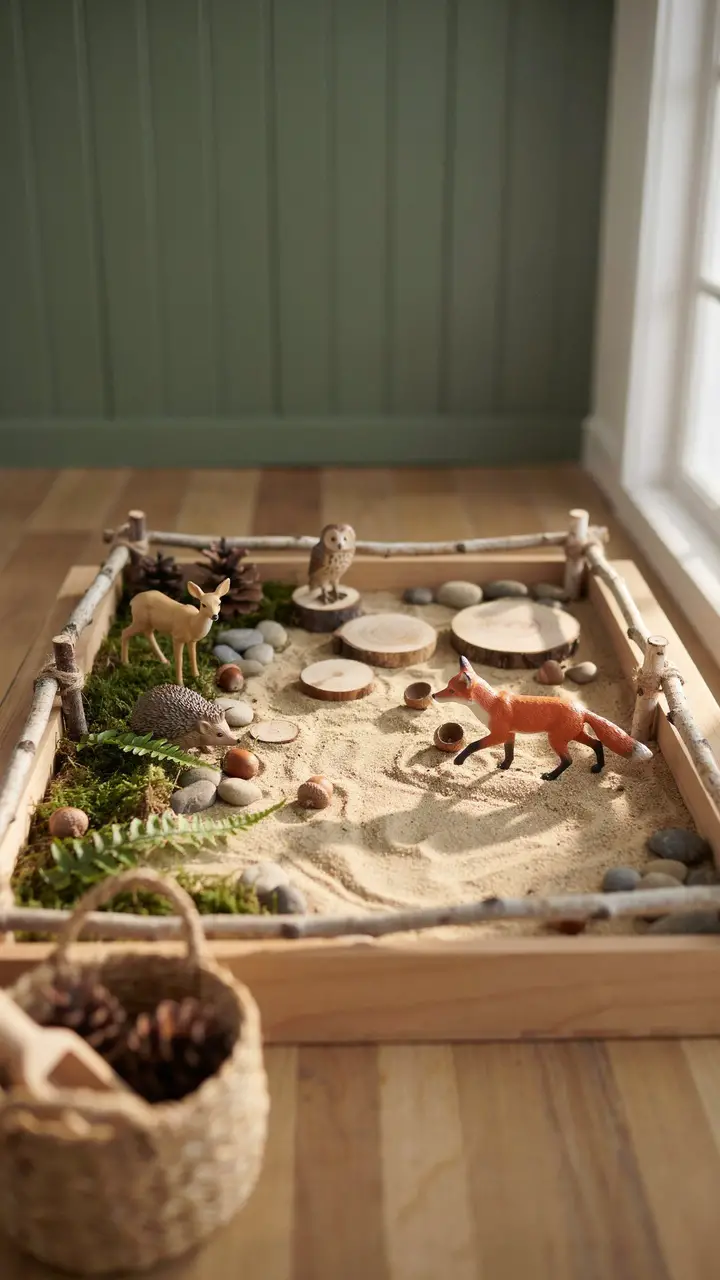
Here’s something I genuinely believe: the best playroom features aren’t things kids look at — they’re things kids do things with. A forest floor sensory table delivers on that completely. FYI, this is also one of those setups that works equally well for toddlers sorting pebbles as it does for older kids creating elaborate wildlife dioramas.
The sensory table isn’t just about touch (though the combination of cool smooth pebbles, soft moss, and rough pinecone textures is genuinely irresistible). It’s about open-ended storytelling. Every time a child sits down at this table, they’re running a different narrative — the fox is hunting today, the deer found a new clearing, the owl has claimed the tallest log. That kind of play is genuinely irreplaceable for imaginative development.
How to Recreate This Look
Shopping List:
- Shallow wooden sensory tray or low-sided table ($40–$120 from Amazon or Etsy woodworkers — look for “wooden sensory bin”)
- Fine kinetic sand or natural dried sand ($10–$20)
- Preserved sheet moss ($10–$20 at craft stores)
- Smooth river pebbles ($8–$15 at garden centers or Amazon)
- Small pinecones ($5–$10 collected outdoors or purchased)
- Wooden log cross-sections ($8–$15 at craft stores)
- Woodland animal figurines — Schleich or Papo brand for durability ($15–$30)
- Small birch branch lengths for the fence surround (collect free outdoors or purchase $10–$15)
Step-by-Step:
- Fill the tray with 2–3 inches of sand as the base.
- Press patches of preserved moss into the sand at irregular intervals — aim for about 30% coverage.
- Arrange river pebbles in small clusters, embedding them slightly in the sand.
- Position log cross-sections at varying heights.
- Add pinecones and acorn caps in the spaces between.
- Place animal figurines in natural-looking poses — grazing, perching, peeking.
- Press birch branch lengths vertically into the sand along the tray edge for the fence effect.
- Budget breakdown: Under $100 — plastic under-bed storage container as tray + collected natural outdoor materials + basic figurines. $100–$500 — purpose-built wooden sensory table + full curated material set + quality Schleich figurines. $500+ — custom carved wooden sensory table with storage drawers underneath + complete seasonal material collection.
- Space requirements: 3×2 ft floor space for the table, plus 2 ft clearance on all sides so children can reach the full tray.
- Difficulty level: Beginner. No tools or construction required — this is pure assembly and curation.
- Durability: Natural materials need refreshing every few months. Sand lasts indefinitely. Keep a supply bin of replacement moss and pinecones nearby.
- Seasonal adaptability: This table is practically made for seasonal rotation. Spring: flower petals and fresh moss. Summer: shells and smooth sea glass. Autumn: acorns, mini gourds, and maple leaves. Winter: pinecones, silver-toned pebbles, and white glass gems.
- Common mistakes: Overfilling the tray so there’s no room for rearranging — leave at least 40% of the surface clear for the child’s own arrangements. Also avoid any materials with sharp edges for children under 5.
- Maintenance: Remove and replace damp or molding natural materials immediately. Refresh sand monthly by spreading on a flat surface to air out. Wash figurines with mild soap weekly.
[Browse these kids playroom ideas for more inspiration on setting up imaginative, sensory-rich play environments.]
4. Mushroom Village Seating Area
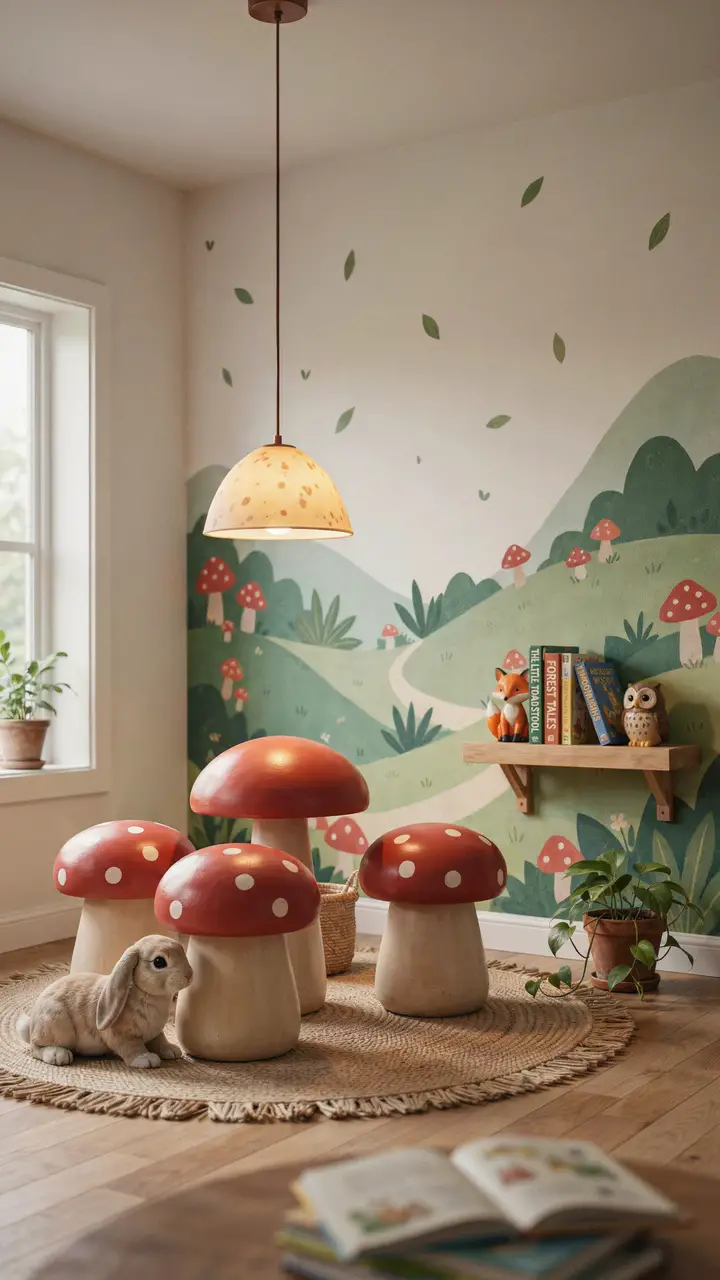
There’s a seating arrangement that photographs so well, parents will genuinely hesitate before letting the kids mess it up. The mushroom village seating area is that arrangement — and the wonderful thing is that kids are so delighted by it they actually take care of it better than you’d expect. Something about toadstool seats tells children they’re in a special place, and they treat it accordingly.
Red-capped mushroom stools with white polka dots have become a genuine classic of the whimsical playroom world, and for good reason. They’re sturdy, lightweight enough for kids to rearrange independently, and they look absolutely spectacular grouped around a low mushroom-shaped table. Add a mushroom pendant lamp overhead and you have a seating vignette that earns its place as the room’s anchor piece.
How to Recreate This Look
Shopping List:
- Mushroom toadstool stools ($35–$90 each — search “toadstool ottoman” on Amazon or Wayfair; look for anti-slip bottoms)
- Mushroom-shaped low table in terracotta tone ($60–$150)
- Mushroom pendant lamp ($40–$120 from Amazon or West Elm Kids)
- Round jute rug in natural tones ($30–$90 for 5-ft round)
- Forest mural sticker or hand-painted detail for the back wall (optional; $20–$80)
Step-by-Step:
- Position the jute rug as the base for the seating area.
- Place the mushroom table at the center of the rug.
- Arrange mushroom stools at irregular distances around the table — three stools at varying positions feel more organic than four placed symmetrically.
- Install pendant lamp on the ceiling directly above the table center.
- Add a low shelf to the adjacent wall for books and figurines that invite children to sit down and settle in.
- Budget breakdown: Under $100 — thrift round stools and paint them red with white polka dots using outdoor acrylic + seal with polyurethane. A small round coffee table becomes the mushroom table with a coat of terracotta paint. $100–$300 — purchased toadstool stools + painted DIY table + pendant light. $300+ — full curated mushroom set with quality stools, custom table, and a designer pendant light.
- Difficulty level: Beginner for the purchased setup. Intermediate for the DIY painted-stool approach (patience and two coats of topcoat make all the difference).
- Durability: Painted stools sealed with polyurethane handle daily use beautifully. The terracotta table finish may need touching up annually if kids use it as a work surface.
- Seasonal adaptability: Swap the jute rug for a green grass-look rug in spring/summer, returning to warm natural tones for autumn/winter.
- Common mistakes: Spacing the stools in a perfect circle — irregular positioning looks more like a genuine fairy village gathering spot and less like a furniture catalog photo.
[Get inspired by more colorful playroom ideas that bring vibrant, nature-rich palettes into kids’ spaces.]
5. Vertical Enchanted Garden Wall for Small Spaces
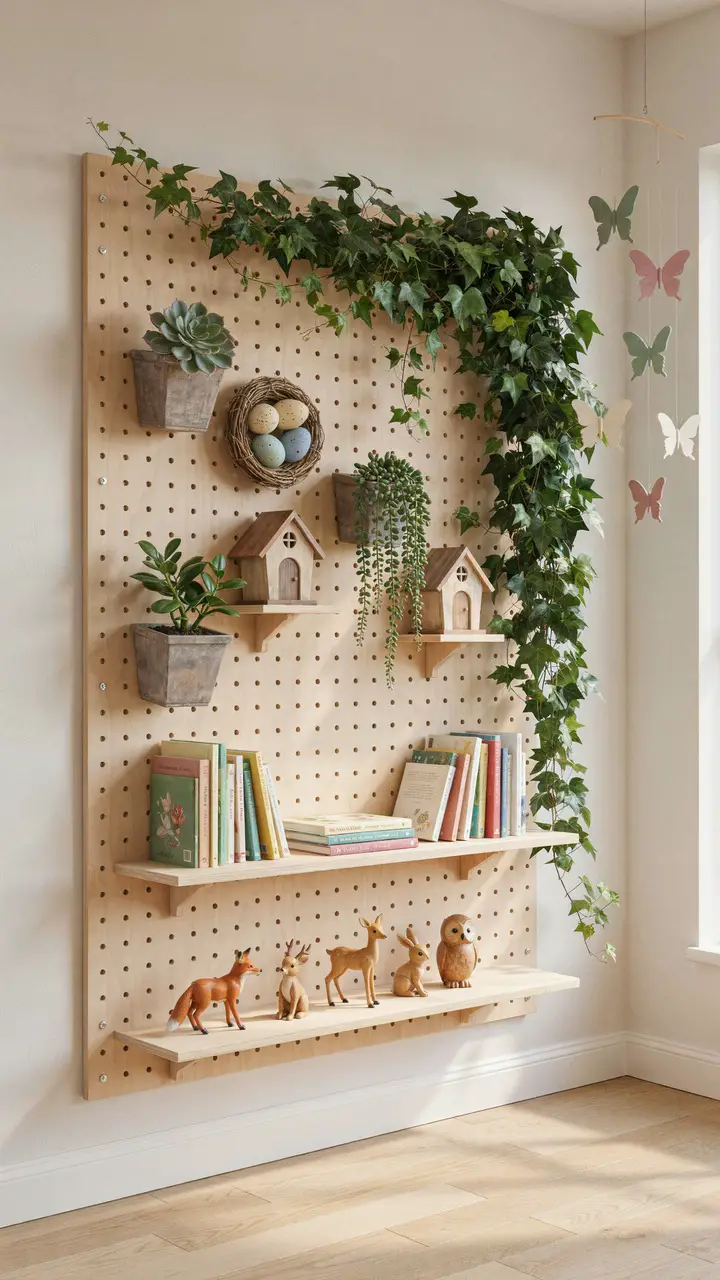
Got a small space? This one’s for you. The vertical enchanted garden wall takes a single 4-foot wide section of wall and transforms it into the room’s complete storytelling feature — from floor to ceiling. It’s genuinely one of the smartest small-space playroom moves available, because it does the work of an entire themed room in a footprint that uses exactly zero floor space.
The pegboard is the unsung hero of this design. It gives you total flexibility to rearrange — shift the fairy house higher, move the planters, swap out seasonal elements — without any new holes in your wall. If you’re renting, a pegboard mounted on French cleats (which hook over a single horizontal board screwed to studs) means you can take the whole installation down in an afternoon.
How to Recreate This Look
Shopping List:
- Large pegboard panel ($30–$60 at Home Depot or Lowe’s)
- Trailing artificial ivy in two or three green shades ($15–$25 for multiple strands)
- Small wall planter boxes ($10–$20 each; 2–3 boxes)
- Real succulents or air plants ($5–$15 each — non-toxic varieties only; always verify before purchasing)
- Carved wooden fairy houses ($10–$25 each)
- Two floating shelves ($15–$40 each)
- Bird’s nest decoration with speckled eggs ($10–$15)
- Butterfly mobile ($15–$30)
Step-by-Step:
- Mount pegboard with 1-inch wall standoffs — that clearance gap behind the board is non-negotiable for hooks to work.
- Install two floating shelves directly below the pegboard for toy and book storage.
- Thread ivy strands through pegboard holes and drape naturally downward.
- Mount wall planters in the mid-section of the board and fill with succulents.
- Install fairy house shelf brackets and houses in the upper section.
- Hang the bird’s nest at or near the top — this is your canopy.
- Place the butterfly mobile to the side of the installation as the finishing touch.
- Budget breakdown: Under $100 — pegboard + dollar-store ivy + collected bird’s nest + one small planter. $100–$300 — full installation with quality planters and fairy houses + proper floating shelves. $300+ — extend the concept to two walls, add grow lights for live plants, and commission custom fairy house woodwork.
- Space requirements: Works in any room with a 4-foot wide wall section. Floor area: zero. This is as small-space-friendly as it gets.
- Difficulty level: Beginner to intermediate — the pegboard mounting is the one step that requires a drill and stud finder.
- Durability: Artificial ivy lasts for years. Live succulents need watering every 1–2 weeks. Air plants need misting twice weekly. Choose the maintenance level that fits your actual lifestyle honestly.
- Common mistakes: Skipping the wall standoffs on the pegboard. Without that gap, the hooks don’t seat properly and the whole thing becomes frustrating to use.
- Seasonal swap: Change planter contents seasonally — spring bulbs, summer herbs, autumn dried flowers, winter air plants with white moss.
[Small space? Big dreams. Find your next brilliant solution in these playroom ideas for small spaces that maximize every square inch.]
6. DIY Fairy Light Firefly Jars
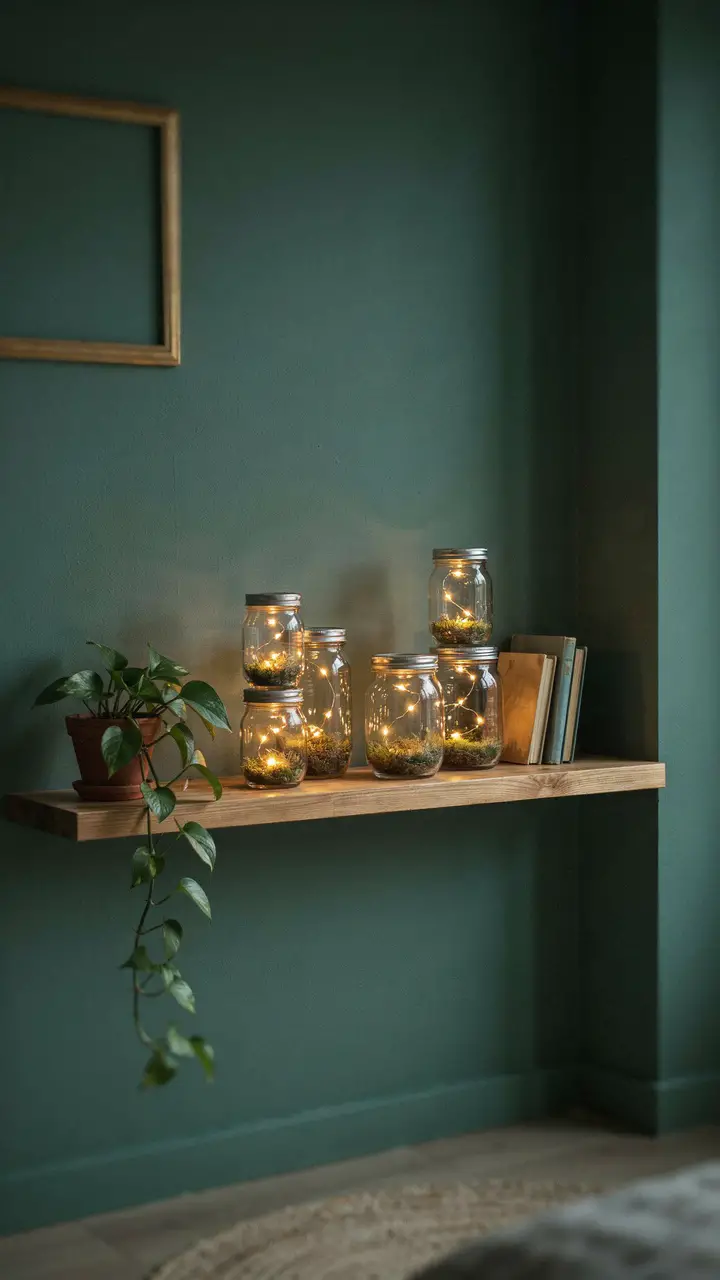
Honestly? This might be the single most impactful playroom feature per dollar spent in this entire article. A cluster of mason jars filled with preserved moss and firefly-effect LED lights costs less than $30 to make, takes about 45 minutes to assemble, and creates a display that children and adults alike will stand in front of just… looking.
The key detail is using firefly-effect LED strands — the kind that blink at random intervals rather than steadily glowing. That random blink pattern is what creates the genuine firefly illusion. Steady lights just look like jars of lights. Blinking firefly-effect strands look like something alive is in there. Worth hunting for the right product.
How to Recreate This Look
Shopping List:
- Mason jars in mixed sizes ($8–$15 for a set of 6)
- Firefly-effect LED micro strands — battery or USB ($8–$15 per strand; you need one per jar)
- Preserved sheet moss ($10–$20)
- Natural wood floating shelf ($20–$50)
- Command strips or shelf brackets depending on wall type
Step-by-Step:
- Tear small pieces of preserved moss and press into the base of each jar.
- Coil the LED firefly strand loosely inside the jar, letting the wire drape out through the lid ring for connection.
- Test each jar’s glow before placing on the shelf — the blink pattern should look random and organic.
- Install floating shelf at an adult’s eye level or slightly above for the best ambient effect.
- Arrange jars in groups of 2–3 at varying heights using small wooden rounds or stacked books as risers.
- Budget breakdown: Under $30 — the entire firefly jar display, truly. $30–$100 — add quality natural wood floating shelves and a smart plug so the jars automatically glow at dusk. $100+ — upgrade to a custom built-in shelf system with permanent wiring and integrated dimmer control.
- Difficulty level: Beginner. No tools required beyond shelf installation. This is genuinely one of the most achievable magical features in any nature-themed playroom.
- Durability: LED strands last 5+ years. Mason jars are essentially indestructible. Preserved moss needs replacing every 1–2 years.
- Common mistakes: Using regular fairy lights instead of firefly-effect blink lights. Packing too many lights into each jar so the whole thing glows too brightly — the subtle glow is the point.
[For a complete gallery of atmospheric, creative spaces, explore these creative playroom setups for kids that bring different nature themes to life.]
7. Woodland Animal Gallery Wall
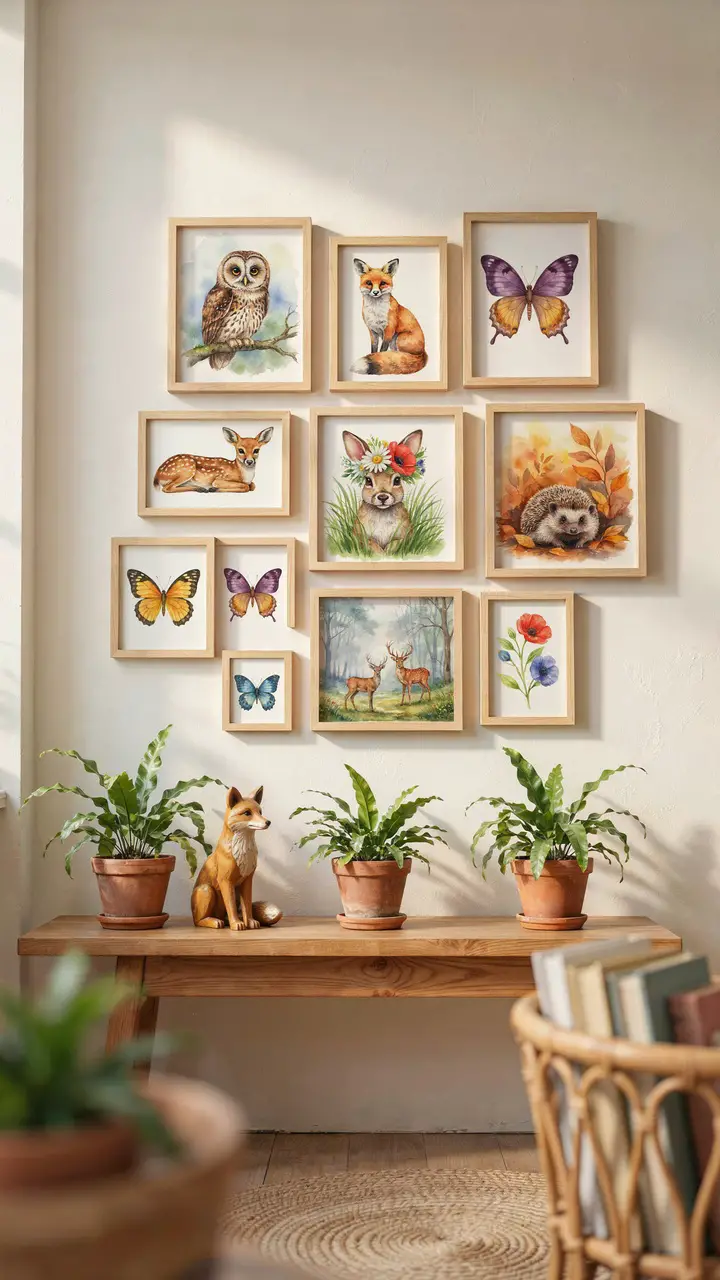
A gallery wall works in any home decor context. In a nature-inspired playroom, it becomes something more: a cast of characters. Children name them. They tell stories about them. The owl becomes Professor Feathers. The fox becomes the main character in an ongoing narrative that’s been running for six months. This is not an exaggeration — I’ve heard from families where the gallery wall animals became genuinely beloved fictional friends.
The key to a gallery wall that looks intentional rather than random is buying prints in a consistent illustration style. Watercolor woodland illustrations work beautifully for this theme. Mix styles and you get visual noise; commit to one style and you get a cohesive, beautiful feature. Etsy is genuinely the best source for this — you can find complete sets of 8–12 matching woodland animal prints for $20–$50, which is remarkable value.
How to Recreate This Look
Shopping List:
- Woodland animal art prints in matching watercolor style — set of 10–15 ($20–$80 on Etsy or Society6)
- Thin natural wood frames, all matching ($5–$15 each from IKEA’s RIBBA line)
- Low console table or shelf in natural pine ($40–$120)
- 2–3 small potted ferns or trailing plants ($8–$15 each)
- Hand-carved wooden animal figurine ($15–$40)
- Level and measuring tape for hanging
Step-by-Step:
- Lay all frames out on the floor first and arrange until you love the composition before making a single hole.
- Take a photo of the final floor arrangement — this is your reference map.
- Begin hanging from the center outward, using a level on every frame.
- Maintain approximately 2–3 inches of consistent spacing between frames.
- Install the console shelf below the gallery cluster.
- Style the shelf with ferns and figurine — keep it restrained; the art above needs space to breathe.
- Budget breakdown: Under $100 — free downloadable vintage botanical or animal prints (check the Metropolitan Museum of Art’s free collection online) + IKEA frames + one small plant. $100–$300 — curated Etsy print set + quality frames + console shelf + full plant styling. $300+ — commission a local illustrator to create custom woodland animal portraits of the child’s favorite characters.
- Difficulty level: Beginner for the hanging; the floor-plan-before-you-hang approach removes essentially all the difficulty.
- Common mistakes: Not laying frames out on the floor first and then spending three hours patching holes. Learn from my mistakes, not your own walls.
- Maintenance: Dust frames monthly. Wipe glass with a slightly damp cloth.
[Find even more beautiful and achievable inspiration in these kids playroom design ideas that balance style with real-life function.]
8. Natural Loose Parts Exploration Table
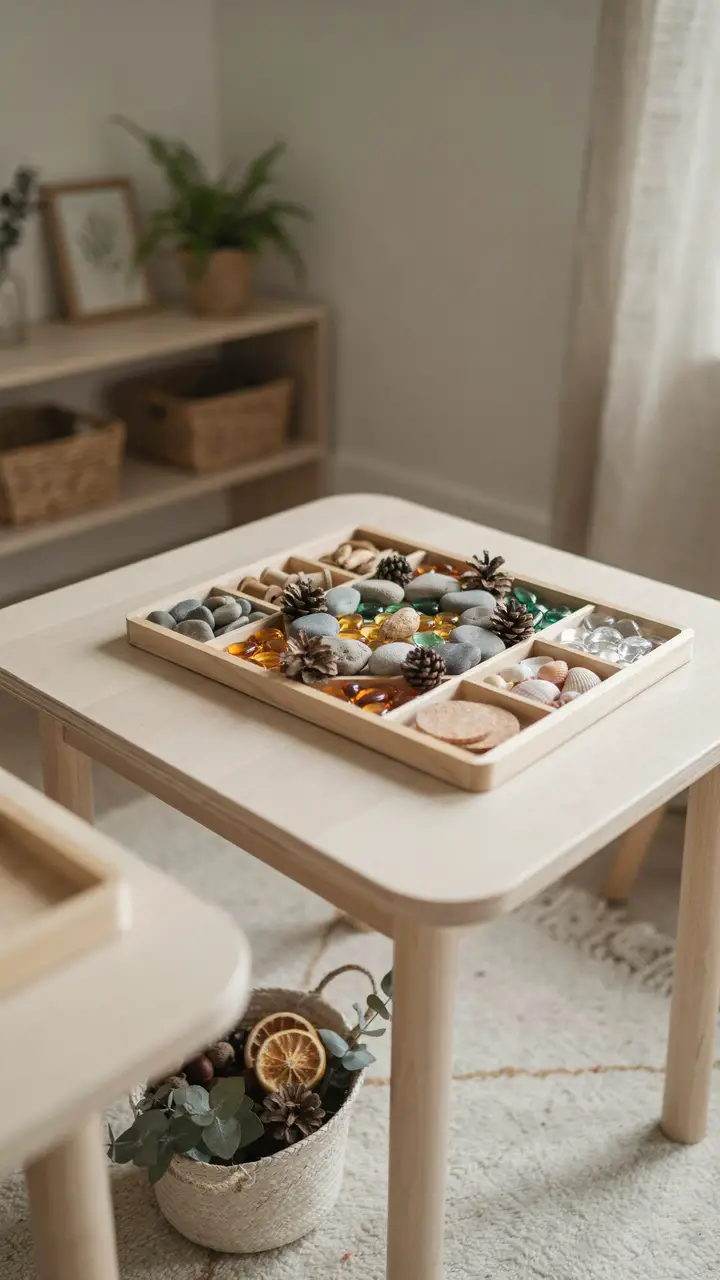
This is the setup that Montessori educators talk about when they describe “the work.” A loose parts table doesn’t look like much in a shopping cart — it’s literally rocks, sticks, glass gems, and wooden spools. But watch what a child does with them for 45 minutes, and you’ll never question whether it was worth it. Children create portraits, mandalas, maps, stories, and things that have no name yet but clearly mean something important to them.
The nature connection here runs deep. These materials communicate that the outdoor world is worth collecting, examining, and playing with. Kids who engage with natural loose parts regularly develop a genuine attentiveness to the natural world — noticing the difference between two types of pebbles, the weight of a pinecone versus a seed pod, the way glass gems catch light differently than river stones. That attentiveness is worth more than any educational toy on the market, IMO.
How to Recreate This Look
Shopping List (Mostly Free or Very Low Cost):
- Natural materials from outdoors: river rocks, pinecones, acorns, seed pods, small sticks, dried flowers, bark pieces (free)
- Glass gems ($3–$6 per bag at craft stores)
- Wooden spools ($5–$10 for 50)
- Cork circles ($5–$8 for 20)
- Small shells ($3–$8 at craft stores)
- Sectioned wooden organizer tray ($15–$30)
- IKEA FLISAT children’s table or similar low table ($50–$70)
Step-by-Step:
- Begin with 6–8 material types maximum — more than that overwhelms rather than invites.
- Fill each section of the organizer tray with one material type.
- Arrange the tray on the low table with the full surface visible and accessible.
- Introduce the table to the child by sitting down together first and exploring materials yourself — children learn by watching.
- Then step back completely and let them lead.
- Budget breakdown: Under $25 — entirely collected natural materials + a basic sectioned plastic tray. $25–$75 — purchased glass gems and wooden materials + quality wooden tray. $75+ — full seasonal set with dedicated low table and premium natural materials.
- Difficulty level: Beginner for setup. The Montessori philosophy of stepping back and observing rather than directing takes a little practice, but the setup itself is completely achievable for anyone.
- Seasonal rotation: Create dedicated seasonal trays — spring: flower petals and seed pods; summer: shells and sea glass; autumn: acorns, mini gourds, and maple leaves; winter: pine sprigs, silver pebbles, and white glass gems.
- Important note for younger children: Always supervise children under 3 around small loose parts. Some materials (small pebbles, glass gems) are choking hazards for toddlers.
[Explore the full world of child-led play spaces in these Montessori playroom ideas that trust children to lead their own learning.]
9. Enchanted Forest Art Studio Corner
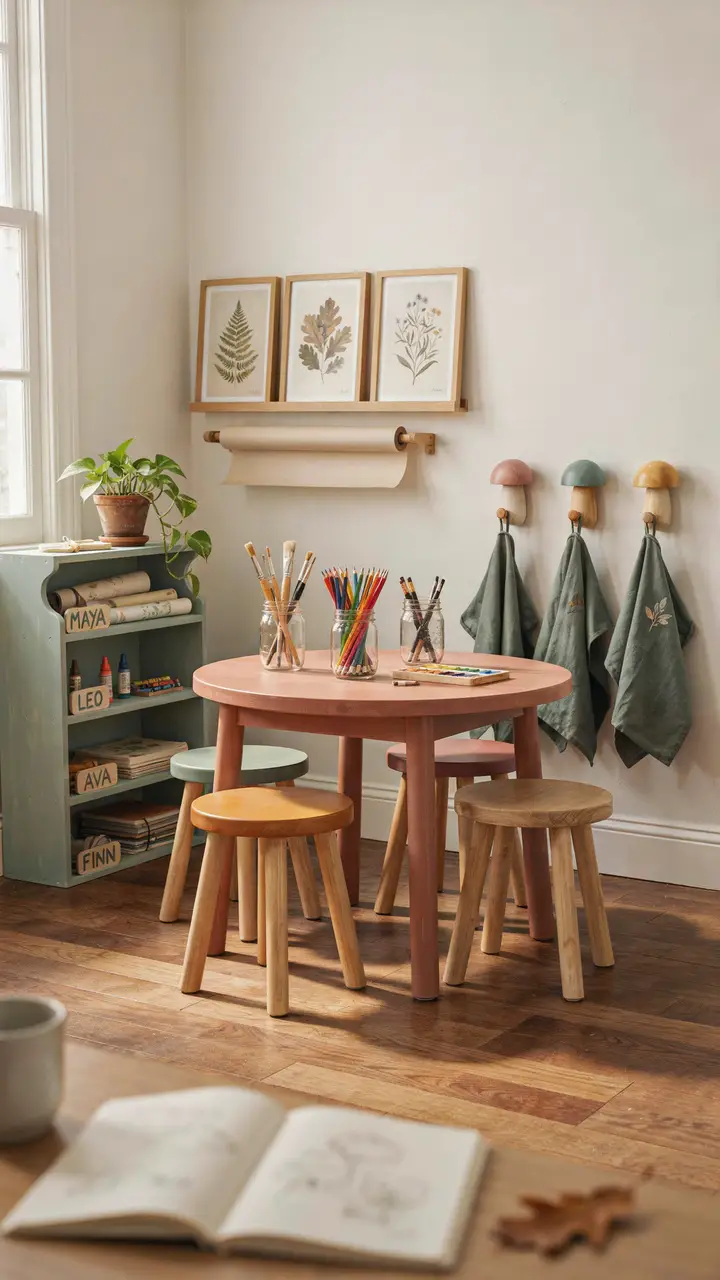
There’s something about an art corner that’s styled rather than just placed that genuinely changes how often kids use it. When the table is painted in a warm terracotta and the smocks hang on mushroom-shaped hooks and the mason jars hold supplies sorted by type, children treat the space with a kind of respect that an unstained folding table with a plastic organizer doesn’t inspire. The aesthetic of the space communicates “this is a real place for real creating.”
The wall-mounted kraft paper roll is the secret weapon here. A continuous surface of clean paper means no fighting over who gets the last sheet of drawing paper, no hunting for supplies, and a roll that kids can pull down and tear off whenever inspiration strikes. Mount it low enough that children can access it themselves — that independence matters.
How to Recreate This Look
Shopping List:
- Round table ($40–$120 thrifted or from IKEA, painted in terracotta or your chosen nature tone)
- Wooden stools in complementary earth tones — 3 or 4 ($15–$40 each, thrifted and painted)
- Glass mason jars for supply organization ($8–$15 for a set of 6)
- Wall-mounted kraft paper roll holder ($25–$50)
- Kraft paper roll ($10–$20 for a large roll)
- Mushroom-shaped wall hooks ($15–$35 for a set of 4)
- Linen child smocks ($10–$20 each)
- Painted wooden cubby unit ($60–$150)
- Botanical prints in frames for the back wall ($20–$60)
Step-by-Step:
- Paint the table with chalk paint or eggshell paint in your chosen earthy tone, then seal with water-based polyurethane for wipe-clean durability.
- Mount the paper roll holder at 40 inches from the floor — low enough for children to pull paper themselves.
- Install mushroom hooks beside the table at 36 inches (child height) for smocks.
- Arrange mason jars on the table with supplies sorted visibly — paintbrushes by size, pencils, scissors.
- Mount botanical prints above the paper roll in a simple horizontal grouping.
- Position the cubby unit within arm’s reach, with each section labeled with the child’s name.
- Budget breakdown: Under $100 — thrifted table repainted + dollar-store mason jars + basic paper roll + command hooks. $100–$300 — full setup with purchased stools, quality smocks, and botanical print display. $300+ — custom painted furniture set + artisan mushroom hooks + built-in cubby shelving.
- Difficulty level: Beginner. The painting takes a weekend afternoon; everything else is pure styling.
- Durability: A polyurethane-sealed table wipes clean of paint, glue, and marker. Glass jars are easy to clean and essentially unbreakable under normal use.
- Common mistakes: Leaving supplies accessible but unorganized — sorted visible storage is what makes this look intentional rather than chaotic.
[Browse these kids art space ideas for more beautifully organized creative spaces that inspire little artists.]
10. Seasonal Nature Table — A Living Corner That Changes with the Year
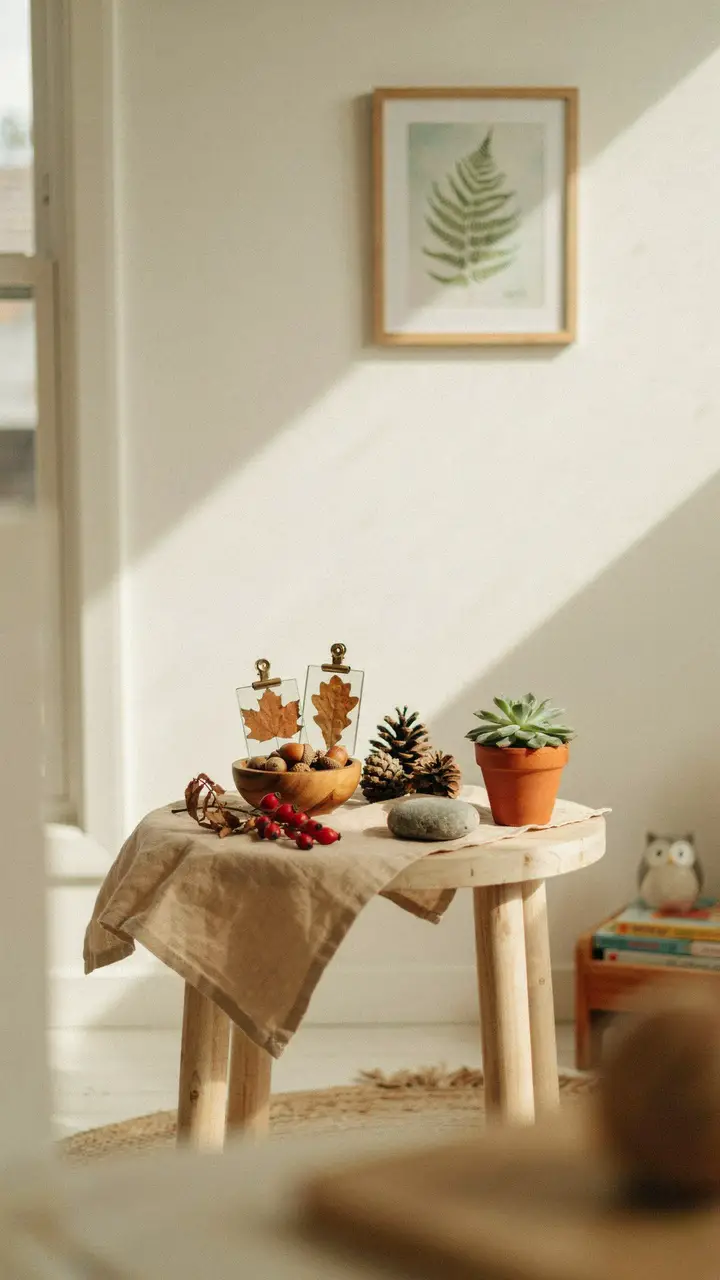
Here’s the thing about a seasonal nature table: it doesn’t just decorate the room. It teaches children to actually see the year. When the acorns come off the table and the pine sprigs go on, children understand that the world outside is changing and that change is worth paying attention to. That awareness — seasonal, natural, attentive — is one of the most meaningful gifts a thoughtfully designed playroom can offer.
A seasonal nature table is also the lowest-maintenance ongoing decor project in this article. Once a month or once a season, you and your child walk outside together, gather what’s there — fallen leaves, a smooth stone, a pine branch, some wildflowers — and bring them home to refresh the table. The whole activity takes 30 minutes and creates a memory. And honestly? It’s as lovely to look at as anything you could buy.
How to Recreate This Look
Shopping List:
- Low round table in natural birch ($30–$80 from IKEA or thrifted)
- Linen cloth in sage or cream ($10–$20)
- Small wooden bowl ($8–$20 for natural objects)
- Seasonal objects gathered outdoors (free)
- One small potted succulent or trailing plant ($5–$15)
- One framed botanical print for the wall behind ($10–$30)
Step-by-Step:
- Position the table in a corner with wall space behind it for the framed print.
- Lay the linen cloth loosely — it shouldn’t look starched, it should look lived-in and gentle.
- Place the wooden bowl as the centerpiece and fill it with the season’s main object (acorns in autumn, shells in summer, pinecones in winter, flower heads in spring).
- Arrange 2–3 additional objects around the bowl at varying heights — use small books or wooden rounds to create different levels.
- Position the plant in a terracotta pot at one side.
- Change the table with your child at each season change — make it a ritual.
- Seasonal Rotation Examples:
- Spring: pressed wildflowers, fresh moss, robin egg-blue glass gems, seed packets
- Summer: smooth sea glass, small shells, a tiny potted herb, dried lavender
- Autumn: acorns, mini gourds, maple leaves, a small pinecone collection
- Winter: pine sprigs, silver-toned pebbles, white preserved moss, dried orange slices
- Budget breakdown: Under $30 — thrifted or existing small table + collected natural objects + one plant in a terracotta pot. $30–$100 — quality wooden bowl + framed print + linen cloth. $100+ — dedicated nature table furniture + framed botanical series + seasonal subscription to a natural materials kit.
- Difficulty level: Beginner. The hardest part is slowing down enough to do it intentionally.
- Common mistakes: Overcrowding the table — restraint creates beauty here. Five well-chosen objects beat fifteen crammed in together every single time.
[Step outside (conceptually) and explore these sensory playroom ideas that bring the textures and wonders of the natural world indoors.]
Making the Magic Last
Here’s what all ten of these ideas have in common: they don’t just decorate a room. They create a world with a point of view — one that says nature is beautiful, worthy of attention, and endlessly interesting. Children who grow up in spaces like these carry that sense of wonder with them.
You don’t need all ten ideas at once. Start with one corner — the birch tree wall, the sensory table, the firefly jars — and watch how a child responds. Let that response guide what comes next. The best nature-inspired playrooms aren’t finished all at once; they grow over time, the way a real garden does, with new details added as the seasons change and new interests emerge.
The room doesn’t have to be perfect. The moss doesn’t have to be evenly distributed. The fairy lights don’t have to be untangled before the kids see it. What matters is that someone cared enough to create a world where imagination has a home — and that intention, more than any perfectly curated detail, is what children remember. 🙂

Greetings, I’m Alex – an expert in the art of naming teams, groups or brands, and businesses. With years of experience as a consultant for some of the most recognized companies out there, I want to pass on my knowledge and share tips that will help you craft an unforgettable name for your project through TeamGroupNames.Com!