
Every little royal deserves a kingdom — and if you’ve got a child whose imagination runs toward tiaras, fairy godmothers, and happily-ever-afters, a whimsical princess playroom might just be the most magical gift you can give them.
The best part about designing a princess-themed space is that it doesn’t have to be a wall-to-wall explosion of pink and glitter (though if that’s what your little one wants, absolutely lean in).
It can be a genuinely beautiful, dreamy space that captures the enchantment of fairy tales while still feeling warm, livable, and age-appropriate as your child grows.
Think soft florals, canopy beds, jewel-toned accents, and touches of gold that feel more storybook cottage than plastic toy aisle.
Ready to build the kingdom? Let’s go. 👑
1. Dreamy Canopy Bed or Reading Canopy
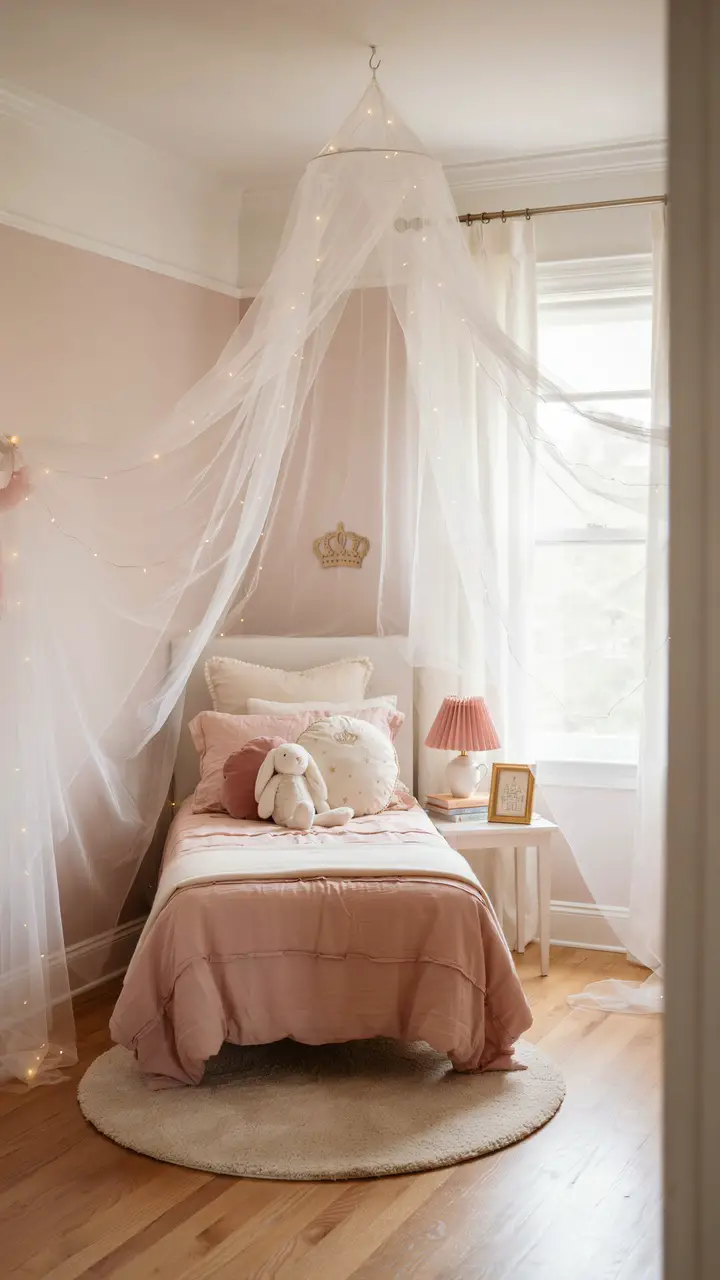
Nothing says “princess quarters” quite like a canopy. Whether you’re working with an actual canopy bed frame or simply draping fabric from a ceiling hook above a regular bed, the effect is immediate and transformative. Sheer white or blush tulle creates a soft, dreamy cloud of fabric that makes any sleeping or reading spot feel like a royal chamber.
Add fairy lights woven through the canopy fabric, and at night it glows like something straight out of a storybook. Tuck some star-shaped pillow confetti and a small crown accent on top of the canopy frame, and you’ve created a focal point the whole room builds around.
How to Recreate This Look
- Shopping list: Ceiling canopy hook with tray ($10–$20), white or blush sheer tulle fabric (3–5 yards, $5–$15), blush fairy lights ($12–$25), crown wall decoration ($15–$40), assorted throw pillows in blush/white/gold ($15–$35 each)
- Step-by-step: Install ceiling hook with appropriate anchor for your ceiling type. Gather tulle and drape from hook, spreading panels outward to cover the head of the bed. Weave fairy lights throughout the fabric layers. Style pillows on the bed below. Mount crown decoration directly above hook.
- Style compatibility: Works beautifully with romantic, boho, and classic princess styles; pairs with white, blush, or lavender furniture
- Budget breakdown: Budget ($25–$60) — hook + tulle + basic fairy lights; Mid-range ($60–$150) — quality tulle + premium fairy lights + crown decor + pillows; Investment ($150–$400) — full canopy bed frame with custom draping
- Space requirements: Works in rooms as small as 8×8 feet over a twin bed
- Difficulty: Beginner
- Durability: Tulle is delicate but replaceable; fairy lights are long-lasting LED
- Seasonal adaptability: Swap tulle color for seasonal touches (pale gold for autumn, ice blue for winter)
- Common mistakes: Don’t use a hook not rated for the ceiling type — use proper anchors. Don’t let tulle hang where a child could pull it onto themselves.
- Maintenance: Hand wash or gentle machine wash tulle every few months; check fairy light connections annually
2. Castle Wall Mural or Fairy Tale Wallpaper
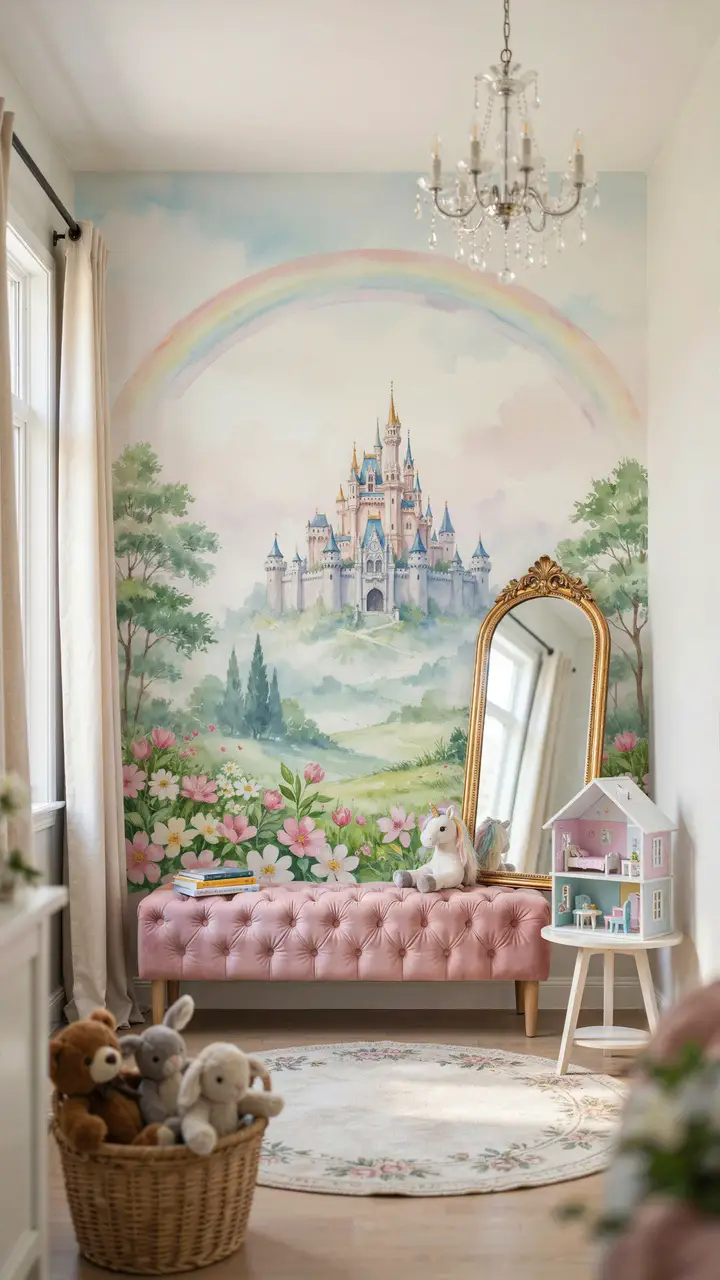
The walls tell the story in a princess room, and a castle mural or fairy tale wallpaper transforms a plain room into an enchanted kingdom. A soft watercolor-style mural of a castle on a hillside with rolling meadows, glowing windows, and maybe a distant rainbow creates a backdrop that feels genuinely magical without being overwhelming.
Peel-and-stick wallpaper options have exploded in quality recently, and you can find beautiful patterns — soft florals with hidden fairies, watercolor castles, enchanted forest scenes — that rival professional murals at a fraction of the cost. The best part? They’re fully removable, making them perfect for renters.
How to Recreate This Look
- Shopping list: Fairy tale or castle-theme peel-and-stick wallpaper ($50–$200 for an accent wall), soft ivory wall paint ($25–$50), gold-framed mirror ($40–$120), sheer blush curtains ($25–$60)
- Step-by-step: Paint remaining walls ivory first and let dry fully. Measure accent wall and order wallpaper with 10% extra. Apply from top to bottom, smoothing air bubbles with a squeegee. Lean mirror against the wallpapered wall for a layered look.
- Style compatibility: Works in romantic, fairy tale, and eclectic styles; beautiful alongside white or natural wood furniture
- Budget breakdown: Budget ($30–$80) — painted mural DIY with stencil + basic mirror; Mid-range ($80–$220) — quality peel-and-stick wallpaper + mirror; Investment ($220–$500+) — professional hand-painted mural
- Space requirements: One accent wall minimum; works in rooms of any size
- Difficulty: Beginner (peel-and-stick) to Advanced (hand-painted mural)
- Durability: Quality peel-and-stick wallpapers last 5–7 years without peeling; perfect for renters
- Seasonal adaptability: Swap accessories and soft furnishings seasonally without touching the mural
- Common mistakes: Don’t apply to freshly painted walls — wait at least two weeks. Don’t pull the backing off too fast; work panel by panel.
- Maintenance: Wipe with a barely damp cloth; avoid scrubbing
Looking for a truly royal name for your little princess? These stunning princess names for girls are fit for a queen!
3. Royal Dress-Up Wardrobe Station
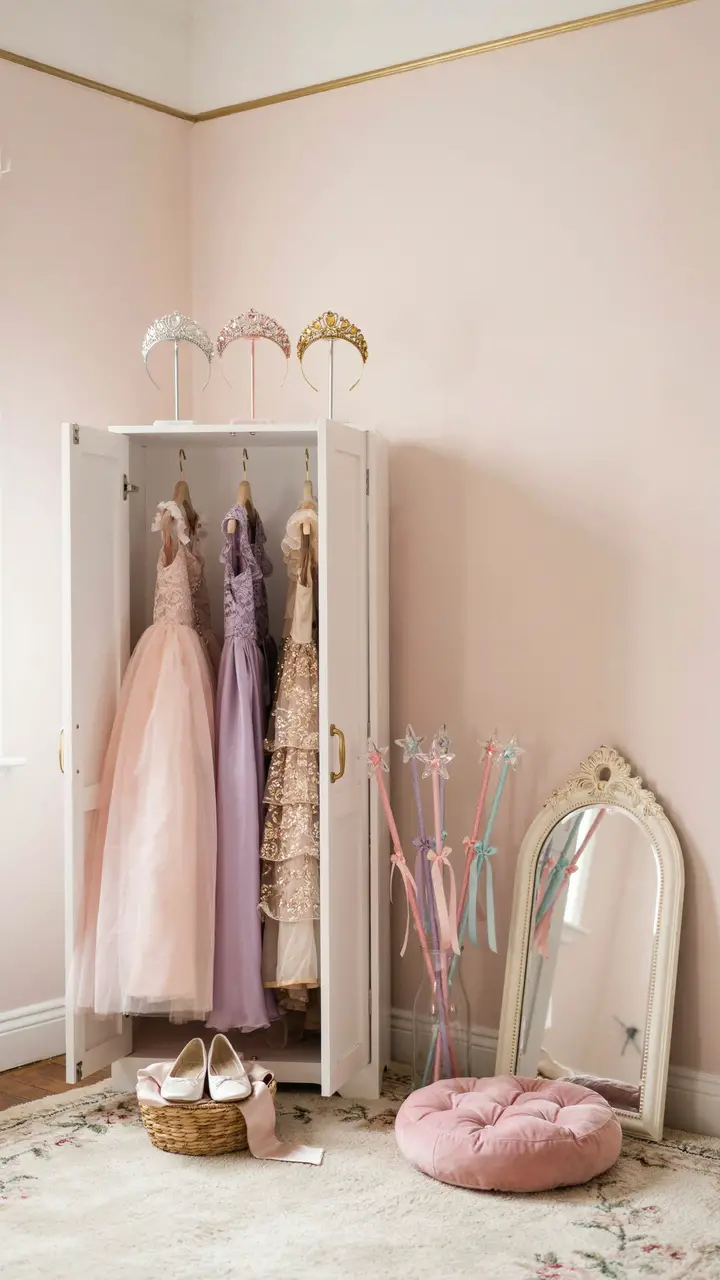
A princess room without a dress-up station is like a castle without a throne. Create a dedicated dress-up corner with a children’s wardrobe or armoire painted in soft white with gold hardware, stocked with princess gowns, fairy wings, wands, tiaras, and sparkly shoes. Add a small full-length mirror with a carved or painted gold frame beside it.
The key to a great dress-up station is organization — hang gowns on velvet hangers so they feel genuinely special, line tiaras on a tiara stand or velvet hooks, and keep wands in a tall clear vase. When everything has a beautiful place, kids are more likely to treat the items carefully and put them back.
How to Recreate This Look
- Shopping list: Small children’s wardrobe or armoire ($80–$250), chalk paint in soft white ($15–$30), gold spray paint for hardware ($8–$15), princess gown set ($30–$80), tiara and wand set ($15–$40), tiara display stand ($10–$25), gold-frame mirror ($40–$100), velvet floor cushion ($25–$50), tall clear glass vase ($10–$20)
- Step-by-step: Paint wardrobe in white chalk paint (sand lightly first). Spray hardware gold. Let dry 48 hours. Stock with hanging gowns. Set up tiara display on top. Fill vase with wands. Place mirror and cushion beside it.
- Style compatibility: Works in romantic, classic, and eclectic styles; beautiful with antique or vintage-feel furniture
- Budget breakdown: Budget ($40–$100) — thrifted wardrobe + painted + bargain costume set; Mid-range ($100–$280) — quality wardrobe + paint + costume set + mirror; Investment ($280–$600) — custom built-in wardrobe with mirror and integrated lighting
- Space requirements: Needs 4×4 feet minimum corner space
- Difficulty: Intermediate (furniture painting)
- Durability: Gowns may fray with heavy play — buy mid-range quality for longevity. Painted wardrobe lasts indefinitely with proper prep.
- Seasonal adaptability: Rotate gowns seasonally; add holiday-specific costumes for occasions
- Common mistakes: Don’t skip the sanding step before painting — chalk paint needs tooth to adhere. Don’t stack tiaras — they scratch and lose gems.
- Maintenance: Hand wash gowns; wipe wardrobe with dry cloth; check tiara gems periodically
4. Enchanted Garden Play Corner
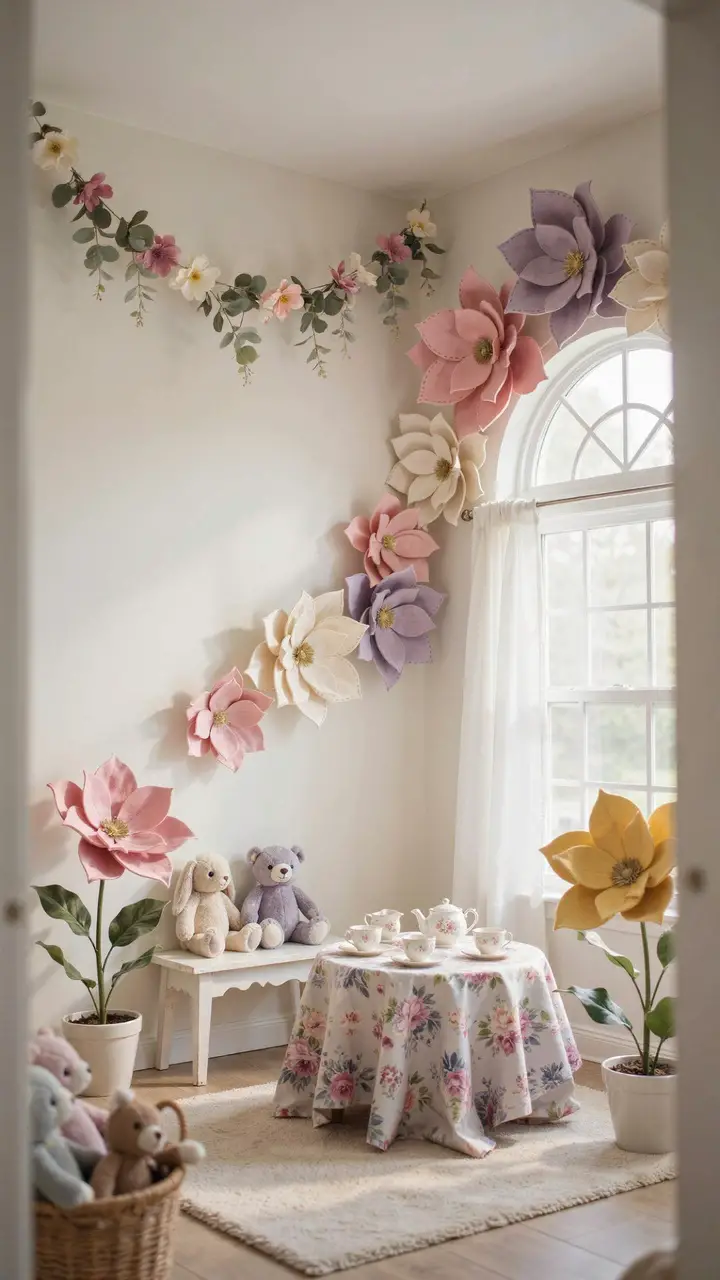
Bring the outdoors into the princess kingdom with an enchanted garden play corner — a dreamy arrangement of oversized fabric flower wall decals, hanging floral garlands, a small faux garden with giant felt flowers, and a little wooden garden bench where stuffed animals (or the royal court) can gather.
Add a small wooden tea set on a child-height table dressed in a floral tablecloth, and you’ve created the most charming spot for royal tea parties and imaginative garden picnics. This kind of setup works beautifully in a corner and doesn’t require a large dedicated space.
How to Recreate This Look
- Shopping list: Fabric or felt flower wall decals ($15–$40), hanging floral garland ($15–$35), giant felt flower kits or pre-made ($20–$50), small wooden bench ($40–$100), child’s round table and chairs ($60–$150), floral tablecloth ($10–$20), children’s ceramic or porcelain tea set ($20–$60), small white plant pots ($5–$15 each)
- Step-by-step: Apply flower wall decals in the corner, layering sizes for depth. Hang floral garland from ceiling above. Arrange giant felt flowers in pots at floor level. Position bench, table, and chairs. Style tea set on tablecloth.
- Style compatibility: Works in romantic, cottage, boho, and fairy tale styles; pairs beautifully with floral or solid light-colored wallpaper
- Budget breakdown: Budget ($40–$80) — DIY felt flowers + printable tablecloth + secondhand tea set; Mid-range ($80–$200) — quality decals + garland + proper table set; Investment ($200–$450) — custom corner garden with climbing vine installation
- Space requirements: Works in a 5×5 foot corner minimum
- Difficulty: Beginner
- Durability: Fabric decals last 2–3 years; felt flowers are very durable; tea sets vary by material
- Seasonal adaptability: Swap garland colors seasonally; add autumn leaves or winter berries
- Common mistakes: Don’t apply decals to textured walls — they won’t stick evenly. Don’t use real flowers (they die and create mess); faux is ideal here.
- Maintenance: Dust felt flowers with a dry brush; wipe tea set pieces after each use
Your little princess deserves a name as magical as her kingdom — explore these beautiful girl names that mean princess for truly royal inspiration!
5. Jewel-Toned Accent Wall with Gold Trim
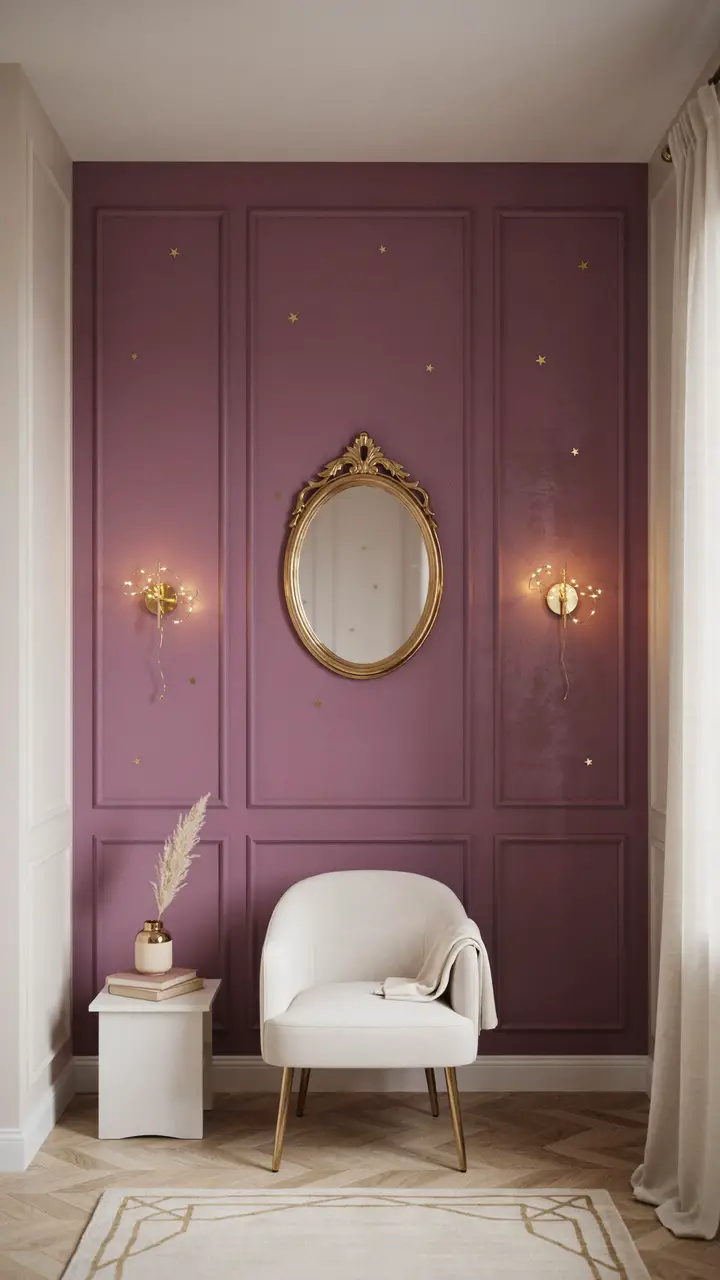
Not every princess room needs to be pink. A deep jewel-toned accent wall — think amethyst purple, sapphire blue, or emerald green — creates a sophisticated, enchanting backdrop that works beautifully as a child grows. Pair it with white or ivory trim, gold accents throughout, and soft furnishings in complementary tones.
Frame the accent wall with simple DIY painted wainscoting or a picture-frame molding treatment in white, which makes any wall look instantly more elegant and castle-like. Add a gold-framed mirror, gold sconces or fairy lights, and suddenly the whole room feels genuinely regal.
How to Recreate This Look
- Shopping list: Jewel-tone wall paint in amethyst, sapphire, or emerald ($30–$60), white trim paint ($20–$40), MDF picture-frame molding strips ($15–$30), gold spray paint for molding edges ($8–$15), gold oval mirror ($40–$120), gold fairy light sconces ($25–$50 each), white upholstered children’s chair ($80–$200)
- Step-by-step: Paint accent wall in jewel tone — two coats. Once dry, measure and cut molding strips into rectangular frames directly on the wall. Attach with finishing nails or strong adhesive. Paint molding strips white, edge in gold. Hang mirror at center. Mount sconces symmetrically.
- Style compatibility: Works in classic, romantic, eclectic, and sophisticated modern styles; pairs with gold, white, or crystal accents
- Budget breakdown: Budget ($40–$90) — paint + painted-on wainscoting effect (no actual molding) + thrifted mirror; Mid-range ($90–$250) — paint + real molding + mirror + sconces; Investment ($250–$500) — full custom millwork wall treatment
- Space requirements: Works on any wall 6 feet wide or more
- Difficulty: Intermediate (molding installation)
- Durability: Jewel tones hold beautifully for years; touch up scuffs as needed
- Seasonal adaptability: Completely timeless; the rich tone works every season
- Common mistakes: Don’t rush the tape when painting molding — precision here makes everything look professional. Don’t mix too many different jewel tones on accessories.
- Maintenance: Touch up paint chips promptly; dust molding with a dry brush
6. Princess Art Gallery Wall
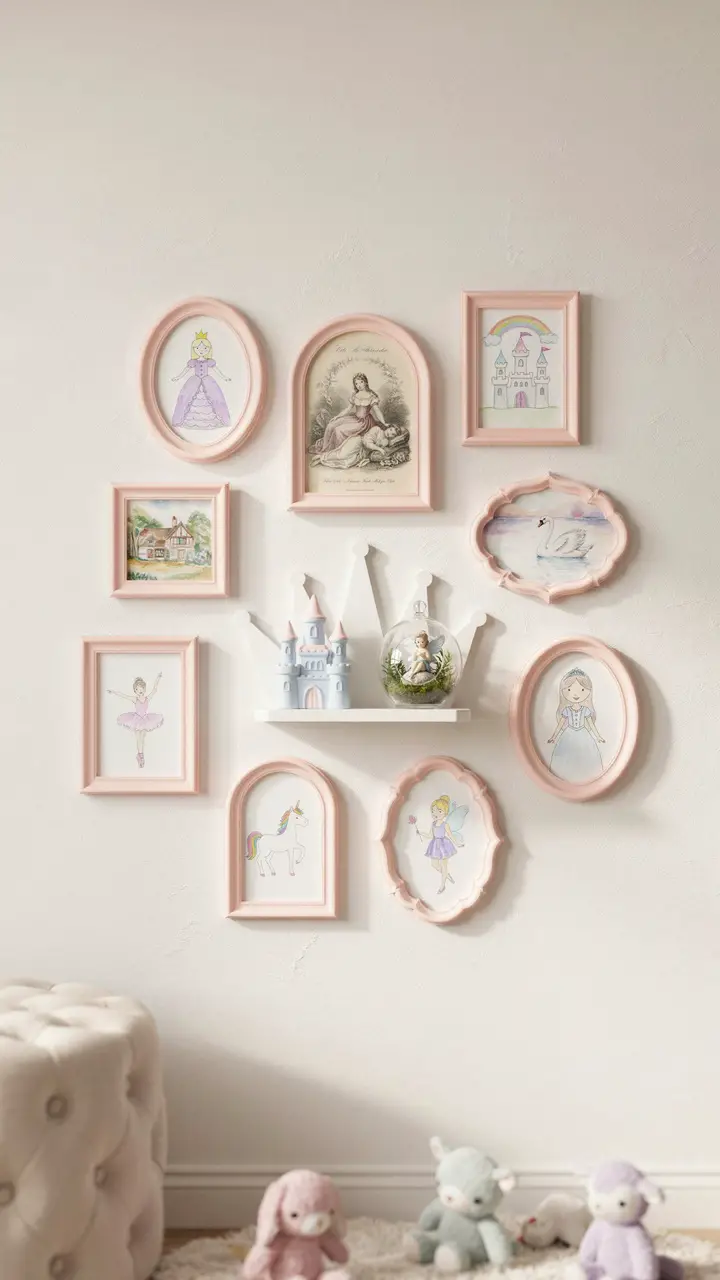
Celebrate your little creator’s artistry with a dedicated princess art gallery wall. Use a mix of pink-painted frames (spray painting mismatched thrift-store frames is deeply satisfying) to display their princess drawings, fairy tale watercolors, and mixed-media castle collages alongside one or two purchased prints of classic fairy tale illustrations.
Add a small crown-shaped shelf to hold a few 3D art pieces — a clay castle, a fairy garden terrarium, a painted rock collection — and the wall becomes a living gallery that grows and evolves as their art does.
How to Recreate This Look
- Shopping list: Assorted thrift store frames ($2–$8 each), blush or rose gold spray paint ($8–$15), fairy tale illustration prints ($10–$30 each), crown-shaped wall shelf ($20–$50), small ceramic castle figurine ($10–$25), glass terrarium with fairy figurine ($15–$35), hanging hardware ($5–$10)
- Step-by-step: Collect 6–8 frames in varied sizes and shapes. Sand lightly and spray paint blush pink. Let dry. Arrange frames on the floor first in a pleasing layout before committing to wall placement. Hang in that layout. Center the crown shelf within the arrangement. Style shelf with 3D pieces.
- Style compatibility: Works in romantic, eclectic, and fairy tale styles; beautiful on ivory, white, or blush walls
- Budget breakdown: Budget ($20–$50) — all thrifted frames + painted + free kid artwork; Mid-range ($50–$130) — quality frames + purchased prints + shelf; Investment ($130–$300) — custom framing + gallery lighting
- Space requirements: Works on any wall 5 feet wide or more
- Difficulty: Beginner
- Durability: Painted frames last indefinitely; rotate artwork regularly
- Seasonal adaptability: Swap a few pieces seasonally or for holidays
- Common mistakes: Don’t skip the floor layout step — hanging blind always results in uneven spacing. Don’t use heavy frames on standard picture hooks without checking wall anchors.
- Maintenance: Dust frames monthly; replace damaged artwork immediately so the gallery always looks intentional
Looking for a truly magical name worthy of your princess? These gorgeous royal names for girls are absolutely fit for royalty!
7. Cozy Reading Throne Corner
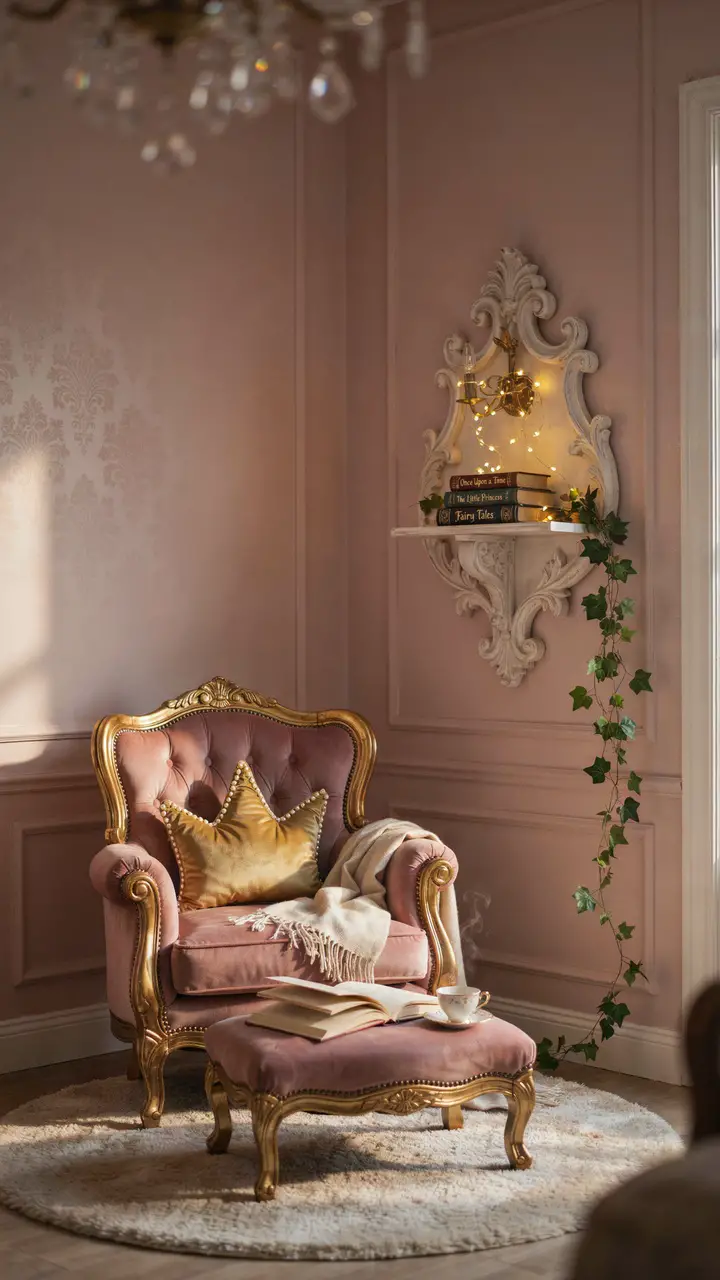
Every princess needs a reading throne — a gloriously over-the-top (in the most charming way) dedicated reading chair dressed up like actual royalty. Take a secondhand armchair and reupholster it (or have it done affordably) in a plush velvet in blush, violet, or emerald. Add a fringed throw, a crown-shaped pillow, and a small ottoman for tiny feet.
Mount a small ornate wall bracket beside the throne to hold a reading lamp and a stack of fairy tale books. Frame the whole corner with some trailing faux ivy and small gold sconce lights, and the reading corner becomes the room’s most beloved spot.
How to Recreate This Look
- Shopping list: Small velvet armchair ($120–$400 new, $30–$80 thrifted + reupholstered), crown-shaped pillow ($20–$45), ivory fringed throw ($25–$55), small velvet ottoman ($40–$100), baroque wall bracket ($20–$50), gold fairy light sconce ($25–$55), illustrated fairy tale books ($5–$20 each), faux ivy garland ($10–$25), circular plush cream rug ($40–$100)
- Step-by-step: Position the armchair in the corner at a slight angle — not flush against both walls. Place ottoman in front. Mount wall bracket at reading height. Drape faux ivy from bracket. Add sconce, books, pillow, and throw. Layer rug beneath the seating area.
- Style compatibility: Works in romantic, baroque, and eclectic styles; particularly beautiful with vintage or ornate furniture nearby
- Budget breakdown: Budget ($60–$120) — thrifted chair + painted + basic accessories; Mid-range ($120–$300) — quality velvet chair + full accessory set; Investment ($300–$700) — custom reupholstered throne chair with built-in reading light
- Space requirements: 5×5 foot corner minimum; ideal in rooms 10×10 feet or larger
- Difficulty: Beginner (new chair) to Intermediate (thrifted + reupholstered)
- Durability: Velvet shows wear over time — choose a performance velvet fabric for kids’ rooms
- Seasonal adaptability: Swap throw color seasonally; keep the chair as the permanent anchor
- Common mistakes: Don’t position the chair facing a wall — it should face the room so the child feels like they’re presiding over their kingdom. Don’t overfill the bracket with too many books.
- Maintenance: Vacuum velvet weekly with an upholstery brush; spot-clean spills immediately with cold water
8. Starlit Princess Ceiling Treatment
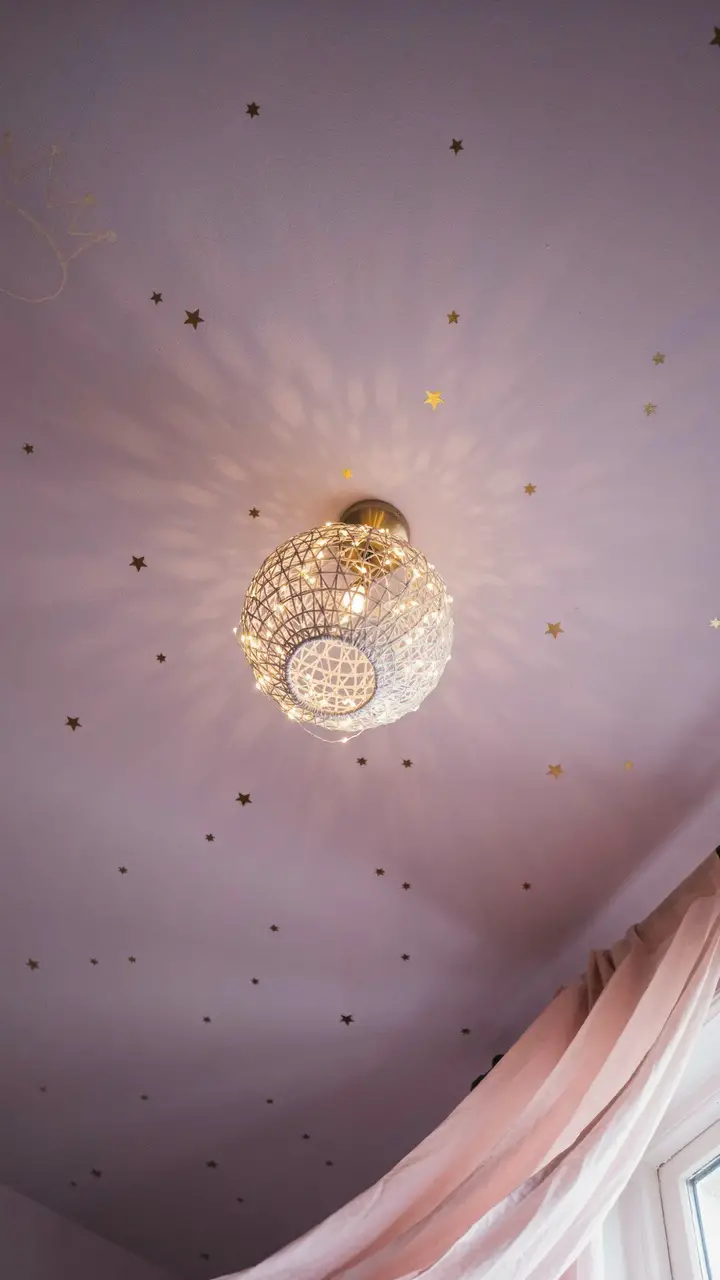
A princess ceiling doesn’t need to be fiber optic to be magical. A soft warm white with hand-painted or stenciled gold stars creates a subtle, elegant effect that glows beautifully in nightlight conditions. Add a large paper lantern or rattan pendant light wrapped in fairy lights as the room’s main light fixture, and the whole ceiling becomes part of the enchantment.
For a more elaborate effect, paint the ceiling a very soft lavender and add adhesive gold foil stars in a scattered pattern — the foil catches light differently than paint, creating a subtle shimmer throughout the day.
How to Recreate This Look
- Shopping list: Soft lavender ceiling paint ($25–$55), adhesive gold foil star stickers ($10–$25), large rattan globe pendant light ($45–$120), warm white fairy light string for pendant wrapping ($12–$25), ceiling light fixture canopy cover ($10–$25)
- Step-by-step: Paint ceiling lavender — two coats minimum. Let dry 48 hours. Apply gold foil stars in a scattered, organic pattern (cluster them slightly near the center, space out toward edges). Install rattan pendant light. Wrap fairy lights through the rattan exterior before hanging.
- Style compatibility: Works beautifully in romantic, boho, fairy tale, and eclectic styles
- Budget breakdown: Budget ($25–$55) — lavender paint + gold star stickers only; Mid-range ($55–$160) — paint + stars + rattan pendant; Investment ($160–$350) — custom chandelier + professional ceiling treatment
- Space requirements: Works in rooms of any size; most impactful in rooms with 8+ foot ceilings
- Difficulty: Beginner (painting) to Intermediate (pendant light installation — may need electrician)
- Durability: Foil stars last 2–3 years; rattan pendants are very durable
- Seasonal adaptability: Add subtle seasonal garland to the rattan pendant for holidays
- Common mistakes: Don’t apply foil stars too uniformly — random clusters look far more natural and magical. Don’t skip the fairy light wrapping; it transforms a basic pendant.
- Maintenance: Dust rattan pendant carefully with a dry brush; replace any fallen foil stars
Searching for a Disney-worthy name for your little princess? These enchanting Disney girl names are pure fairy tale magic!
9. Princess Castle Play Structure
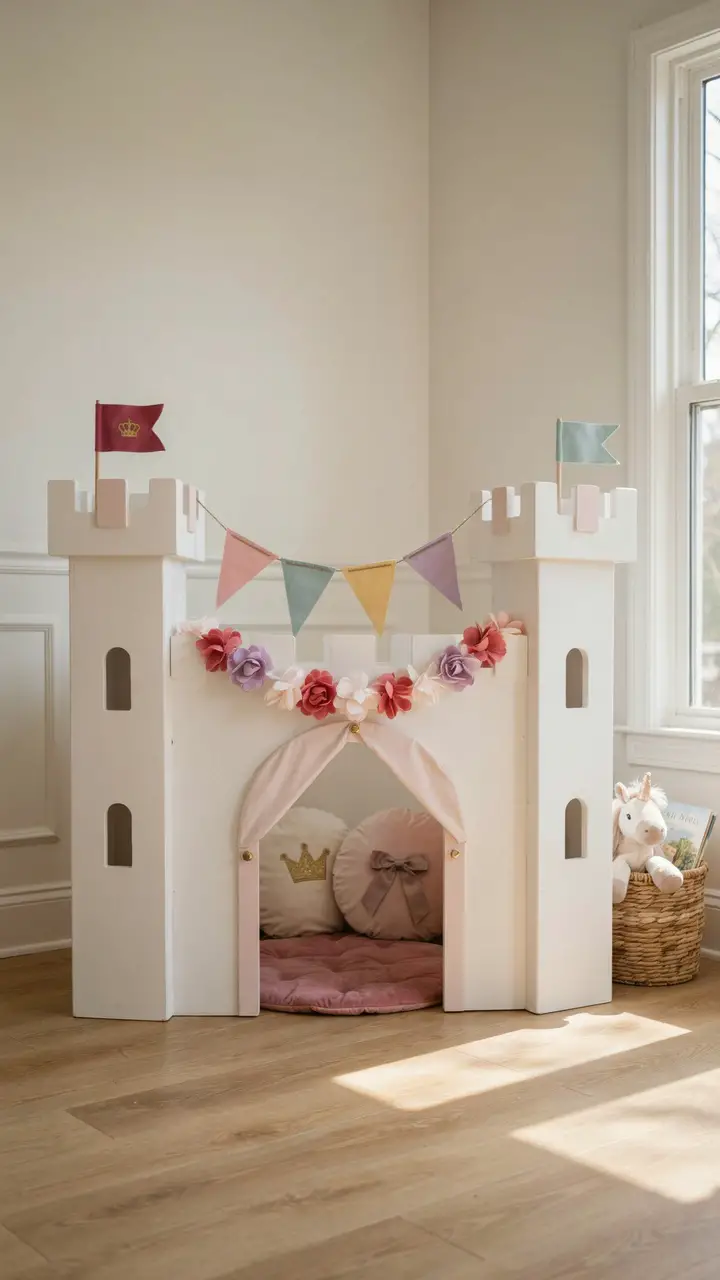
For rooms with enough space, a play castle structure becomes the room’s crown jewel. You can find affordable wooden or fabric castle tents that create an instant “tower” effect — or go full DIY with a wooden frame draped in white canvas and painted battlements. Add a rope ladder, a slide, and a lookout tower, and you’ve built the kind of playroom feature that children will talk about for years.
Even a simpler castle tent in fabric or canvas, positioned in the corner with a pennant banner and some felt flowers around the base, creates the magic without the construction project. Start with a tent version and see how much it gets used before committing to a built-in structure.
How to Recreate This Look
- Shopping list: Wooden castle tent kit or children’s fabric castle tent ($60–$300), white and soft gray paint for battlements ($10–$25), pink pennant banner ($10–$25), pink felt flower garland ($15–$30), round interior cushion ($25–$55), princess pillows ($15–$30 each), small flag on stick ($5–$10)
- Step-by-step: Assemble castle kit per instructions. Paint battlements and towers in white with subtle gray shadow detailing. Let dry. String pennant banner between towers. Add felt flower garland at base. Place cushion inside with pillows. Add flag.
- Style compatibility: Works in princess, fairy tale, and playful modern styles; best against neutral or light-colored walls so the castle pops
- Budget breakdown: Budget ($60–$120) — fabric castle tent + basic accessories; Mid-range ($120–$300) — wooden castle kit + painted details + full accessory set; Investment ($300–$800+) — custom built-in castle structure with slide
- Space requirements: Fabric tent needs 5×5 feet minimum; full wooden structure needs 8×8 feet minimum
- Difficulty: Beginner (fabric tent) to Advanced (DIY built structure)
- Durability: Fabric tents last 2–3 years with regular play; wooden structures last indefinitely
- Seasonal adaptability: Swap pennant colors seasonally; change flowers to berries or leaves in autumn
- Common mistakes: Don’t place a heavy wooden structure without verifying it can’t tip — anchor to wall if needed. Don’t skip the inside cushion; it’s what makes kids actually want to sit in it.
- Maintenance: Spot-clean fabric tent; touch up painted wood annually
10. Magical Princess Lighting Collection
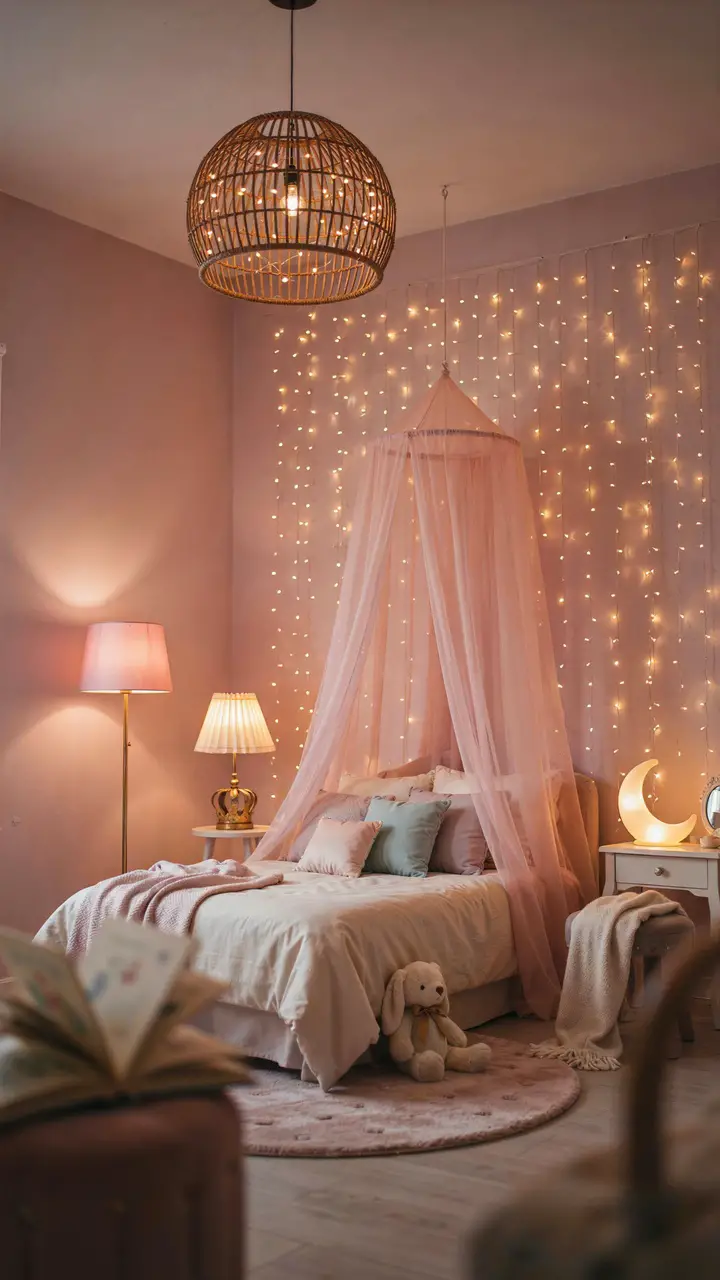
In a princess room, lighting does half the decorating work. Layer multiple light sources at different heights to create a warm, glowing atmosphere that feels genuinely enchanted. Start with the overhead rattan pendant (see #8), then add a floor lamp with a translucent pink shade, wall-mounted fairy light curtains behind the bed or canopy, a crescent moon night light, and a small table lamp with a floral or crown-shaped base.
The goal isn’t bright, functional overhead lighting — it’s a magical layer cake of gentle glows that makes the room feel like somewhere truly special at any hour of the day.
How to Recreate This Look
- Shopping list: Rattan globe pendant (see #8, $45–$120), floor lamp with blush shade ($50–$120), fairy light curtain strand ($20–$45), crescent moon night light ($20–$45), crown-base table lamp ($35–$90), warm white LED bulbs for all fixtures ($5–$15 per bulb)
- Step-by-step: Install pendant light centrally. Position floor lamp in the corner farthest from the window. Mount fairy light curtain behind the bed head. Place moon night light on nightstand. Add table lamp to a side surface. Use all warm white bulbs consistently for cohesion.
- Style compatibility: Works in romantic, boho, and fairy tale styles; layered lighting works in almost any aesthetic
- Budget breakdown: Budget ($40–$90) — fairy light curtain + moon night light + existing lamp + blush shade replacement; Mid-range ($90–$250) — two to three new light fixtures + fairy curtain; Investment ($250–$600) — full lighting suite + pendant installation
- Space requirements: Works in rooms of any size
- Difficulty: Beginner (plug-in fixtures) to Intermediate (wired pendant installation)
- Durability: LED bulbs last 10+ years; lampshades may yellow over time
- Seasonal adaptability: Completely timeless; warm lighting works year-round
- Common mistakes: Don’t mix warm and cool white bulbs — the color temperature clash destroys the magical atmosphere. Don’t rely on a single overhead light; the layering is everything.
- Maintenance: Dust lamp shades regularly; check all light cords for fraying
Ready to crown your little one with the perfect royal name? These gorgeous fairy usernames are enchanting, creative, and fit for any princess!
A Kingdom Built on Love
The most magical thing about a princess playroom isn’t the canopy, the castle, or the fairy lights — it’s the message it sends to your child: your imagination matters, your world is worth building, and this space is entirely yours. Whether you go all-out with a full castle build and fiber optic ceiling or simply drape some tulle over a hook and add a tiara display, you’re creating something that will live in their memory long after the room is repainted and the tiaras are packed away.
Start with the element that excites your child most — the canopy? The dress-up wardrobe? The reading throne? — and build from there. A great princess room isn’t finished in a weekend; it grows with the child who lives in it. And that, truly, is its own kind of fairy tale. 👑

Greetings, I’m Alex – an expert in the art of naming teams, groups or brands, and businesses. With years of experience as a consultant for some of the most recognized companies out there, I want to pass on my knowledge and share tips that will help you craft an unforgettable name for your project through TeamGroupNames.Com!