You know that moment when your best friend announces she’s pregnant and you immediately start plotting how to make her baby shower absolutely magical? Well, if she’s a Harry Potter fan, you’ve just hit the jackpot.
I’m talking wands, sorting hats, and enough whimsy to make even Professor McGonagall smile.
I recently helped host a Potter-themed shower for my cousin, and watching grown adults debate whether the baby would be Gryffindor or Hufflepuff was honestly the highlight of my year.
There’s something incredibly special about combining the wonder of Harry Potter with the anticipation of welcoming a new little wizard into the world.
Whether you’re planning for a die-hard Potterhead or someone who just enjoys a good theme, these 15 ideas will help you create a shower that’s equal parts nostalgic and baby-cute.
And the best part? You don’t need Hermione’s organizational skills or a Gringotts vault to pull it off. Let’s make some magic happen! 🙂
Platform 9¾ Entrance Display
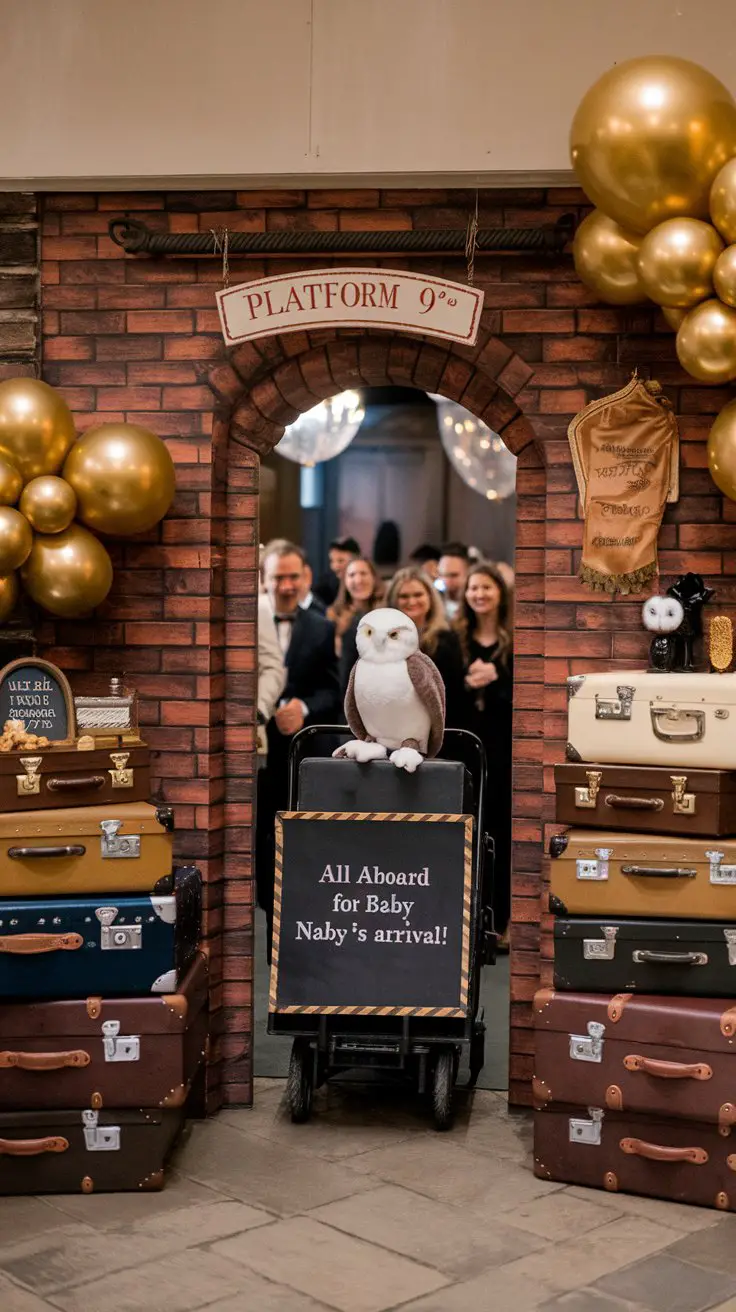
First impressions matter, right? Transform your entrance into the iconic Platform 9¾ to immediately transport guests into the wizarding world. I’ve seen this done with everything from elaborate brick wall facades to simple kraft paper “brick” patterns, and honestly, guests lose their minds either way.
How to Do It
- Create the brick wall: Use brick-patterned fabric backdrop ($15-25), printed poster board, or paint your own design on butcher paper
- Source the cart: Borrow a small utility cart or wagon and half-cover it with the brick pattern to create that “disappearing through the wall” effect
- Gather vintage touches: Hit up thrift stores for old suitcases, trunks, or leather bags (usually $5-15 each)
- Add labels: Print Hogwarts luggage tags and attach them to the cases with twine
- Include the owl: A stuffed Hedwig (around $10-20) or any white owl plush works perfectly
- Time estimate: 2-3 hours to set up, but you can prep the brick backdrop days in advance
- Budget tip: Skip the backdrop purchase and use brown packing paper to hand-draw or stamp a brick pattern—way cheaper and adds a personal touch
The beauty of this setup is that it doubles as an amazing photo op. Guests will line up for pictures, which means you’re getting great shower documentation without even trying!
Sorting Hat Baby Prediction Game

This game never fails to get everyone involved, and I mean everyone. Even Uncle Bob who usually sits quietly in the corner will have opinions about which Hogwarts house the baby belongs in.
How to Do It
- Make or buy the hat: Purchase a sorting hat ($15-30) or craft one using brown felt, wire for structure, and fabric stiffener
- Set up voting jars: Use clear containers from the dollar store and create house labels with printed parchment paper
- Prepare tokens: Use colored craft pom-poms, buttons, or poker chips in house colors (buy a pack of 100 for about $5)
- Create voting cards: Print parchment-style cards where guests can write why they chose their house
- Display the results: Keep a running tally on a chalkboard or parchment scroll nearby
- Time needed: 30 minutes to set up, ongoing throughout the party
- Variation: Have guests vote on baby traits too—brave, loyal, wise, or ambitious
Pro tip: Read some of the voting card reasons aloud during gift opening. The explanations are usually hilarious and heartfelt. My favorite from our shower was “Hufflepuff because this baby already has the most loyal parents-to-be.” Not crying, you’re crying.
For more team celebration inspiration, check out these adventure group names that capture the spirit of embarking on new journeys together.
Hogwarts House Table Settings
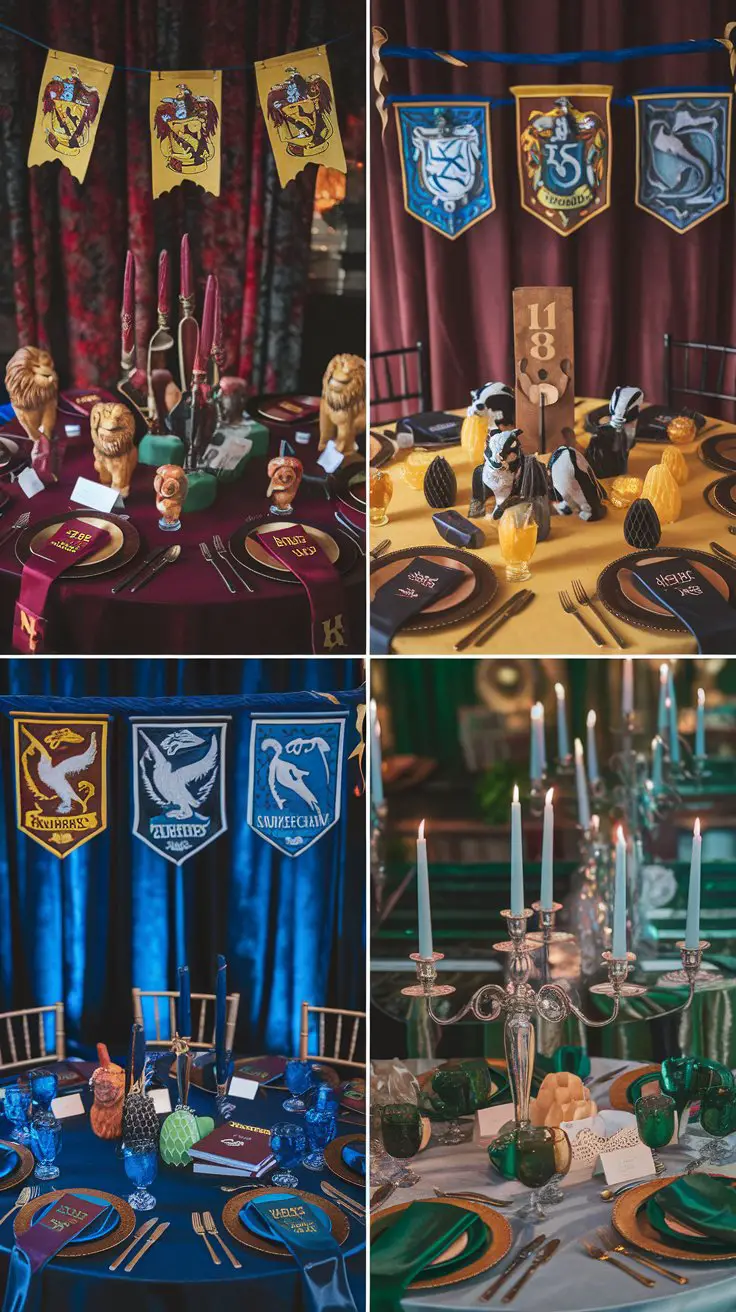
Why stick with one house when you can celebrate them all? Creating distinct Hogwarts house sections for seating adds visual drama and gives guests a fun way to pick their spot. Plus, it naturally encourages mixing if people choose houses other than their usual favorites.
How to Do It
- Choose your linens: Buy or borrow tablecloths in house colors—doesn’t have to be expensive, party stores often have solid colors for $3-5 each
- Create centerpieces: For each house, combine themed elements:
- Gryffindor: Red roses, gold candlesticks, toy lions, or sword letter openers
- Hufflepuff: Sunflowers, honey jars with tea lights, badger figurines, yellow ribbon
- Ravenclaw: Blue hydrangeas, stacked books, eagle feathers, bronze accents
- Slytherin: White roses with greenery, silver candleholders, snake figurines, elegant glass votives
- Add house banners: Print house crests or purchase mini flags ($10 for a set) to hang above each section
- Label the tables: Use printed tent cards with house names in appropriate fonts
- Include house trivia: Place a small card at each table with fun facts about that house
- Budget: Approximately $50-75 for all four tables if you’re resourceful
- Time to set up: About an hour for all four tables
The best part? Guests remember which table they sat at and it becomes part of their shower story. “Remember when we were at the Slytherin table and…”
Wand Selection Station

Every wizard needs a wand, and every shower guest needs a party favor they’ll actually keep! Setting up a wand selection station lets guests “choose” their wand (or let the wand choose them, if we’re being technical about it).
How to Do It
- Gather materials: Collect chopsticks, dowel rods, or sturdy twigs from your yard (free!)
- Decorate the wands: Use hot glue to add texture and designs, then paint with acrylics in various wood tones
- Add finishing touches: Some wands can have beads, others wrapped handles with twine or ribbon
- Create personalization: Set up a station where guests can add their initials to their wand with paint pens
- Make it interactive: Include a “wand personality quiz” printout so guests can find their perfect match
- Quantity needed: Make 2-3 extra beyond your guest count (people always want backups or one for their kids)
- Cost per wand: Approximately $0.50-1.50 depending on embellishments
- Time investment: Plan for an evening or weekend afternoon—put on the movies and make it fun!
- Alternative: Purchase pre-made wands online for $2-4 each if crafting isn’t your thing
BTW, if you’re short on time, you can also set up the wand-making as an actual shower activity. Guests decorate their own wand to take home. Two birds, one spell!
If you’re planning other magical celebrations, these harry potter team names offer great inspiration for group activities.
Potions Class Beverage Bar
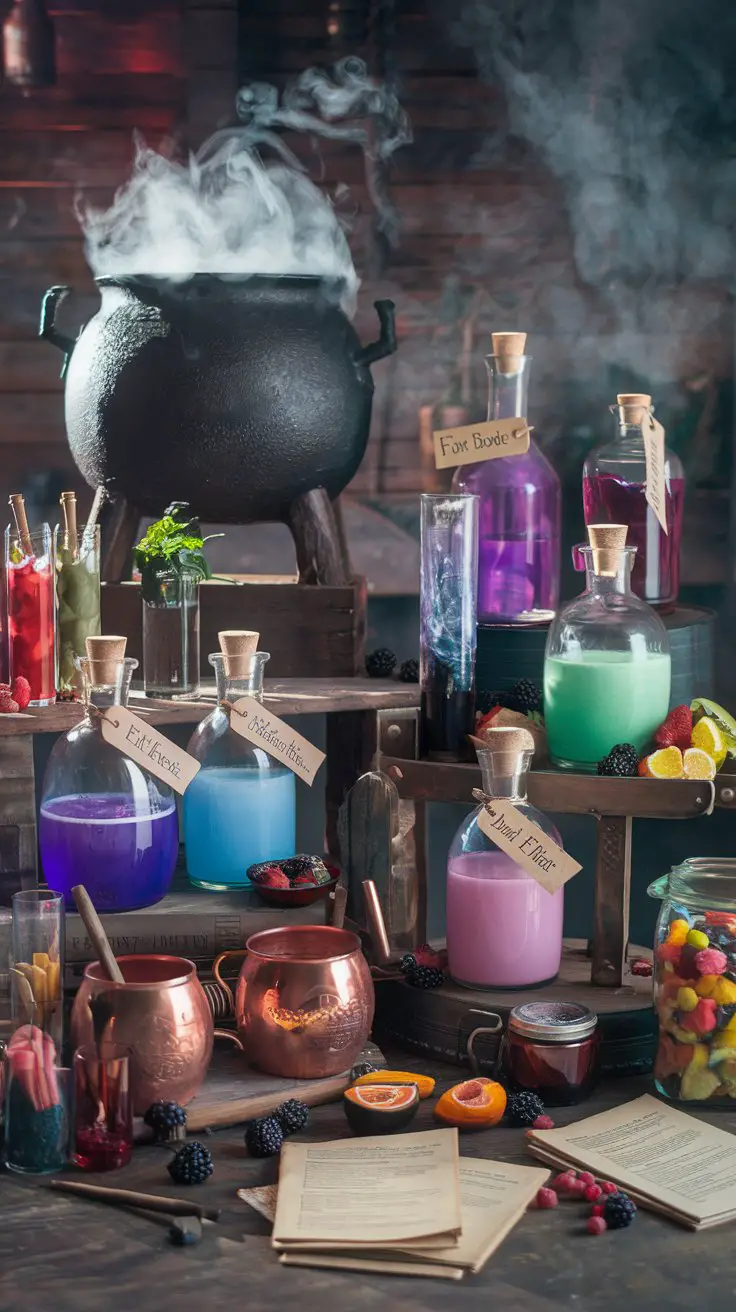
Nothing says “wizard celebration” quite like a bubbling potions station! A themed beverage bar with creative “potion” names turns regular drinks into magical elixirs. This was hands-down the most photographed element at the shower I helped with.
How to Do It
- Select your potions: Plan 4-6 different beverages:
- Felix Felicis (Liquid Luck): Gold sparkling cider or champagne for the adults
- Amortentia (Love Potion): Pink lemonade or strawberry punch
- Polyjuice Potion: Green smoothies or lime punch with color-changing ice cubes
- Butterbeer: Cream soda with butterscotch syrup topped with whipped cream
- Pumpkin Juice: Apple cider mixed with pumpkin spice
- Veritaserum (Truth Serum): Clear sparkling water with lemon
- Create the cauldron punch: Use a large black cauldron (around $15-25) and add dry ice right before serving for dramatic effect
- Label everything: Print parchment-style labels and attach with twine to each bottle
- Set up garnish station: Provide options like fresh herbs, edible flowers, fruit slices, and fun straws
- Add the aesthetic: Stack vintage books, place spell ingredient jars (filled with candy), and scatter faux potion bottles
- Safety note: Keep dry ice separate and use tongs—never touch directly!
- Budget: About $40-60 for all beverages and decorations if you shop smart
- Prep time: 1-2 hours the morning of the shower
The dry ice effect alone makes guests feel like they’re actually in Snape’s classroom. Just maybe with less terror and more joy. 🙂
Golden Snitch Cake Pops
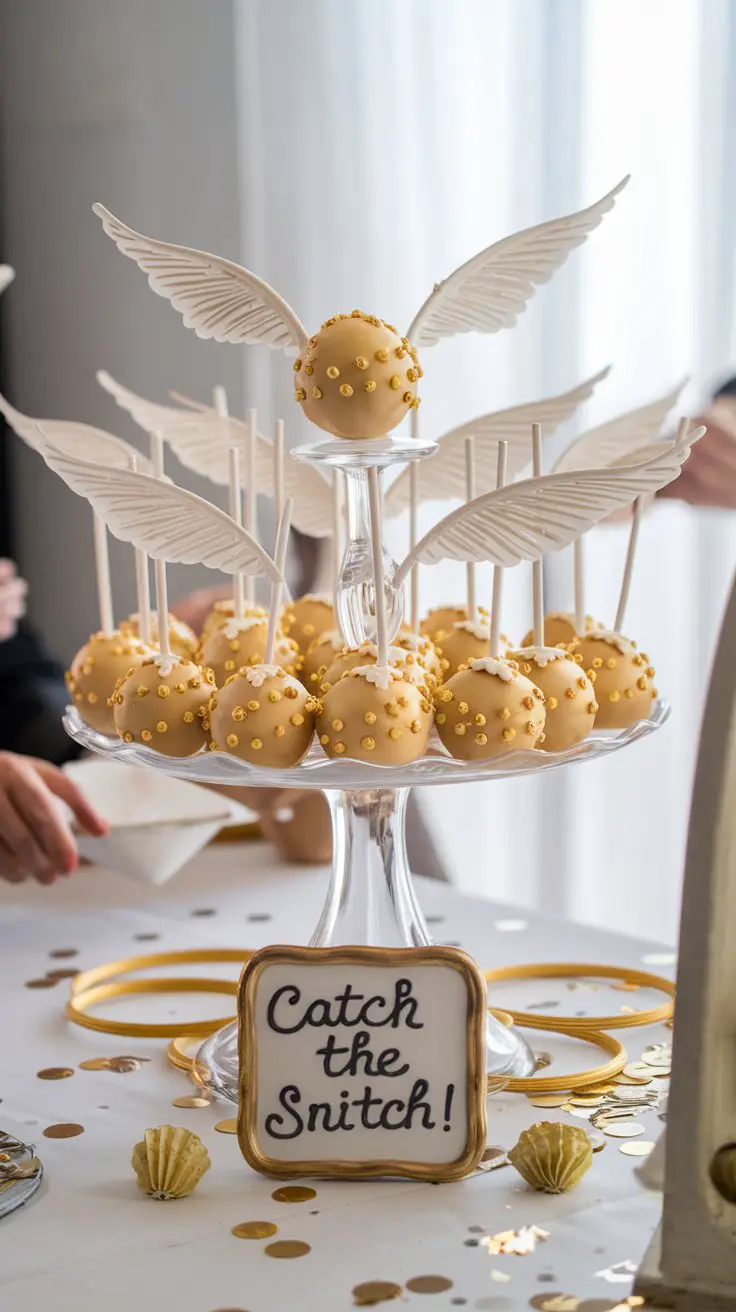
Desserts need to be both delicious and Instagram-worthy, right? Golden Snitch cake pops check both boxes beautifully. They’re adorable, themed perfectly, and way easier to make than you’d think.
How to Do It
- Make or buy cake pops: Bake your favorite cake, crumble it, mix with frosting, and roll into balls (or buy pre-made)
- Coat in gold: Dip pops in gold candy melts ($5-8 per bag)
- Add shimmer: Dust with edible gold luster dust or gold shimmer spray while still slightly wet
- Create wings: Cut wing shapes from wafer paper (edible!) or white candy melts piped onto parchment
- Attach wings: Use a tiny bit of melted chocolate as “glue” to attach wings to the golden sphere
- Add details: Use an edible marker to draw the wing patterns if desired
- Display beautifully: Present on a tiered stand or stick them in a foam block covered with gold fabric
- Quantity: Plan for 2-3 per guest
- Time needed: About 3-4 hours total (plus freezing time)
- Shortcut: Order plain cake pops from a bakery and just add the wings and gold dust yourself
These little golden beauties are proof that themed treats don’t have to be complicated. Plus, they’re the perfect size for a baby shower where people want to taste everything without committing to a huge slice of cake.
Marauder’s Map Guest Book

Forget the standard guest book—this is so much better! A Marauder’s Map styled guest book becomes a keepsake that parents will actually treasure. It’s interactive, meaningful, and totally on-theme.
How to Do It
- Create the base: Purchase parchment paper or age regular paper with tea-staining (soak paper in strong tea, let dry)
- Design the map: Hand-draw or digitally design a map layout with winding paths and rooms
- Add personalization: Include the baby’s name (or “Baby [Last Name]”) and shower date
- Create signature spaces: Leave plenty of blank areas along the paths for guests to sign
- Include prompts: Add small questions like “Your advice for the new parents:” or “Your wish for baby:”
- Provide authentic pens: Use calligraphy pens or attach feathers to regular pens for the quill effect
- Set up the station: Display on an antique desk or table with candles and an ink bottle (real or decorative)
- Finishing touch: Get a wax seal kit ($10-15) for guests to seal their messages
- Alternative format: Use a large poster-sized map that can be framed afterward
- Time to create: 2-3 hours for design and preparation
- Cost: About $15-25 for supplies
The mom-to-be can frame this and hang it in the nursery. How cool is that? Years later, the kid can read all the messages from people who celebrated before they even arrived.
For creative name ideas that match this magical theme, explore these unique group names perfect for any special gathering.
Diagon Alley Food Labels
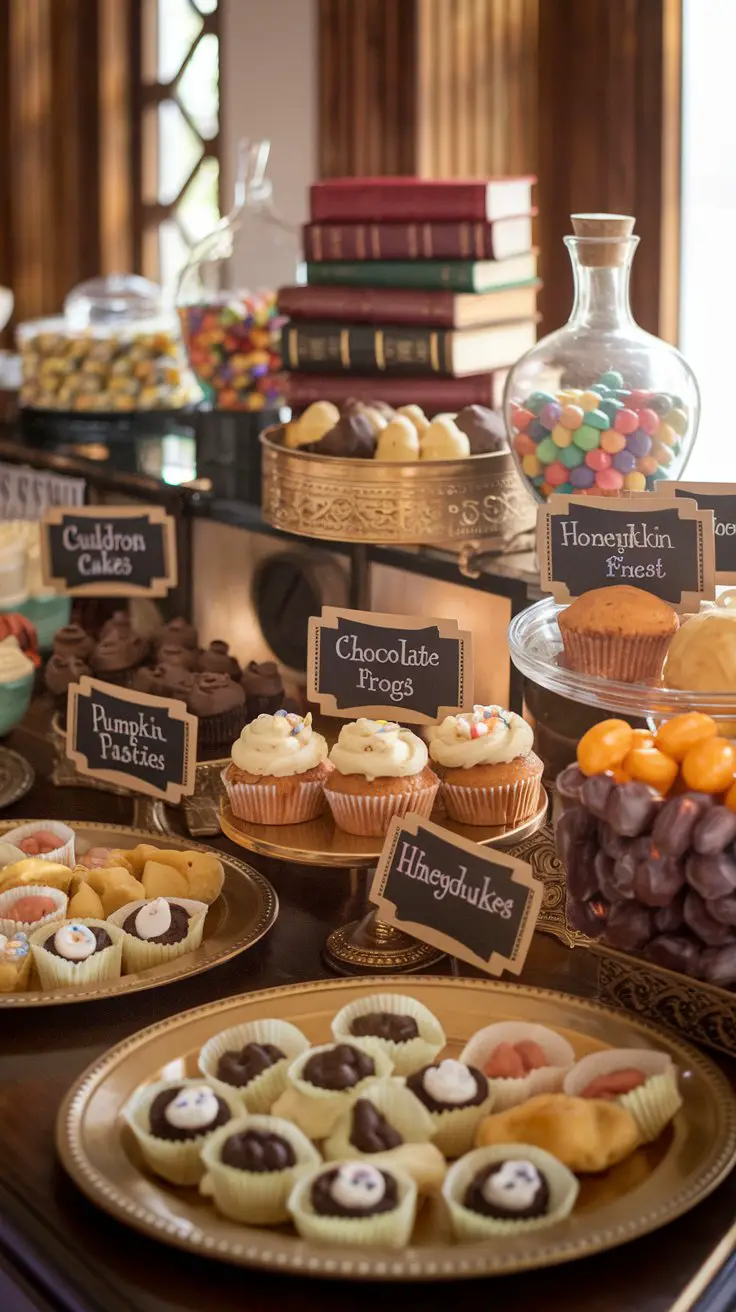
Okay, so you’re serving regular party food—but are you though? With clever Diagon Alley themed food labels, your veggie platter becomes something from the wizarding world. This is my favorite hack for making a shower feel completely themed without cooking anything complicated.
How to Do It
- Create your menu translations:
- Cauldron Cakes: Any cupcakes or muffins
- Pumpkin Pasties: Mini pumpkin tarts or empanadas
- Treacle Tart: Any custard or caramel tart
- Chocolate Frogs: Chocolate brownies or frog-shaped chocolates
- Bertie Bott’s Every Flavour Beans: Jelly beans in apothecary jars
- Rock Cakes: Oatmeal cookies or scones
- Licorice Wands: Pretzel rods dipped in chocolate
- Fizzing Whizzbees: Any fizzy candy or honey candies
- Honeydukes’ Finest: General candy buffet section
- Design the labels: Use parchment-style paper and vintage fonts (free templates online)
- Display creatively: Print labels and attach to small chalkboards, acrylic stands, or wooden blocks
- Add descriptions: Include a small note about what each item actually is for guests unfamiliar with Potter references
- Group by location: Organize sections like “Honeydukes Sweet Shop,” “The Leaky Cauldron,” and “Hogwarts Feast”
- Budget: Free if you print at home, or about $10-15 for nicer printing
- Time needed: About an hour to design and print labels
- Pro tip: Include both the wizarding name and the actual food in smaller text so guests aren’t guessing
Honestly, guests get such a kick out of this. I watched a grandmother laugh so hard when she realized “Pumpkin Pasties” were just mini quiches. The theming makes everything more special!
Hogwarts Acceptance Letter Invitations
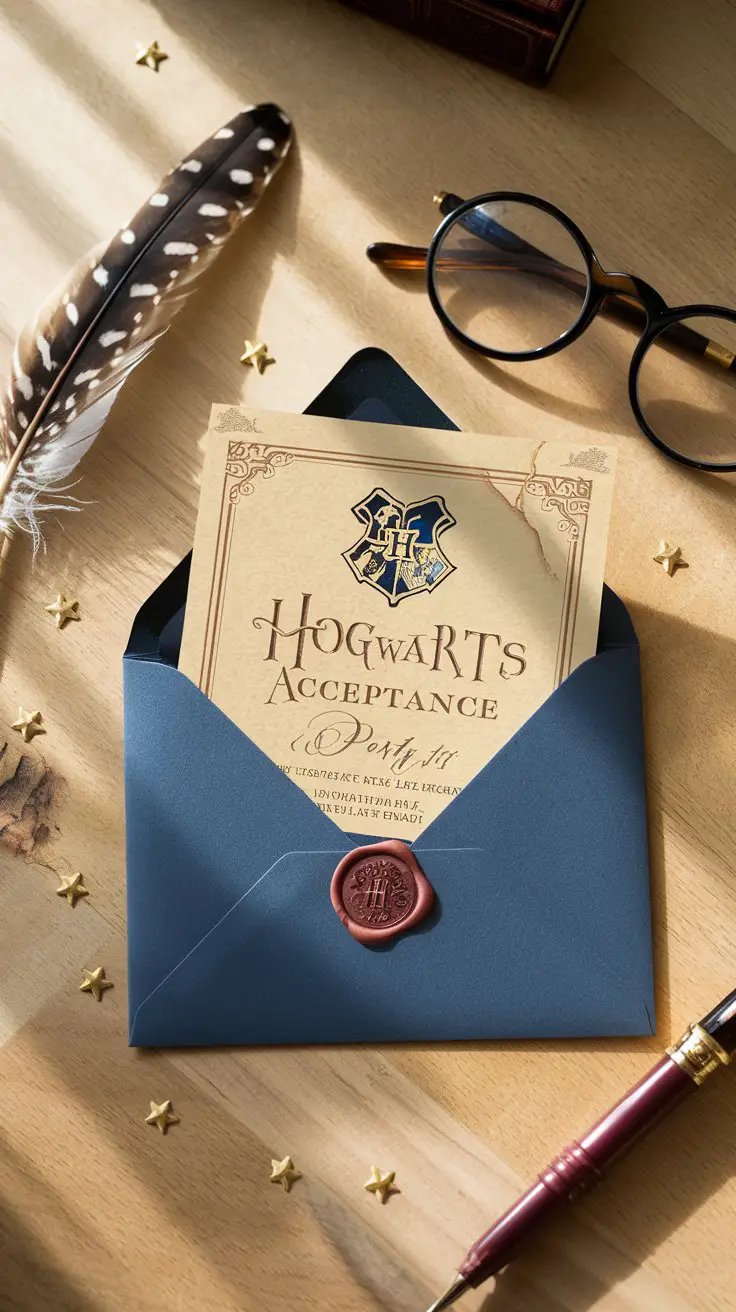
Set the tone before guests even arrive with Hogwarts acceptance letter style invitations. These immediately tell people this isn’t just any baby shower—it’s going to be magical. Plus, they’re surprisingly easy to make!
How to Do It
- Design the letter: Use a template or create your own with the Hogwarts crest at the top
- Write the invitation text: Adapt the famous letter opening: “Dear [Guest Name], We are pleased to inform you that you have been invited to celebrate the upcoming arrival of [Baby Name] at their magical baby shower…”
- Include details: Date, time, location, RSVP info, and registry details in wizard-appropriate language
- Print on parchment: Use parchment paper or age regular paper with tea-staining
- Address envelopes: Hand-address in green ink or emerald marker
- Add wax seals: Use a wax seal kit with a generic “H” or shield design ($12-20 for a kit that does 25+ invitations)
- Include a “ticket”: Add a small Platform 9¾ boarding pass as a separate insert
- Quantity: Order 10% more than your guest count for keepsakes and mistakes
- Cost per invitation: About $2-4 each if you DIY
- Time investment: Plan for an evening to assemble, plus drying time for wax seals
- Alternative: Several Etsy shops sell customizable digital or printed versions if you’d rather skip the DIY
These invitations alone get people excited. I’ve had guests tell me they kept their invitation as a keepsake even before attending the shower!
House Points Competition

Want to keep guests engaged throughout the entire party? A House Points competition running all afternoon creates friendly rivalry and keeps the energy up. Plus, it gives that one competitive aunt something to focus on. 🙂
How to Do It
- Create the scoreboard: Use four tall clear vases, cylinders, or jars labeled with house names
- Prepare the “points”: Buy glass gems, large beads, or colored stones in house colors (about $10 for all four houses)
- Assign points for activities:
- Winning shower games: 10 points
- Most creative gift wrap: 5 points
- First to arrive: 5 points
- Participating in activities: 3 points
- Making the mom-to-be laugh: 5 points
- Best baby advice: 5 points
- Appoint a scorekeeper: Designate someone (maybe the dad-to-be?) to award points throughout
- Display prominently: Place the scoreboard where everyone can see the running tallies
- Announce winners: At the end of the shower, the winning house gets first pick at the dessert table or an extra favor
- Keep it lighthearted: Emphasize this is just for fun—no actual stakes!
- Time commitment: Ongoing throughout the 2-3 hour shower
- Cost: About $15-20 for supplies
- Variation: Let guests sort themselves into houses at arrival and compete as teams
The competition aspect gets people mingling across different groups, which is perfect for showers where not everyone knows each other. It’s a built-in conversation starter!
For team-building inspiration that works for any gathering, check out these team names for competition ideas.
Owl Post Photo Booth
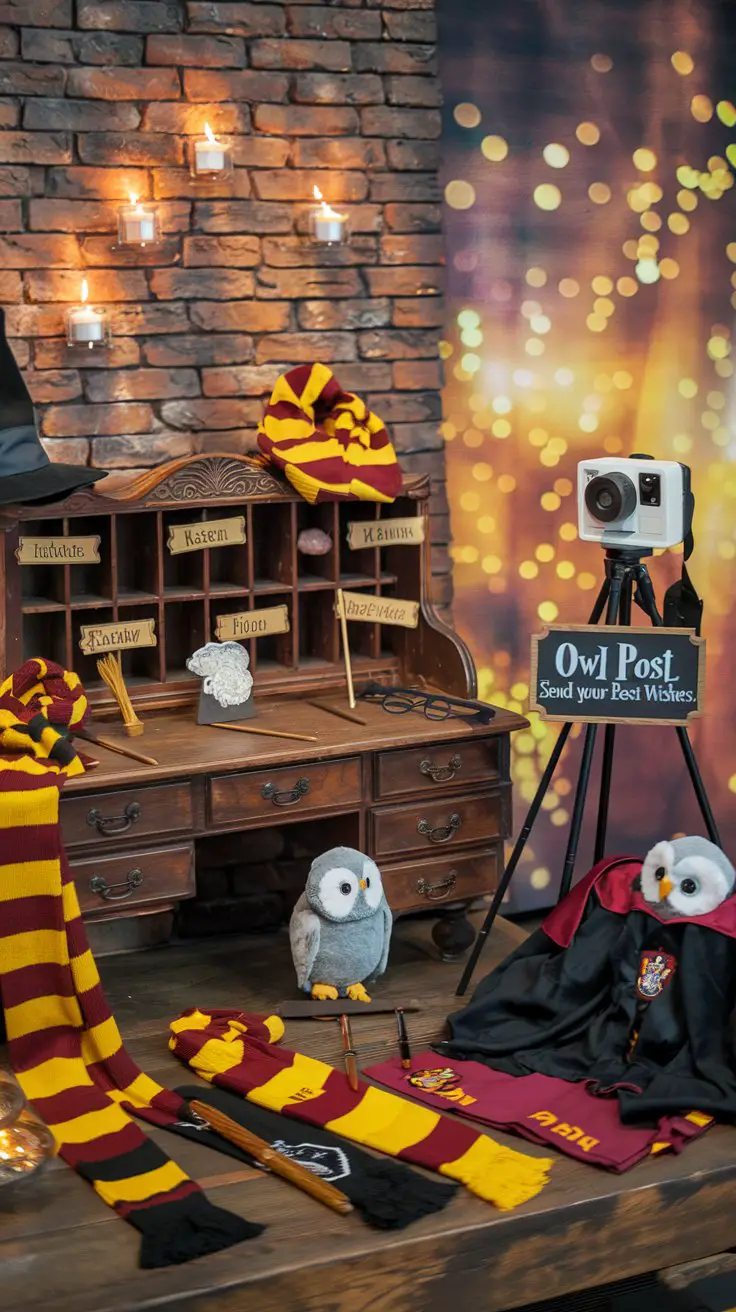
Every shower needs a photo booth, but a Harry Potter themed owl post station takes it to another level. This becomes the spot where everyone wants their picture taken, and you end up with amazing shower documentation without hiring a photographer.
How to Do It
- Set up the backdrop: Use the same brick wall pattern from your entrance or create a new scene with hanging candles
- Create floating candles: Stuff paper towel tubes with tissue paper, add LED tea lights on top, hang with clear fishing line at varying heights
- Gather props: Collect or make:
- Round glasses (dollar store, 6 pairs for $5)
- House scarves (DIY from felt or buy online for $8-15 each)
- Witch and wizard hats (party store, about $3-5 each)
- Wands from your wand station
- Stuffed owls
- Signs with famous quotes: “Mischief Managed,” “Always,” “I solemnly swear…”
- Brooms (dollar store toy brooms work great!)
- Set up a photo station: Provide a polaroid or instant camera with film so guests can take physical photos
- Include a “memory box”: Have guests take a photo, write a message on it, and drop it in a decorative box for the parents
- Create good lighting: String lights or a ring light makes photos look professional
- Make it self-serve: Clear instructions so guests can use it whenever they want
- Budget: Around $50-75 for all props if you shop smart
- Setup time: About 45 minutes to an hour
The best part? Parents get physical photos from the shower to put in the baby book, and guests get to take silly pictures that they’ll actually look at later. Win-win!
Quidditch Broomstick Centerpieces
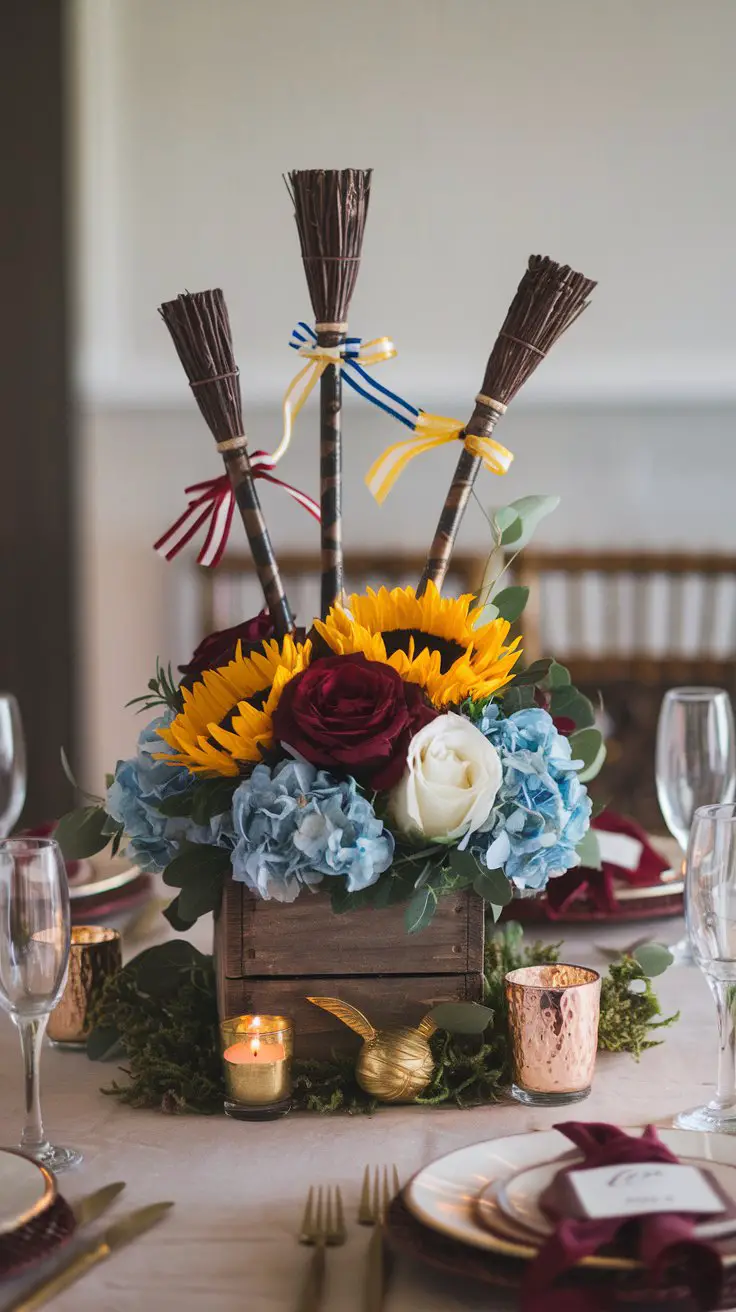
Centerpieces can make or break your table aesthetic, and miniature broomstick arrangements are both thematic and surprisingly elegant. They work for any house color scheme too!
How to Do It
- Create mini broomsticks: Use cinnamon sticks or small dowels as handles, attach natural raffia or twine as bristles
- Prepare containers: Use small wooden crates, terra cotta pots, or mason jars as bases
- Add stability: Fill containers with floral foam and cover with moss or decorative grass
- Insert broomsticks: Arrange 3-5 broomsticks per centerpiece at varying heights
- Add flowers: Tuck in fresh or silk flowers in your chosen house colors around the broomsticks
- Include golden touches: Add gold spray-painted walnuts, golden snitch ornaments, or gold ribbon
- Personalize each table: If doing house tables, customize colors to match
- Make them favors: Attach a small tag: “Take a broom home—every parent needs a clean sweep!” Corny? Yes. Do guests love it? Also yes.
- Cost per centerpiece: Approximately $8-15 depending on flower choice
- Time to create: About 30 minutes per centerpiece
- Quantity needed: One per table, plus one for the gift/cake table
These centerpieces photograph beautifully and double as conversation pieces. I’ve watched guests spend 10 minutes examining the craftsmanship on the tiny broomsticks!
Honeydukes Candy Buffet
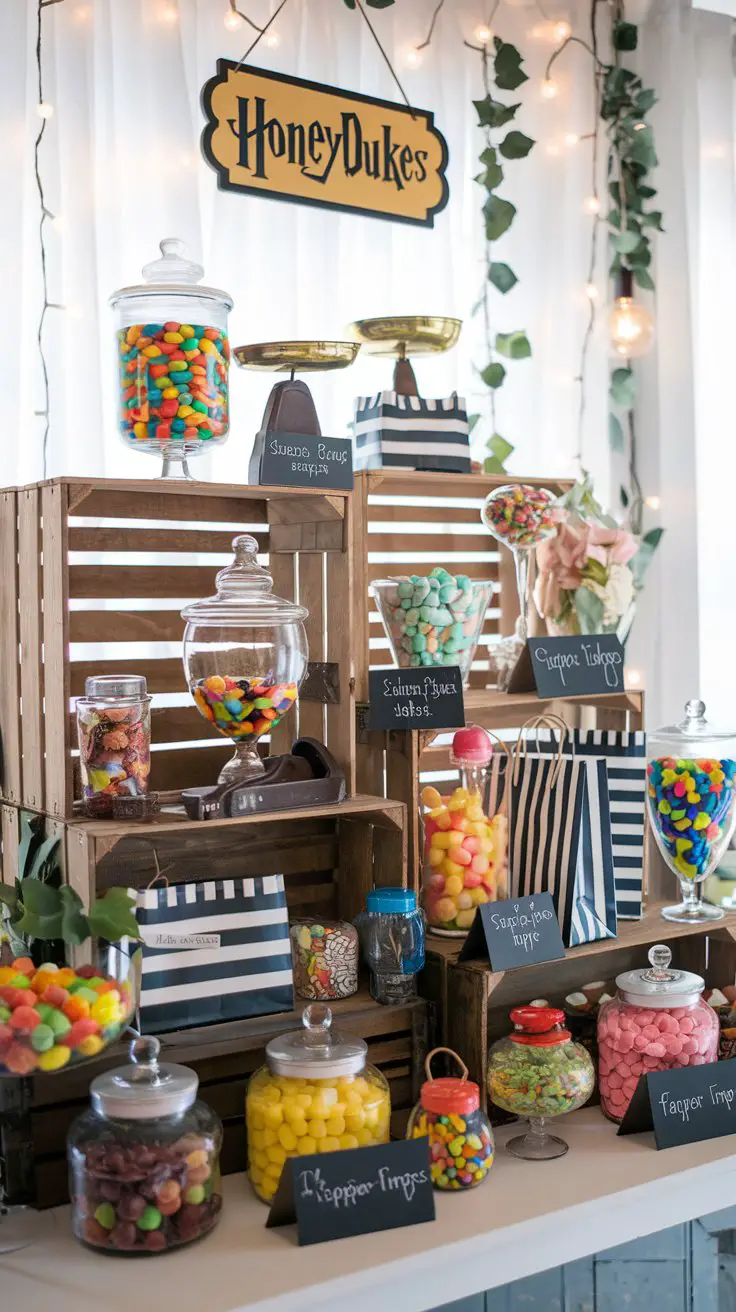
A candy buffet is pretty standard for showers, but a Honeydukes themed display makes it feel like guests are actually shopping in the famous sweet shop. Plus, candy bars are the easiest way to feed a crowd without actual cooking!
How to Do It
- Select your sweets: Choose a variety of textures and colors:
- Chocolate Frogs: Any chocolate frogs or frog-shaped candies
- Bertie Bott’s Beans: Jelly Belly jellybeans (get the actual Bertie Bott’s or regular flavors)
- Acid Pops: Sour lollipops or jawbreakers
- Fizzing Whizzbees: Honey or pop rocks
- Sugar Quills: Rock candy sticks or pretzel rods
- Pepper Imps: Cinnamon candies
- Licorice Wands: Black licorice or chocolate sticks
- Sherbet Lemons: Lemon drops
- Create the display: Use varying heights with crates, cake stands, and risers
- Choose containers: Glass jars from thrift stores or dollar stores ($1-5 each)
- Label everything: Print Honeydukes-style labels with candy names
- Provide scoops: Include serving spoons or scoops for each jar
- Offer take-home bags: Striped paper bags or small boxes guests can fill
- Add atmosphere: Hang a “Honeydukes” sign and include some fake vines or flowers
- Budget: About $75-100 for candy and containers (candy is the expensive part!)
- Setup time: 1-2 hours to arrange everything
- Tip: Buy candy in bulk from warehouse stores to save money
The candy buffet does double duty as both decoration and dessert. Plus, guests love having options, and it accommodates different dietary preferences easily.
The Daily Prophet Newsletter
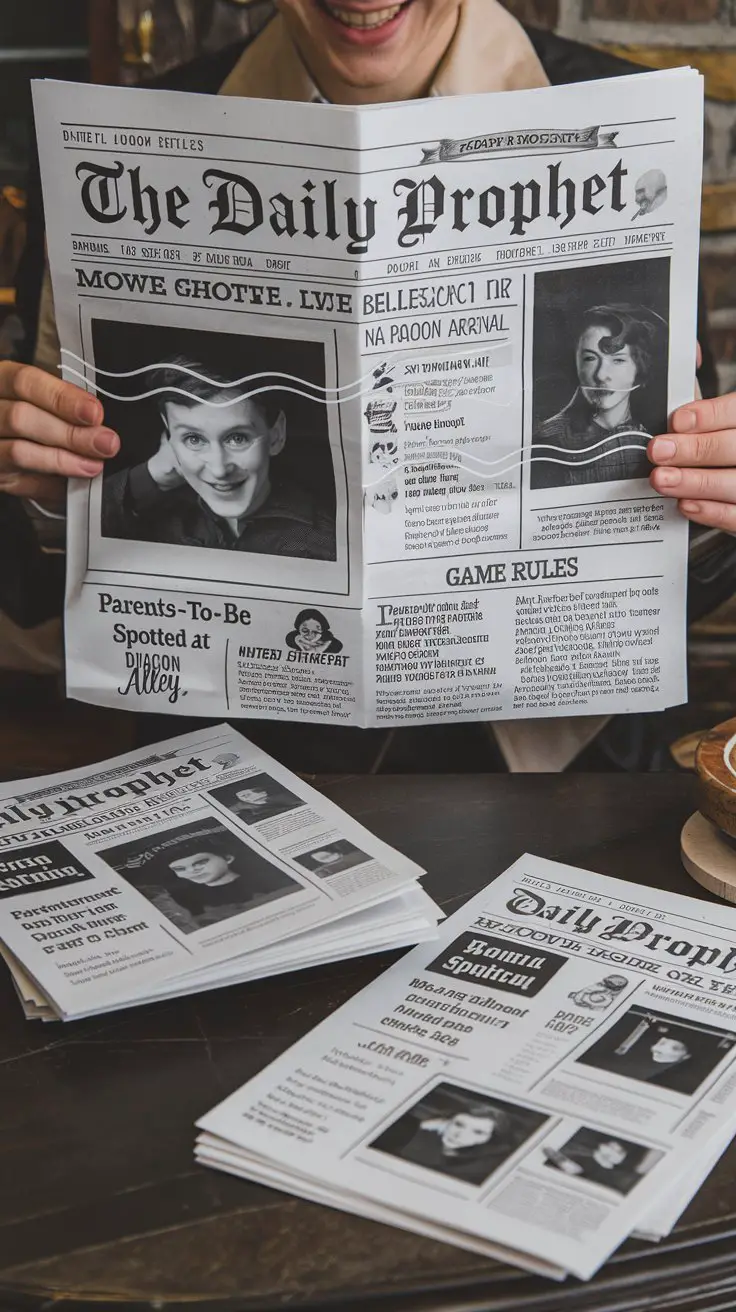
This is such a clever touch that adds personality throughout the shower! Create a Daily Prophet style newsletter as your program or as table reading material. It’s entertaining, informative, and totally keepsake-worthy.
How to Do It
- Design the layout: Use newspaper column formatting with Daily Prophet masthead
- Create headlines: Adapt your shower details into news stories:
- “Miracle Expected: Wizard Family to Welcome New Addition”
- “Baby Registry Spotted at Muggle Stores”
- “Shower Schedule: A Magical Day Awaits”
- “Guests Arrive via Floo Network (and Minivans)”
- Include sections:
- Event schedule and timeline
- Game instructions
- Fun facts about the parents
- Baby predictions chart
- Registry information disguised as “advertisements”
- A “horoscope” predicting baby’s personality
- Add photos: Include engagement or maternity photos styled like “moving photographs”
- Print professionally: Many copy shops can print newspaper-style for reasonable prices
- Distribute: Place one at each seat or in a basket at the entrance
- Cost: About $20-40 for 30-50 copies
- Design time: 2-3 hours to create and perfect
- Alternative: Create it as a digital PDF and print at home on regular paper
I love this idea because it gives guests something to read while mingling before activities start, and it’s such a unique keepsake. Plus, writing the funny headlines is genuinely entertaining!
For more creative gathering ideas, explore these beautiful group names that celebrate special occasions.
Baby Name Sorting Ceremony
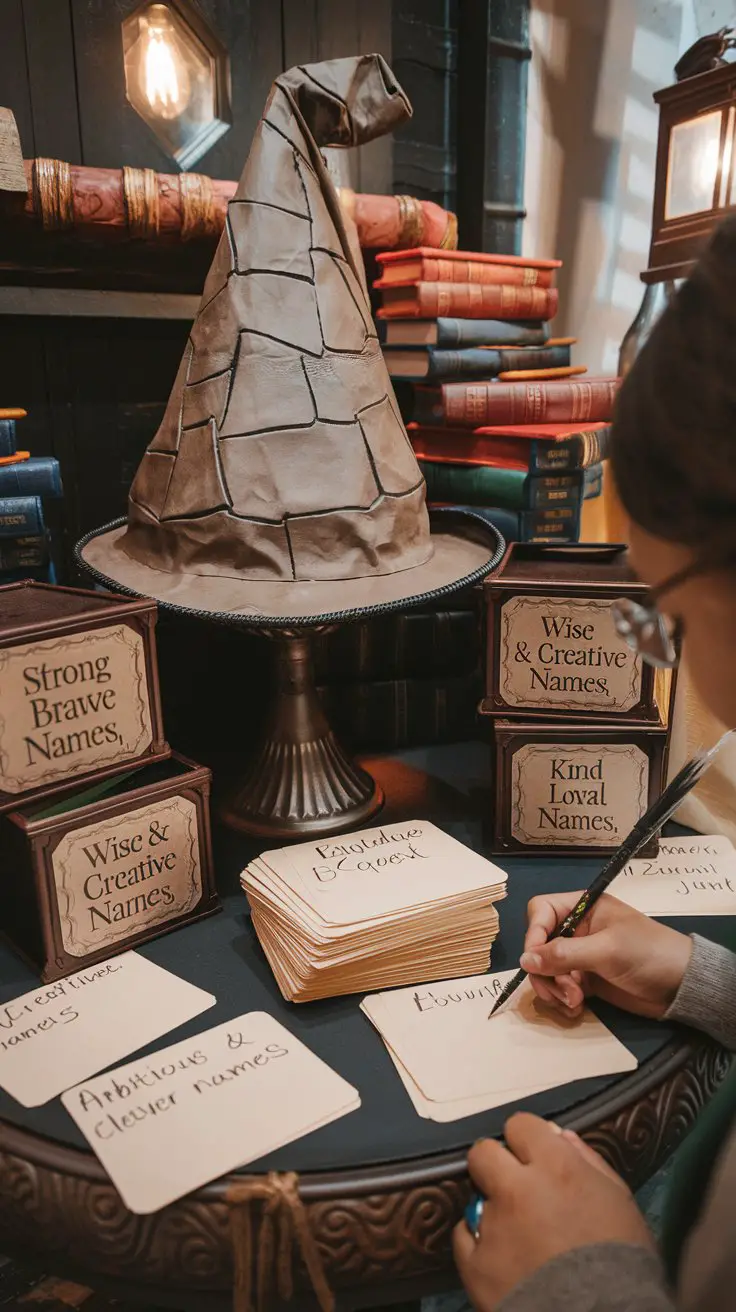
This activity combines the sorting hat idea with actual baby naming help! A baby name sorting ceremony lets guests suggest names and “sort” them into categories. It’s both helpful for undecided parents and fun for guests who all think they know the perfect name.
How to Do It
- Set up sorting categories: Create four boxes labeled with name attributes:
- Gryffindor qualities: Strong, Brave, Bold names
- Hufflepuff qualities: Kind, Gentle, Classic names
- Ravenclaw qualities: Wise, Creative, Unique names
- Slytherin qualities: Ambitious, Sophisticated, Elegant names
- Provide suggestion cards: Print small parchment-style cards where guests write one name per card
- Include instructions: “Suggest a name for Baby [Last Name] and sort it into the category that fits best”
- Display examples: Show a few sample names in each category to guide guests
- Make it anonymous: Guests don’t sign their cards, keeping it pressure-free
- Review during shower: Have the parents-to-be read some aloud if they’re comfortable
- Alternative approach: If parents have chosen a name but haven’t shared it, have guests guess and sort their guesses
- Setup cost: About $10 for boxes, cards, and decorations
- Time needed: Ongoing activity throughout the shower
- Bonus: Parents get a collection of name ideas to consider, even if they’ve already decided
This works especially well for parents who genuinely haven’t chosen a name yet. And even if they have, guests love participating in the “selection process.” Plus, the sorting into personality categories makes it more meaningful than just a random name suggestion box.
Hogwarts House Baby Onesie Decorating
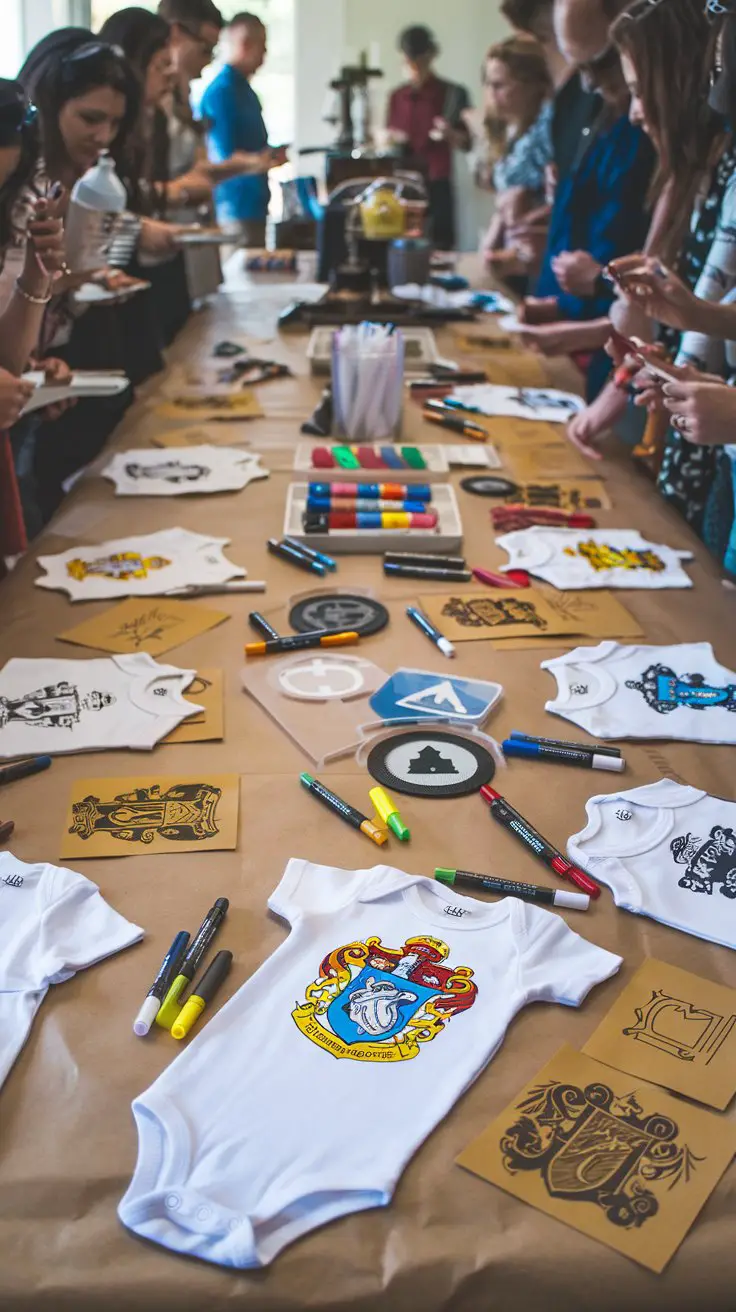
Hands-on activities keep guests engaged, and decorating house-themed onesies gives them something creative to do while providing the baby with adorable outfits. It’s productive fun—my favorite kind!
How to Do It
- Purchase supplies:
- Plain white onesies in sizes newborn through 12 months (5-pack for about $10-15)
- Fabric markers and paint in house colors (about $15-20 for a set)
- Iron-on transfers of house crests (downloadable and printable)
- Stencils with house animals or simple shapes
- Cardboard inserts to prevent bleed-through (cut from boxes you have!)
- Set up the station: Cover a long table with craft paper or plastic tablecloth
- Provide inspiration: Display examples of completed designs or print idea sheets
- Offer different skill levels: Some guests want to freehand elaborate designs, others prefer tracing stencils
- Include instructions: Simple how-to guide for fabric markers and iron-on application
- Allow drying space: Set up a clothesline or drying rack for finished onesies
- Make it optional: Not everyone wants to craft, so keep it as one activity option
- Time allocation: About 45-60 minutes as a mid-shower activity
- Cost: Approximately $40-50 for supplies for 25-30 guests
- Pro tip: Have parents choose their favorite house or let guests decorate all four
The beautiful thing about this activity is guests of all artistic abilities can participate. Some create museum-worthy designs, others add sweet simple touches, and all of them are meaningful because they’re handmade with love.
Magical Mocktail Recipe Cards
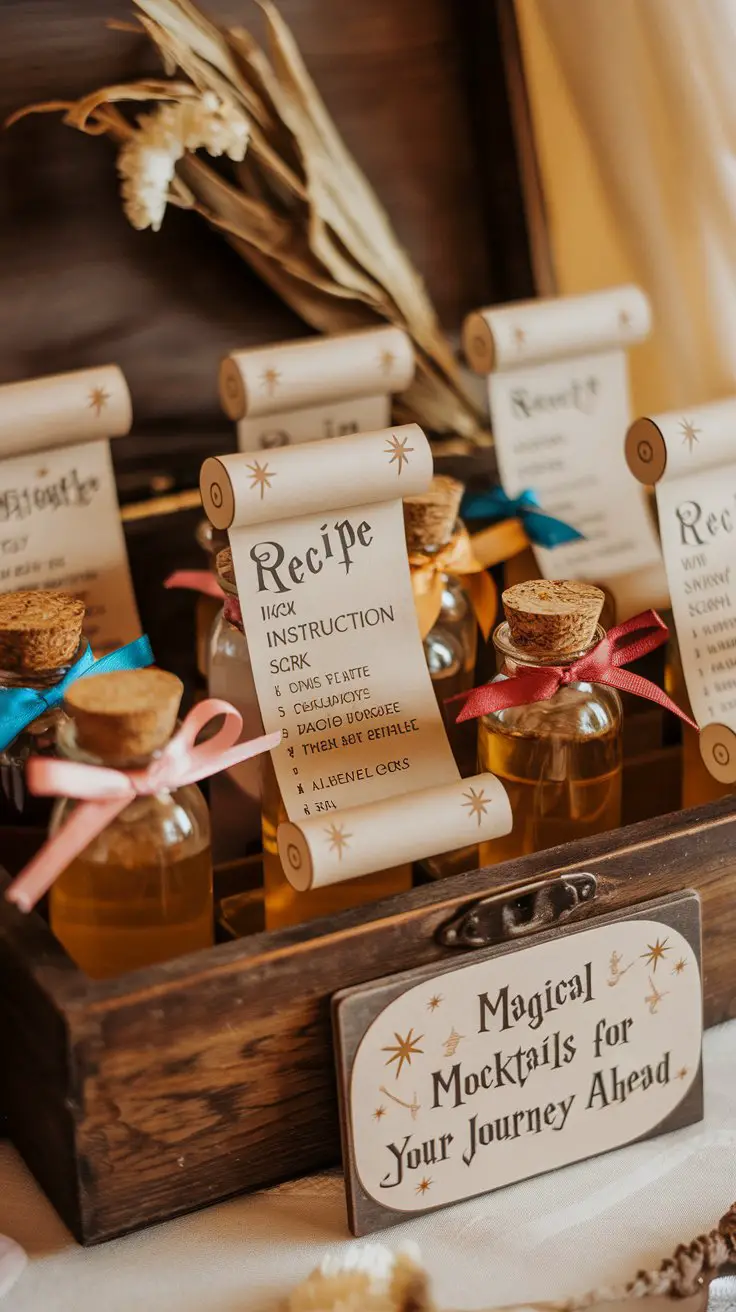
Send guests home with something useful! Themed mocktail recipe cards featuring the potions you served (plus a few bonus recipes) make practical favors that guests will actually use. Plus, they can recreate the shower magic at home.
How to Do It
- Design the cards: Create recipe cards for each potion you served, plus 2-3 bonus recipes
- Include key elements on each card:
- Potion name and traditional Harry Potter reference
- Ingredients list with measurements
- Simple mixing instructions
- Serving suggestions
- A note about the potion’s “magical properties” (humor!)
- Format options:
- Small scroll tied with ribbon
- Card tucked into a miniature bottle
- Traditional recipe card in a decorative holder
- Postcard-sized with beautiful design on both sides
- Print professionally: Vistaprint or local print shops can do beautiful cardstock printing
- Package thoughtfully: Bundle with ribbon or place in small organza bags
- Personalize: Add a note: “From [Mom’s Name]’s Magical Baby Shower, [Date]”
- Cost per favor: About $1-2 per guest
- Design time: 2-3 hours to create templates
- Printing time: Order a week ahead to ensure arrival
These are the kind of favors people keep and actually reference. Way better than chocolate that gets eaten in the car on the way home (though no judgment if you add chocolate too!).
Planning a Harry Potter baby shower means creating an experience that celebrates both the magic of the wizarding world and the very real magic of welcoming a new baby. The beauty of this theme is that it works for any budget—you can go all out with elaborate decorations and custom details, or you can keep it simple with smart DIY touches and creative food labeling.
The most important ingredient isn’t perfect decorations or expensive favors—it’s the love and excitement you’re channeling into celebrating these soon-to-be parents. When guests walk in and see Platform 9¾, taste their first sip of Butterbeer, and compete for house points, they’re not just attending another baby shower. They’re part of something magical.
Whether your shower has 15 guests in a living room or 50 in a rented venue, these Harry Potter ideas adapt to your space, budget, and crafting ability. Mix and match the elements that speak to you, add your own creative twists, and don’t stress about perfection. The wonky hand-drawn Marauder’s Map and the slightly lopsided Golden Snitch cake pops? Those imperfections make it personal and real.
So grab your wand (or hot glue gun), gather your house elves (aka your helpful friends and family), and start planning a celebration that would make even Dumbledore proud. After all, as Sirius Black said, “We’ve all got both light and dark inside us”—and baby showers are definitely on the light side. Here’s to creating memories that last longer than any Patronus charm! ✨

Greetings, I’m Alex – an expert in the art of naming teams, groups or brands, and businesses. With years of experience as a consultant for some of the most recognized companies out there, I want to pass on my knowledge and share tips that will help you craft an unforgettable name for your project through TeamGroupNames.Com!