There’s something quietly thrilling about opening a door and seeing a space that does two jobs beautifully.
A closet-laundry combo might sound like a compromise, but honestly?
Done right, it’s one of the smartest moves you can make in a home—especially when square footage is precious and you’d rather not trek across the house with a basket of damp towels at midnight.
Whether you’re renovating a master suite, reimagining a walk-in closet, or just trying to figure out why your builder gave you that awkward alcove next to the bedroom, this guide is for you.
Let’s talk about ten real, beautiful, completely achievable ways to make your closet and laundry share a space—without it looking like a storage unit that went through a crisis.
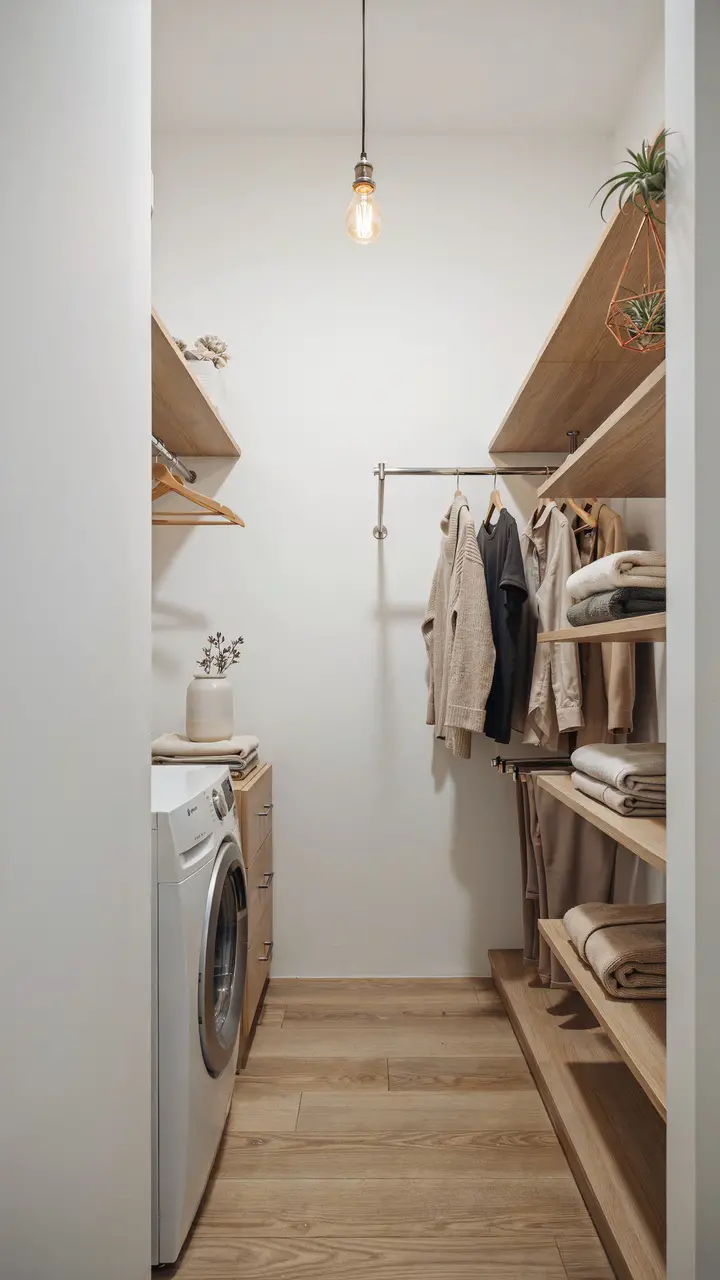
1. The Seamless Built-In Setup
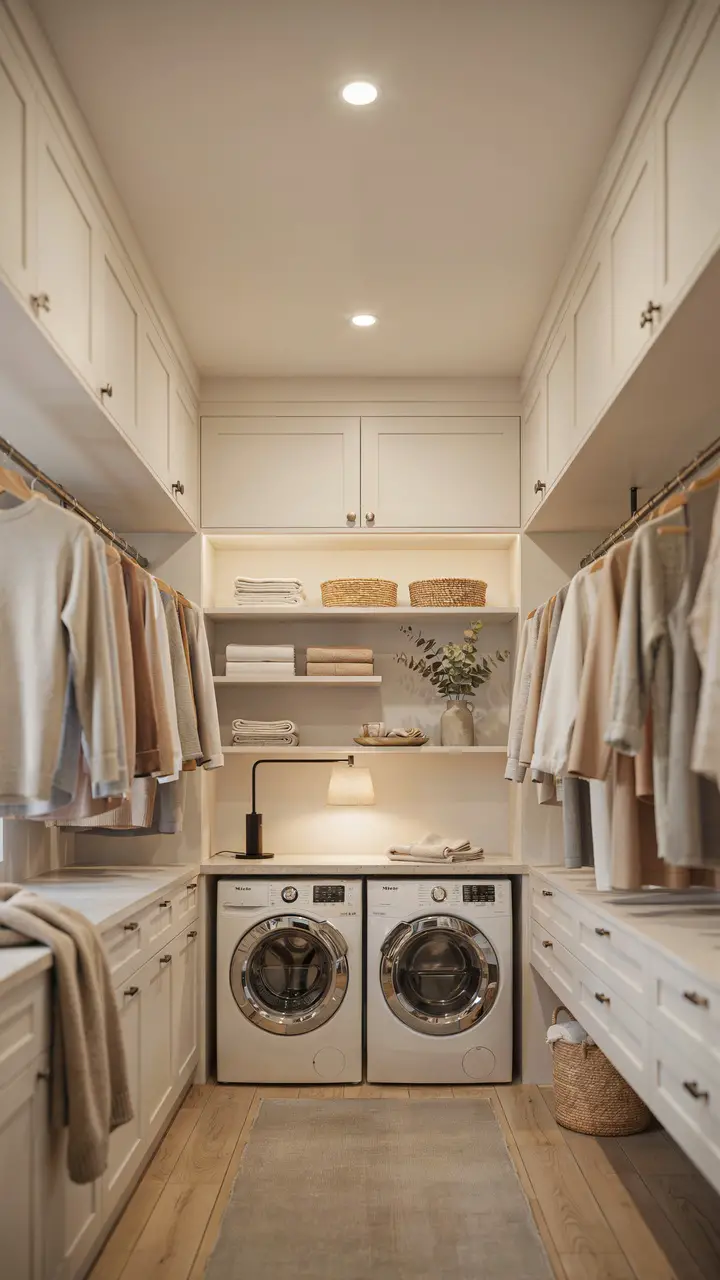
How to Recreate This Look
This is the gold standard of closet-laundry combos—everything built in, nothing out of place, and visitors will honestly ask if you had a designer come in (you can let them wonder).
Shopping List:
- Front-loading washer and dryer with pedestal drawers — $1,200–$2,500 per unit; look for package deals at big box stores like Home Depot or Best Buy
- Custom or semi-custom cabinetry (IKEA’s PAX system works beautifully here) — $500–$3,000 depending on scale
- Quartz or laminate countertop cut to fit — $200–$800
- Undermount or plug-in task lighting — $40–$150
- Woven storage baskets in matching sizes — $15–$40 each at HomeGoods or Amazon
Step-by-Step Styling:
- Measure your washer and dryer with pedestal height included—this determines your countertop height
- Plan cabinetry around the appliances first, then fill remaining wall space with hanging rails and shelving
- Install countertop over appliances to create a continuous folding surface
- Use matching basket systems for dirty laundry sorting, clean folding, and seasonal textile storage
- Add recessed or under-cabinet lighting so the space doesn’t feel like a cave
Budget Breakdown:
- Under $100: Reorganize existing closet with tension rods and use a freestanding shelf unit beside stacked appliances
- $100–$500: Add IKEA PAX units around existing appliances, install a butcher block counter
- $500+: Full custom cabinetry, quartz counters, matching appliances with pedestal drawers
Difficulty Level: Intermediate to Advanced — the cabinetry installation requires some DIY confidence or a carpenter
Space Requirement: Minimum 8×6 ft for comfortable function
Lifestyle Note: Smooth cabinet fronts resist pet hair and wipe clean easily — great for families
Common Mistake: Forgetting ventilation! Your dryer needs proper ducting; don’t box it in completely without planning airflow
2. The Stack-and-Stash Vertical Solution

How to Recreate This Look
When your closet is long and narrow—maybe 5 feet wide and going back 8 feet—stacking your appliances vertically is the single best decision you’ll make. You reclaim the floor footprint and suddenly have room for actual organization.
Shopping List:
- Stacking washer-dryer unit or stackable separate units — $800–$2,000; LG and Samsung both make excellent compact stackable pairs
- Stacking kit (if buying separate units) — $15–$30
- Bifold doors to conceal appliances — $100–$400 depending on material
- Pull-out ironing board cabinet insert — $80–$200 on Amazon
- Labeled fabric bins — $12–$25 each at The Container Store or IKEA
Step-by-Step Styling:
- Position stacked appliances at the far end of the closet run or behind bifold doors
- Install double hanging rods on the opposite wall to maximize hanging capacity
- Use top shelving for out-of-season items and labeled bins for linens
- Add a pull-out ironing board between appliance column and shelving—this one trick eliminates the need for a separate ironing station entirely
- Use consistent hardware finishes throughout for a polished, cohesive look
Budget Breakdown:
- Under $100: Add tension rod shelf dividers and labeled bins to existing setup
- $100–$500: Install bifold doors and a pull-out ironing board
- $500+: Built-in cabinetry with integrated hamper drawers and a full stacked appliance upgrade
Difficulty Level: Beginner to Intermediate
Space Requirement: Works in spaces as narrow as 5 ft wide
Seasonal Adaptability: Swap out bins for heavier wool and flannel storage in winter; keep them light and linen-forward in summer
Common Mistake: Installing the stacked unit too close to the hanging rod—allow at least 6 inches of clearance so your clothes don’t touch the appliance
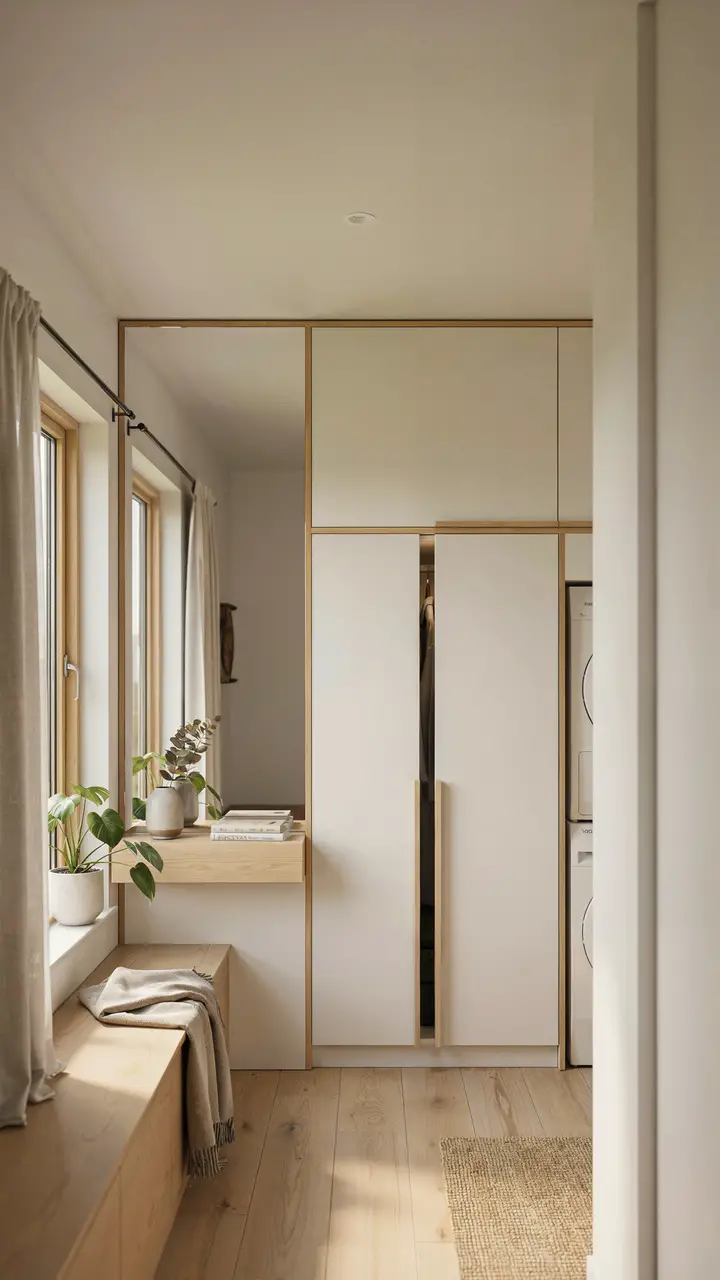
3. The Hidden Laundry Nook with Pocket Doors
How to Recreate This Look
This idea is genuinely my favorite on this list—and the reason is simple. When those pocket doors slide shut, there is zero visual evidence that laundry happens in your dressing room. It’s like a magic trick that costs less than you’d think.
Shopping List:
- Pocket door hardware kit — $60–$200; available at Home Depot or Lowe’s
- Doors to match your cabinetry finish — $150–$600 per door depending on material
- Stacked compact appliances — $900–$1,800
- Interior nook shelving (one small floating shelf is enough) — $30–$80
- Matching cabinet pulls throughout the closet — $8–$25 each
Step-by-Step Styling:
- Plan the nook dimensions around your specific stacked appliance footprint plus 2–3 inches clearance on each side
- Frame the pocket door rough opening during any renovation—retrofitting pocket doors into an existing wall is harder but doable
- Match the door finish exactly to your surrounding cabinetry so the nook disappears completely when closed
- Inside the nook, add one floating shelf above the dryer for detergent, dryer sheets, and a small basket
- Add a single sturdy hook on the nook’s interior side wall for a hanging laundry bag
Budget Breakdown:
- Under $100: Use floor-length curtain panels on a tension rod to conceal stacked appliances in an existing closet
- $100–$500: Install basic bifold doors with matching hardware
- $500+: Full pocket door installation with custom-matched cabinetry panels
Difficulty Level: Advanced for full pocket door installation; hire a carpenter unless you’re confident with framing work
Common Mistake: Forgetting to account for dryer venting—plan the duct route before you build the enclosure around the appliances
4. The Open Concept Laundry-Dressing Room Hybrid
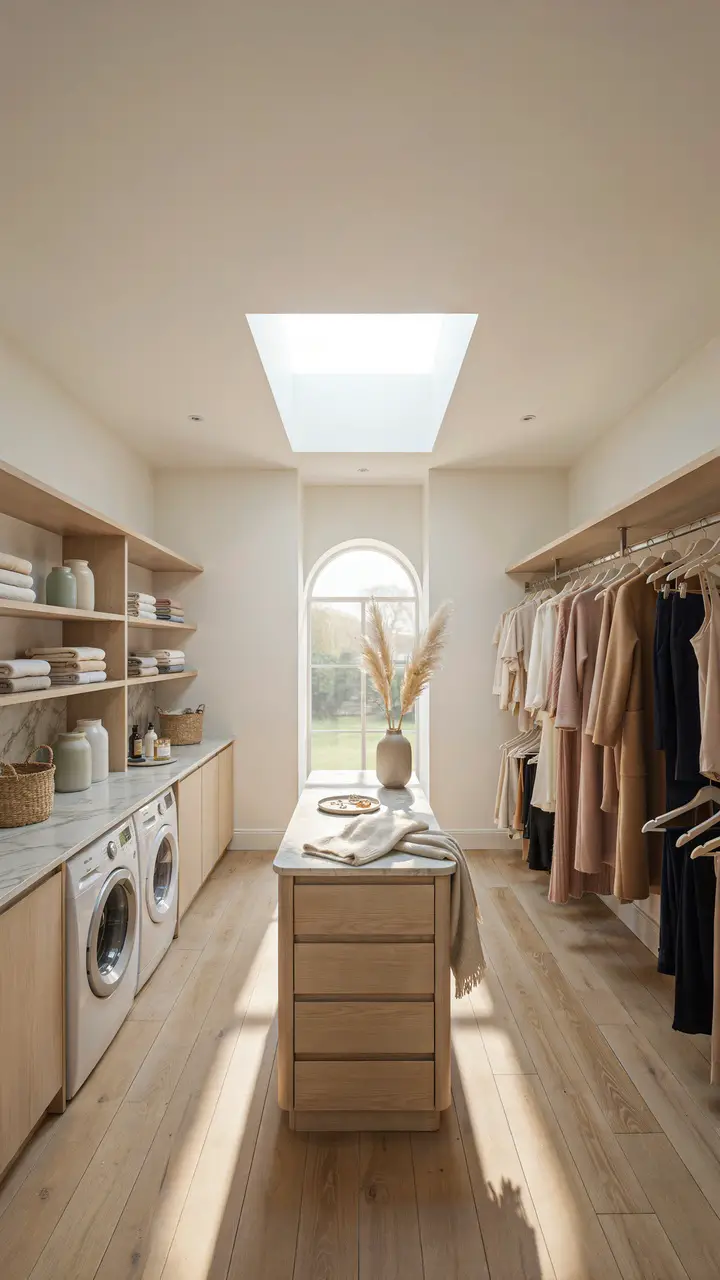
How to Recreate This Look
If you have the square footage—and I mean genuinely have it, not “I think I can make this work” have it—the open concept combo feels less like a utility room and more like a personal boutique. It works beautifully in master suites with a dedicated dressing room alcove of at least 10×10 feet.
Shopping List:
- Side-by-side washer and dryer (not stacked) — $1,000–$3,000 for the pair
- Marble-look quartz countertop for folding station — $300–$700
- Central island with soft-close drawers — IKEA KALLAX base units work well here; $200–$600
- Open wardrobe rail system — $150–$500 depending on brand and length
- Matching decorative storage jars for detergent — $20–$60 at HomeGoods
Step-by-Step Styling:
- Place appliances on the wall farthest from the bedroom entry so the first visual impression is the wardrobe, not the washer
- Run the countertop continuously across the appliances and alongside for maximum folding real estate
- Style the counter with decorative laundry accessories—glass or ceramic jars, a small potted plant, matching baskets—so it reads as intentional, not utilitarian
- Keep clothing organization visually calm: arrange by category and color to prevent visual chaos in an open space
- Use a central island with closed drawers to hide items that would otherwise clutter flat surfaces
Budget Breakdown:
- Under $100: Add decorative jars and uniform baskets to an existing open setup
- $100–$500: Install a continuous countertop and add open shelving above appliances
- $500+: Full island, custom rail system, and matched appliances
Difficulty Level: Intermediate
Space Requirement: Minimum 10×10 ft for this to feel open rather than cramped
Common Mistake: Underestimating how visible dirty laundry becomes in an open space—invest in attractive hamper baskets that complement your color palette
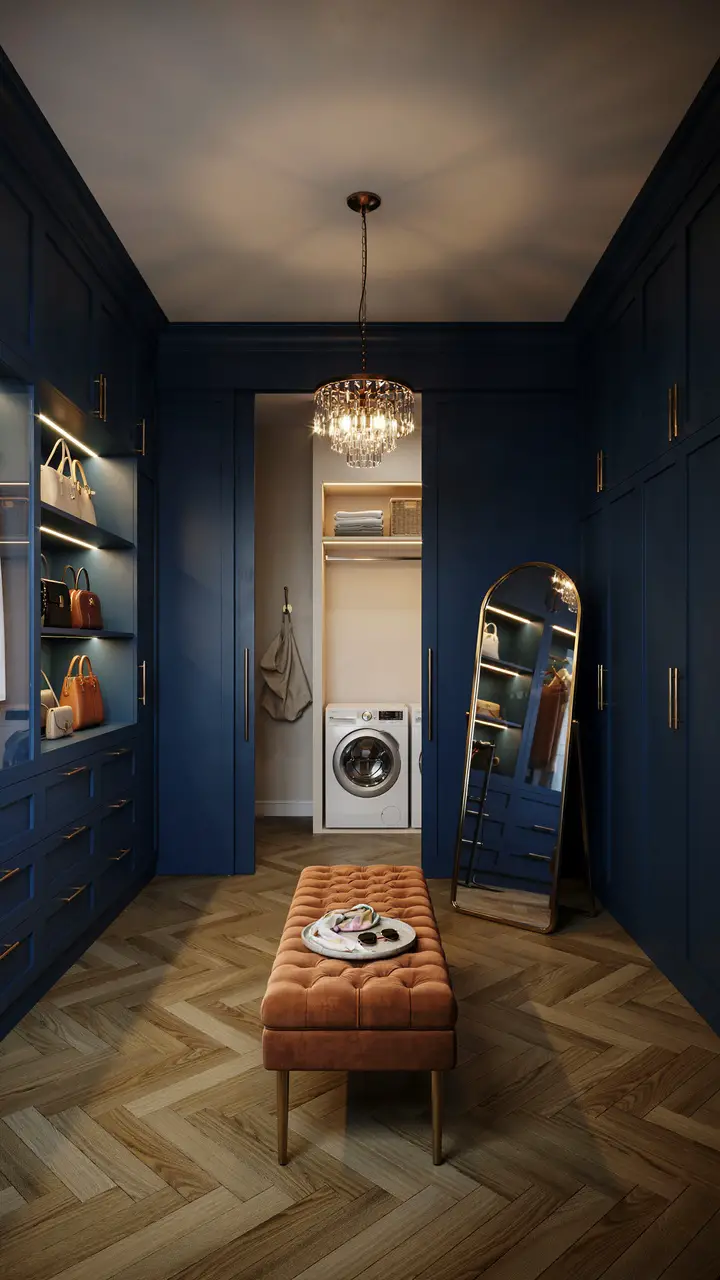
5. The Murphy Bed-Adjacent Closet-Laundry in a Studio or Guest Suite
How to Recreate This Look
This one is for the guest suite that moonlights as a home office that also somehow needs laundry access. Yes, that room. If you know, you know.
Shopping List:
- Murphy bed wall unit with integrated storage — $1,500–$5,000; IKEA PAX can be adapted with Murphy hardware kits around $300
- Compact 24-inch stacked laundry unit (ventless is ideal here) — $900–$1,800; LG WashTower Compact is excellent
- Ventless dryer (critical for interior rooms) — ensure your chosen unit has a heat pump or condenser drying option
- Bifold or cabinet doors to match the wall unit — $100–$400
- Full-length mirror panel — $80–$250
Step-by-Step Styling:
- Plan the entire wall unit as one cohesive design before purchasing any individual components
- Position the laundry nook on the side of the unit farthest from the Murphy bed mechanism—the two systems need independent structural support
- Use a ventless dryer exclusively in this configuration—no exterior ducting means infinite placement flexibility
- Add a full-length mirror panel on the wardrobe section door; it visually doubles the room’s apparent size
- Keep the color palette of the entire wall unit in one tone—any variation fragments the visual calm of the space
Budget Breakdown:
- Under $100: Improve organization in an existing guest closet with bins and labels
- $100–$500: Add a full-length mirror and bifold laundry doors to existing setup
- $500+: Custom or semi-custom Murphy wall unit with integrated appliances
Difficulty Level: Advanced — this is a serious project; strongly consider professional installation for the Murphy mechanism
Common Mistake: Buying a vented dryer for an interior room—always confirm ventless compatibility before purchasing appliances for this setup
6. The Luxury Spa-Inspired Closet-Laundry
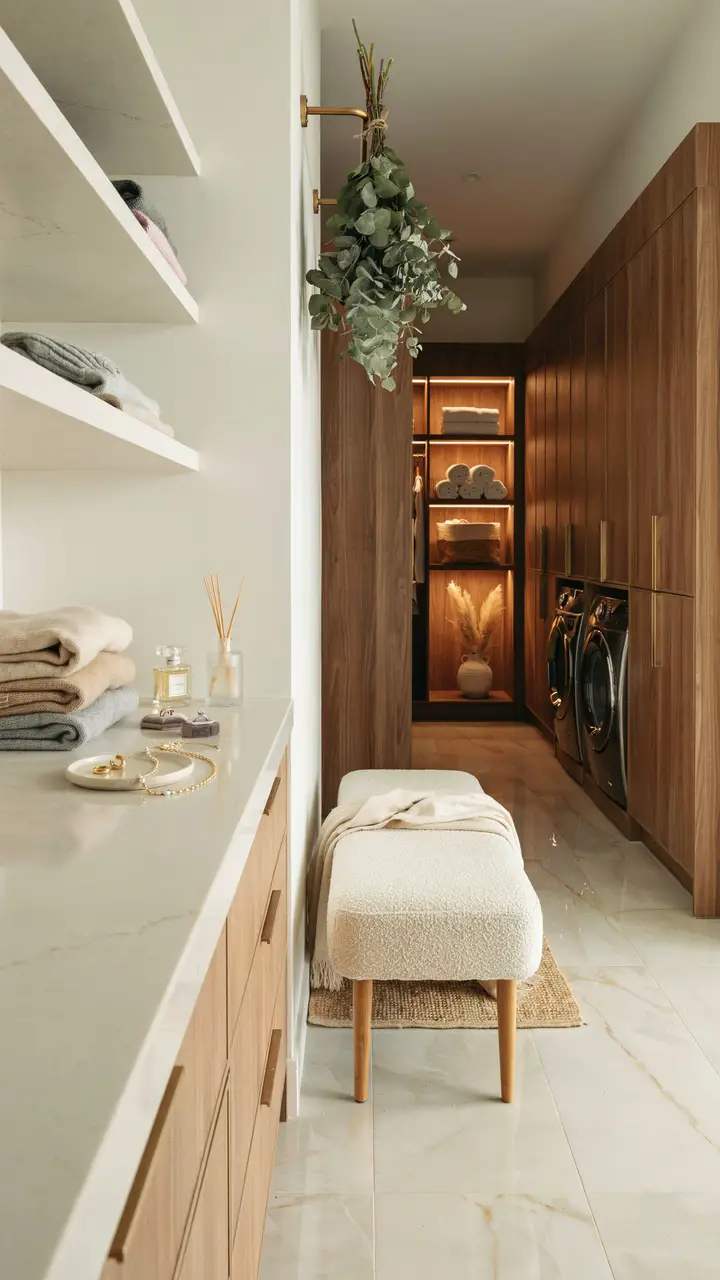
How to Recreate This Look
Real talk: hanging fresh eucalyptus from your drying hook is a $4 bunch from Trader Joe’s and it makes the entire room smell extraordinary. That’s the kind of simple, specific detail that separates a beautiful space from a merely functional one.
Shopping List:
- Paneled washer and dryer fronts (custom panels through your appliance brand) — $200–$600 for the panel set
- LED strip lighting for under-shelf installation — $30–$80 for the full run; Govee and Philips Hue both work well
- Boucle or upholstered bench — $150–$600; check TJ Maxx and HomeGoods for deals
- Fresh or dried eucalyptus bundles — $4–$15
- Matching decorative laundry accessories (soap dispenser, linen spray bottle, ceramic tray) — $40–$120 total
Step-by-Step Styling:
- Start with under-shelf LED lighting—this single addition transforms the atmosphere of any closet
- Install cabinet panels on your appliances if your brand offers them; this one upgrade makes appliances disappear into the cabinetry
- Create a dedicated “spa tray” on the countertop with decanted laundry soap, fabric softener, and a linen spray
- Hang eucalyptus from an existing hook near the dryer’s warm air vent—the heat lightly releases the oils and the scent is genuinely wonderful
- Keep a small boucle throw or upholstered stool in the space for those “waiting for the cycle to finish” moments
Budget Breakdown:
- Under $100: Add LED strip lighting and a ceramic tray with decanted laundry products
- $100–$500: Add a boucle bench and consistent hardware upgrades throughout
- $500+: Full appliance paneling, custom cabinetry upgrades, marble tile flooring
Difficulty Level: Beginner for styling upgrades; Advanced for any structural or tile work
Seasonal Adaptability: Swap eucalyptus for dried lavender in summer and cedar bundles in fall for a seasonal scent change without any redesign
7. The Rental-Friendly Freestanding Setup
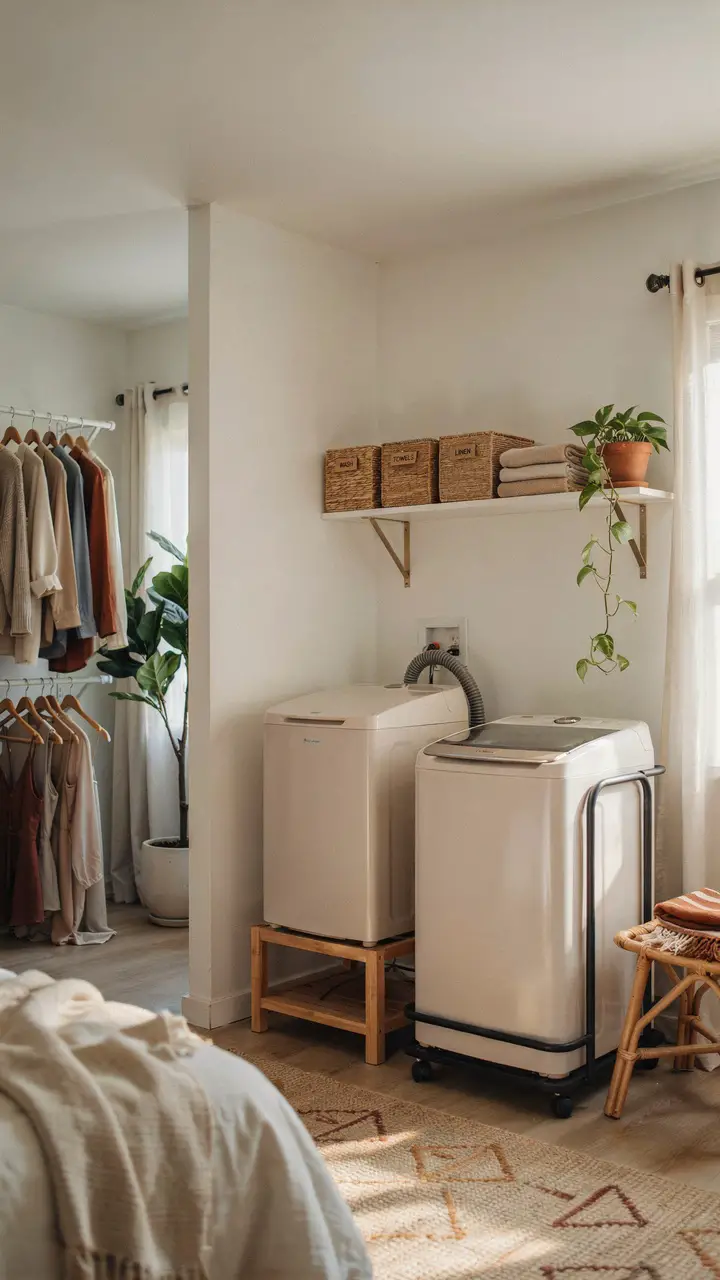
How to Recreate This Look
This one is for my renters. FYI: you do not have to choose between doing laundry and having a space that looks intentional. The key is treating freestanding and portable as a design choice rather than a limitation—because honestly, it kind of is.
Shopping List:
- Portable countertop or compact portable washer — $200–$600; Magic Chef and Black+Decker make reliable compact units
- Compact electric dryer (vented to window with kit) or ventless dryer — $200–$500
- Heavy-duty freestanding shelving unit — $60–$150 at Costco or Amazon
- Rolling utility cart for appliance base — $40–$90
- Command strip shelf brackets for floating shelves — $25–$50 for a set of 4
- Trailing pothos or philodendron in a terracotta pot — $8–$20
Step-by-Step Styling:
- Choose matching baskets or bins in the same color family for all storage—visual consistency is what makes freestanding setups look intentional
- Place the rolling cart under your portable washer so you can move it to the hookup (usually the bathroom) when in use, then roll it back
- Style the shelving above as you would any open shelf: vary heights, mix textures, include one trailing plant
- Use a tension rod closet system rather than wall-mounted hardware—no holes, fully adjustable, completely removable
- Add a small rug underneath the entire setup to define the zone and add warmth
Budget Breakdown:
- Under $100: Organize existing space with bins, a tension rod system, and a trailing plant
- $100–$500: Add a compact portable washer and styled open shelving
- $500+: Portable washer and dryer pair with full freestanding shelving and organized bins
Difficulty Level: Beginner — this is the most accessible setup on this list
Rental Note: Always verify your lease before installing even Command strips; some leases prohibit adhesive wall products
Common Mistake: Choosing appliances that require permanent plumbing modifications—always confirm your portable unit connects to a standard faucet adapter
8. The DIY Barn Door Laundry Reveal
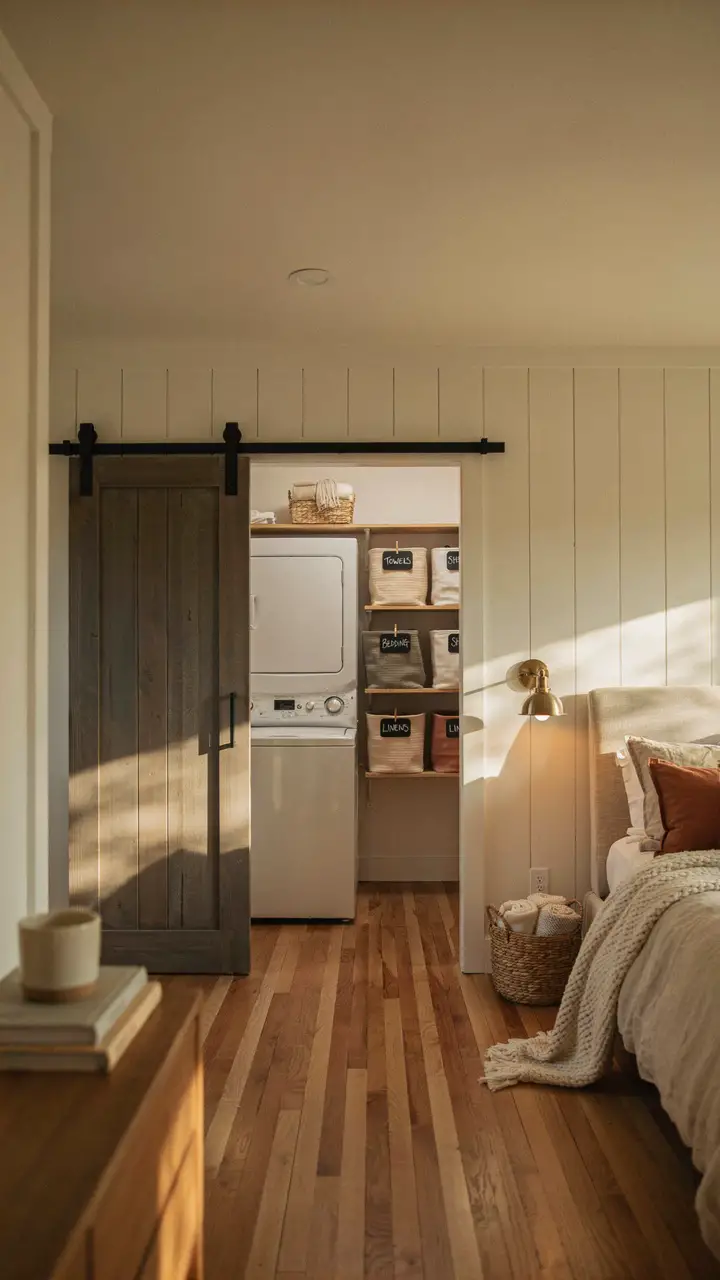
How to Recreate This Look
This might be the most satisfying DIY project in this entire list because the before-and-after is absolutely dramatic. A set of barn doors doesn’t just conceal your laundry—it becomes a genuine focal point in the room.
Shopping List:
- Barn door hardware kit — $80–$200 on Amazon; check that it supports your door weight
- Pre-hung or slab doors (two needed for a double setup) — $60–$250 per door at Home Depot or a salvage yard
- Stain or paint in your chosen finish — $15–$40
- Chalkboard or kraft paper labels for bins — $8–$20
- Black matte bin pulls to match hardware — $10–$25 for a pack
Step-by-Step Styling:
- Measure your closet opening carefully—each barn door should be 2–3 inches wider than half the opening for full coverage when closed
- Install the track at ceiling height (or 1 inch above the door’s finished height) using a level—a crooked track will haunt you forever
- Stain or paint doors before hanging; much easier than doing it in place
- Label bins with chalkboard labels for laundry sorting categories (colors, whites, delicates, dry clean) so the interior looks organized even when the doors are open
- Add a small chalkboard panel inside one door for laundry care notes or a running list of detergent supplies to restock
Budget Breakdown:
- Under $100: Use curtain panels on a tension rod to conceal laundry area as a starting point
- $100–$500: Full DIY barn door setup with pre-bought slab doors and a standard hardware kit
- $500+: Custom milled barn doors with premium hardware, professional installation
Difficulty Level: Intermediate — the track installation requires a level, a drill, and patience, but this is genuinely achievable for a first-time DIYer
Common Mistake: Buying a track that’s too short—your track should be at least double the width of the opening for proper sliding clearance
9. The His-and-Hers Divided Closet-Laundry
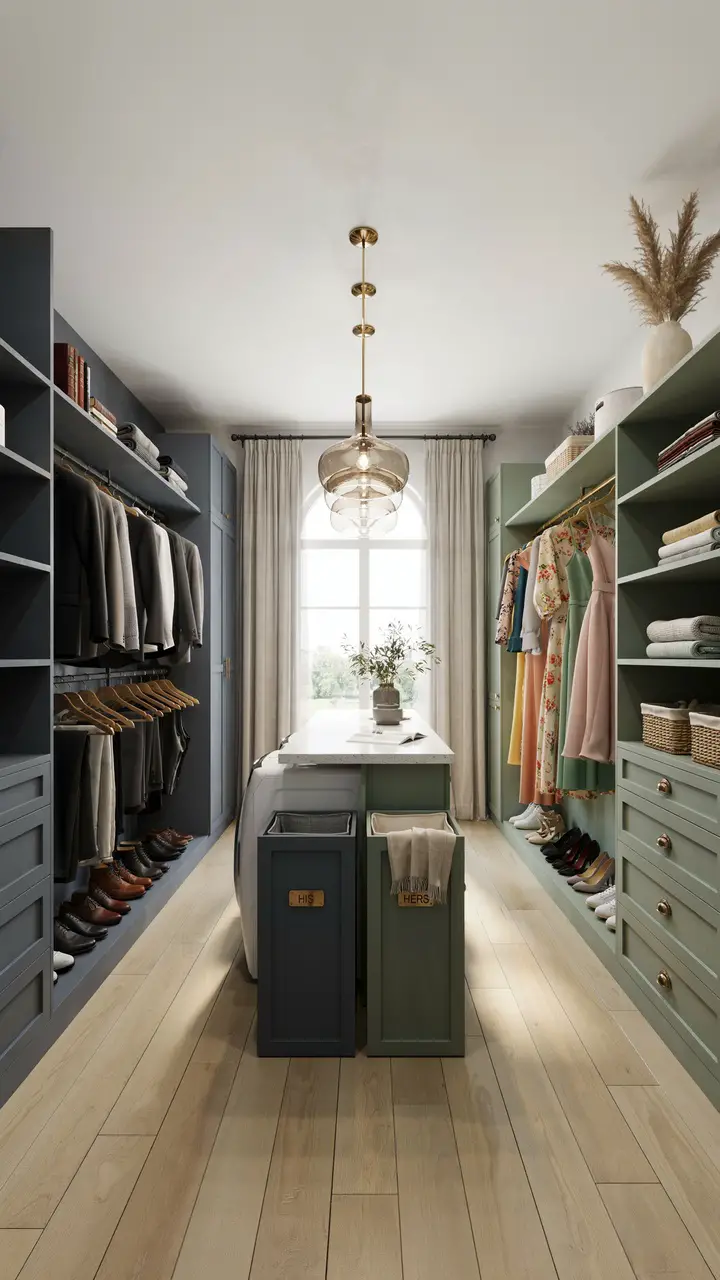
How to Recreate This Look
If you’ve ever had the “but where does my stuff go” conversation with a partner, this layout is genuinely worth the conversation. Two distinct style zones, one shared laundry station in the middle—everybody wins. 🙂
Shopping List:
- Two separate cabinetry runs in contrasting but complementary finishes — $600–$4,000 depending on custom vs. IKEA PAX
- Shared countertop spanning both sides above appliances — $300–$700
- Pull-out hamper inserts (two separate) — $60–$150 each at Rev-A-Shelf
- Statement pendant light for the center — $80–$400
- Matching hardware in each section’s chosen finish — $8–$25 per pull
Step-by-Step Styling:
- Plan each person’s side around their actual wardrobe needs—more hanging vs. more folded, more shoes vs. more accessories
- Position the laundry station exactly at the center point of the room; symmetry here creates visual balance between the two distinct sides
- Use two pull-out hampers (one per person) built into the cabinetry flanking the appliances—this eliminates the laundry pile entirely
- Choose a central pendant light that bridges both aesthetics—a warm brass or antique bronze finish tends to read well against both dark and light cabinetry
- Keep the shared folding counter’s styling completely neutral—no one person’s items on the shared surface
Budget Breakdown:
- Under $100: Use different colored bins and labels to designate sides within an existing shared closet
- $100–$500: Add pull-out hamper drawers and a shared countertop
- $500+: Dual custom cabinetry runs with appliance integration and a statement light
Difficulty Level: Advanced for full build-out; Beginner for organizational designation within an existing space
Common Mistake: Making the division equal in size regardless of need—if one partner has significantly more clothing, adjust the square footage allocation accordingly, not 50/50
10. The Capsule Closet + Laundry Station for Small Spaces
How to Recreate This Look
There’s a quiet confidence to a capsule wardrobe closet-laundry setup that I genuinely love. It forces you to be intentional—about what you own, where it lives, and how your space works for you rather than against you.
Shopping List:
- All-in-one washer-dryer combo unit — $900–$1,800; LG, Bosch, and Samsung all make excellent single-unit combo appliances
- Floating shelves (2–3 at varying heights) — $30–$80 each at IKEA or Amazon
- Chrome or brushed nickel hanging rail — $20–$60
- Matching slim velvet hangers — $15–$30 for a pack of 50; these alone will transform how your closet looks
- Small air plant or hanging geometric planter — $10–$25
- Single pendant bulb with plug-in cord — $25–$70
Step-by-Step Styling:
- Start by editing your wardrobe before designing the space—a capsule approach only works if you’ve genuinely curated what stays
- Choose the all-in-one combo washer-dryer unit; it occupies the footprint of a single appliance and eliminates the stacking complexity entirely
- Install 2–3 floating shelves above the appliance unit for folded items, laundry supplies, and one decorative element
- Use slim velvet hangers exclusively—they reduce the visual weight of clothing dramatically and allow you to fit significantly more items in less rod space
- Add a single hanging plant and one warm-toned pendant bulb; in a small space, these two details create tremendous personality without consuming any floor space
Budget Breakdown:
- Under $100: Edit your wardrobe, switch to slim velvet hangers, add one plant and consistent baskets
- $100–$500: Install floating shelves and a plug-in pendant light; add a laundry organization system
- $500+: All-in-one combo appliance and full floating shelf installation
Difficulty Level: Beginner for styling; Beginner-Intermediate for floating shelf installation
Space Requirement: Works in spaces as small as 6×5 ft with an all-in-one unit
Seasonal Adaptability: Rotate seasonal items into labeled under-bed storage to keep the closet containing only current-season pieces year-round
Common Mistake: Trying to squeeze a full separate washer and dryer into a space sized for a combo unit—measure twice, and if it doesn’t fit comfortably, the all-in-one is genuinely the better choice here, not a compromise
Your Space, Your Rules
Here’s the thing nobody tells you about a closet-laundry combo: it’s not just a practical decision—it’s a genuinely joyful one when it’s done thoughtfully. Finding a sweater, doing a load, folding it while it’s warm and hanging it up immediately? That’s a small, real luxury that changes the texture of a regular Tuesday.
The most important thing isn’t the price point or the aesthetic tier you’re working in. It’s that the space works for your actual life. The rental setup with the rolling cart and the terracotta pothos is just as valid as the marble-floored spa version—and in the right home, it’s the one that brings more joy.
Start with one idea that genuinely excites you. Measure your space. Make one change. Then notice how differently you feel about that room tomorrow morning. That feeling—that quiet satisfaction of a space that finally makes sense—is exactly what good design is supposed to give you. <3

Greetings, I’m Alex – an expert in the art of naming teams, groups or brands, and businesses. With years of experience as a consultant for some of the most recognized companies out there, I want to pass on my knowledge and share tips that will help you craft an unforgettable name for your project through TeamGroupNames.Com!