
So you’ve got a bedroom that’s either too open, too cluttered, or just desperately lacking in storage—and you’re wondering if there’s a smarter way to solve two problems at once.
Good news: a partition wall closet might just be the most satisfying home project you never knew you needed.
Whether you’re working with a studio apartment, a sprawling master bedroom that echoes when you talk, or a rental where you can’t touch the walls (we see you), there’s a partition wall closet idea here with your name on it.
Let’s talk about what actually works.
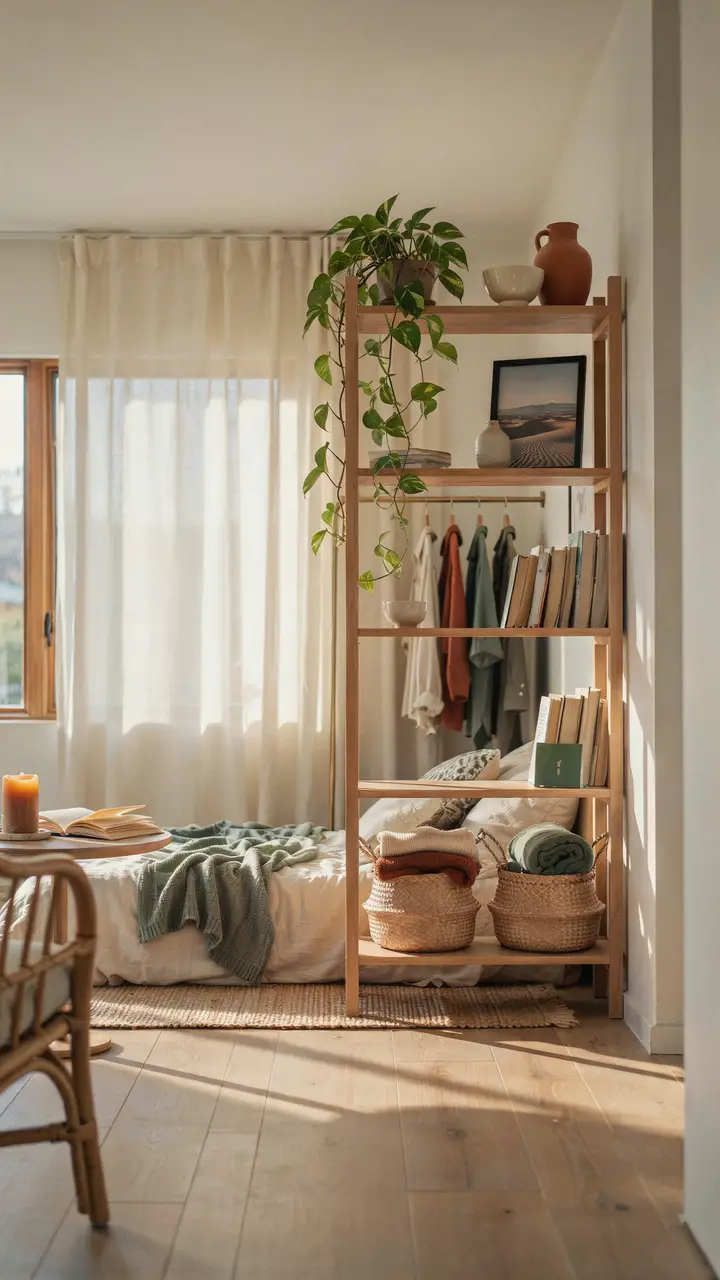
1. The Open Bookshelf Room Divider with Hidden Closet Storage
How to Recreate This Look
This one is genuinely exciting because it does triple duty: it divides your space, displays your personality, and organizes your wardrobe—all without a single wall anchor (perfect for renters).
Shopping List:
- Freestanding open bookshelf unit (IKEA Kallax or Billy series, $80–$180; or thrifted wooden bookshelves, $10–$40 at estate sales or Facebook Marketplace)
- Slim closet hanging rod (tension rod or freestanding rod, $15–$30)
- Woven baskets for folded items (Target, H&M Home, or TJ Maxx, $8–$20 each)
- Anti-tip furniture strap (critical for safety—$8–$15 at any hardware store)
- Trailing pothos or philodendron in a terracotta or ceramic pot ($5–$20)
- LED puck lights or a plug-in strip light for the closet side ($15–$35)
Step-by-Step Styling Instructions:
- Position the shelf unit perpendicular to a wall, leaving at least 24–30 inches of clearance on the bedroom/closet side for comfortable access.
- Anchor it to the wall with an anti-tip strap—this is non-negotiable, especially with anything stored on top.
- Hang a tension rod on the closet side between the unit and the nearest wall, or use a freestanding garment rack tucked behind it.
- Arrange the display side with a mix of heights: trailing plant up top, books in the middle, baskets below.
- Add a plug-in LED strip inside the closet side so you can actually see what you’re grabbing at 7am.
Budget Breakdown:
- Under $100: Thrifted shelving unit + tension rod + secondhand baskets + a single plant
- $100–$500: IKEA Kallax or Billy + new baskets + plug-in lighting + freestanding garment rack
- $500+: Custom freestanding open wardrobe unit with integrated rod and drawer system (Etsy custom makers or small furniture shops)
Space Requirements: Works best in rooms with at least 12 feet of length. The divider needs minimum 6 feet of run to feel intentional rather than awkwardly placed.
Difficulty Level: Beginner. If you can follow flat-pack instructions and use a drill for the anti-tip strap, you’ve got this.
Durability Notes: Keep the display side simple and low-weight. Heavy books on a freestanding unit require the anti-tip strap without exception.
Seasonal Swaps: Swap the trailing plant for a eucalyptus stem in winter. Switch basket textures from rattan (summer) to a chunky knit or wool-wrapped basket (fall/winter).
Common Mistakes: Overloading the top shelves shifts the center of gravity dangerously. Keep the heaviest items on the bottom two shelves always.
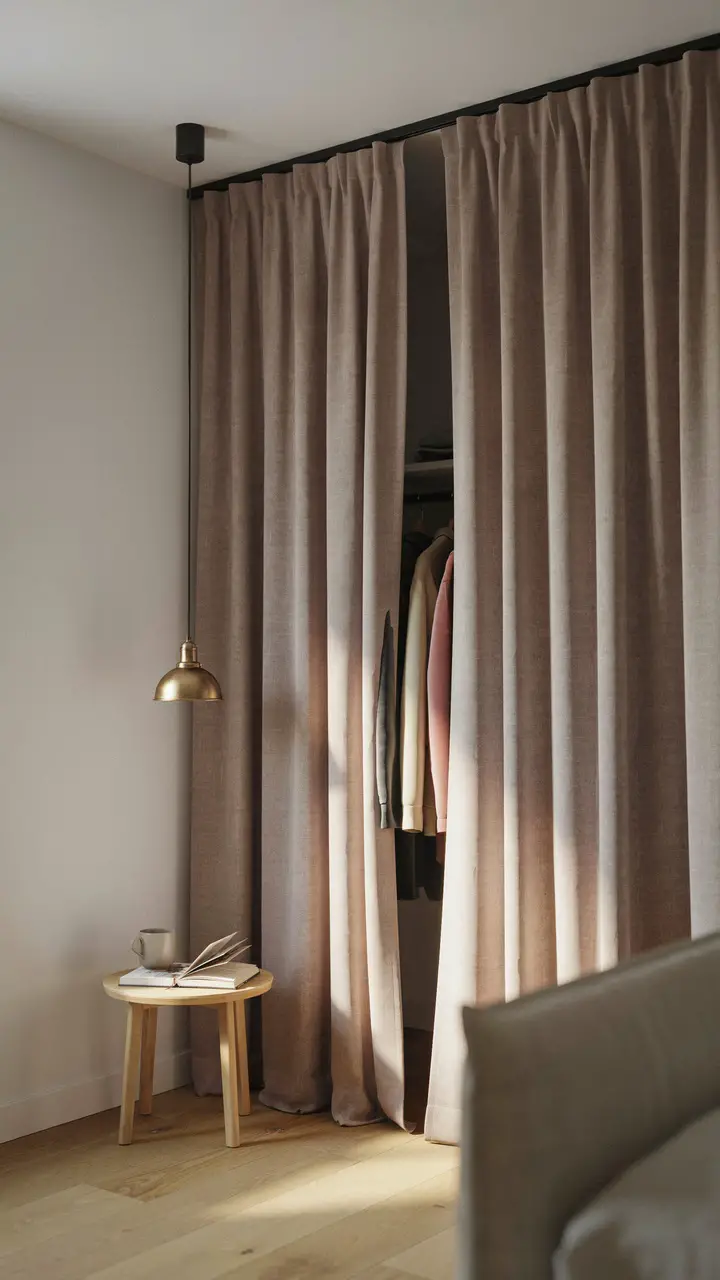
2. The Floor-to-Ceiling Curtain Partition Closet
How to Recreate This Look
Curtains as room dividers and closet covers are one of those ideas that sounds too simple—until you try it and realize it looks more intentional than a traditional door.
Shopping List:
- Ceiling-mounted curtain track or tension rod system ($25–$80 depending on length)
- Floor-to-ceiling linen or velvet curtain panels ($20–$60 per panel at IKEA, H&M Home, or Amazon)
- Tension rod closet organizer system for behind the curtain ($15–$40)
- Cable clips or command hooks to manage any visible wiring for the pendant ($5–$10)
- Adhesive hooks for accessories inside the curtain closet ($8–$15)
Step-by-Step Styling Instructions:
- Measure ceiling height precisely—floor-to-ceiling panels should ideally sit ½ inch from the floor for a clean look, or pool 1–2 inches for drama.
- Install ceiling-mounted track hardware (this requires a drill and finding ceiling joists—the one step that earns this the “intermediate” label).
- Hang your curtain panels and arrange the internal closet system behind them.
- Add a small adhesive hook on the inside edge of the curtain to hold a reusable hook for bags, belts, or tomorrow’s outfit.
Budget Breakdown:
- Under $100: Tension rod system + IKEA Enje panels + basic closet rod inside
- $100–$500: Ceiling-mounted track + quality linen panels + full internal tension rod organizer system
- $500+: Custom ceiling track + designer linen drapes + built-in internal closet system with shelves and drawers
Difficulty Level: Intermediate (ceiling installation requires confidence with a drill and stud finder).
Rental-Friendly Alternative: Use a floor-to-ceiling tension rod system instead of ceiling-mounted hardware. Several brands offer tension poles rated for heavy curtain panels—no holes required.
Common Mistakes: Choosing curtain fabric that’s too sheer defeats the purpose. Go for medium-weight linen or velvet so the closet contents stay genuinely hidden.
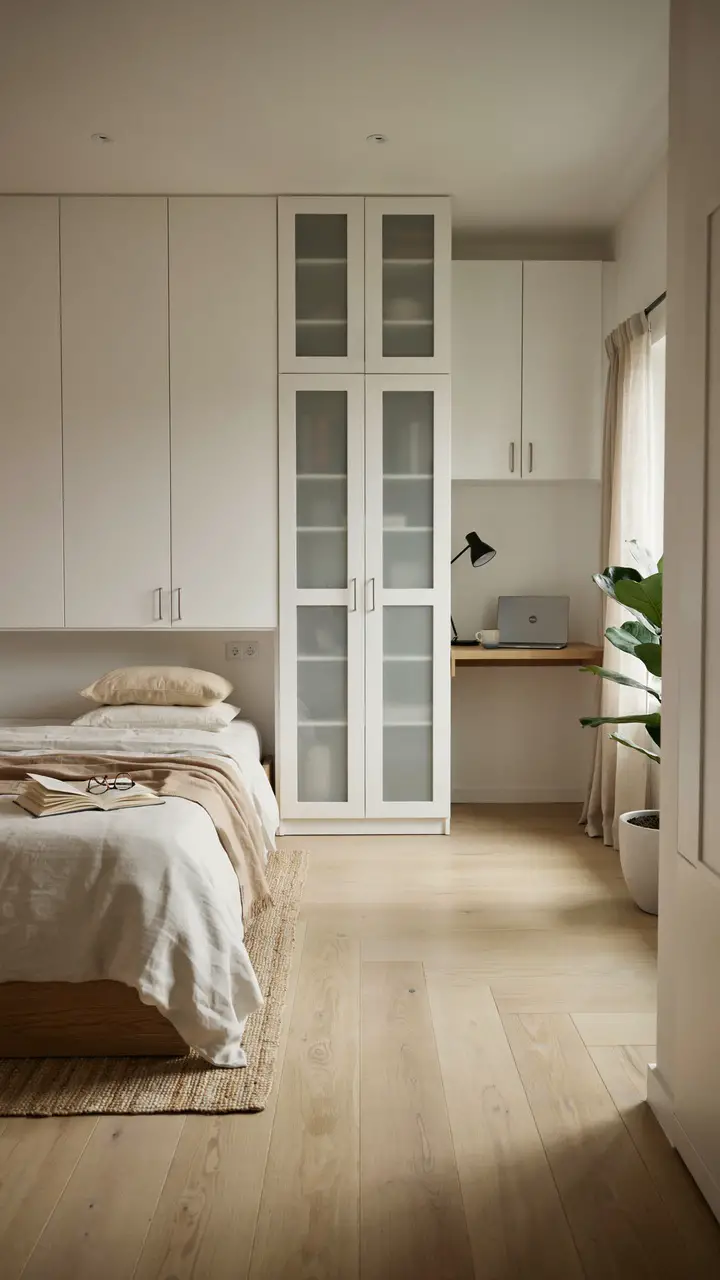
3. The IKEA PAX Wardrobe Wall Configuration
How to Recreate This Look
Let’s be real—IKEA PAX is practically the patron saint of the budget bedroom refresh. Configuring them as a partition wall is one of the smartest things you can do in a large bedroom.
Shopping List:
- IKEA PAX wardrobe frames ($100–$200 each depending on size)
- Door panels (solid, frosted glass, or mirror finish—$40–$130 each)
- Internal organization inserts (drawers, shelves, shoe racks—$15–$60 each)
- IKEA SEKTION filler panels to close any wall gaps ($30–$50)
- Anti-tip wall anchoring hardware (included with PAX—use it)
- Plinths or toe-kick panels for a built-in look ($20–$40)
Step-by-Step Styling Instructions:
- Plan your configuration using the IKEA PAX planner tool online—spend real time here before purchasing.
- Choose consistent door styles across all units for a built-in rather than assembled-furniture look.
- Install units side by side and anchor each to the wall through the side panels.
- Add filler panels at the ceiling junction if your ceiling height exceeds the wardrobe height (this single step makes PAX look genuinely built-in).
- Install internal organization based on your actual wardrobe habits—not what looks good in photos.
Budget Breakdown:
- Under $100: Not achievable with PAX new—check Facebook Marketplace for secondhand PAX frames
- $100–$500: 1–2 PAX units with basic door and shelf inserts
- $500+: Full wall configuration with mix of doors, drawers, and custom internal organization
Space Requirements: Each standard PAX unit is 19.75 inches deep—your room needs to comfortably accommodate this depth on the partition side.
Difficulty Level: Intermediate to advanced depending on how many units you’re configuring. Two-unit builds are very manageable; six-unit full walls are a weekend project requiring two people and patience.
Durability Notes: PAX holds up extremely well with daily use. The hinges and drawer runners are genuinely quality components.
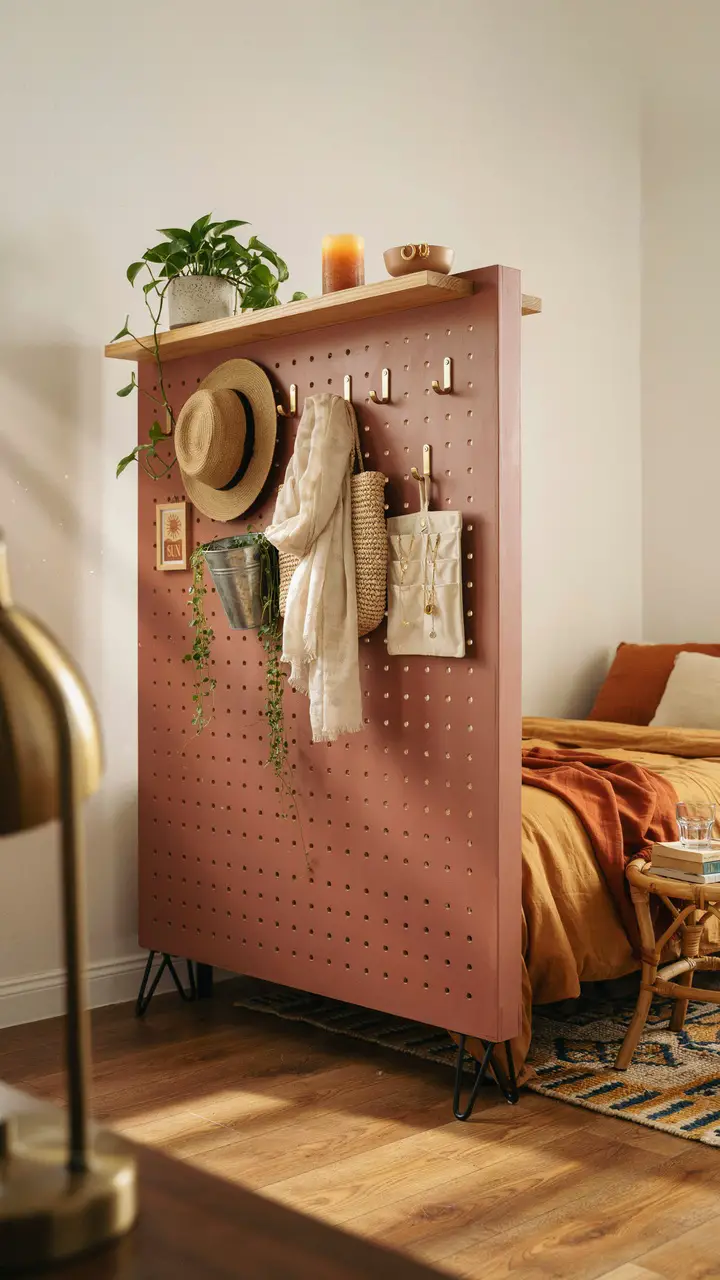
4. The Pegboard Partition Closet Wall
How to Recreate This Look
This one is for the creative souls who also happen to be perpetually running out of storage. A pegboard partition is completely customizable, surprisingly affordable, and—bonus—it doubles as wall art.
Shopping List:
- 4×8 sheet of pegboard (hardware store, $20–$35)
- Hairpin legs or freestanding pegboard frame kit ($30–$80)
- Pegboard hooks and accessories (packs of 25–50 for $10–$20)
- Spray paint in your chosen color ($6–$12 per can)
- Narrow wooden plank for top shelf ($8–$20)
- L-brackets to attach shelf to top of pegboard ($5–$10)
- Felt pads for the feet ($5) to protect floors
Step-by-Step Styling Instructions:
- Sand the pegboard lightly and spray paint it in two thin coats—painting it a solid, intentional color makes it look designed rather than utilitarian.
- Attach the hairpin legs or frame kit according to instructions.
- Screw the narrow shelf to the top edge using L-brackets.
- Arrange hooks in clusters based on use category: bags together, hats together, jewelry in one section.
- Add the small plant and a candle or two on the top shelf to soften the utilitarian feel.
Budget Breakdown:
- Under $100: Full project achievable—pegboard + paint + hooks + DIY hairpin legs (made from pipe fittings)
- $100–$500: Premade pegboard frame + brass or matte black hooks + quality shelf brackets
- $500+: Custom-built pegboard wall unit with integrated shelving, lighting, and premium hardware finish
Difficulty Level: Beginner to intermediate. The painting is easy; attaching the shelf requires comfort with a drill.
Seasonal Adaptability: Swap out accessories seasonally—winter scarves and hats replace summer bags and sunglasses without changing the structure at all.
5. The Sliding Barn Door Closet Partition
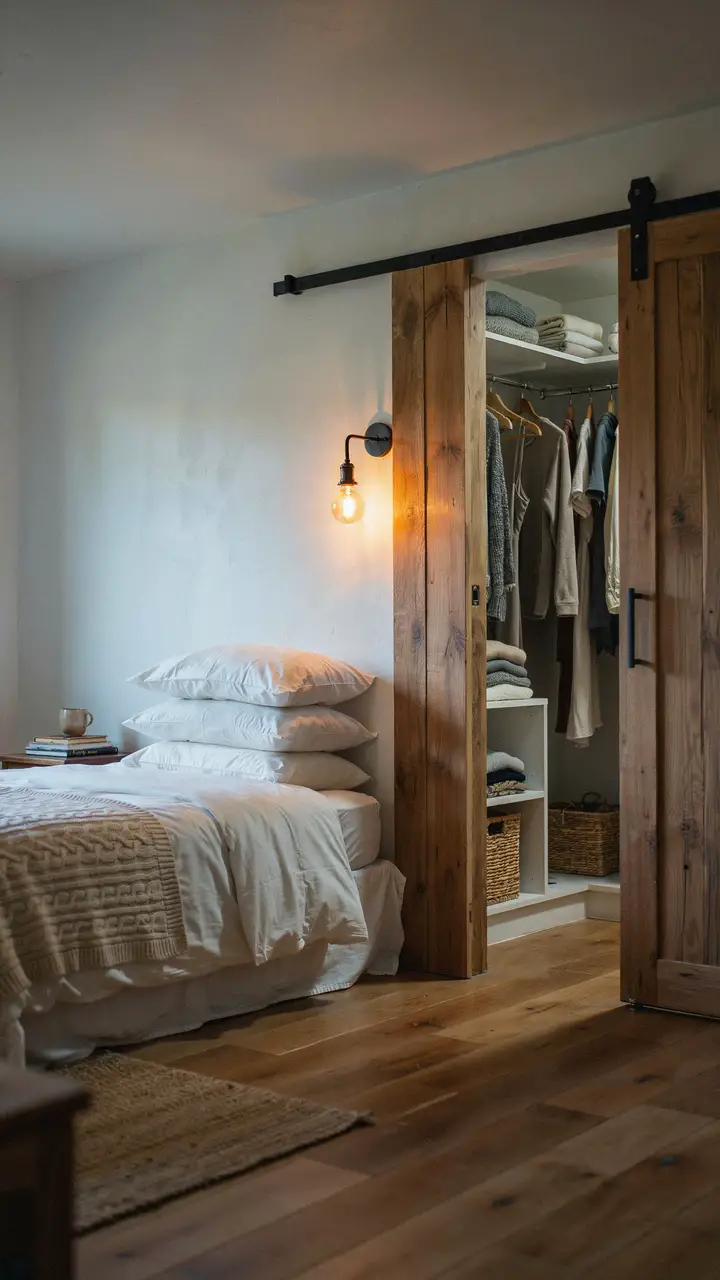
How to Recreate This Look
Barn doors solve a very real problem in bedrooms: swing-clearance. Traditional hinged doors eat into floor space; sliding barn doors use zero square footage when open.
Shopping List:
- Solid wood or MDF barn door slab ($80–$400 depending on material and size)
- Barn door hardware kit with matte black or brushed nickel rail ($60–$200)
- Floor guide (keeps the door from swinging—$10–$20, often included in kits)
- Drill, level, and stud finder (essential tools—$30–$60 if you don’t own them)
- Wood stain or paint to finish the door if purchasing unfinished ($15–$25)
Step-by-Step Styling Instructions:
- Measure your closet opening and purchase a door that’s 2–4 inches wider than the opening on each side.
- Locate wall studs—the rail hardware must anchor into studs, not just drywall.
- Install the header board across the top of the opening, then attach the rail to it.
- Hang the door on the rollers and adjust until it slides smoothly.
- Install the floor guide at the base to prevent the door from swinging when opened.
Budget Breakdown:
- Under $100: Difficult unless you source the door slab secondhand (Facebook Marketplace or salvage yards are your friends here)
- $100–$500: Mid-range door slab + basic barn door hardware kit—the most common price point
- $500+: Solid reclaimed wood custom door + premium hardware in specialty finishes
Rental Warning: Barn door hardware requires wall stud anchoring and leaves visible hardware and holes. This is an ownership project, not a rental one. FYI.
Difficulty Level: Intermediate. The installation requires stud-finding and precise rail leveling—a small misalignment makes the door slide badly.
6. The Wardrobe-as-Headboard Partition Wall
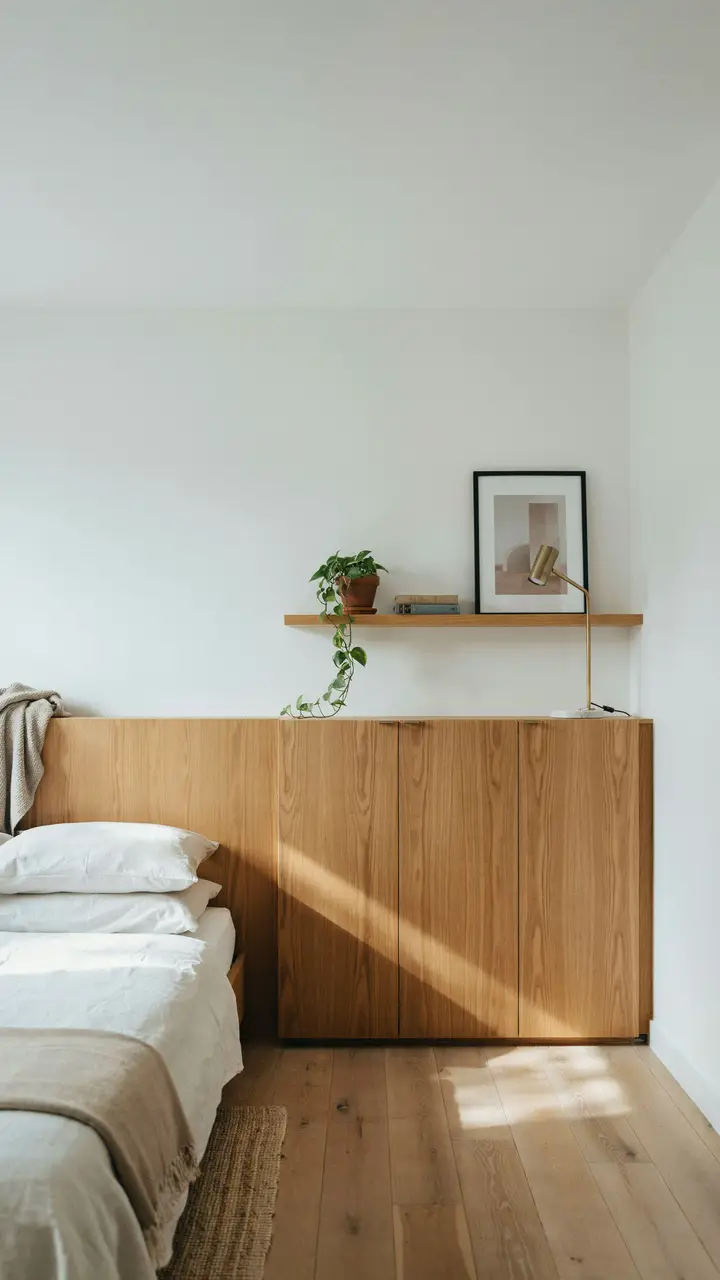
How to Recreate This Look
This is the one that makes people stop scrolling and say “wait, that’s genius.” Positioning your storage behind the bed wall turns wasted vertical space into your most functional zone.
Shopping List:
- Modular cabinet system (IKEA BESTA series is ideal here—$150–$500 depending on configuration)
- Push-latch door hardware if your chosen cabinet doesn’t include it ($15–$25 for a set)
- Integrated LED strip lighting for the bedroom-side shelf ($20–$40)
- Floating shelf attachment hardware for the top headboard surface ($10–$20)
- Cable management clips if running any charging cables ($5–$10)
Step-by-Step Styling Instructions:
- Measure your bed width precisely and plan your cabinet unit to span that exact width (or slightly wider) for a built-in appearance.
- Stack BESTA units to reach your desired height—6 feet creates headboard presence without overwhelming a standard 8-foot ceiling.
- Install LED strip lighting under the top shelf overhang on the bedroom side to create reading light.
- Arrange the storage side for pure functionality: push-latch doors mean no hardware visible from either direction.
- Style the top surface with 3–5 items maximum to avoid visual clutter above sleeping space.
Budget Breakdown:
- Under $100: Not achievable new—check secondhand for BESTA/IKEA pieces
- $100–$500: 2–3 BESTA units configured as a headboard wall
- $500+: Custom cabinet unit built to exact dimensions with integrated lighting
Space Requirements: Your room needs at least 10 feet from the headboard wall to the foot of the bed to avoid feeling cramped.
Difficulty Level: Intermediate. Modular unit assembly is manageable; running LED strips adds minor complexity.
7. The Ladder Shelf Partition with Hanging Closet Rod
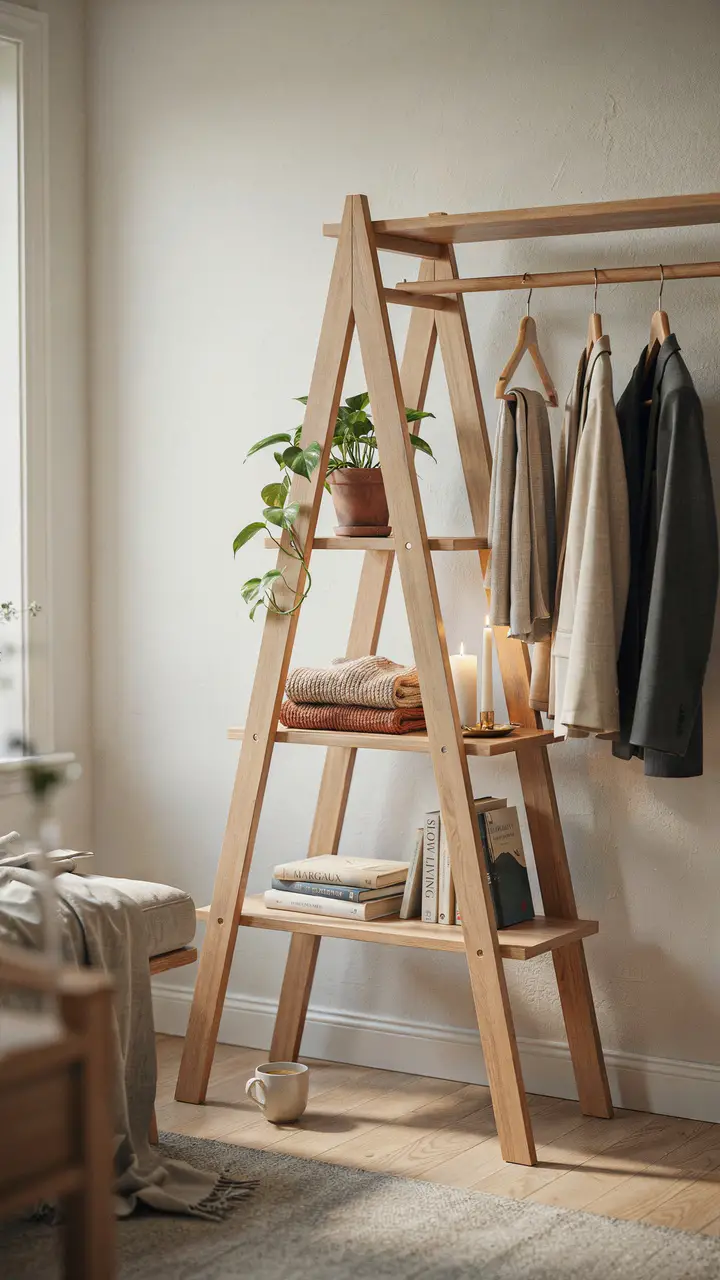
How to Recreate This Look
For renters especially, the ladder shelf partition is practically a lifesaver. Zero wall holes, completely movable, and it genuinely looks like you meant it.
Shopping List:
- A-frame ladder shelf (Target, Amazon, or thrifted, $50–$200)
- Wooden dowel or copper pipe for the hanging rod, cut to span between legs ($10–$20)
- Slim velvet hangers (makes even a few items look intentional—$15–$25 for a pack of 30)
- Felt furniture pads for the feet ($5)
- Rope or leather cord to lash the rod to the ladder legs if needed ($8–$15)
Step-by-Step Styling Instructions:
- Position your ladder shelf to divide a corner or carve out a dressing alcove.
- Cut your dowel rod to the exact width between the ladder’s legs and rest or tie it securely.
- Hang only your most-used or most-loved pieces—this is not a full wardrobe solution, but a curated display.
- Style the shelves with a balanced mix: one plant, one or two folded items, one decorative object per shelf.
- Keep the total color palette of hanging items limited to 2–3 tones so the display looks intentional.
Budget Breakdown:
- Under $100: Thrifted ladder shelf + hardware store dowel + secondhand hangers
- $100–$500: New ladder shelf + copper pipe rod + quality velvet hangers + shelf styling accessories
- $500+: Custom solid wood A-frame with integrated rod fittings
Difficulty Level: Beginner. This might genuinely be the most accessible project on this entire list.
Common Mistake: Hanging too many items makes the whole thing look like a laundry rack. Curate brutally—keep only your most-worn or most-loved pieces on display.
8. The Folding Screen Room Divider with Back-of-Panel Storage
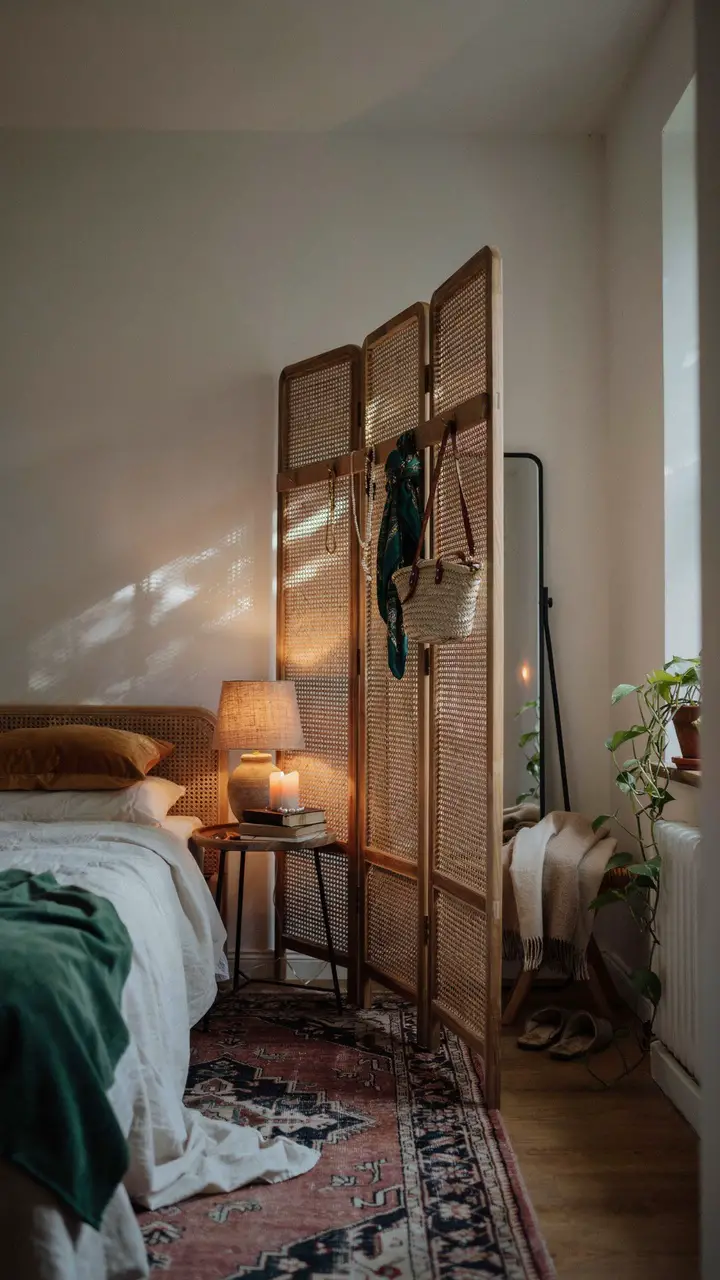
How to Recreate This Look
Folding screens are genuinely underrated, especially in rentals. They cost almost nothing secondhand, take up zero permanent space, and can completely transform the atmosphere of a room.
Shopping List:
- Four-panel folding screen in rattan, wood, or fabric (thrift stores: $15–$60; new at Target or World Market: $80–$200)
- Adhesive hooks rated for the screen material ($8–$15)
- Small S-hooks for jewelry ($5–$10)
- Full-length mirror to lean behind or beside the screen ($30–$100)
- Low wattage table lamp to place beside the screen for ambiance ($20–$60)
Step-by-Step Styling Instructions:
- Position the screen at a slight angle rather than flat against a wall—this creates depth and frames the dressing area.
- Apply adhesive hooks to the panels you want to use for storage, spacing them intentionally.
- Hang only lightweight accessories: necklaces, scarves, bags, belts.
- Place the full-length mirror behind or beside the screen to create the illusion of a proper dressing room.
- Add a small lamp at floor level or on a nearby surface to create the atmospheric lighting that makes this corner feel special.
Budget Breakdown:
- Under $100: Thrifted screen + adhesive hooks + secondhand mirror
- $100–$500: New decorative screen + quality accessories + new mirror
- $500+: Custom carved wooden screen with integrated mirror panels
Difficulty Level: Beginner. Zero tools required.
Durability Notes: Keep accessories lightweight. Heavy bags or jackets on a folding screen will eventually stress the hinges.
9. The Built-In Closet with False Wall Panels
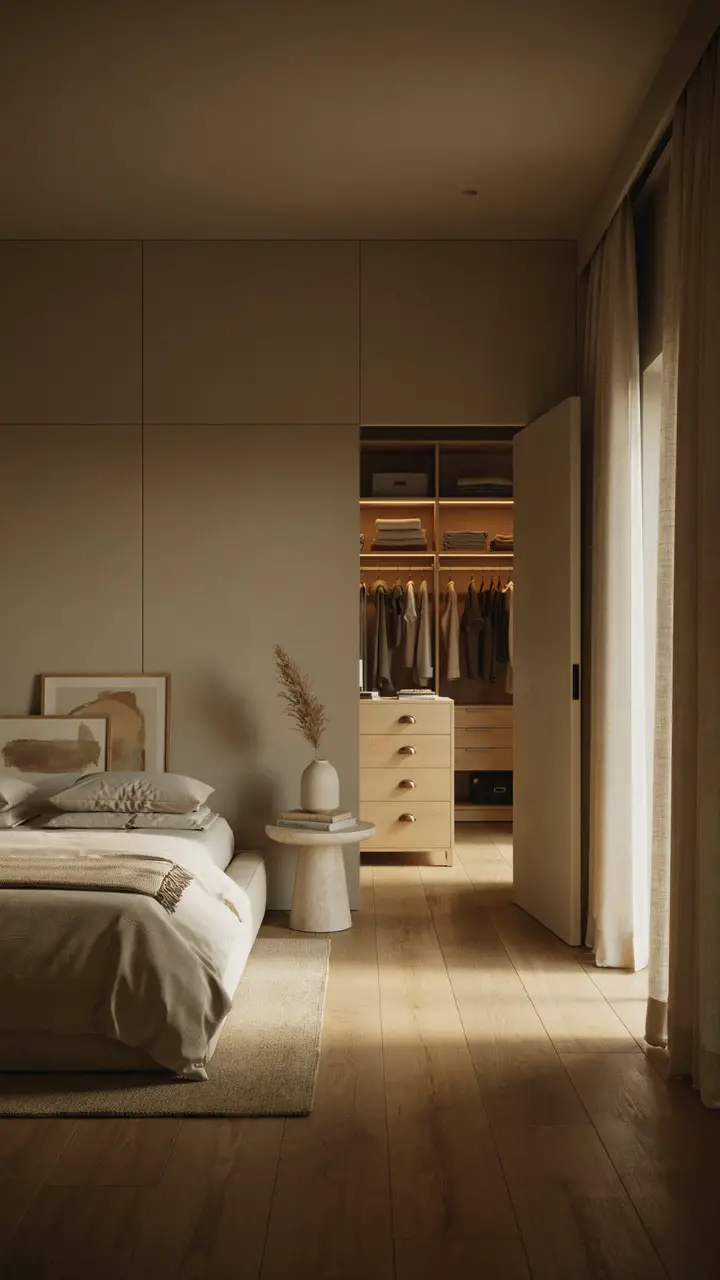
How to Recreate This Look
This is the project that requires the most investment—time, money, and patience—but the result is genuinely stunning. A flush, paint-matched hidden closet wall looks like something from an architectural magazine. 🙂
Shopping List:
- MDF or pre-primed door panels cut to ceiling height ($40–$100 per panel from a lumber yard)
- Flush push-to-open hardware (Sugatsune or Häfele brand, $20–$60 per door)
- Piano hinge or European concealed hinges ($15–$40 per door)
- Interior closet system (IKEA PAX, Elfa, or custom built—$200–$2000+ depending on size)
- Integrated LED lighting for interior ($30–$80)
- Paint matching your walls precisely (bring a chip to the paint store for exact color matching)
Step-by-Step Styling Instructions:
- Frame out your closet opening with lumber, building a precise rectangular frame that allows your panel doors to sit perfectly flush.
- Install your interior closet system completely before hanging the doors.
- Cut and hang the panel doors using piano hinges for full-height installation.
- Install push-to-open hardware so no visible handle disrupts the wall plane.
- Paint doors and surrounding wall with the exact same paint—in the same sheen—so the panel lines disappear visually.
Budget Breakdown:
- Under $100: Not achievable for this project—material costs alone exceed this
- $100–$500: Basic framing + MDF panels + IKEA interior system + DIY installation
- $500+: This is the realistic territory for this project with quality materials and a proper interior system
Difficulty Level: Advanced. This project requires carpentry confidence, precise measuring, and comfort with framing, hanging, and finishing work.
Rental Note: This is firmly an ownership project. The modification is significant and permanent.
10. The Tension Rod and Fabric Canopy Partition Closet
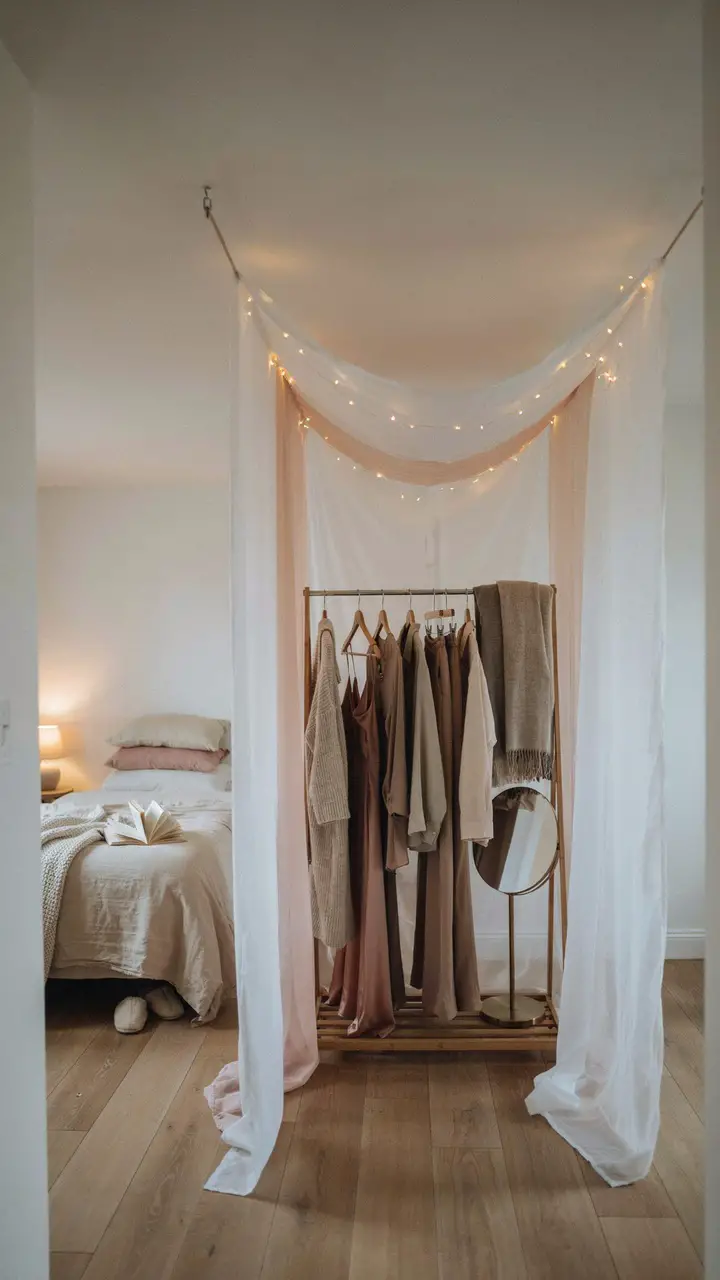
How to Recreate This Look
This is the one for the dreamers, the renters, and the people who want their bedroom to feel like something out of a novel. And the best part? It costs almost nothing and leaves zero damage.
Shopping List:
- Two floor-to-ceiling tension poles ($20–$40 each)
- Sheer curtain panels in white, blush, or ivory ($10–$25 each, IKEA or Amazon)
- Freestanding clothing rack ($30–$80)
- Matching wooden or velvet hangers ($15–$25 for a set)
- Battery-operated fairy lights ($10–$20)
- Small round mirror on a stand ($20–$60)
- Command hooks to gently guide fabric if needed ($5)
Step-by-Step Styling Instructions:
- Position your two tension poles to flank the clothing rack, creating a framed alcove.
- Thread your sheer panels over the top of each tension pole before extending them to the ceiling.
- Let the fabric drape loosely between the poles at the top, creating a soft canopy effect.
- Weave fairy lights through the upper drape and connect to a simple plug-in timer.
- Style your clothing rack with only your most-loved pieces, organized by color or category.
- Place the small mirror inside the alcove so the whole corner functions as a self-contained dressing space.
Budget Breakdown:
- Under $100: Entirely achievable—this might be the most budget-friendly project on this list
- $100–$500: Upgrade to premium tension poles + linen panels + quality clothing rack
- $500+: Custom canopy frame + premium fabric + integrated lighting system
Difficulty Level: Beginner. If you can extend a tension rod and drape fabric, you’ve got this completely handled.
Seasonal Adaptability: Swap sheer panels for heavier linen or velvet in cooler months for a cozier, more cocoon-like feel. Change the fairy light color temperature from cool white to warm amber for an instant seasonal shift.
Common Mistake: Using too many layers of fabric makes the alcove feel crowded rather than dreamy. Two panels total—one per pole—is enough.
Your Space, Your Rules
Here’s the thing about partition wall closet ideas: none of them require a contractor, a designer’s eye, or a credit card you’re afraid to look at. Whether you’re renting a studio and working with zero wall holes or you’re finally ready to tackle that built-in hidden closet you’ve been dreaming about for years, there’s genuinely a version of this that works for your space, your budget, and your life right now.
The most important principle across all ten ideas is this: create a solution that serves your actual life, not a hypothetical tidy version of it. That means accounting for how you really get dressed in the morning (grabbing things off the floor counts as a system, we don’t judge), what your actual budget is today rather than someday, and whether you’re more likely to maintain a curated six-item capsule wardrobe display or need to hide approximately everything behind closed doors.
Start with one idea. Try it imperfectly. Move things around until it feels right. That process—the arranging and rearranging, the “what if I moved this there?”—is actually the best part of making a home truly yours. Your space is already the backdrop for your real, actual life. Making it beautiful is just the best kind of problem-solving there is. <3

Greetings, I’m Alex – an expert in the art of naming teams, groups or brands, and businesses. With years of experience as a consultant for some of the most recognized companies out there, I want to pass on my knowledge and share tips that will help you craft an unforgettable name for your project through TeamGroupNames.Com!