Ever watched your toddler spend 20 minutes trying to fit a square block into a round hole, refusing all help?
That stubborn determination isn’t just adorable frustration—it’s their brain building critical problem-solving skills in real time.
As someone who’s navigated countless stuck zippers, lost toys, and “I can’t do it!” meltdowns, I’ve learned that the best problem-solving activities don’t come from expensive educational kits.
They come from everyday moments where kids get to wrestle with challenges, test solutions, and experience that incredible “I figured it out!” rush.
Problem-solving isn’t about creating tiny geniuses (though that’s a nice bonus). It’s about raising kids who can handle life’s inevitable frustrations, think creatively when plans change, and persist when things get tough.
The activities below have survived the ultimate test: real kids, real mess, real learning. Some will keep your LO engaged for 30 blissful minutes. Others might last exactly 90 seconds before they wander off to investigate the dog’s water bowl.
Both outcomes are perfectly fine—because every attempt at problem-solving strengthens those developing neural pathways.
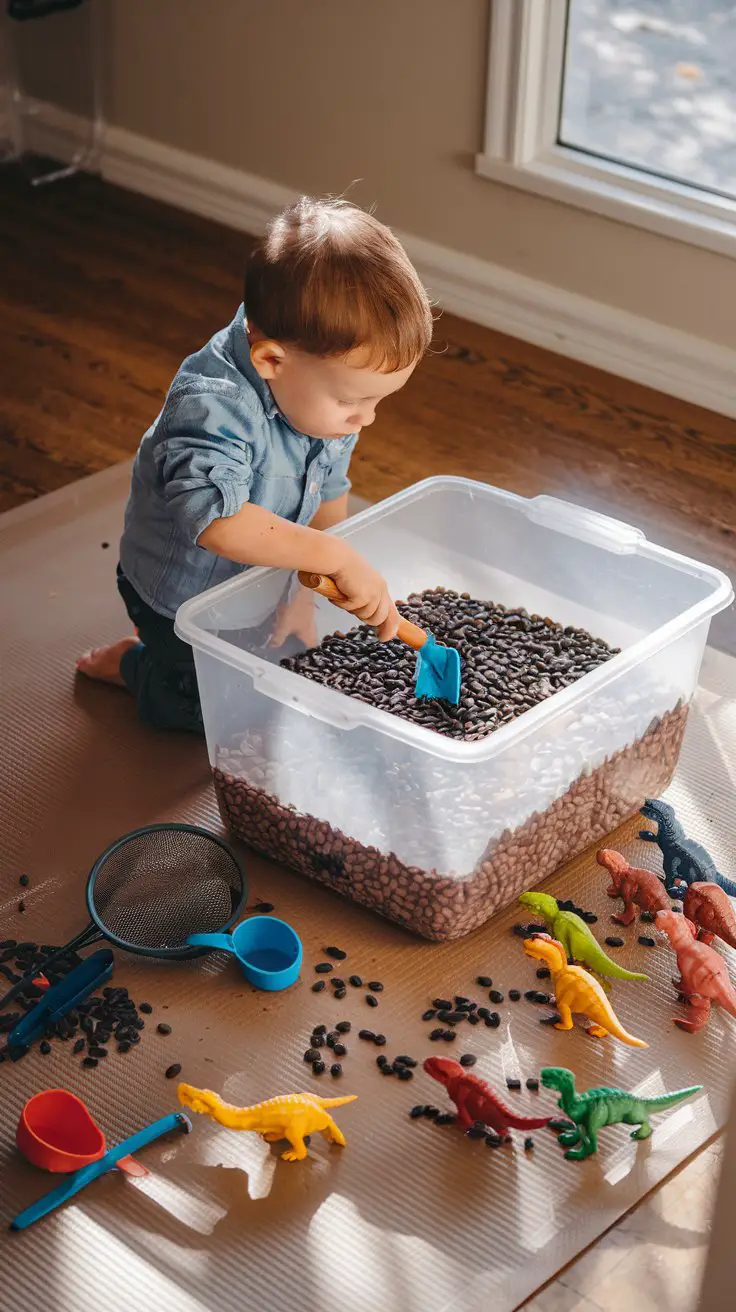
Sensory Bins with Hidden Challenges
There’s something magical about watching a toddler’s face light up when they discover a hidden toy buried in rice or beans. Sensory bins aren’t just about tactile exploration—they’re brilliant problem-solving playgrounds where little hands learn about cause and effect, spatial reasoning, and persistence.
How to Set This Up
- Materials needed: Large plastic storage bin (10-15 quart size), 3-5 pounds of dried beans/rice/pasta, 8-10 small toys or objects to hide, variety of scoops and tools (measuring cups, spoons, strainers, tongs), large vinyl mat or old shower curtain
- Setup instructions: Spread protective mat in designated play area, pour sensory base material into bin (about 3-4 inches deep), completely bury some objects while leaving others partially visible, arrange tools within easy reach, demonstrate once then step back
- Age appropriateness: 18 months-5 years (supervise younger children carefully around small items)
- Time commitment: 5 minutes setup, 15-45 minutes play, 10 minutes cleanup
- Mess level: Medium-high (containment is key—the mat will save your sanity)
- Developmental benefits: Fine motor skills, tactile exploration, problem-solving through trial and error, tool use, hand-eye coordination, persistence
- Safety notes: Always supervise to prevent choking hazards; avoid materials that could cause allergic reactions; teach “beans stay in the bin” boundaries
- Variations: Bury magnetic items for fishing with magnetic wands (ages 3+), freeze small toys in ice blocks for melting challenges (2+), create themed hunts like farm animals in “hay” (dried pasta)
- Budget-friendly alternatives: Use shredded paper, packing peanuts, or sand from the hardware store instead of beans
- Cleanup strategy: Keep a handheld vacuum nearby; let kids help pour materials back using funnels (more problem-solving!); shake mat outside before storing
Looking for animal team names to make this activity more engaging? Try creating a “rescue mission” where kids save zoo animals from the sensory bin!
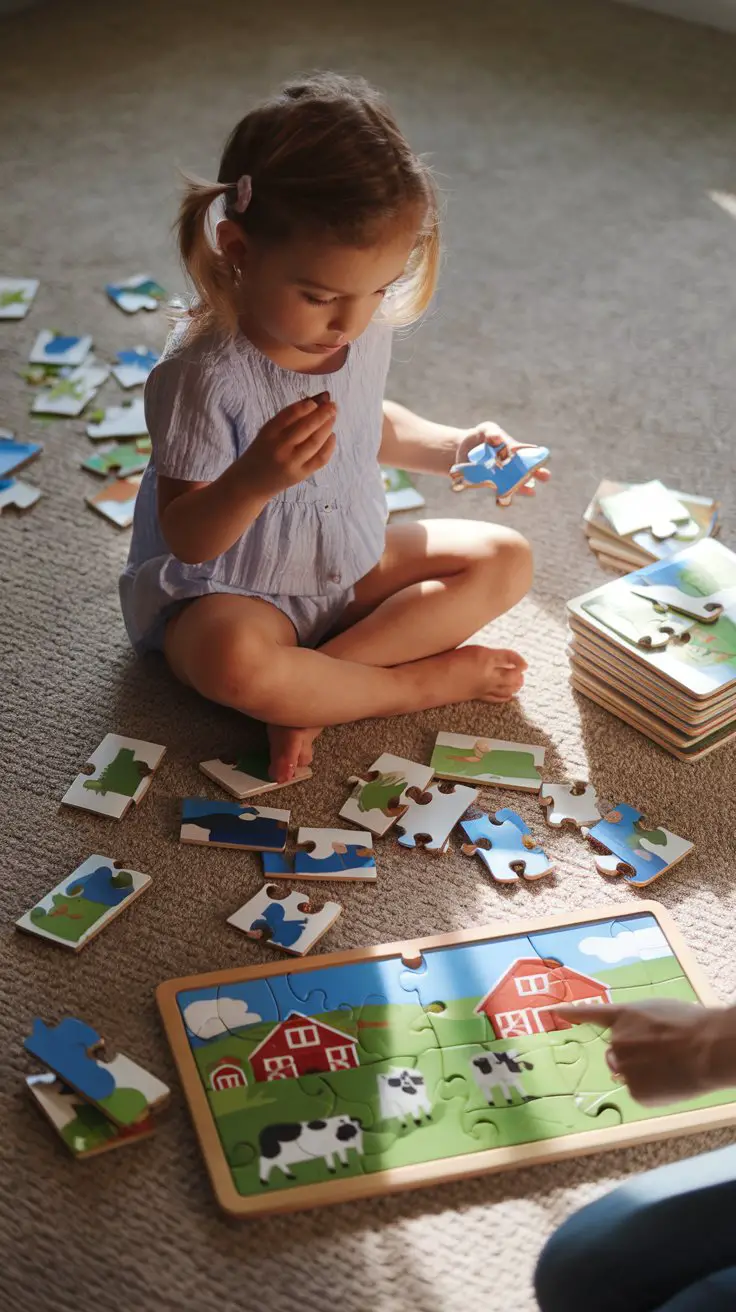
Puzzle Challenges That Grow With Them
Puzzles are the unsung heroes of problem-solving activities. Unlike many toys that get one enthusiastic week of attention, good puzzles evolve with your child’s abilities. I’ve watched my daughter progress from chunky wooden knob puzzles to 24-piece cardboard challenges, and each stage teaches different problem-solving strategies.
How to Set This Up
- Materials needed: Age-appropriate puzzles in varying difficulty levels, flat working surface (puzzle board or placemat), good lighting, optional puzzle mat for storage mid-project
- Setup instructions: Start with puzzles slightly below current skill level to build confidence, introduce one new challenge puzzle alongside familiar ones, create dedicated puzzle space where projects can stay undisturbed, sort pieces by edge/middle or color before starting (great pre-problem-solving activity)
- Age appropriateness: 12 months (simple 3-4 piece), 18-24 months (5-8 knob puzzles), 2-3 years (12-20 pieces), 3-4 years (24-48 pieces), 4-5 years (48-100+ pieces)
- Time commitment: Varies wildly—5 minutes to ongoing project spanning days
- Mess level: Low (pieces get everywhere but nothing’s sticky)
- Developmental benefits: Spatial reasoning, visual discrimination, memory development, patience and persistence, fine motor precision, pattern recognition, independent problem-solving
- Safety considerations: Supervise younger children with small pieces; check for damaged pieces with sharp edges
- Puzzle progression tips: When your child completes a puzzle 3+ times easily, level up; rotate puzzles monthly to maintain novelty; visit libraries that loan puzzles
- Cost-saving approach: Thrift stores and yard sales are goldmines for gently used puzzles; create DIY puzzles by gluing magazine pictures to cardboard and cutting irregular shapes
- Frustration management: If they’re stuck for 2+ minutes on one piece, offer a subtle hint (“Maybe try rotating it?”) rather than placing it yourself; teach the “take a break and come back” strategy early
Team names for kids can make puzzle time more collaborative when siblings or playmates work together on challenging projects!
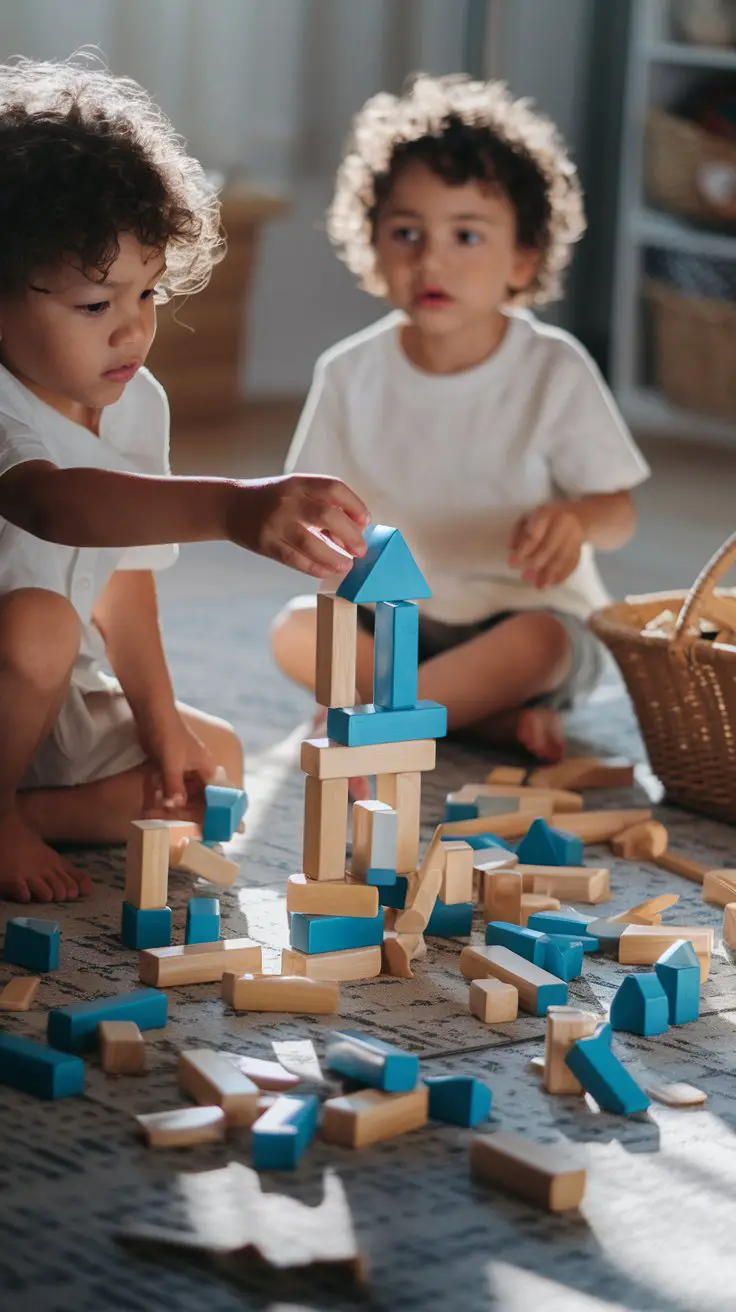
Building Block Engineering Projects
Blocks are problem-solving powerhouses disguised as simple toys. Every tower that falls teaches lessons about balance, gravity, and structural integrity that engineering students learn formally years later. The beauty of block play? Failure isn’t frustrating—it’s just an invitation to rebuild differently.
How to Set This Up
- Materials needed: 50-100+ wooden or foam blocks in various shapes (rectangles, squares, triangles, arches, cylinders), flat stable building surface, optional challenge cards with structure pictures, measuring tape for recording “tower height records”
- Setup instructions: Clear adequate floor space (block towers need falling room!), sort blocks by shape/size initially to help kids plan, start with simple challenges (“Can you build a tower taller than your head?”), photograph completed structures before inevitable destruction
- Age appropriateness: 12 months (large soft blocks, simple stacking), 18-36 months (wooden unit blocks, basic towers and lines), 3-4 years (deliberate structures like bridges and enclosures), 4-5 years (complex buildings with multiple rooms, symmetrical designs)
- Time commitment: 5 minutes to 2+ hours depending on project ambition and age
- Mess level: Medium (blocks everywhere but easy cleanup, especially with helper songs)
- Developmental benefits: Spatial reasoning, gravity and balance understanding, mathematical concepts (symmetry, patterns, measurement), planning and sequential thinking, cause-and-effect learning, frustration tolerance when towers fall
- Safety notes: Supervise younger children around thrown blocks; teach “blocks stay low” for toddlers; establish “gentle deconstruction” vs. aggressive knocking down
- Challenge variations: Build bridges that toy cars can drive under (tests span and height), create block mazes for small figures to navigate, construct structures that can hold specific weights (stuffed animals, books), replicate famous buildings from picture cards
- Storage solution: Take photos of favorite structures before cleanup—kids love rebuilding from their own “blueprints”
- Sibling cooperation tip: Assign roles like “architect” (designer) and “construction crew” (builder) to prevent territorial disputes
Explore creative team names when kids collaborate on massive block building projects—it makes cleanup feel like part of the game!
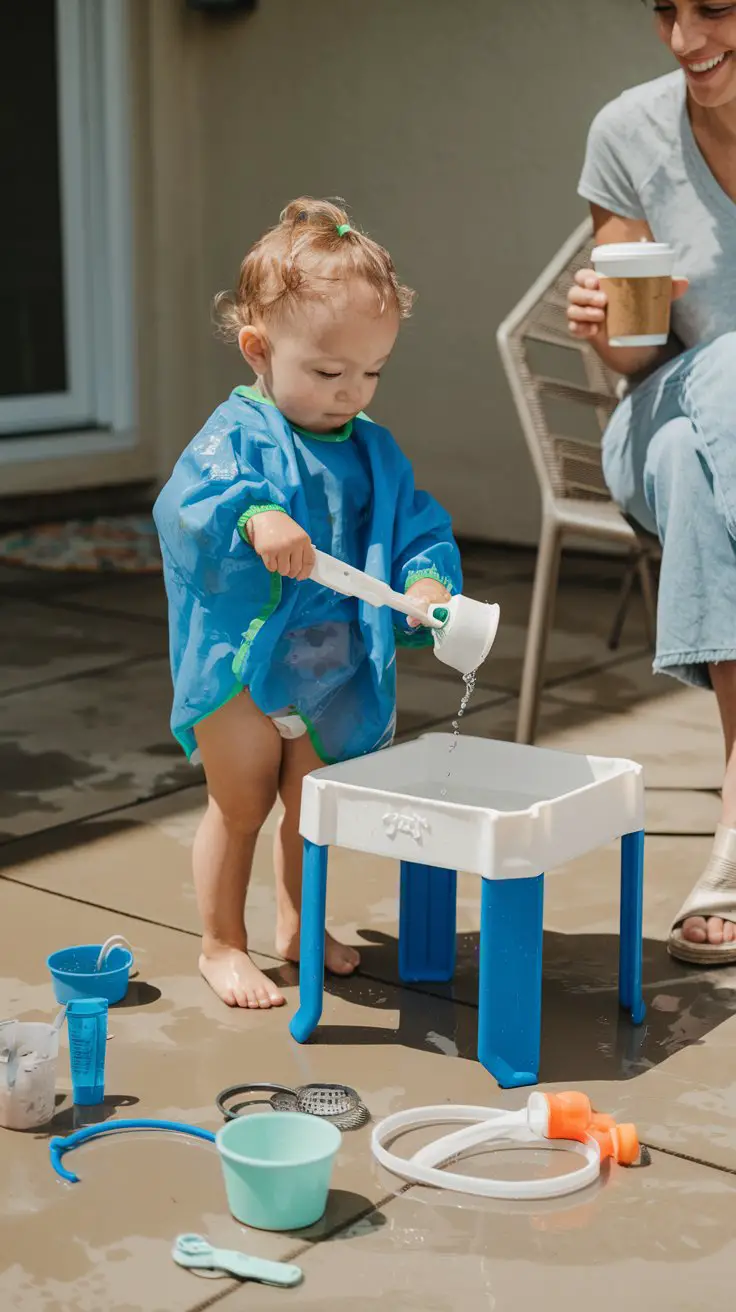
Water Transfer Problem-Solving Play
Water play isn’t just for bath time and summer fun. Setting up intentional water transfer challenges creates low-pressure problem-solving opportunities where kids experiment with volume, tool effectiveness, and cause-and-effect relationships. Plus, the sensory element keeps even short-attention-span toddlers engaged.
How to Set This Up
- Materials needed: Large plastic bin or water table, 3-4 containers of varying sizes and shapes, water transfer tools (turkey baster, medicine dropper, sponges, small cups, funnel, plastic tubing, mesh strainer), waterproof smock or old clothes, towels for cleanup, optional food coloring for visual interest
- Setup instructions: Place water station on patio, deck, or bathroom floor with towels underneath, fill one container 3/4 full with lukewarm water, arrange empty target containers nearby, demonstrate each tool once then encourage independent exploration, add a few drops of food coloring to make water movement more visible
- Age appropriateness: 18 months-5 years (adjust tool complexity by age)
- Time commitment: 10 minutes setup, 20-60 minutes engaged play, 15 minutes cleanup and clothes changing
- Mess level: High (embrace it—learning is happening!)
- Developmental benefits: Fine motor skill refinement, hand-eye coordination, understanding volume and capacity, tool experimentation, cause-and-effect reasoning, sequential problem-solving, sensory regulation
- Safety considerations: Supervise constantly around water; teach “water stays in the bin” boundaries; dress for inevitable soaking; use only safe, age-appropriate tools
- Challenge progressions: Start with large scooping cups (easy success), advance to turkey basters (requires coordination), introduce funnels with narrow openings (tests precision), try sponge transfers (most challenging), add ice cubes to transfer with tongs
- Indoor adaptation: Set up in empty bathtub with less water and stricter containment rules
- Cost-free version: Repurpose kitchen tools and recycled containers—no special purchases needed
- Extended learning: Introduce concepts like “full/empty,” “more/less,” “floating/sinking” during play; ask open-ended questions like “What happens if you use the big cup instead?”
Science team names work perfectly when framing this as a “water laboratory experiment” for older kids!
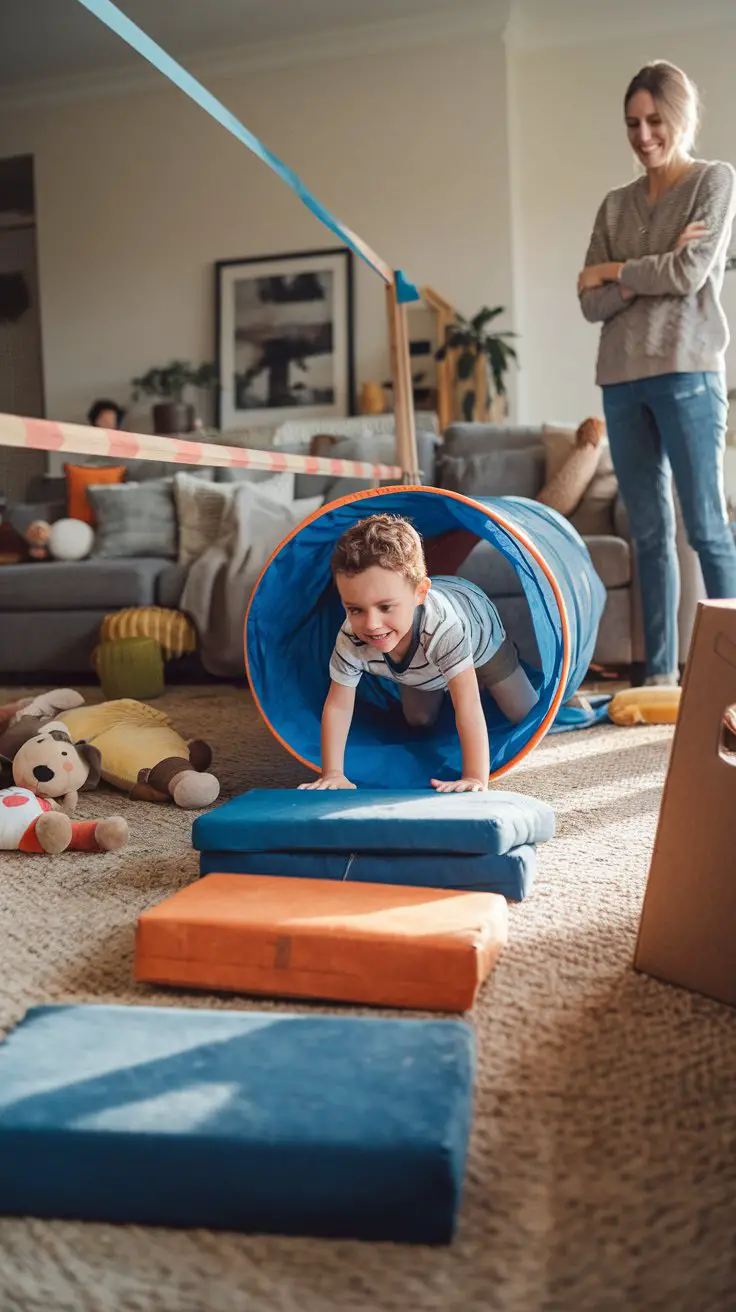
Nothing says problem-solving like asking a 3-year-old to figure out how to crawl under a chair bridge without touching the “lava” floor beneath. Obstacle courses turn your living room into an interactive puzzle where kids must plan routes, adjust movements, and persist through physical challenges.
How to Set This Up
- Materials needed: Couch cushions, pillows, painter’s tape, cardboard boxes, chairs and blankets, hula hoops, stuffed animals or cones for markers, optional small objects for carrying challenges, timer for speed trials
- Setup instructions: Map course route through available space (sketch it out to avoid mid-construction chaos), establish clear start and finish points, create 5-8 challenge stations (crawl under, jump over, balance on, weave through, climb over, throw into, etc.), test course yourself first for safety hazards, introduce one station at a time initially
- Age appropriateness: 18 months-5+ years (adjust difficulty dramatically by age)
- Time commitment: 15-20 minutes setup, 30-60+ minutes play, 10 minutes breakdown
- Mess level: Medium (furniture rearrangement but nothing breakable)
- Developmental benefits: Gross motor skills, spatial awareness, sequential memory (remembering course order), problem-solving body movements, following multi-step directions, persistence through physical challenges, self-confidence building
- Safety setup: Remove breakable items from play area, pad any sharp furniture edges, ensure adequate space for safe movement, establish “controlled chaos” rules (no running), supervise climbing challenges closely
- Challenge variations for ages 18-24 months: Simple one-step challenges like “step over rope,” “crawl through tunnel,” short courses with 3-4 stations
- For ages 2-3 years: Introduce carrying objects while navigating, balancing challenges, animal movement mimicking (hop like bunny, crawl like bear)
- For ages 3-5 years: Multi-step courses requiring memory, timed challenges, backwards navigation, carrying full cups of water (advanced!), partner challenges where kids must help each other
- Reusability tip: Take photos of favorite course layouts for quick reconstruction; let kids design their own courses (massive problem-solving opportunity)
- Competition alternative: Time individual runs and encourage self-improvement rather than sibling competition
Kids working together on course design? Check out duo team names to make the collaboration official!
Sort and Categorize Everything Games
Toddlers are natural sorters—ever watched one organize all the forks out of the silverware drawer while you’re trying to cook? Harness that obsession into problem-solving activities that build classification skills, pattern recognition, and logical thinking.

How to Set This Up
- Materials needed: Collection of safe, small objects in various colors, sizes, and categories (buttons, toy vehicles, plastic lids, pompoms, shells, rocks, blocks), sorting containers (muffin tins, egg cartons, small bowls, ice cube trays, cardboard boxes with dividers), optional sorting cards showing categories
- Setup instructions: Gather 30-50 objects representing multiple category options (color, size, type, texture, purpose), present collection in large central bowl or basket, offer 4-6 sorting containers initially, demonstrate ONE sorting method then let them explore their own logic, resist correcting “wrong” sorting—their reasoning is the point
- Age appropriateness: 18 months (simple two-category sorting), 2-3 years (sorting by single obvious attribute like color), 3-4 years (sorting by multiple attributes, creating own categories), 4-5 years (complex classification systems, sub-categories, pattern creation)
- Time commitment: 5 minutes setup, 15-40 minutes engaged sorting, 5 minutes cleanup (let them “sort” items back into storage)
- Mess level: Medium (small pieces everywhere but usually manageable)
- Developmental benefits: Classification and categorization skills, pattern recognition, logical thinking development, attention to detail, decision-making, color/size/shape recognition, mathematical set theory foundation
- Safety warnings: Supervise constantly with small items (choking hazards); avoid items with sharp edges; check for damaged pieces
- Sorting challenge progressions: Start with obvious distinctions (big/small, red/blue), advance to subtle differences (light blue/dark blue, rough/smooth), introduce multi-attribute sorting (“Find all the big red circles”), create sorting “rules” they must figure out
- Real-world applications: Sort laundry by colors together, organize toys into categories at cleanup time, help sort groceries after shopping, organize art supplies by type
- Cost-free version: Use household items exclusively—pasta shapes, recycled caps, sock pairs, plastic utensils, nature items from outdoor walks
- Independent play tip: Create sorting task cards showing completed examples—kids follow the pattern independently while you fold laundry nearby
Sorting by team categories? Color team names can help organize group sorting competitions!
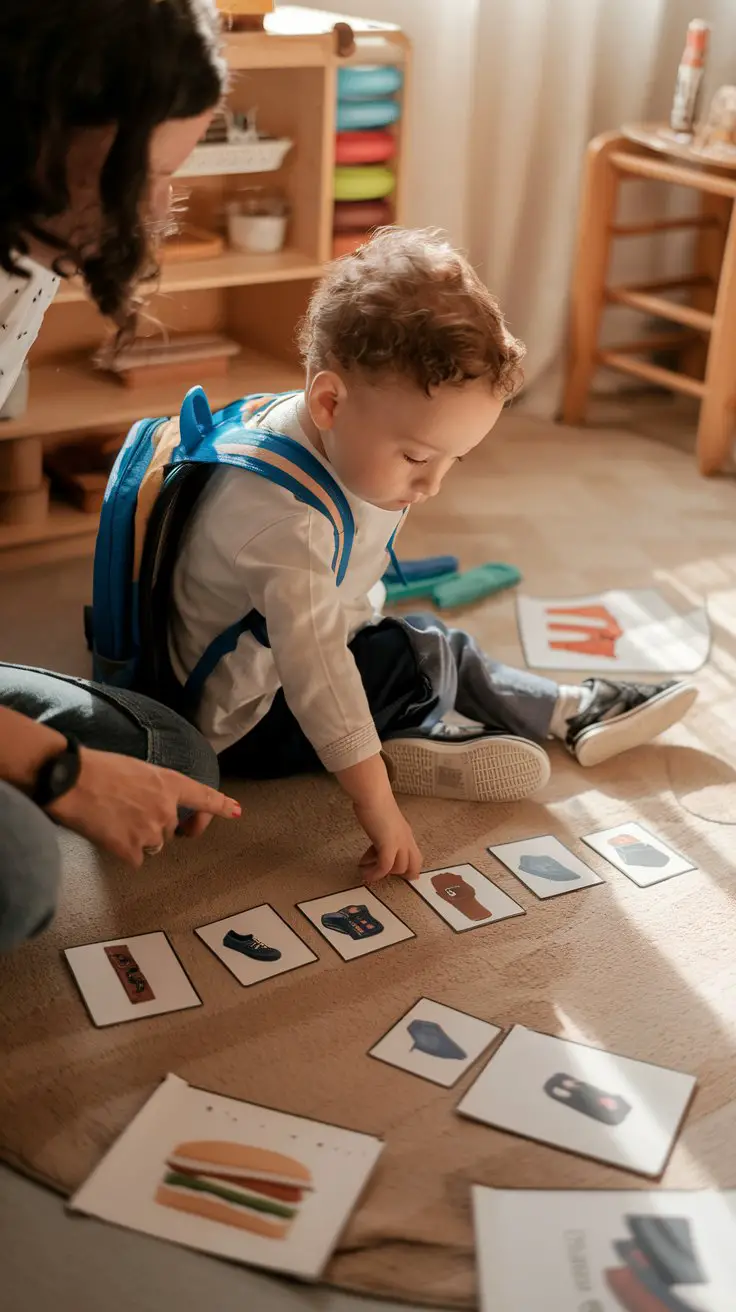
Simple Coding and Sequencing Activities
Before you panic—no, I’m not suggesting toddlers learn Python. But basic sequencing activities (first this, then this, finally this) build the logical thinking foundation that makes actual coding possible years later. Plus, watching a 2-year-old successfully follow a three-step sequence is ridiculously satisfying.
How to Set This Up
- Materials needed: Index cards or cardstock, markers or printed images, clear tape or lamination for durability, Velcro dots for reusable boards, images showing clear action sequences, optional toy “robot” that follows directions
- Setup instructions: Create 4-6 simple sequence sets showing 3-5 step processes, use photographs of real objects or simple drawings (stick figures work!), arrange one sequence in order as demonstration, mix up cards and let child recreate correct order, start with very familiar routines before introducing novel sequences
- Age appropriateness: 2-3 years (following 2-3 step sequences with pictures), 3-4 years (arranging 3-4 step sequences independently), 4-5 years (creating own sequences, following complex 5-6 step patterns, verbal-only directions)
- Time commitment: 20 minutes initial creation, 10-20 minutes play per session, infinite reusability
- Mess level: Low (just cards to manage)
- Developmental benefits: Sequential thinking, logical ordering, cause-and-effect understanding, following multi-step directions, memory development, planning skills, early computational thinking
- Safety notes: None significant—cards are safe for all ages
- Sequence ideas by complexity:
- Simple (2-3 steps): Getting dressed sequence, washing hands, eating snack
- Medium (3-4 steps): Making sandwich, brushing teeth properly, setting table
- Complex (5+ steps): Morning routine, baking cookies, planting seed
- Interactive variation: Create “human robot” game where child gives step-by-step directions to parent who follows EXACTLY what’s said (hilarious when they realize they skipped crucial steps like “open the door before walking through”)
- Real-world application: Use sequence thinking for transitions—”First cleanup, then snack, then playground”—visual schedule reduces transition meltdowns
- Tech-free foundation: These analog sequencing skills transfer directly to coding concepts later—you’re literally teaching algorithm thinking
- Storage solution: Keep sequence sets in labeled envelopes or small photo boxes; rotate weekly to maintain interest
Looking for puzzle team names when kids work together solving sequence challenges? Make it a team effort!
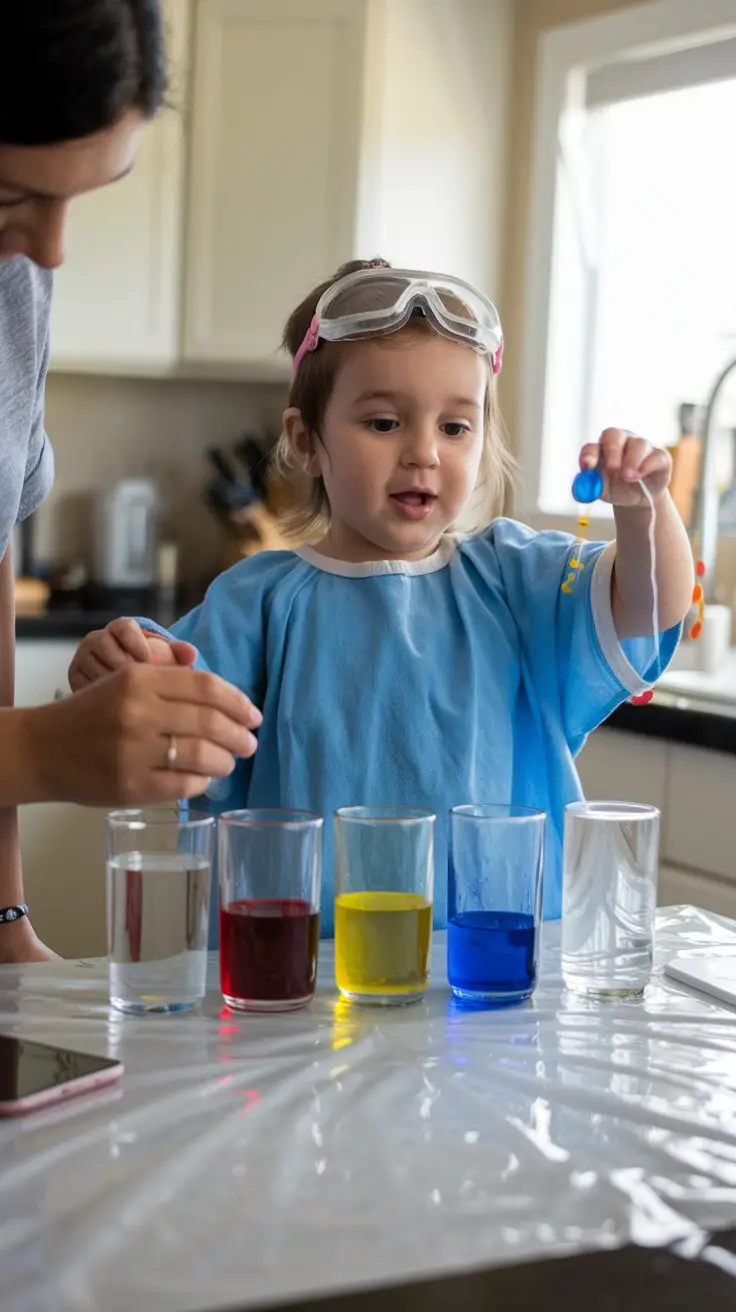
Cause-and-Effect Science Experiments
Toddlers are natural scientists—they’re constantly experimenting to see what happens when they drop spaghetti off their high chair tray (every. single. piece.). Channel that experimental energy into structured cause-and-effect activities where problem-solving meets magical discovery.
How to Set This Up
- Materials needed: Clear glasses or jars, water, food coloring, baking soda, vinegar, dish soap, vegetable oil, various small objects to test (rock, cork, button, leaf, toy, sponge), measuring spoons, droppers or pipettes, plastic trays to contain experiments, protective table covering
- Setup instructions: Choose one experiment focus per session (mixing colors, sink/float testing, volcano reactions, oil/water separation), gather all materials before announcing activity, protect surfaces thoroughly (trust me on this), demonstrate safely then supervise closely, ask predictive questions (“What do you think will happen when…”)
- Age appropriateness: 2-3 years (simple observations with close supervision), 3-4 years (making predictions, conducting experiments with guidance), 4-5 years (more independent experimentation, recording observations)
- Time commitment: 10-15 minutes setup, 20-45 minutes experimenting, 15-20 minutes cleanup (chemistry is messy)
- Mess level: High (but controllable with proper prep)
- Developmental benefits: Scientific thinking development, prediction and hypothesis testing, observation skills, cause-and-effect understanding, patience waiting for results, following procedures, vocabulary expansion (words like “dissolve,” “react,” “absorb”)
- Safety requirements: ALWAYS supervise; use only non-toxic materials; teach “science supplies are not food” firmly; keep vinegar/baking soda reactions at arm’s length (they fizz vigorously); no drinking the colored water (this will be attempted)
- Beginner experiments (ages 2-3):
- Color mixing: Drop food coloring in water, observe diffusion
- Sink or float: Test various objects in water tub, make predictions first
- Fizzy fun: Add vinegar to baking soda in tray, watch reaction
- Intermediate experiments (ages 3-4):
- Oil and water: Pour both in jar, add food coloring, shake and observe separation
- Dissolving race: Test what dissolves (salt, sugar, sand, flour) and what doesn’t
- Ice melt challenge: Place ice cubes in different liquids (water, salt water, warm water), predict which melts fastest
- Advanced experiments (ages 4-5):
- Density tower: Layer liquids of different densities (honey, dish soap, water, oil)
- Crystal growing: Supersaturate water with sugar/salt, observe crystal formation over days
- Ramps and speed: Test how height affects rolling speed using toy cars
- Recording observations: Take photos of experiments; let kids draw “before and after” pictures; use simple journals to document predictions vs. results
- Budget option: Everything here uses kitchen staples—no expensive science kits required
Frame experiments as missions? Try science club team names to make lab time feel official!
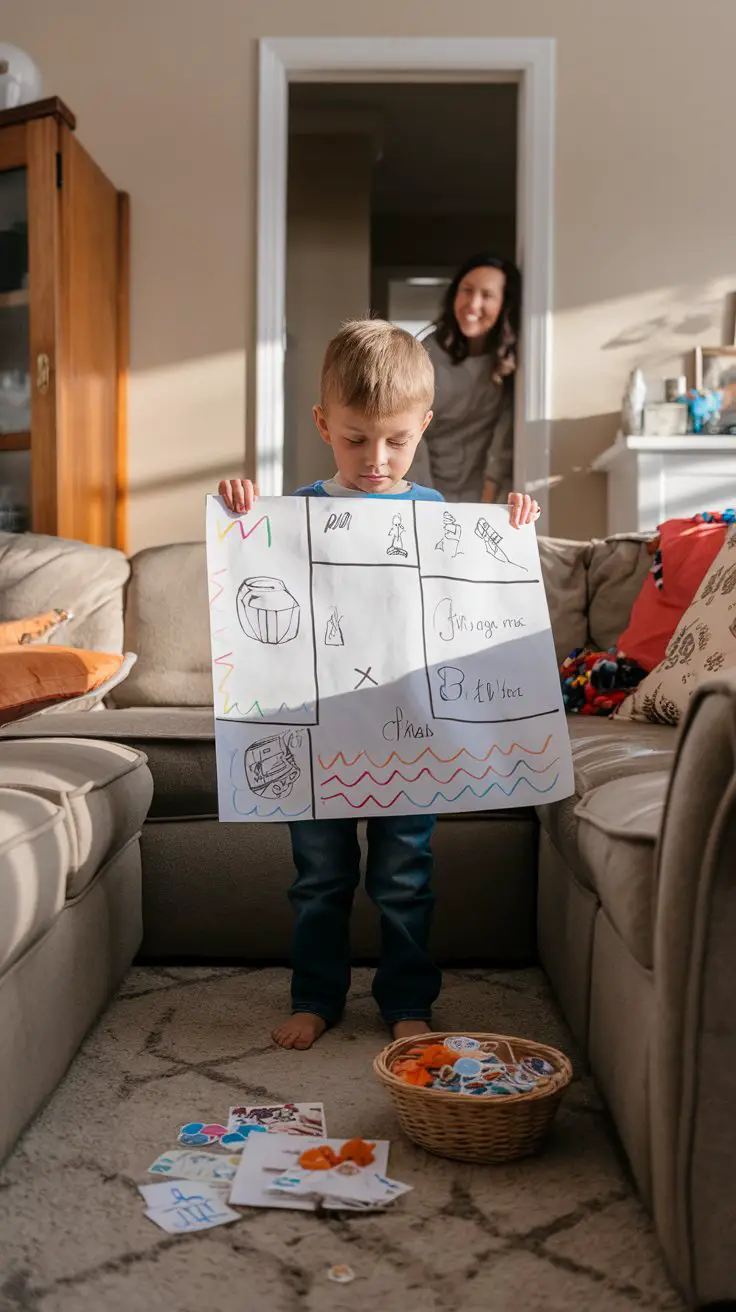
Treasure Hunt Problem-Solving Missions
Nothing engages a child’s problem-solving brain quite like the quest to find hidden treasure. Whether you’re hiding actual objects or creating clue-based hunts, this activity builds sequential thinking, spatial reasoning, and delicious persistence.
How to Set This Up
- Materials needed: Small treasures to hide (stickers, small toys, healthy treats, trinkets), clue cards with pictures (for non-readers) or simple words (early readers), hand-drawn maps with recognizable landmarks, optional treasure chest or special box for final prize, markers and paper for map creation
- Setup instructions: Start super simple—hide 3-5 items in plain sight for first hunts, create picture clues showing locations clearly, progress to simple maps marking rooms, eventually add sequential clue chains where finding one clue reveals the next location, always ensure treasures are findable (nothing worse than a hunt that ends in frustrated tears)
- Age appropriateness: 2-3 years (direct pointing hunts—”Can you find the toy under the table?”), 3-4 years (picture clue following, simple maps), 4-5 years (written clues for early readers, multi-step clue chains, map navigation)
- Time commitment: 15 minutes setup, 15-30 minutes hunting, 5 minutes celebration
- Mess level: Low (unless you hide things too well and searching becomes destructive)
- Developmental benefits: Spatial reasoning, map reading skills, symbol interpretation, sequential thinking, memory (remembering where they’ve searched), persistence, following directions, problem-solving through trial and error
- Safety considerations: Avoid hiding in genuinely dangerous spots; establish off-limits areas (kitchen drawers, bathrooms); never hide where climbing is required
- Hunt variations by age:
- Ages 2-3: “Hot and cold” verbal guidance game, hide toys in obvious spots, one-step picture clues
- Ages 3-4: Simple treasure maps with 4-5 landmarks, picture clue sequences (find one, it shows next location), themed hunts (find all the blue things)
- Ages 4-5: Written clues with simple riddles, multi-room map navigation, clue chains requiring 5+ steps, create their own hunts for siblings/parents
- Theme ideas: Pirate treasure, dinosaur egg hunt, fairy garden search, construction site material hunt, safari animal tracking
- Outdoor adaptation: Nature scavenger hunts using picture cards showing leaves, rocks, flowers, etc.—find items matching pictures
- Sibling cooperation: Pair older and younger siblings with different abilities—older one reads clues, younger one reaches hiding spots
- Reusability: Laminate maps and clue cards; use dry-erase markers to change locations each time; let kids hide treasures for you (their hiding spots are hilariously obvious)
Planning team-based treasure hunts? Adventure group names make the quest feel epic!
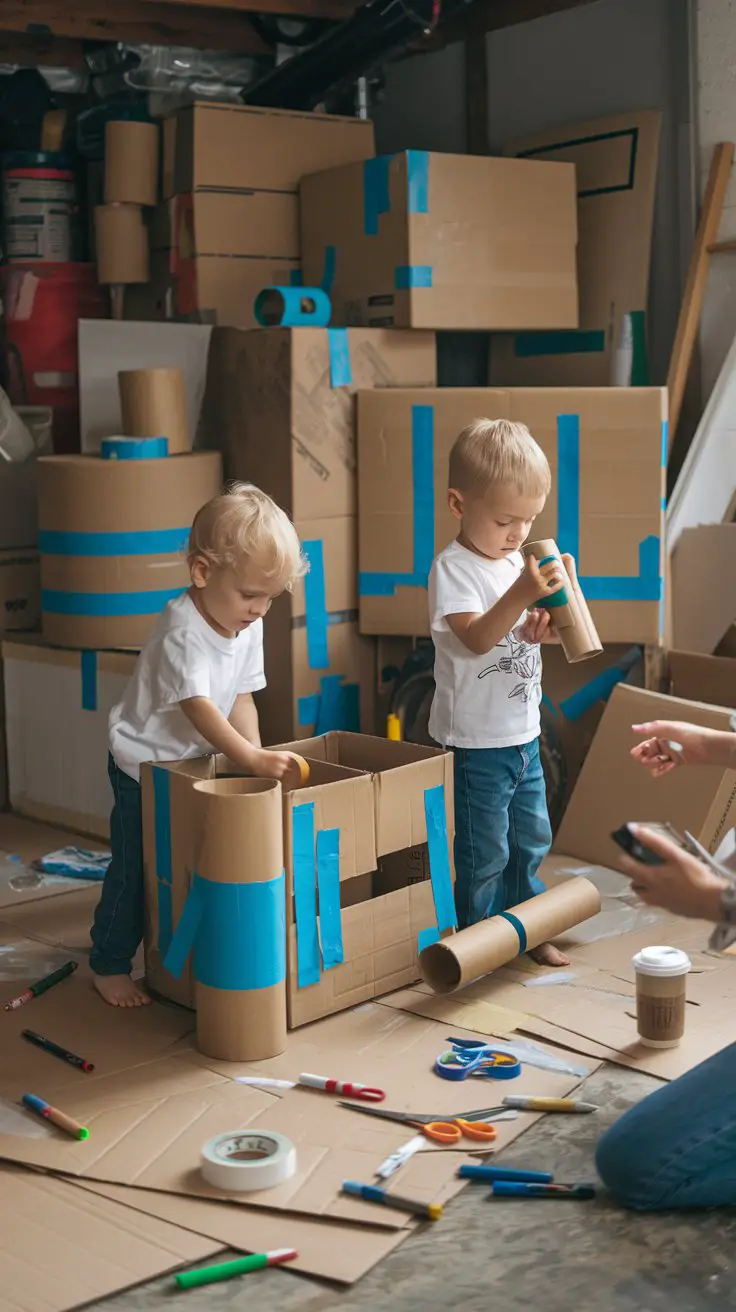
Open-Ended Building and Engineering Challenges
Hand kids some cardboard boxes, tape, and free reign—then step back and watch problem-solving in action. Open-ended construction projects let children define the problem (“I want to build a rocket ship!”) and work through solutions independently. The mess is significant. The learning is spectacular.
How to Set This Up
- Materials needed: Variety of cardboard boxes (save packaging!), painter’s tape or masking tape (easier for small hands than clear tape), child-safe scissors, markers and crayons for decorating, optional paper towel tubes, egg cartons, fabric scraps, string, recyclables
- Setup instructions: Designate a construction zone (garage, basement, corner of playroom where mess is acceptable), present materials with minimal instruction, offer simple challenge (“Can you build something you could sit inside?”) or let them dream up projects, demonstrate tape use once, then resist fixing their engineering “mistakes”—falling structures teach valuable lessons
- Age appropriateness: 2-3 years (simple stacking and taping with heavy supervision), 3-4 years (deliberate structures with adult help connecting pieces), 4-5 years (increasingly independent complex building, some projects spanning multiple days)
- Time commitment: 5 minutes setup, 30 minutes to several days for elaborate projects, 20 minutes cleanup (cardboard recycling day will be heavy)
- Mess level: Very high (embrace the creative chaos)
- Developmental benefits: Spatial reasoning, engineering thinking, problem-solving when structures don’t work, planning and design skills, fine motor practice (tape wrestling builds character), creative thinking, persistence through failed attempts, collaborative building with siblings
- Safety setup: Pre-screen boxes for staples or sharp edges; use only child-safe scissors; supervise tape use (kids will mummify themselves given the chance); establish “no standing on cardboard towers” rule immediately
- Challenge prompts to spark creativity:
- Build a vehicle you can sit in
- Create a house for stuffed animals with multiple rooms
- Design a marble maze or ball run
- Construct a spaceship with control panel
- Make a puppet theater with curtain
- Build a bridge that can hold a toy car
- Problem-solving opportunities arise naturally: Structure falls—how do we make it sturdier? Tape isn’t holding—what could work better? Door won’t stay open—how do we prop it? Box is too small—how do we make it bigger?
- Extension activities: Let them decorate completed structures, photograph projects before disassembly (preservation without storage), create simple blueprints for rebuilding favorite designs
- Budget reality: This is essentially free using saved packaging and household supplies
- Cleanup made easier: Teach flattening boxes for recycling (gross motor workout!), establish “we build, we clean up” rule, take photos as memorial before teardown
Building in teams? Engineering team names make construction projects feel professional!
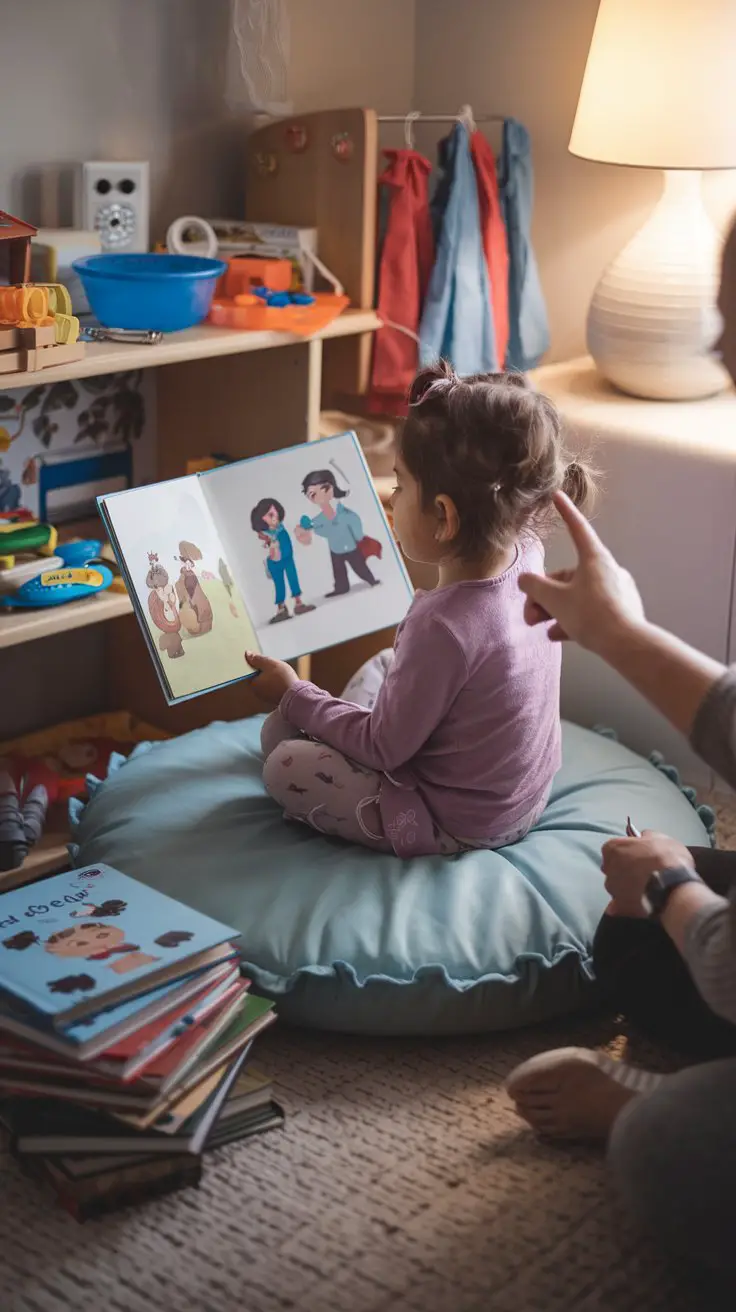
Story Problem-Solving Through Books and Roleplay
Books aren’t passive entertainment—they’re problem-solving simulations where characters face challenges and kids watch (or predict) solutions. Combined with roleplay, story-based activities build empathy, creative thinking, and that crucial “what would I do?” reasoning.
How to Set This Up
- Materials needed: Age-appropriate storybooks featuring problem-solving situations, simple props related to common scenarios (toy phone, doctor kit, kitchen items, dress-up clothes), comfortable reading space, optional story problem cards you create
- Setup instructions: Choose books where characters face age-appropriate challenges and must solve problems, pause at key decision points to ask “What should they do?”, after reading, set out props for acting out story scenarios, encourage alternative solutions to story problems, resist giving answers—let them wrestle with possibilities
- Age appropriateness: 2-3 years (very simple problem books like “Where’s Spot?”), 3-4 years (social problem books about sharing, feelings, making choices), 4-5 years (more complex moral dilemmas, multi-step problem stories)
- Time commitment: 15-20 minutes reading with discussion, 20-40 minutes roleplay extensions
- Mess level: Low (just props to manage)
- Developmental benefits: Empathy development, cause-and-effect thinking, social problem-solving, perspective-taking, creative solution generation, language development, understanding consequences, emotional regulation strategies
- Book selection tips: Look for stories where:
- Characters make mistakes and fix them
- Problems have multiple possible solutions
- Consequences are shown clearly
- Characters use thinking/planning to solve issues
- Situations mirror real preschool challenges (sharing, friendship conflicts, trying new things, managing disappointment)
- Discussion prompts during reading: “What do you think they should do?”, “How is this character feeling?”, “What would you do if this happened to you?”, “What might happen if they choose that?”, “Can you think of a different way to solve this?”
- Roleplay extensions: Act out the story problem with different endings, let child be the problem-solver character, use stuffed animals to recreate scenarios, swap roles (child plays upset friend, parent shows problem-solving)
- Real-world connection: When real conflicts arise (“He took my toy!”), reference similar story situations—”Remember when the characters in our book had this problem? What did they do?”
- DIY story problems: Create simple photo books showing familiar situations (lost toy, friend saying no, spilled juice) with question prompts
- Library recommendation: Librarians can suggest excellent problem-solving books for your child’s age—they’re gold mines of knowledge
Reading together often? Book club names can formalize family reading adventures!
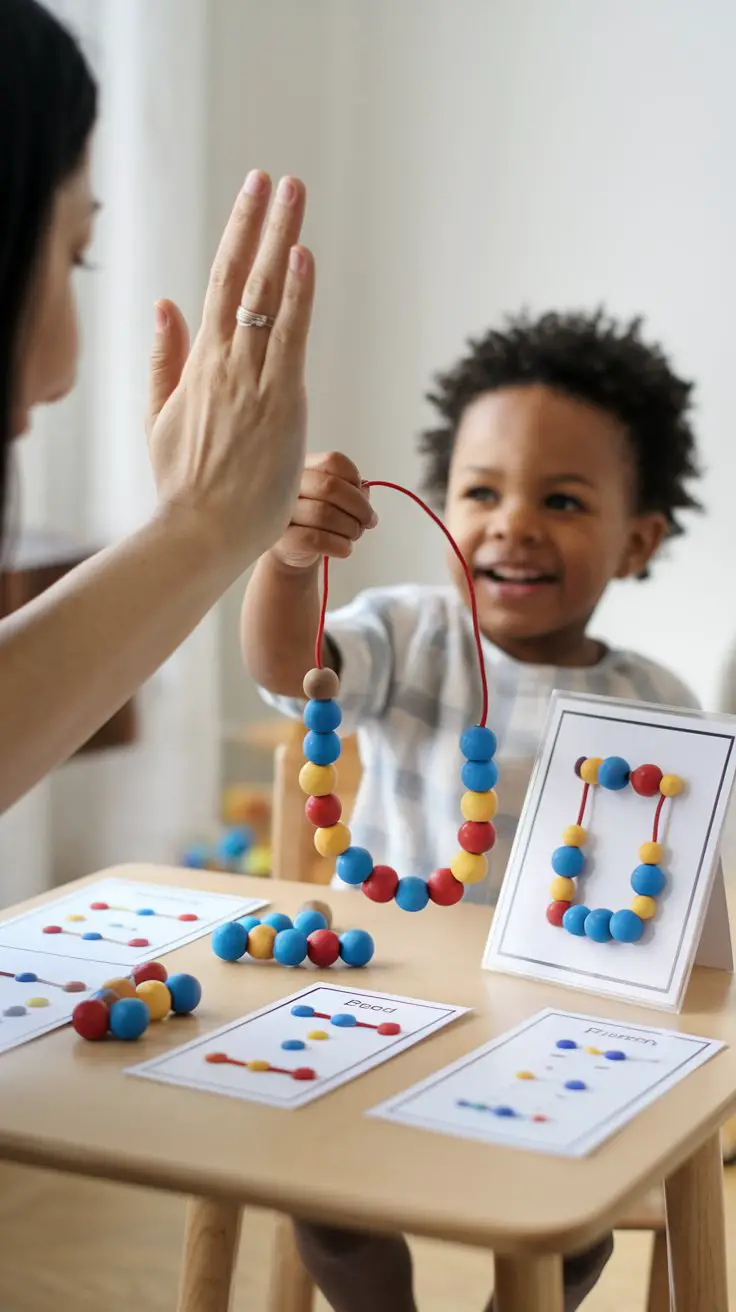
Pattern Recognition and Completion Games
Patterns are everywhere—in music, nature, daily routines, mathematics—and recognizing them is fundamental problem-solving. Creating and completing patterns teaches prediction, logical thinking, and that satisfying moment when they figure out “what comes next.”
How to Set This Up
- Materials needed: Pattern-building items (colored blocks, beads and string, stickers on paper, colored manipulatives, pompoms), pattern cards showing sequences clearly (make your own or print), sorting trays, paper and markers for creating drawn patterns
- Setup instructions: Start with simple AB patterns (red/blue, red/blue), create 3-4 sample pattern cards at current ability level, demonstrate completing one pattern then let them try independently, gradually introduce more complex patterns (ABC, ABB, AABB), encourage creating their own original patterns
- Age appropriateness: 2-3 years (simple two-item patterns with help), 3-4 years (independent two-item patterns, beginning three-item patterns), 4-5 years (complex patterns, creating original patterns, identifying patterns in environment)
- Time commitment: 5 minutes setup, 15-30 minutes pattern work, 5 minutes cleanup
- Mess level: Low-medium (beads and blocks to gather but usually contained)
- Developmental benefits: Pattern recognition and prediction, logical/sequential thinking, mathematical foundation (patterns are pre-algebra!), fine motor skills (bead stringing, careful placement), attention to detail, planning skills, problem-solving when patterns don’t match cards
- Safety notes: Supervise closely with small beads (choking hazard); use large wooden beads for younger children; ensure cords are safe length
- Pattern progression:
- Beginner (AB): Red block, blue block, red block, blue block
- Early (ABB): Red block, blue block, blue block, red block, blue block, blue block
- Intermediate (ABC): Red block, blue block, yellow block, red block, blue block, yellow block
- Advanced (AABB): Red, red, blue, blue, red, red, blue, blue
- Complex (AABC): Red, red, blue, yellow, red, red, blue, yellow
- Real-world pattern hunting: Find patterns around the house together—tile floors, clothing stripes, stacking rings, songs with repeating verses, daily routine sequences (wake, breakfast, play, lunch…)
- Creative variations: Clapping patterns (clap-stomp-clap-stomp), movement patterns (jump-spin-jump-spin), snack patterns (grape-cheese-cracker pattern on plate), nature patterns (leaf-rock-stick arrangement)
- Self-check opportunity: Let child create pattern and parent guess the rule—great reversal that deepens understanding
- Budget option: Use household items—silverware, pasta shapes, coins, buttons, cut paper shapes in colors
Working on patterns together? Math club team names make math time feel fun!
Bringing It All Together: The Beautiful Mess of Learning
If you’ve made it this far, you’re either deeply committed to nurturing your child’s problem-solving abilities or you’re procrastinating cleanup from one of these activities (no judgment—I’m writing this while dried beans remain scattered under my kitchen table). Here’s the truth about problem-solving activities: they’re messy, they don’t always work as planned, and sometimes your child will solve the “puzzle” by throwing all the pieces and declaring “DONE!”
And that’s absolutely perfect.
Every tower that falls teaches resilience. Every “wrong” sorting category shows creative thinking. Every abandoned sensory bin after three minutes still provided valuable exploration. Every frustrated “I can’t!” moment that turns into “I DID IT!” builds confidence that carries into kindergarten, career challenges, and every obstacle life presents.
The secret isn’t finding the perfect activity—it’s creating space for your child to struggle safely, experiment freely, fail without shame, and ultimately solve problems in their own beautifully illogical, brilliantly creative ways. Some days that looks like elaborate cardboard construction projects. Other days it’s just figuring out how to put their own shoes on. Both are problem-solving victories worth celebrating.
Now go forth and embrace the chaos. Stock up on towels for water play. Save those cardboard boxes. Hide the good scissors but bust out the painter’s tape. Take photos of the magnificent messes because these are the moments you’ll treasure—not the perfectly executed Pinterest activity, but the messy, genuine, problem-solving brilliance of childhood in action.
Your future problem-solver is working on their next challenge right now. Probably involving those cushions you just straightened. 🙂

Greetings, I’m Alex – an expert in the art of naming teams, groups or brands, and businesses. With years of experience as a consultant for some of the most recognized companies out there, I want to pass on my knowledge and share tips that will help you craft an unforgettable name for your project through TeamGroupNames.Com!