You know that moment when you stand in your child’s doorway, tape measure in hand, mentally trying to fit a bed, a dresser, a play area, and approximately 4,000 stuffed animals into what is essentially a glorified closet?
Yeah, I’ve been there. Twice, actually — once when my oldest moved out of the nursery into “the small room,” and again when I tried to make a shared bedroom work for two kids with wildly different opinions about whether dinosaurs or unicorns should dominate the wall art. (We compromised with space themes. Neutral territory.)
Here’s the thing nobody tells you when you’re browsing perfectly styled kids’ rooms online: most of those rooms are enormous. Like, suspiciously enormous. Real kids’ bedrooms — especially in apartments, older homes, or anywhere where square footage comes at a premium — demand a completely different approach.
And honestly? The creative constraints of a small room often produce the most charming, imaginative results.
I’ve spent years collecting, testing, and occasionally failing at small-space kids’ room design. What follows are ten ideas that genuinely work, complete with real budget considerations, practical shopping guidance, and honest assessments of what holds up when actual children live in these spaces. Let’s get into it.
1. The Lofted Bed With a Play Nook Underneath
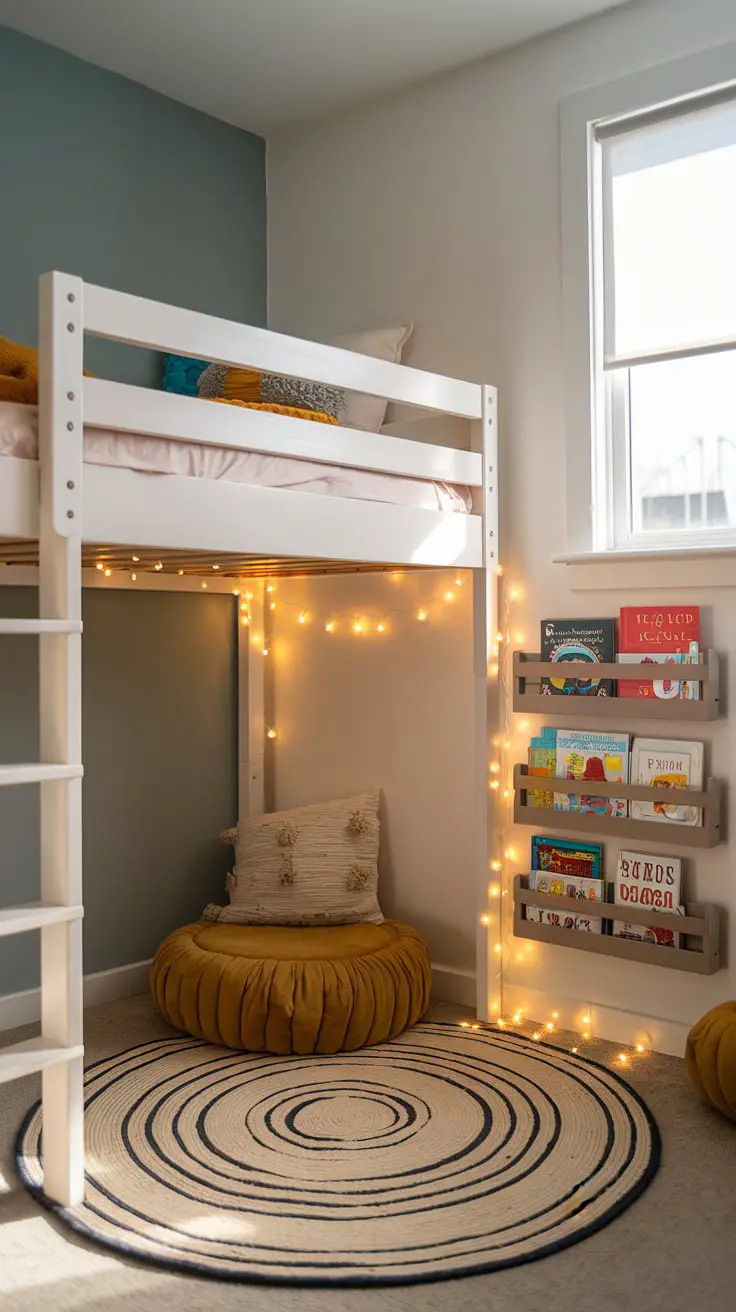
How to Recreate This Look
- Shopping list: A mid-height loft bed frame ($150–$400 from IKEA, Wayfair, or Facebook Marketplace), a large floor cushion or kids’ daybed mattress ($30–$80), peel-and-stick fairy lights ($10–$15), a small wall-mounted shelf ($15–$40), and a round area rug in the 4-foot range ($25–$60 from Target, Ruggable, or TJ Maxx)
- Step-by-step: Start by assembling the loft bed against the room’s longest wall. Measure the space underneath and select a floor cushion that fills roughly 70% of it — you want room to crawl in comfortably. Mount the bookshelf at child-reaching height on the back wall of the nook. Drape lights along the upper bed frame for a canopy effect. Lay the rug to define the nook’s footprint.
- Budget tiers: Under $100 — thrifted loft bed, DIY floor pillows from old comforters, and string lights. Mid-range ($100–$500) — new loft bed, quality cushion, coordinated accessories. Investment ($500+) — custom-built loft with integrated shelving and premium textiles.
- Space requirements: Works in rooms as small as 8×9 feet with at least 8-foot ceilings for safe loft height.
- Difficulty level: Beginner to intermediate. Loft bed assembly takes about 2–3 hours with a partner.
- Durability notes: Choose a loft bed rated for your child’s weight plus a generous margin. Skip the fairy lights if your child is under four — go with battery-operated puck lights instead.
- Seasonal swaps: Switch the floor cushion cover from warm flannel in winter to lightweight cotton in summer. Rotate books seasonally to keep the nook feeling fresh.
- Common mistakes: Hanging the loft too high for young children, or choosing a cushion that’s hard to wash. Always pick removable, machine-washable covers.
2. The Vertical Storage Wall
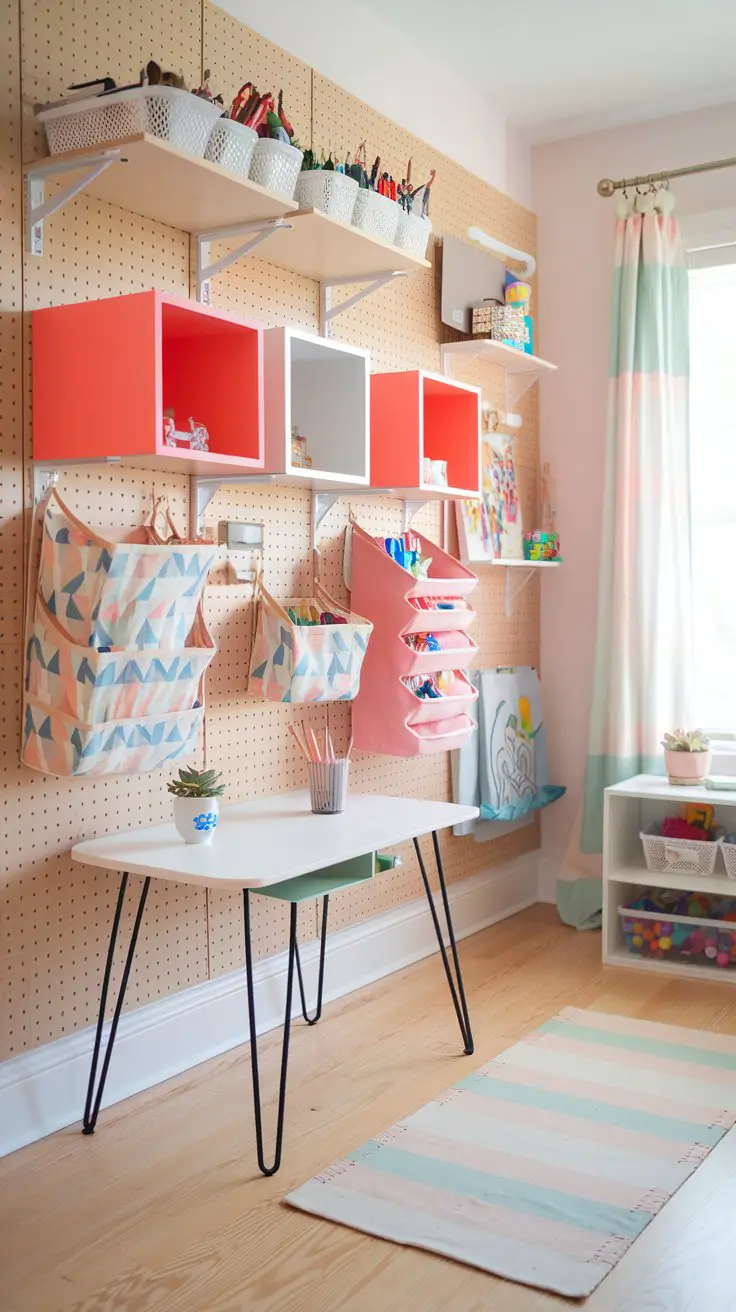
How to Recreate This Look
- Shopping list: IKEA SKÅDIS pegboard system or similar ($20–$50), wall-mounted cube shelves ($30–$70 for a set of three), a hanging fabric organizer ($10–$25), a compact desk ($50–$150), and coordinating baskets or bins ($15–$30 for a set)
- Step-by-step: Map out your wall space first — literally tape newspaper to the wall in the shapes of your planned pieces to visualize placement before drilling a single hole. Mount the pegboard at your child’s eye and arm level. Install cube shelves above the desk in a staggered pattern. Hang the fabric organizer on the back of the door or beside the desk.
- Style compatibility: This approach pairs beautifully with Scandinavian, modern, or eclectic aesthetics. The pegboard serves as both storage and rotating art display.
- Budget tiers: Under $100 — thrifted desk, DIY pegboard from hardware store plywood, repurposed containers. Mid-range ($100–$500) — coordinated retail pieces with matching color palette. Investment ($500+) — custom built-in wall system with integrated lighting.
- Difficulty level: Beginner. The hardest part is finding studs in the wall for secure mounting.
- Durability notes: Pegboard systems are surprisingly resilient. Choose metal hooks over plastic — they hold up years longer with kids yanking things on and off.
- Common mistakes: Mounting everything too high. Kids stop using storage they can’t reach independently. Design for their current height, not yours.
3. The Murphy Bed or Fold-Down Desk Combo
Sometimes a small kids’ room needs to serve triple duty — bedroom, homework station, and play area. A fold-down desk that tucks flat against the wall when not in use, or a Murphy-style bed for older kids, instantly reclaims floor space during daytime hours.
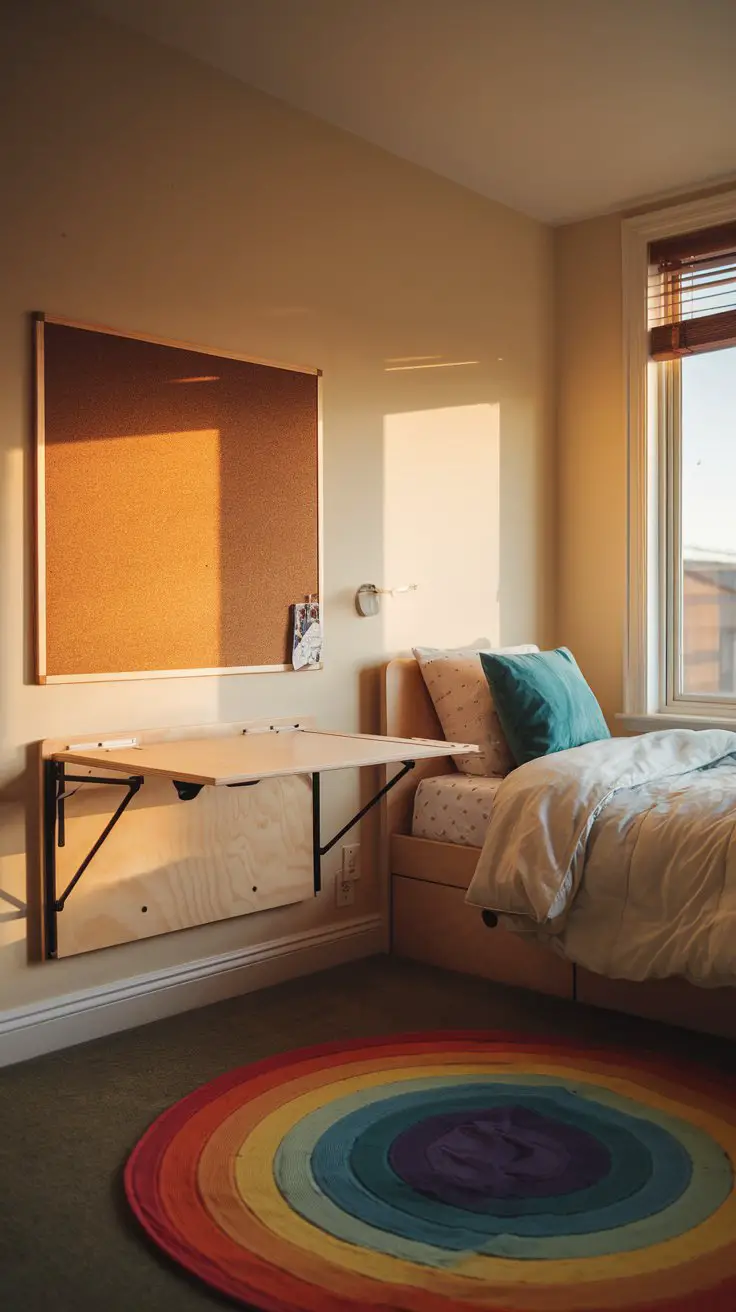
How to Recreate This Look
- Shopping list: A wall-mounted fold-down desk ($80–$250 from Wayfair, Amazon, or IKEA), a corkboard or magnetic board ($10–$30), a compact desk lamp ($15–$40), and a rollable play rug ($20–$50)
- Step-by-step: Install the fold-down desk on the wall opposite or adjacent to the bed, ensuring the fold-down clearance doesn’t block walkways. Mount the corkboard directly above at the child’s standing eye level. Choose a rug that rolls easily so kids learn the habit of clearing floor space themselves.
- Space requirements: Works in rooms as small as 7×9 feet, which makes this ideal for truly tiny bedrooms.
- Durability notes: Test the fold-down mechanism monthly and tighten hardware as needed. Kids are not gentle with hinges. FYI, a soft-close mechanism is worth every extra dollar.
- Common mistakes: Choosing a fold-down desk that’s too heavy for your child to operate independently. If they can’t fold it themselves, they won’t use it.
4. Bold Accent Walls That Create Depth
Want to make a small room feel bigger without knocking down walls? A single accent wall in a deeper tone — think navy, forest green, or warm charcoal — creates an optical illusion of depth that actually pushes the wall back visually. I once painted my daughter’s 8×10 room with a deep teal accent wall behind her bed, and three separate visitors asked if we’d made the room bigger. Nope. Just paint 🙂
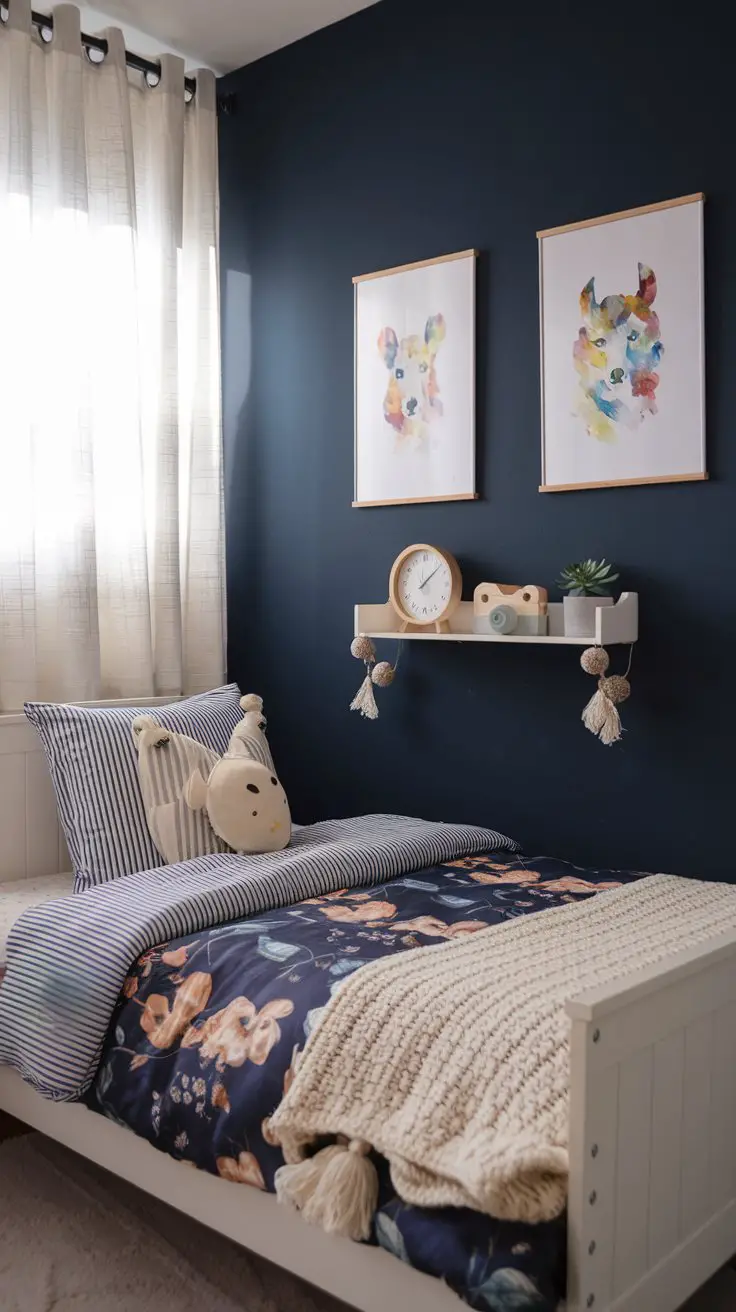
How to Recreate This Look
- Shopping list: One quart or gallon of quality paint in your chosen accent shade ($25–$55 — BTW, Benjamin Moore and Sherwin-Williams offer peel-and-stick color samples so you avoid that nightmare of painting the whole wall only to hate it in daylight), painter’s tape ($5–$8), a basic roller set ($10–$15), and coordinating bedding and frames ($40–$120 from Target, H&M Home, or thrift stores)
- Budget tiers: Under $100 — paint plus thrifted frames and existing bedding refreshed with one new accent pillow. Mid-range ($100–$500) — new paint, coordinated bedding set, quality frames, and shelf accessories. Investment ($500+) — designer paint, custom framing, and premium bedding.
- Seasonal swaps: Keep the accent wall year-round but rotate the throw blanket and one pillow seasonally — lightweight linen for summer, chunky knit for winter.
- Common mistakes: Choosing a color that’s too bright rather than deep. Bright red or electric blue on an accent wall in a small room feels aggressive. Muted, deep tones create depth; saturated brights close walls in.
- Rental-friendly alternative: Peel-and-stick wallpaper in a deep tone or bold pattern achieves the same effect without any paint commitment. Removal takes about an hour.
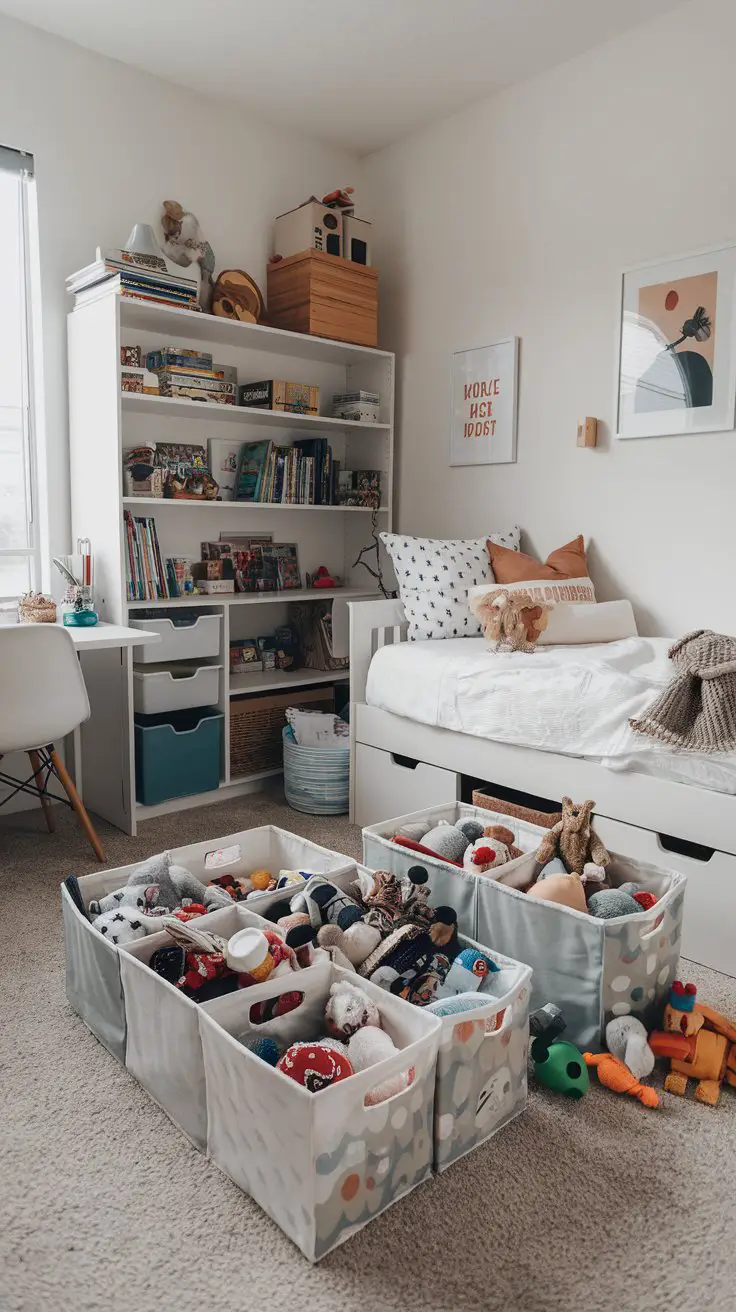
5. Under-Bed Storage That Actually Stays Organized
Every parenting article mentions under-bed storage like it’s revolutionary. But here’s what they don’t mention: without a system, under-bed storage becomes an abyss where toys go to die. The trick is labeled, wheeled bins that slide in and out easily enough for small hands.
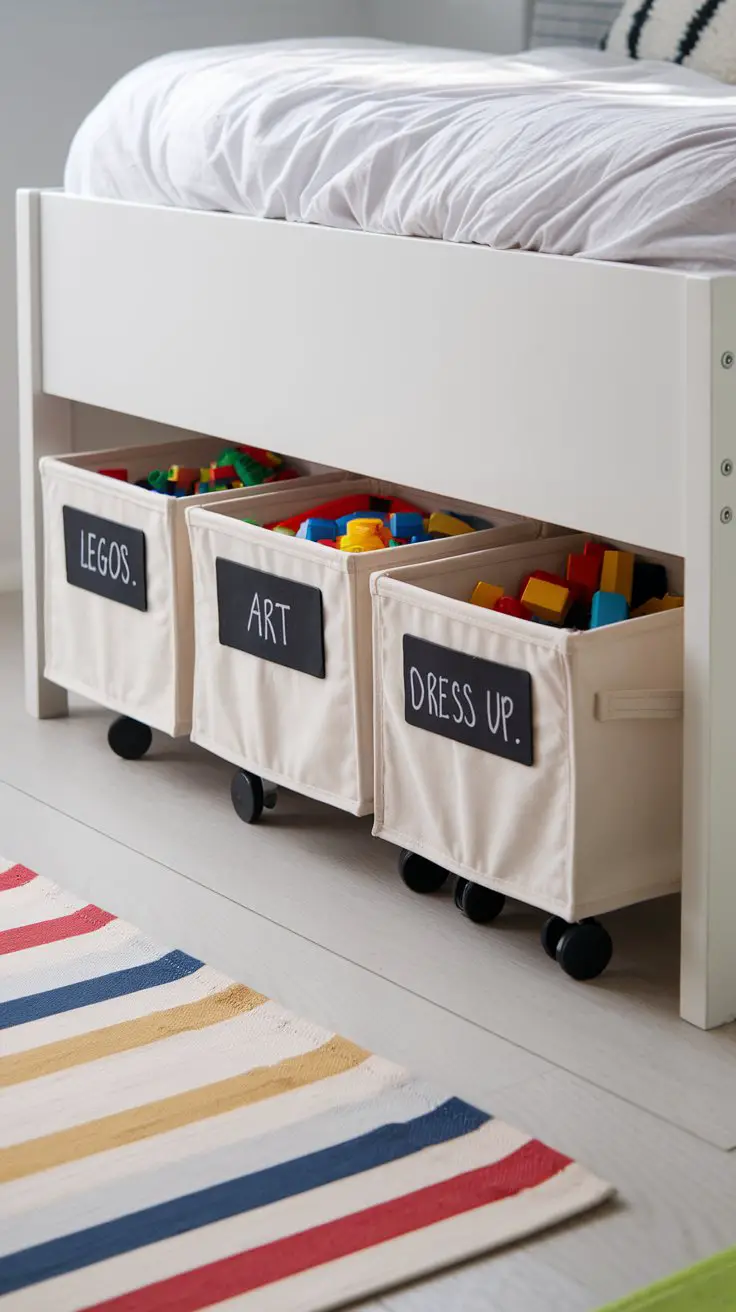
How to Recreate This Look
- Shopping list: Bed risers if needed ($10–$25), rolling under-bed bins ($15–$30 each — look for fabric-lined options at Target or The Container Store), chalkboard labels or adhesive chalkboard tape ($5–$10), and chalk markers ($5–$8)
- Step-by-step: Measure the clearance under your child’s bed before buying anything. You need at least 6 inches of clearance for most rolling bins. If your bed sits too low, affordable risers solve this instantly. Let your child label the bins themselves — they’re dramatically more likely to actually put things away when they chose the categories.
- Difficulty level: Absolute beginner. This is a one-hour project, including labeling time.
- Durability notes: Wooden bins outlast fabric-only options, especially with kids pulling them in and out daily. Wheels are non-negotiable — bins without them become permanent floor obstacles.
- Common mistakes: Making categories too specific. “Cars” and “Trucks” should just be “Vehicles.” Fewer, broader categories mean faster cleanup and less arguing about where the truck-car hybrid belongs.
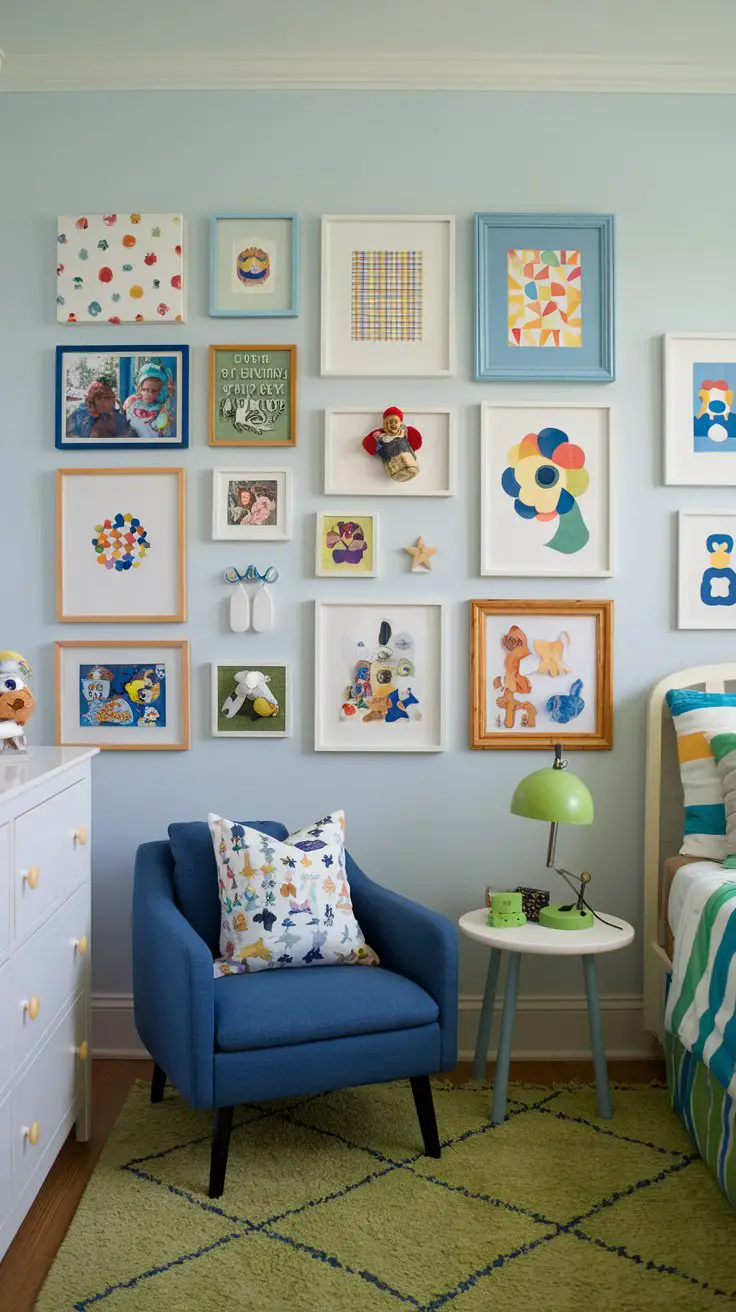
6. A Gallery Wall at Kid Height
Hang art, photos, and your child’s own creations at their eye level, not yours. This single shift transforms a room from “decorated for a child” to “a child’s own space.” Use lightweight frames with acrylic instead of glass (trust me on this one), and include a mix of professional prints and their own masterpieces in matching frames.
7. Corner Reading Tents and Canopies
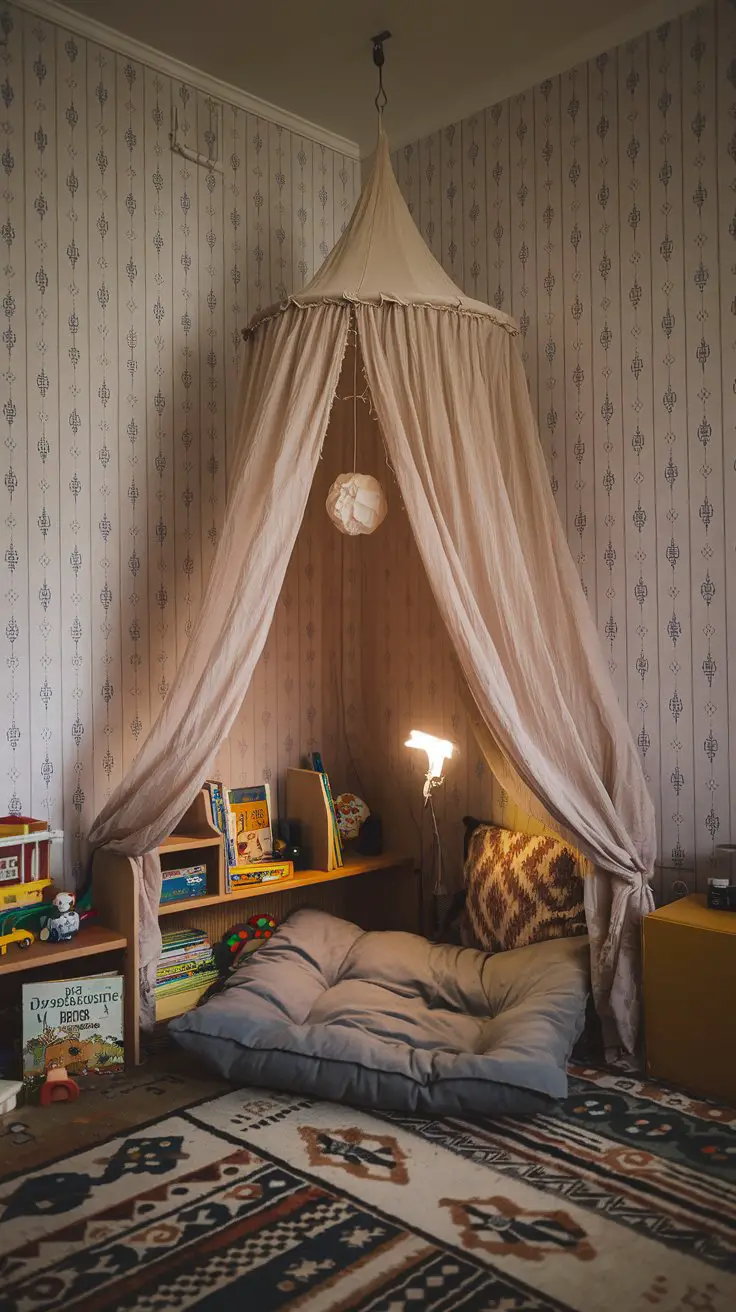
A simple canopy or play tent tucked into a corner creates a defined “zone” in a small room without using a single extra square foot of floor space against the walls. Hang a sheer fabric canopy from a ceiling hook above a floor cushion, add a battery-operated reading light, and watch that dead corner become the favorite spot in the house.
8. Magnetic or Chalkboard Paint on One Wall
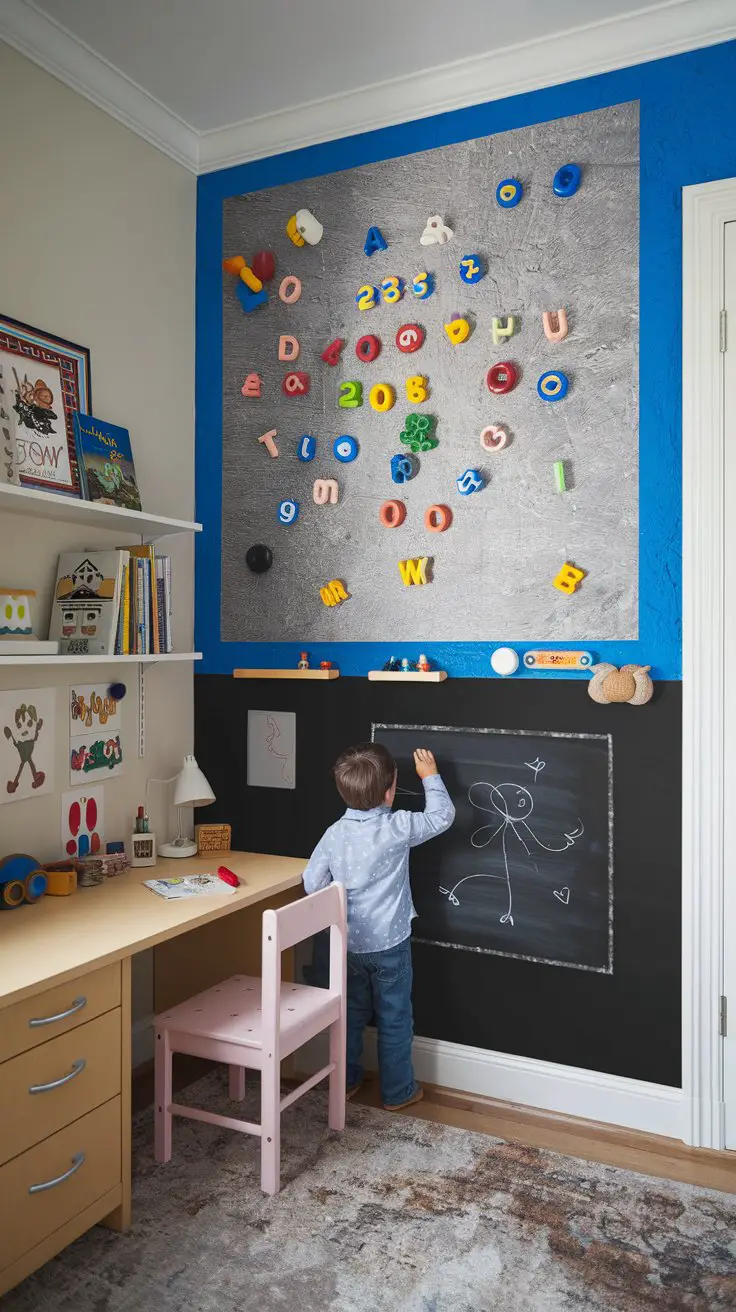
Turn a wall into an interactive surface. Magnetic primer beneath regular paint lets kids display artwork with magnets instead of tape. Chalkboard paint on a lower wall section (waist-height and below) gives them a sanctioned drawing surface. IMO, this is the single best investment for a creative kid’s small room — it replaces an easel, a bulletin board, and a whiteboard in zero additional floor space.
9. Bunk Beds With Personality Zones
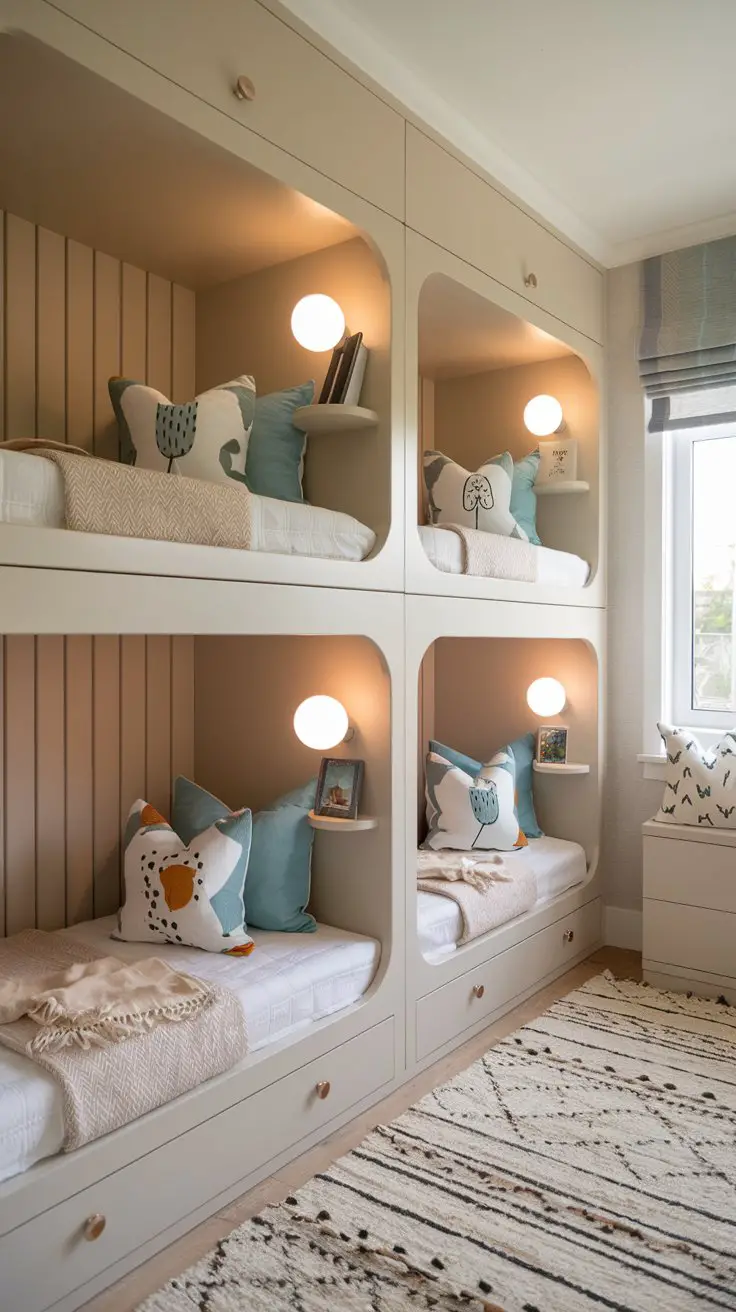
For shared rooms, bunk beds are obvious — but giving each child a “personality zone” within the bunk setup makes the difference between tolerating a shared room and loving it. Individual reading lights, a small shelf or caddy mounted on each bunk’s wall side, and different bedding choices within a coordinated color palette let siblings express independence within three feet of each other.
10. The Capsule Toy Rotation System
This isn’t a furniture idea — it’s a sanity idea. Instead of cramming every toy into a small room, keep only a curated selection available and store the rest in a closet or another area. Rotate toys every 2–3 weeks. Kids rediscover “forgotten” toys with fresh excitement, the room stays manageable, and cleanup takes five minutes instead of forty-five. Store rotation bins in a hall closet, garage, or under a parent’s bed.
Making It All Come Together
Here’s the most important thing I’ve learned from designing small kids’ rooms: your child’s input matters more than any trend. A perfectly styled room that doesn’t reflect their personality becomes just another space they pass through.
But a tiny room where they helped choose the wall color, labeled their own bins, and hung their favorite drawing at their own eye level? That becomes their place in the world.
You don’t need a big room to give a kid a big sense of belonging. You just need a little creativity, a willingness to think vertically, and maybe a tape measure you haven’t lost yet. (Check the junk drawer. It’s always in the junk drawer.)
Now go measure that room, grab a coffee, and start dreaming. You’ve absolutely got this <3

Greetings, I’m Alex – an expert in the art of naming teams, groups or brands, and businesses. With years of experience as a consultant for some of the most recognized companies out there, I want to pass on my knowledge and share tips that will help you craft an unforgettable name for your project through TeamGroupNames.Com!