You know that moment when your toddler discovers they can smear yogurt across the highchair tray and suddenly they’re Picasso?
That’s the magic of toddler art—it’s messy, unpredictable, and absolutely essential for their growing brains.
I’ll be honest with you: toddler art activities rarely look like the Pinterest photos. My 2-year-old once spent 45 minutes with watercolors, but instead of painting the paper, she painted her feet, the dog, and somehow the ceiling fan.
And you know what? That’s perfectly okay.
The developmental benefits happening during these chaotic creative sessions are incredible, even when the “masterpiece” ends up being three scribbles before they wander off to find a snack.
These ten art activities are specifically designed for toddlers aged 18 months to 3 years, with modifications for older and younger siblings.
I’ve included realistic mess levels, actual setup times, and honest assessments of how long each activity might hold your LO’s attention.
Some require almost no preparation, while others need a bit more planning—but I promise, they’re all worth it.
Sensory Paint Bag Art (Zero Mess, Maximum Fun)
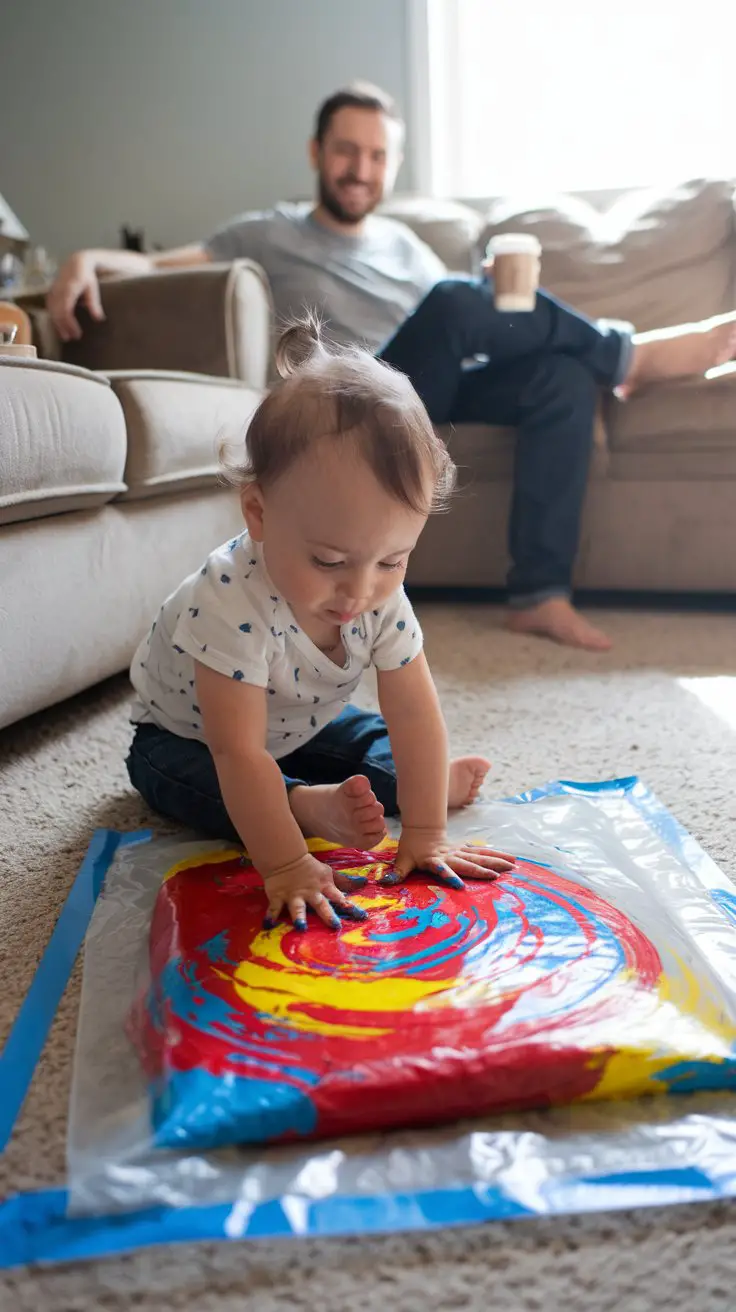
How to Set This Up
- Materials needed:
- 2-3 gallon-sized ziplock freezer bags (the heavy-duty kind)
- 3-4 different colors of washable paint or finger paint (about 2 tablespoons of each color per bag)
- Strong packing tape or duct tape
- Optional: add-ins like glitter, small beads, or paper shapes for extra visual interest
- Step-by-step setup:
- Squeeze paint colors into the bag in separate blobs—don’t mix them yet
- Remove as much air as possible before sealing (this prevents bag explosions)
- Seal the bag completely, then reinforce the opening with duct tape
- Tape the entire bag flat to a table, highchair tray, or even the floor
- Show your toddler how to press, squish, and push the paint around
- Stand back and watch the magic happen
- Age appropriateness: Perfect for 12-36 months; older toddlers (2-3 years) love it too
- Time commitment: 2 minutes setup, 10-30 minutes of play, zero cleanup
- Mess level: LOW (unless the bag breaks—use quality bags!)
- Developmental benefits: Sensory exploration, cause-and-effect learning, color recognition, fine motor development without the cleanup stress
- Safety notes: Always supervise to ensure bags stay sealed; discard immediately if any tears appear
- Cost-saving tip: Use any paint you have on hand, even cheap craft paint works great
- Parent sanity-saver: Make 2-3 bags at once and rotate them throughout the week for fresh entertainment
For more creative group activities, check out these creative team names for inspiration when organizing playdates or parent groups.
Cotton Ball Cloud Painting
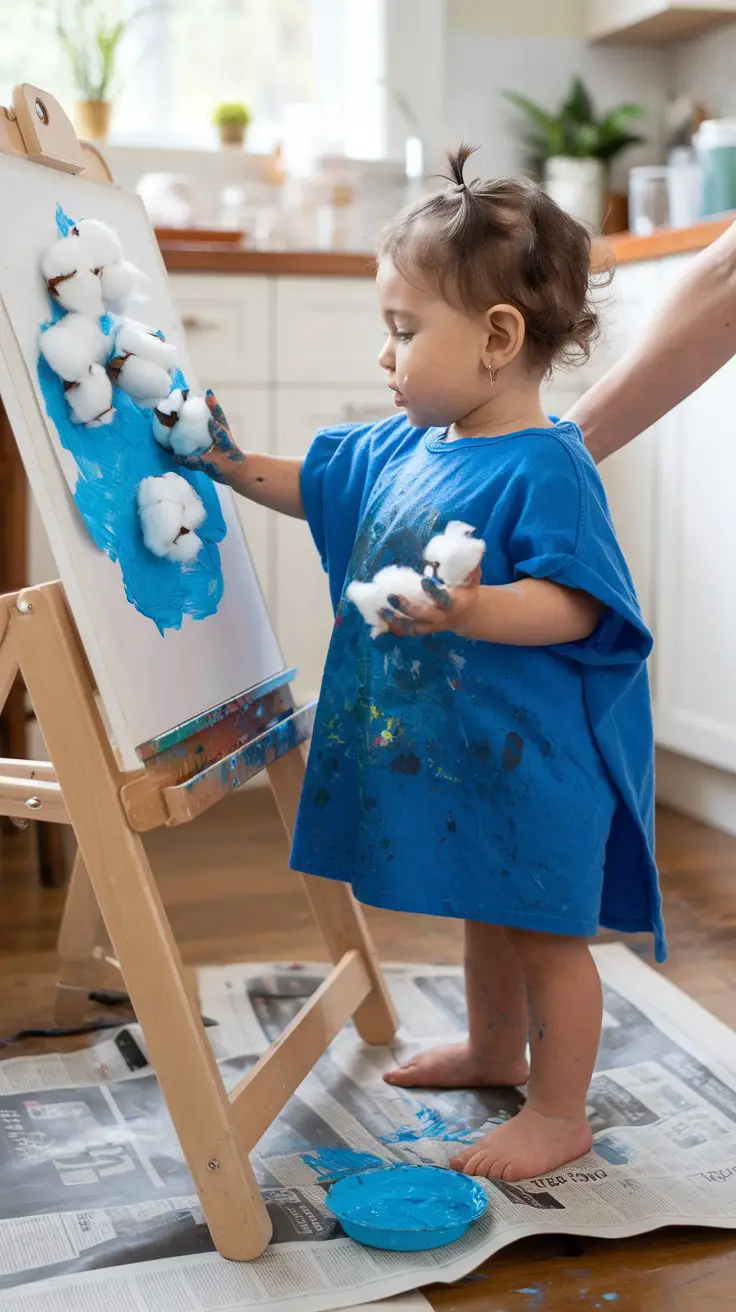
How to Set This Up
- Materials needed:
- Large cotton balls (about 10-15)
- Wooden clothespins (one per cotton ball)
- Washable tempera paint in 2-3 colors
- Shallow bowls or paper plates for paint
- Large sheets of paper or cardboard
- Drop cloth, old sheet, or newspaper for floor protection
- Old t-shirt or actual paint smock
- Step-by-step setup:
- Clip cotton balls into clothespins to create easy-grip paint daubers
- Pour small amounts of paint into shallow containers (about 2 tablespoons each)
- Secure paper to easel, table, or tape to a wall at toddler height
- Demonstrate the dabbing motion a few times
- Step back and let them experiment
- Age appropriateness: 18-36 months (older kids love this too); younger toddlers may need hand-over-hand guidance
- Time commitment: 5 minutes setup, 15-25 minutes of creative time, 10 minutes cleanup
- Mess level: MEDIUM (expect paint on hands, maybe some floor splatters)
- Developmental benefits: Pincer grip strengthening, hand-eye coordination, understanding texture differences, color exploration
- Activity variation for older kids: Add multiple cotton ball sizes, mix colors, or create specific pictures like flowers or snowmen
- Safety reminder: Cotton balls are choking hazards—always supervise closely
- Cleanup strategy: Have wet wipes ready and rinse cotton balls immediately if you want to reuse them
- Budget hack: Use makeup sponges cut in half if cotton balls aren’t available
Contact Paper Sticky Collage
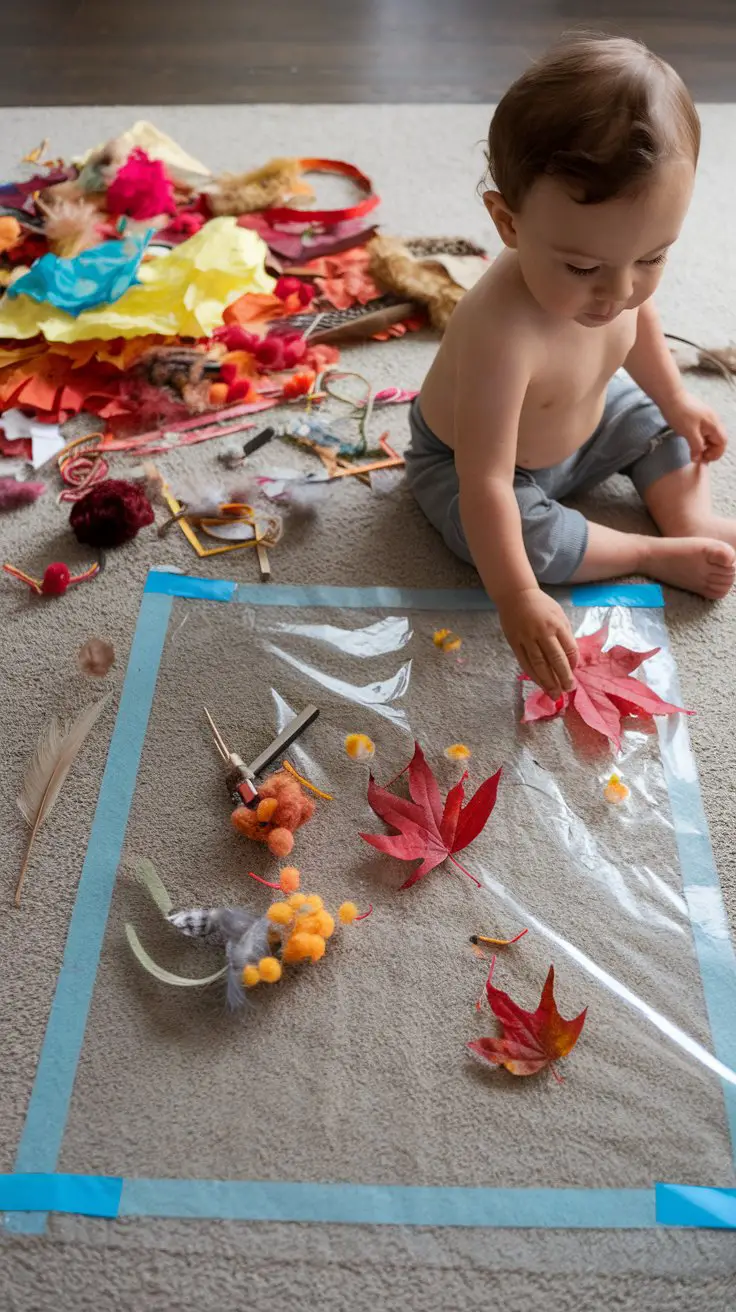
How to Set This Up
- Materials needed:
- Roll of clear contact paper (about 2 feet length per child)
- Painter’s tape or masking tape
- Collected nature items: leaves, flower petals, small twigs
- Craft materials: tissue paper pieces, feathers, yarn scraps, ribbon
- Small pom-poms or foam shapes
- Optional: when finished, add a second sheet on top to seal and create window art
- Step-by-step setup:
- Cut contact paper to desired size (start with 18″x24″ for toddlers)
- Peel backing and tape sticky-side-up to floor, table, or tape vertically to window
- Arrange collected materials in bowls or scattered nearby within reach
- Show your toddler how items stick when pressed down
- Let them explore freely—there’s no wrong way to do this
- Age appropriateness: Perfect for 15-36 months; even younger babies enjoy this with supervision
- Time commitment: 5 minutes setup, 20-40 minutes of engaged play (this one has serious staying power!), 2 minutes cleanup
- Mess level: LOW (one of the cleanest art activities you’ll find)
- Developmental benefits: Fine motor skills, spatial awareness, decision-making, understanding sticky/not-sticky concepts, sensory exploration
- Safety considerations: Monitor small items carefully with younger toddlers who mouth everything
- Seasonal variation: Use fall leaves in autumn, flower petals in spring, or create themed collages for holidays
- For year-round fun: Save these sealed collages as window decorations—they look beautiful with light shining through
- Parent win: This activity actually keeps toddlers engaged while you prep dinner nearby
Looking for team building activities for parent groups? Check out these volunteer group names for community connection ideas.
Edible Finger Paint (Yes, Really!)
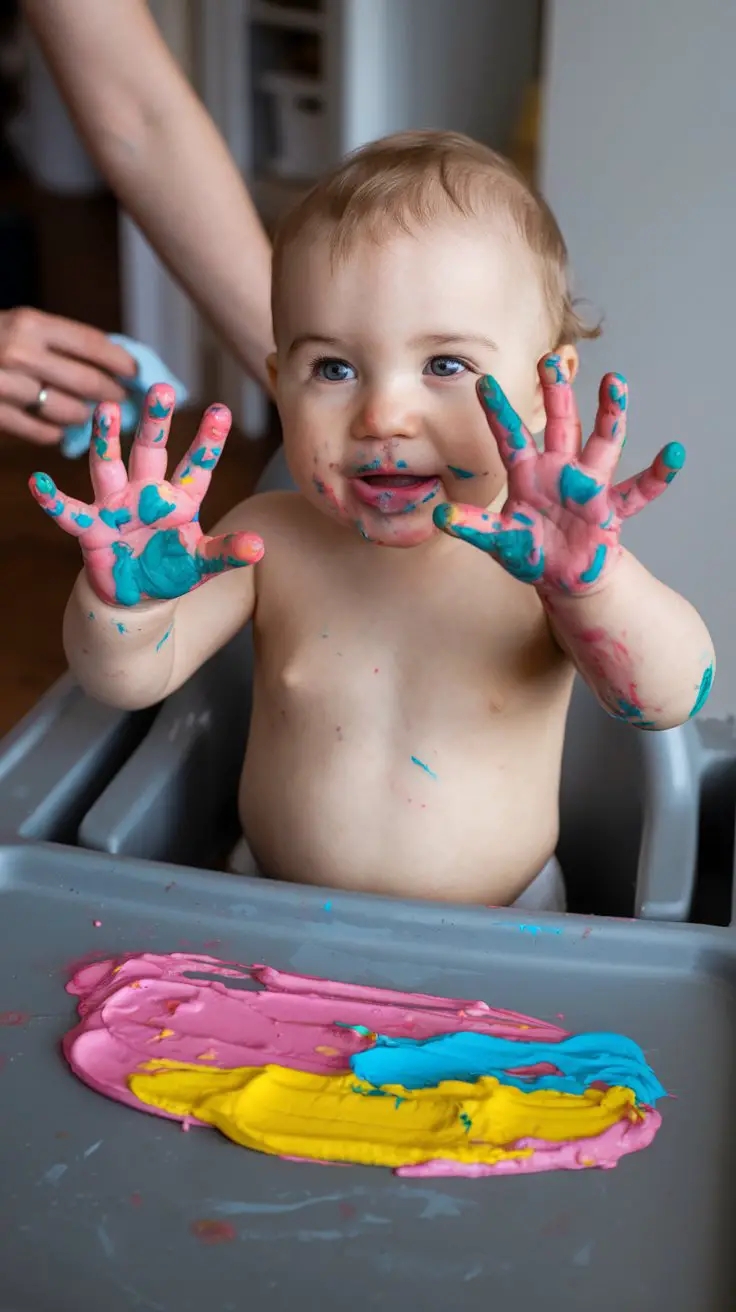
How to Set This Up
- Materials needed:
- 2 cups plain Greek yogurt or vanilla yogurt
- Natural food coloring or pureed fruits/vegetables for colors
- Highchair or booster seat with tray
- Bathtub nearby (trust me on this)
- Camera to capture the adorable mess
- Color options:
- Pink/Red: strawberry puree, raspberry, or beet juice
- Yellow: mango puree or turmeric (tiny amount)
- Orange: carrot puree or sweet potato
- Blue/Purple: blueberry or blackberry puree
- Green: spinach or kale puree (they won’t even notice)
- Step-by-step setup:
- Mix yogurt with your chosen natural colorants in separate small bowls
- Place toddler in highchair wearing minimal clothing (diaper only works great)
- Put a few spoonfuls of each color directly on the tray
- Show them once how to swirl and spread
- Accept that they’ll mostly eat it—and that’s perfectly fine
- Age appropriateness: 12-24 months (perfect for babies still exploring with their mouths)
- Time commitment: 5 minutes prep, 15-20 minutes of play/eating/painting, 15 minutes cleanup including bath time
- Mess level: HIGH, but it’s all washable and non-toxic
- Developmental benefits: Sensory exploration without safety concerns, color mixing discovery, tactile learning, taste-safe creativity
- Genius parent move: Do this right before bath time—plan it into your routine
- Important note: Use natural colorants only; some food colorings can stain temporarily
- Activity extension: Let them “paint” a piece of paper taped to the tray for an abstract masterpiece
- Real talk: This will be messy, but it’s incredibly developmentally appropriate for young toddlers
Water Painting (The Ultimate No-Mess Art)
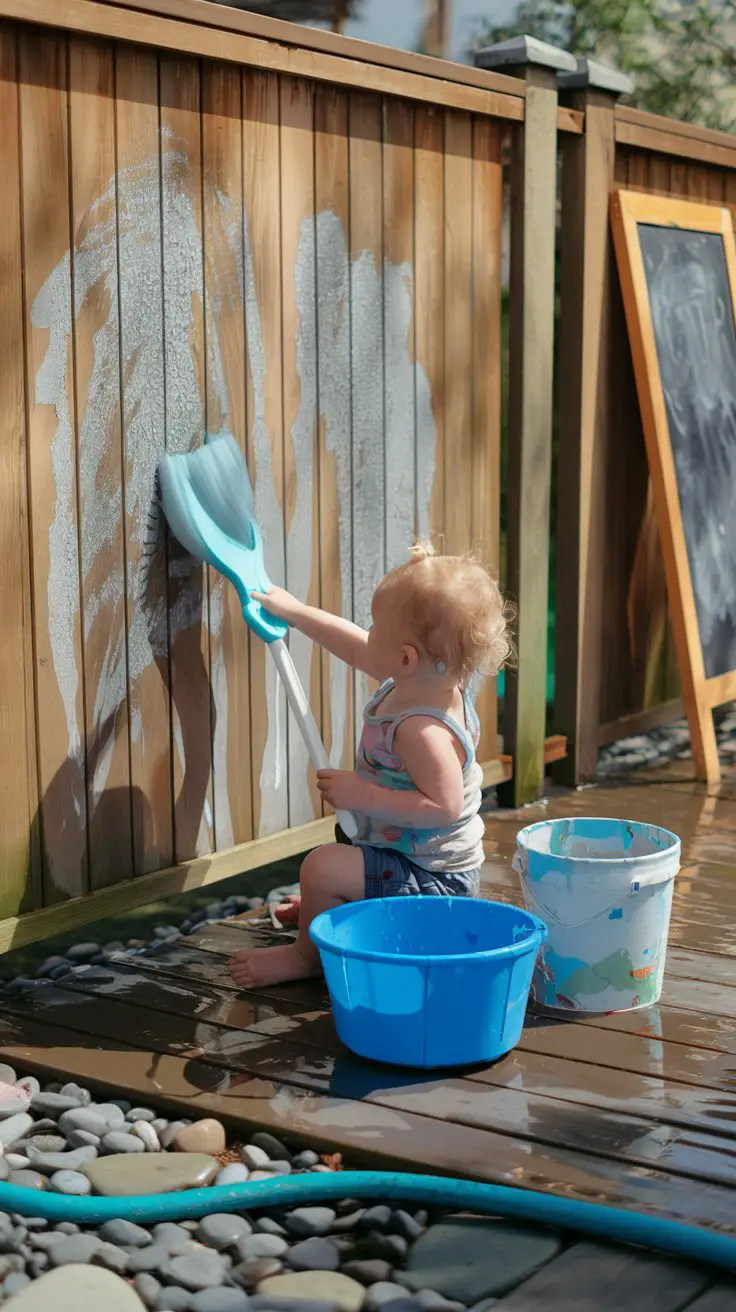
How to Set This Up
- Materials needed:
- Clean bucket or container filled with plain water
- Large foam brushes, regular paintbrushes, or sponge brushes (various sizes)
- Outdoor surfaces to “paint”: fence, deck, patio stones, sidewalk, driveway
- Optional: add chalkboards, smooth rocks, or large cardboard for variety
- Step-by-step setup:
- Fill bucket with 2-3 inches of clean water (no paint needed!)
- Provide several brush options—toddlers love choices
- Demonstrate painting on a surface and show how it darkens when wet
- Point out how the water “painting” slowly disappears as it dries
- Let them paint freely—seriously, they’ll do this for ages
- Age appropriateness: 18 months to 5+ years (even older kids find this surprisingly engaging)
- Time commitment: 2 minutes setup, 30-60 minutes of play (no joke!), zero cleanup
- Mess level: NONE (it’s literally just water)
- Developmental benefits: Hand-eye coordination, arm strengthening, understanding evaporation concepts, cause-and-effect learning, patience as they wait for surfaces to dry
- Weather consideration: Best on warm, sunny days when water dries quickly—the “magic” of disappearing art keeps them painting again and again
- Indoor adaptation: Use small chalkboards or dark construction paper inside with minimal water
- Supervision level: Low—this is a perfect independent play activity for toddlers
- Parent favorite factor: You can sit nearby with coffee while they stay engaged and make zero mess
- Bonus discovery: They’ll figure out sun vs. shade drying rates—accidental science!
For more outdoor group activities, explore these camping group names for family adventure ideas.
Crayon Rubbing Adventures
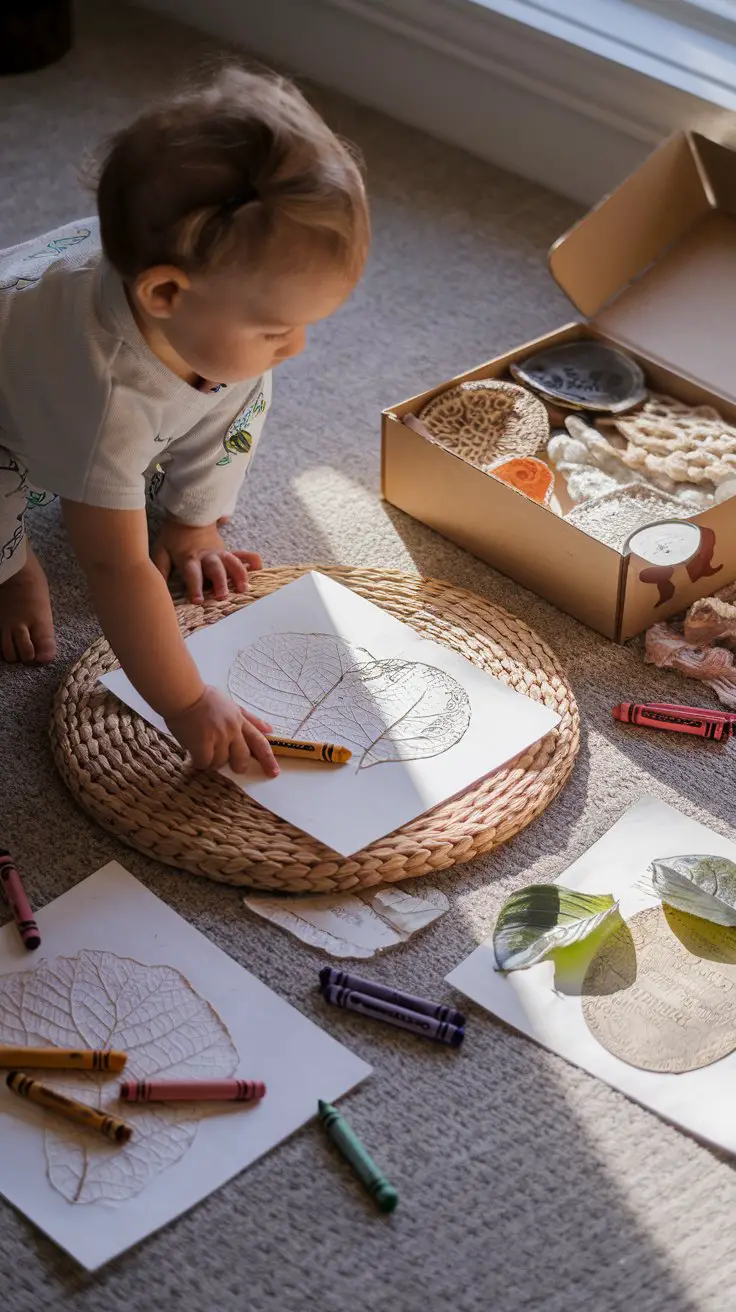
How to Set This Up
- Materials needed:
- Large crayons with paper wrapping removed (peeled crayons)
- White paper or thin printer paper
- Textured items to place under paper:
- Leaves with prominent veins
- Coins
- Textured placemats or fabric
- Lace doilies
- Corrugated cardboard
- Sandpaper
- Embossed greeting cards
- Plastic canvas needlework mesh
- Tape to secure paper if needed
- Flat, hard surface to work on
- Step-by-step setup:
- Peel paper wrappers off 4-5 crayons in different colors
- Gather textured items and arrange in a box or basket
- Place first textured item on table or floor
- Lay paper over the textured item and tape corners if needed
- Show your toddler how to rub the side of the crayon across the paper
- Watch their face light up when the hidden texture appears!
- Age appropriateness: 24-36 months ideal; younger toddlers can participate with hand-over-hand help
- Time commitment: 5 minutes setup, 20-30 minutes of engaged exploration, 3 minutes cleanup
- Mess level: LOW (just paper and crayon bits)
- Developmental benefits: Fine motor control, understanding cause and effect, pattern recognition, spatial reasoning, texture discrimination, patience development
- Learning extension: Talk about the different textures—rough, smooth, bumpy, soft—building vocabulary
- Activity variation: Go on a texture hunt around your home together, finding interesting surfaces to try
- Safety note: Supervise crayon pieces with younger toddlers who still mouth objects
- Storage tip: Keep a “rubbing box” with favorite textured items ready for rainy days
- Parent insight: This activity genuinely fascinates toddlers—the “reveal” keeps them coming back repeatedly
Tape Resist Painting
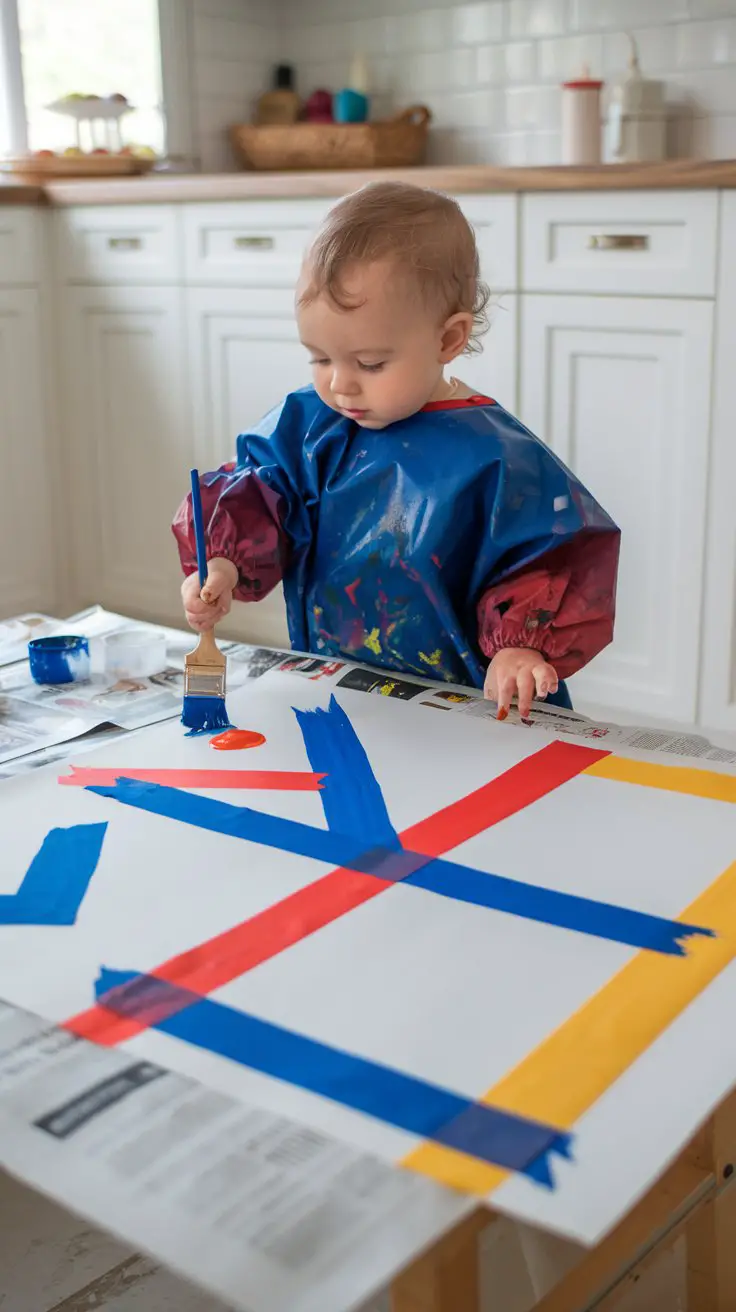
How to Set This Up
- Materials needed:
- Colorful painter’s tape or masking tape (the kind that peels off easily)
- Large white paper or cardstock
- Washable tempera paint in 2-3 colors
- Paintbrushes or foam brushes
- Paint smock or old shirt
- Surface protection (newspaper, plastic tablecloth, or shower curtain)
- Container of water for rinsing brushes
- Step-by-step setup:
- Apply tape strips to paper in any design—simple patterns work best for toddlers
- Press tape down firmly so paint won’t seep underneath
- Secure paper to table with a bit more tape at corners
- Set out paint colors in shallow containers
- Let your toddler paint freely over the entire paper, including the tape
- Allow to dry completely (30-60 minutes)
- Here’s the best part: let your toddler help peel off the tape to reveal clean white lines beneath
- Age appropriateness: 24-36 months for painting; 3+ for independent tape application
- Time commitment: 5 minutes setup, 20 minutes painting, drying time, 5 minutes for the big reveal
- Mess level: MEDIUM (standard painting mess)
- Developmental benefits: Free creative expression, fine motor skills, understanding of “under and over,” delayed gratification as they wait for drying, cause-and-effect (tape blocked the paint!)
- Tape pattern ideas for toddlers:
- Simple straight lines (easiest)
- Large X or cross shapes
- Squares or rectangles
- Free-form squiggles
- First letter of their name
- Pro tip: Let your toddler help place some tape pieces—it doesn’t need to look perfect
- The magic moment: Peeling tape is almost as fun as the painting itself
- Save-it idea: These make beautiful gifts for grandparents or unique wrapping paper
For creative project inspiration, check out these creative usernames that celebrate artistic expression.
Dot Marker Madness
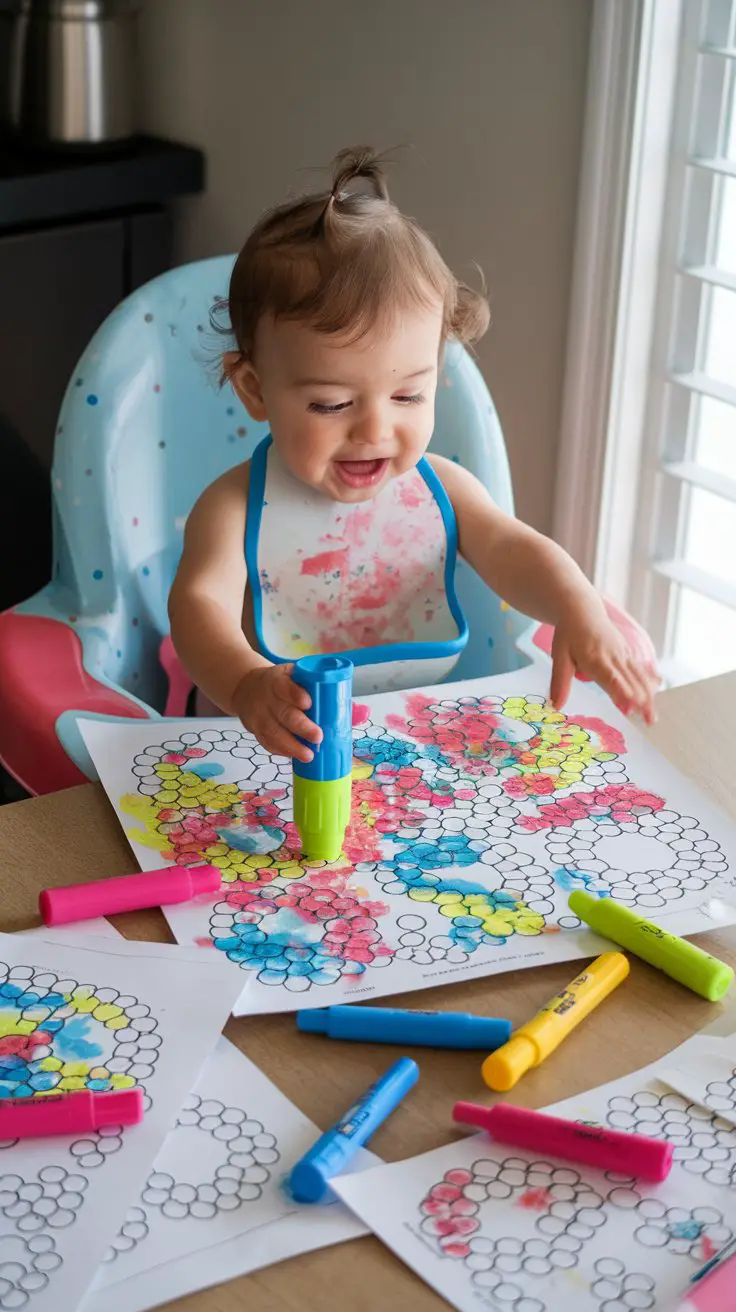
How to Set This Up
- Materials needed:
- Set of washable dot markers/bingo daubers (4-8 colors)
- Large paper, coloring pages, or blank printer paper
- Highchair tray, table, or booster seat setup
- Surface protection (these can bleed through paper)
- Damp cloth for immediate hand cleanup
- Step-by-step setup:
- Test markers on scrap paper—some dry out, so check before giving to toddler
- Place 2-3 sheets of paper on protected surface
- Start with just 2-3 marker colors—you can always add more
- Show stamping motion once or twice (they’ll figure it out fast)
- Let them explore—dots will be everywhere and that’s perfect
- Age appropriateness: 15-36 months (perfect first “marker” for young toddlers)
- Time commitment: 1 minute setup, 15-25 minutes of creative time, 5 minutes cleanup
- Mess level: LOW-MEDIUM (some hand staining, but markers are designed to be washable)
- Developmental benefits: Grip strength, hand-eye coordination, color recognition, cause-and-effect understanding, artistic confidence
- Why toddlers love these:
- Easy to grip with whole hand
- Instant, satisfying results
- Hard to mess up—every dot looks good
- Fun stamping sound and motion
- Can’t roll off tables like regular markers
- Parent-tested variations:
- Simple dot-to-dot pictures (even if they don’t connect dots)
- Stamping patterns or rainbows
- Free dot art on large paper
- Dotting inside simple shapes
- Supervision note: These are relatively safe but caps can be choking hazards
- Storage tip: Store upside down so ink stays at the tip
- Budget consideration: Buy a basic 6-pack—you don’t need dozens of colors
Shaving Cream Marbling (Sensory Art Magic)
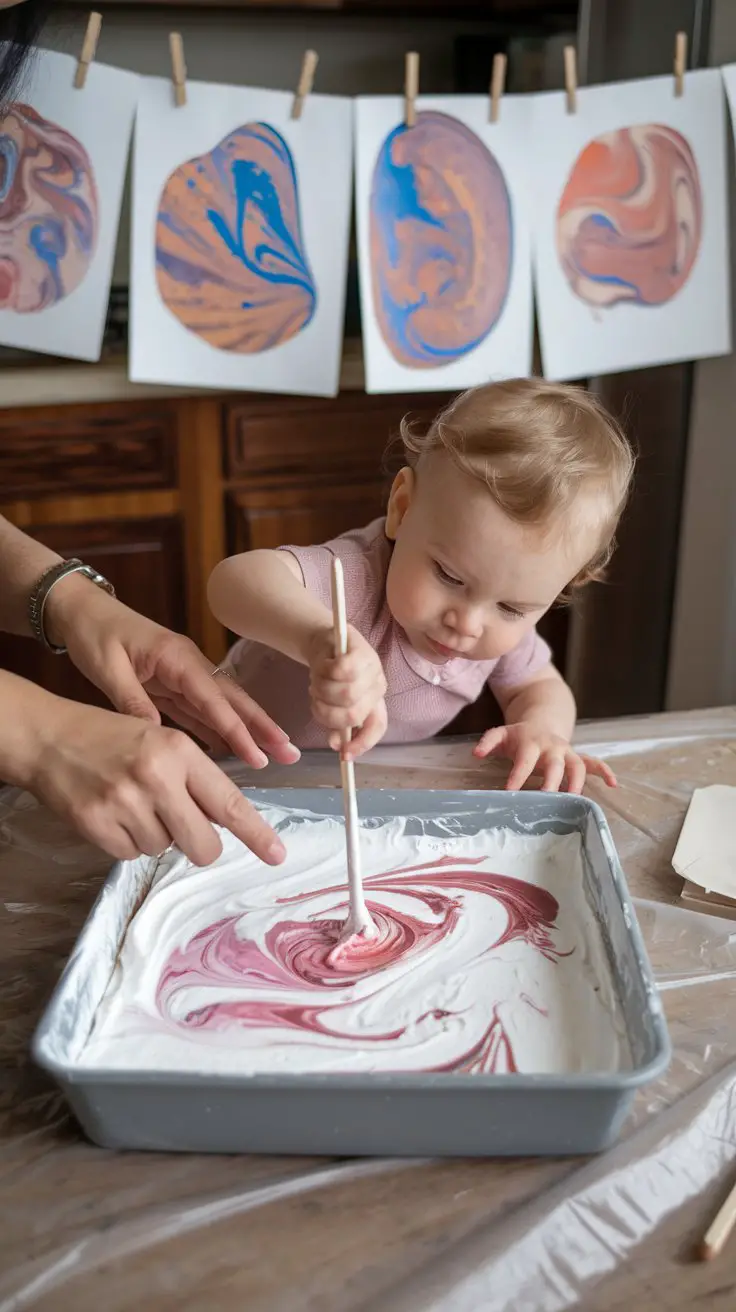
How to Set This Up
- Materials needed:
- Cheap white shaving cream (foam, not gel)
- Shallow baking dish, cake pan, or large tray with edges
- Liquid watercolors or food coloring (3-4 colors)
- Small bowls or containers for colors
- Popsicle sticks, craft sticks, or chopsticks for swirling
- White cardstock or heavy paper
- Paper towels or straight edge (ruler or credit card) for scraping
- Surface protection—this gets messy
- Paint smock or old clothes
- Step-by-step setup:
- Spray shaving cream into tray, filling it about 1 inch deep
- Smooth the top with your hand or a stick to create an even surface
- Drop several drops of each color across the shaving cream surface
- Let your toddler swirl colors with sticks—this is pure sensory heaven
- Press paper gently onto the surface, then lift
- Scrape excess shaving cream off paper with straight edge
- Let print dry flat—colors will intensify as they dry
- Age appropriateness: 24-36 months ideal; younger toddlers can participate in swirling but need help with print-making
- Time commitment: 7 minutes setup, 30-40 minutes of play/creating, 15 minutes cleanup, plus drying time
- Mess level: HIGH (but so worth it—the sensory experience is incredible)
- Developmental benefits: Sensory exploration (texture, smell, visual), color mixing concepts, pattern creation, fine motor skills, patience waiting for prints to dry, process vs. product understanding
- Toddler reality check: They’ll spend more time playing with the shaving cream than making prints—embrace this
- Safety consideration: Shaving cream can irritate eyes; keep wipes handy and supervise closely
- Multiple print option: You can make several prints from one batch of colored cream
- Cleanup hack: Do this activity in a bathtub or outdoors if weather permits
- The bonus: After print-making, let them free-play with the remaining shaving cream on the tray for extra sensory time
- Display idea: These make stunning one-of-a-kind art pieces worth framing
For more sensory play ideas, explore these sensory team names for educational group activities.
Sponge Stamping
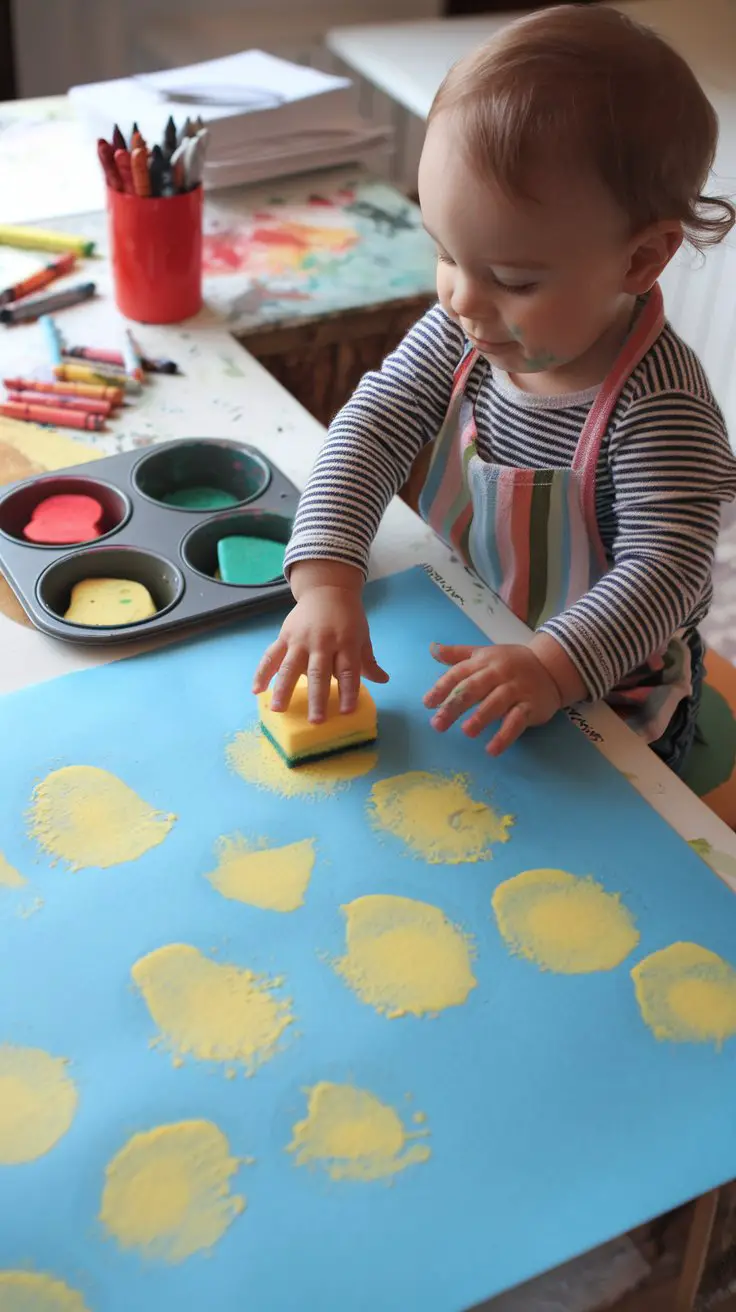
How to Set This Up
- Materials needed:
- Kitchen sponges (new, clean ones)
- Scissors (adult use only)
- Washable tempera paint (2-4 colors)
- Shallow containers for paint (muffin tin works perfectly)
- Large paper or cardstock
- Clothespins (optional, for handles)
- Paint smock
- Workspace protection
- Sponge shape ideas:
- Simple geometric shapes: circles, squares, triangles, stars
- Heart shapes
- Animal silhouettes (very simple ones)
- Letters or numbers (for older toddlers)
- Holiday shapes: pumpkins, trees, hearts
- Step-by-step setup:
- Cut sponges into shapes ahead of time (toddler-sized, about 2-3 inches)
- Pour small amounts of paint into muffin cups or shallow containers
- Place one sponge shape in each paint color
- Secure paper to table with tape
- Show the press-and-lift stamping motion
- Let creativity happen
- Age appropriateness: 18-36 months; younger toddlers can stamp with adult help
- Time commitment: 10 minutes prep (cutting sponges), 20-30 minutes creative play, 8 minutes cleanup
- Mess level: MEDIUM (manageable with good workspace setup)
- Developmental benefits: Hand strength and control, pattern recognition, color learning, shape identification, planning and sequencing (deciding where next stamp goes)
- Grip helper: Clip clothespins to sponges to create handles—easier for small hands to grip without getting painty
- Reusable factor: Rinse sponges immediately after use and they’ll last for many art sessions
- Activity progression: Start with one color and shape, gradually add more as skills develop
- Learning extension: Name shapes and colors as they stamp: “You made a blue circle! Can you find the red star?”
- Parent appreciation: This activity has a wonderful rhythm that keeps toddlers engaged longer than many art projects
Bonus: The “Art Gallery Wall” Mindset
Here’s something I wish someone had told me when my kids were toddlers: display their art like it matters, because it does.
Create a dedicated space—a refrigerator door, a hallway wall with painter’s tape, a cork board, or even a string with clothespins—where you immediately hang finished creations. Toddlers absolutely light up when they see their work displayed. It builds artistic confidence and shows them you value their creative expression.
BTW, take photos of artwork before it gets damaged or you need to purge the collection 🙂 You can’t keep everything (though Lord knows we try), but digital photos let you preserve memories without drowning in toddler masterpieces.
Creating Your Toddler Art Routine
The secret to successful toddler art isn’t fancy supplies or Pinterest-worthy results—it’s removing barriers that prevent you from saying “yes” to creativity.
Set up an art station: Designate one cabinet or bin with basic supplies within your reach (not toddler reach—you want control over when art happens). Include washable markers, crayons, paper, play smocks, and wipes. When you’re ready for art time, setup becomes effortless.
Choose your timing wisely: Art activities work best when toddlers are well-rested and fed. That pre-lunch or post-nap window is golden. Avoid art time when you’re stressed or rushed—your tension transfers to your LO.
Embrace the mess: I mean it. The activities that make the biggest messes often provide the richest learning experiences. Put down the shower curtain, strip your toddler to a diaper, and let go of perfection. You can clean washable paint off floors, but you can’t get back these precious creative years.
Process over product: Your toddler doesn’t care if their painting looks like something recognizable. They care about the squishing, the mixing, the cause-and-effect of their actions. When we focus on what they’re learning rather than what they’re creating, art time becomes so much more meaningful.
Remember, some days your toddler will be deeply engaged for 45 minutes. Other days, they’ll quit after 90 seconds to chase the cat. Both are completely normal and developmentally appropriate. The goal isn’t sustained attention—it’s providing opportunities for creative exploration without pressure or expectations.
These ten activities offer enough variety to keep things fresh while using mostly household items you already own. Pick one that matches your mess tolerance and available time, and see what happens. I promise the paint-covered giggles and proud toddler smiles make every bit of cleanup worthwhile. You’re not just making art—you’re building confidence, teaching that creativity has value, and creating memories neither of you will forget <3

Greetings, I’m Alex – an expert in the art of naming teams, groups or brands, and businesses. With years of experience as a consultant for some of the most recognized companies out there, I want to pass on my knowledge and share tips that will help you craft an unforgettable name for your project through TeamGroupNames.Com!