You know that magical 15-minute window when your toddler sits still at their high chair or little table, completely absorbed in something?
That sweet spot between breakfast cleanup and the next snack demand where you might actually sip warm coffee?
These toddler table activities are designed to stretch that window as long as humanly possible — and sneak in some real developmental wins along the way.
I’ll be honest: some of these ideas came from sheer desperation on rainy Tuesday mornings.
Others were borrowed from fellow parents who swore their toddler spent “at least 20 minutes” engaged (which, in toddler time, is basically an eternity).
Whether your little one is 12 months or pushing 4, there’s something here that’ll capture their attention — at least long enough for you to reheat that coffee.
Let’s get into the activities that have genuinely earned their place in our rotation.
1. Rainbow Rice Scooping Station
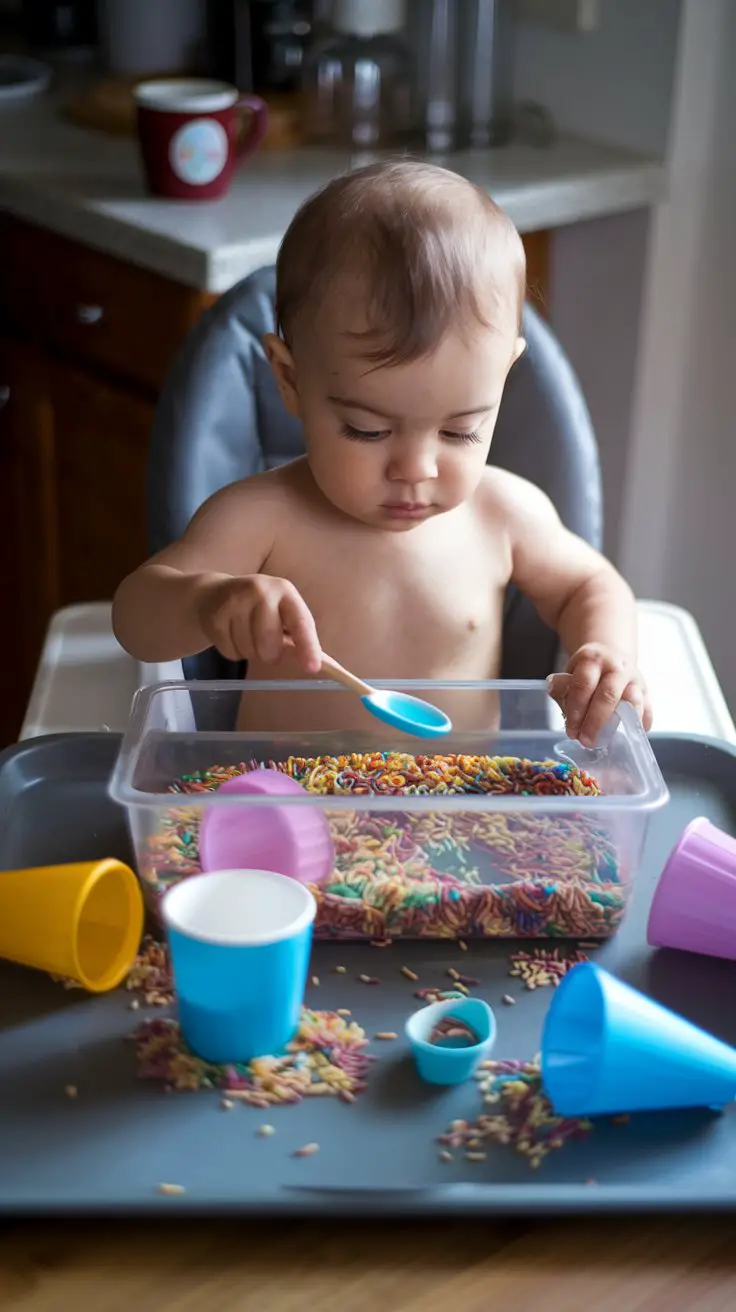
There’s a reason every seasoned parent eventually dyes a bag of rice. It’s cheap, endlessly reusable, and something about the sound and texture absolutely mesmerizes toddlers. My neighbor’s two-year-old once sat scooping rice from cup to cup for nearly 30 minutes while her mom actually finished a phone call. Miracles happen.
The beauty of a rice station is its flexibility. You can toss in measuring spoons one day, toy animals the next, and your LO treats it like a brand-new experience every time.
How to Set This Up
- Materials: 2 cups of uncooked white rice, food coloring or liquid watercolors (4-5 colors), ziplock bags, white vinegar, a shallow plastic bin or baking sheet with raised edges, scooping tools (spoons, cups, small funnels, tongs)
- Setup steps: Add rice to separate bags, squirt in food coloring and a teaspoon of vinegar per bag, shake vigorously, spread on parchment paper to dry overnight, then combine in your bin with scooping tools
- Age range: 12-36 months (with direct supervision for younger toddlers who still mouth everything)
- Setup time: 10 minutes active, overnight drying | Play duration: 15-40 minutes | Cleanup: 5 minutes with a handheld vacuum
- Mess level: Medium — contain it by placing a shower curtain or old sheet under the table
- Developmental benefits: Fine motor strength, hand-eye coordination, early math concepts like full/empty and more/less, sensory exploration, color recognition
- Safety note: Supervise closely with children under 18 months. If your toddler still puts everything in their mouth, substitute with large dried pasta instead
- Budget tip: One batch of dyed rice lasts months if stored in a sealed container
If you’re looking for even more ways to keep your toddler’s hands busy during structured activities, check out team names for kids for when playdate groups need a fun identity.
2. Sticker Peel-and-Stick Bonanza
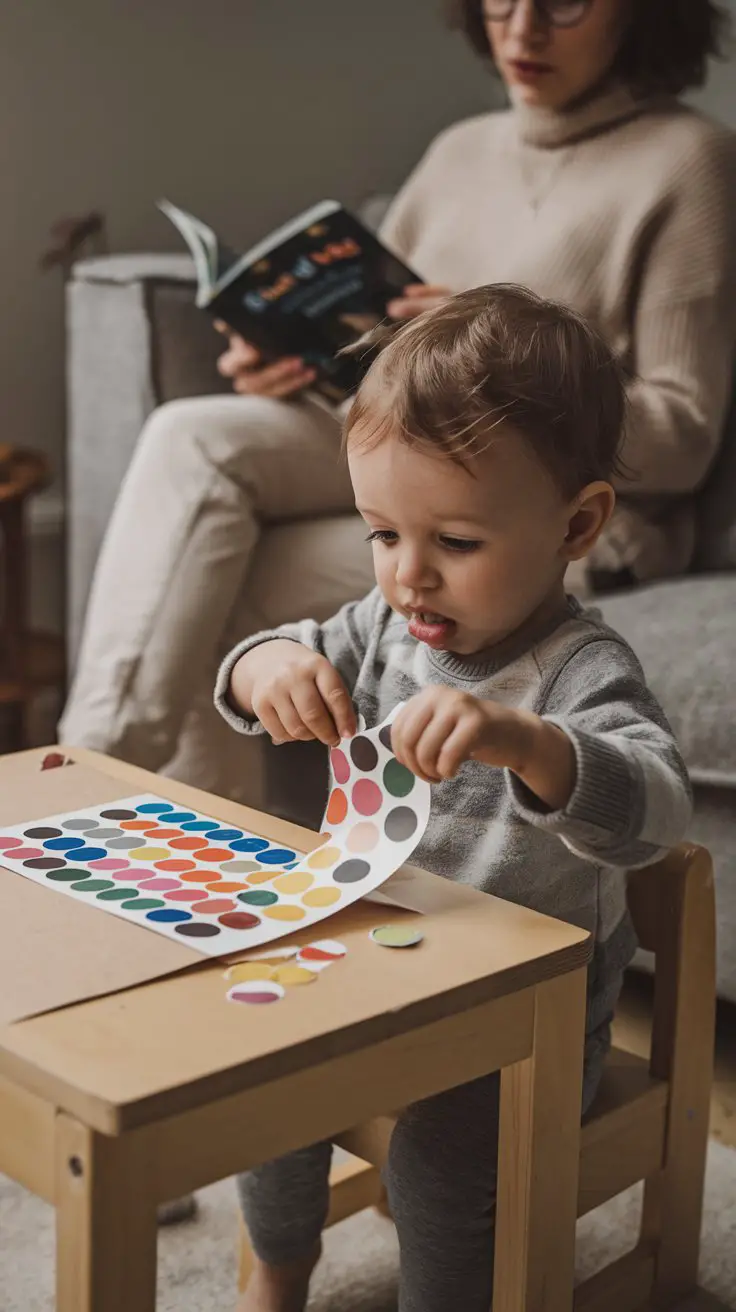
If you haven’t discovered the power of a simple sheet of dot stickers, let me change your life. Dollar store sticker sheets are the unsung hero of toddler entertainment. The act of peeling a sticker off a backing sheet is a serious fine motor workout for little fingers, and placing it on paper gives them creative control they absolutely love.
No instructions needed. No Pinterest-worthy outcome required. Just stickers and paper, and your toddler becomes a tiny, focused artist.
How to Set This Up
- Materials: Round dot stickers (available in bulk packs), construction paper or cardstock, optional: printed outline shapes for older toddlers to fill in
- Setup steps: Peel back a corner of the sticker sheet so your toddler can grip the first sticker, place paper in front of them, step back and watch the magic
- Age range: 18 months-4 years (younger toddlers work on peeling, older kids can create patterns or follow outlines)
- Setup time: Under 1 minute | Play duration: 10-25 minutes | Cleanup: 2 minutes
- Mess level: Low — the dream activity for mess-averse families
- Developmental benefits: Pincer grasp development, bilateral coordination (holding paper while peeling), early creativity, focus and concentration
- Variations: Draw circles on paper for them to place stickers inside, use letter-shaped stickers for name recognition, or try sticking them along a drawn line for pre-writing practice
- Cost: About $1-3 for a pack that lasts weeks
3. Water Transfer With Droppers and Sponges
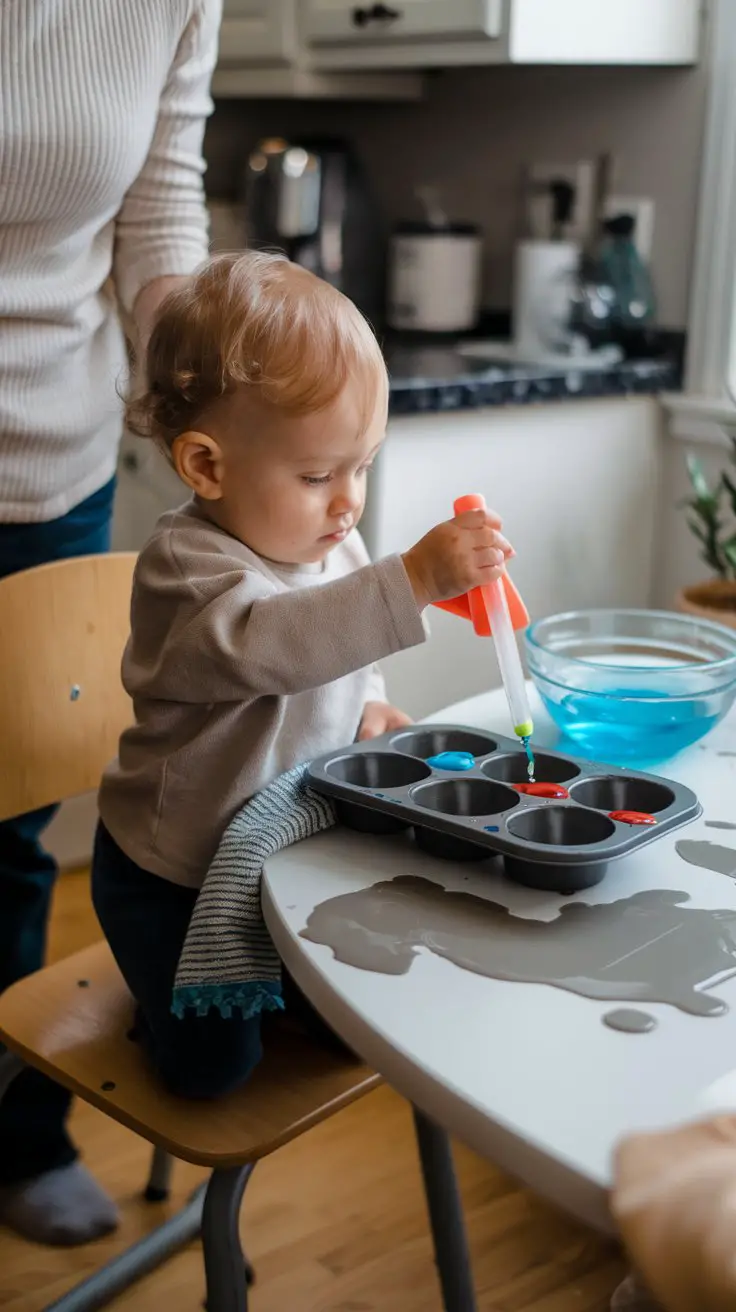
Water play at the table sounds like a recipe for disaster, right? But here’s the trick: small amounts and contained spaces. A muffin tin, a couple of droppers or turkey basters, and a shallow dish of water transforms your kitchen table into a toddler science lab.
I started this one after reading about Montessori transfer activities, and honestly? The concentration on my two-year-old’s face while she squeezed that dropper was worth every water droplet on the floor. BTW, a towel underneath catches most of the mess.
How to Set This Up
- Materials: Plastic droppers or turkey basters, muffin tin or ice cube tray, shallow bowls, water, food coloring (optional), small sponges, a towel for underneath
- Setup steps: Fill a bowl with water (add food coloring for extra appeal), place the muffin tin and dropper tools on a towel-lined tray, demonstrate one squeeze-and-transfer, then let your toddler experiment
- Age range: 2-4 years (the squeezing motion is challenging for very young toddlers)
- Setup time: 3 minutes | Play duration: 10-20 minutes | Cleanup: 5 minutes
- Mess level: Medium — the towel barrier helps enormously
- Developmental benefits: Hand strength for future writing, cause-and-effect understanding, concentration, early science concepts like volume and color mixing
- Extension: Add a small sponge and let them squeeze water from sponge to bowl — toddlers find this endlessly satisfying
For families who love group play and want to organize toddler activities with friends, explore group names for 3 friends to make your playdate crew official.
4. Playdough Station With Kitchen Tools
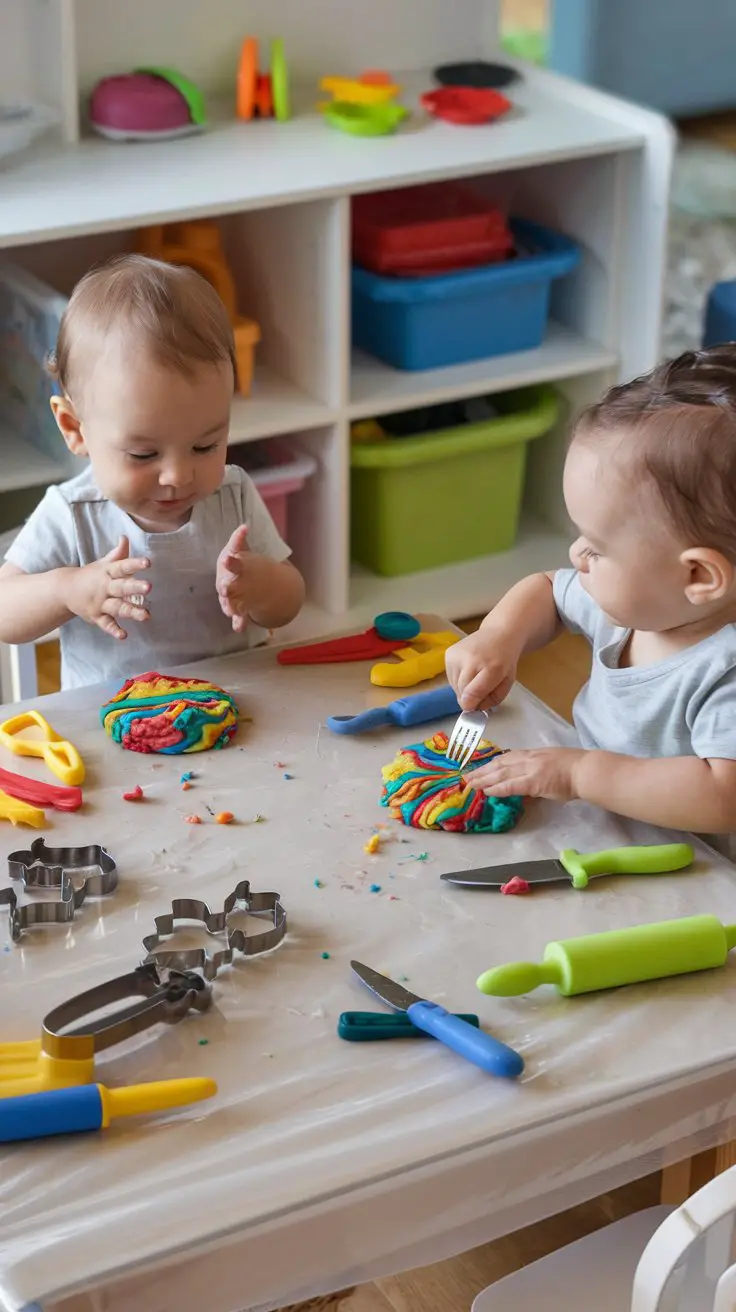
Playdough is a parenting classic for a reason — it genuinely works. But here’s what took our playdough sessions from “meh” to genuinely engaging: raiding the kitchen drawer for interesting tools. A garlic press becomes a spaghetti maker. A fork creates fascinating texture patterns. A plastic knife turns your toddler into a tiny chef slicing “food” for an imaginary restaurant.
And yes, they will taste it. Homemade playdough is deliberately salty enough that one lick usually ends the taste-testing phase permanently 🙂
How to Set This Up
- Materials: Homemade or store-bought playdough (3-4 colors), cookie cutters, rolling pin, plastic utensils, garlic press, textured items like leaves or LEGO bricks for imprinting
- Homemade recipe: 1 cup flour, 1/2 cup salt, 2 tbsp cream of tartar, 1 cup water, 1 tbsp oil, food coloring — cook over medium heat until it forms a ball
- Age range: 15 months-5 years (adjust tool complexity by age)
- Setup time: 5 minutes with pre-made dough, 15 minutes if making fresh | Play duration: 15-45 minutes | Cleanup: 10 minutes
- Mess level: Medium — playdough crumbs get everywhere but vacuum up easily when dry
- Developmental benefits: Hand and finger strength crucial for writing, creativity, imaginative play, sensory regulation, vocabulary building through pretend scenarios
- Safety note: Homemade dough is non-toxic but contains gluten — use a gluten-free recipe for allergic children
5. Pom-Pom Sorting and Pushing
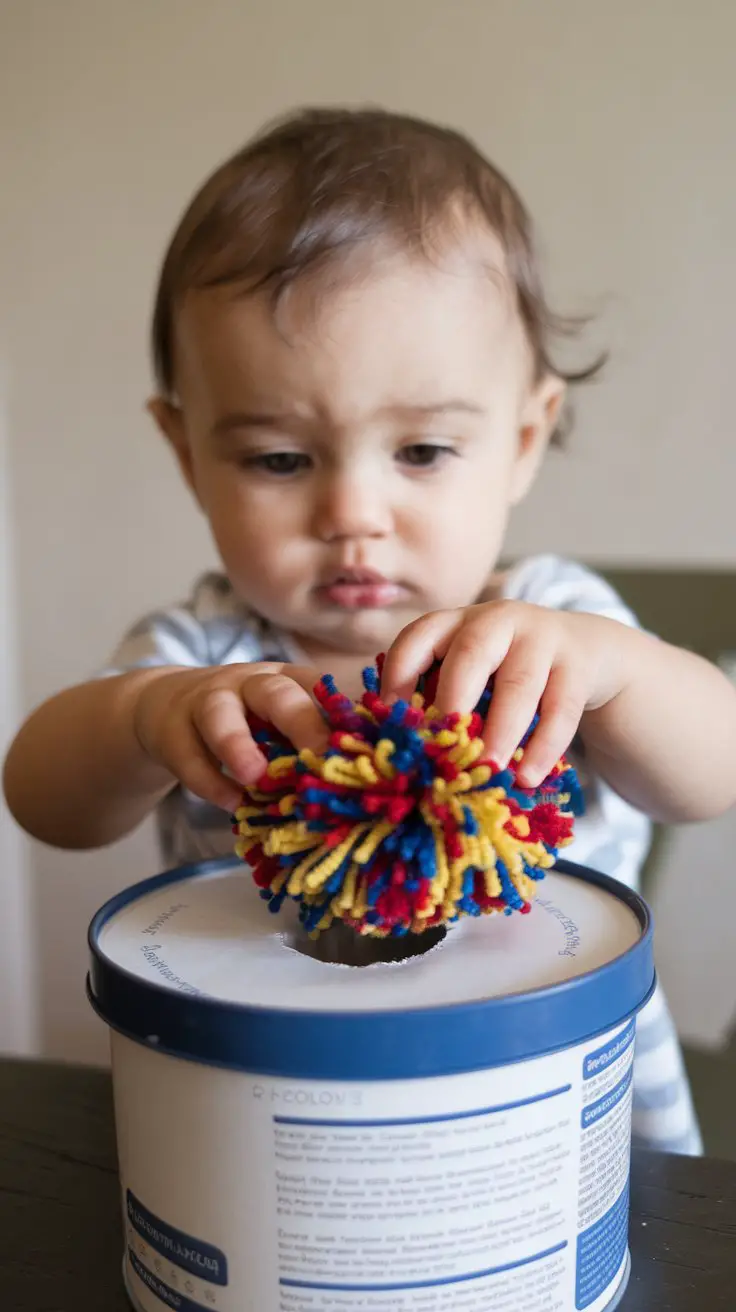
This might be the most underrated toddler table activity in existence. Cut a hole in the plastic lid of an old container, hand your toddler some pom-poms, and watch them push each one through with fierce determination. The satisfying “plop” as each pom-pom drops inside keeps them coming back for more.
For older toddlers, cut multiple holes and assign colors — “Can you put the red pom-pom in the red hole?” Suddenly you’ve got a color-matching game that cost you absolutely nothing.
How to Set This Up
- Materials: Empty container with plastic lid (oatmeal canisters, coffee canisters, or wipes containers work perfectly), pom-poms in assorted sizes and colors, scissors or craft knife for cutting holes
- Setup steps: Cut 1-3 holes in the lid sized slightly smaller than your pom-poms (so they need a gentle push), place lid on container, demonstrate one push, hand over the pom-poms
- Age range: 12-30 months (this is particularly magical for the 12-18 month crowd)
- Setup time: 5 minutes to make, reusable forever | Play duration: 10-20 minutes | Cleanup: 1 minute
- Mess level: Very low — practically mess-free
- Developmental benefits: Pincer grasp, hand-eye coordination, color recognition, object permanence, problem-solving
- Variation: Use large pasta pieces, small balls, or craft sticks through a slot-shaped hole for different challenges
- Cost: Free if you have pom-poms; under $3 if you buy a bag
Looking for creative naming inspiration for your toddler’s playgroup? Browse cute group name ideas for something that matches your crew’s personality.
6. Contact Paper Sticky Wall Art (Table Version)
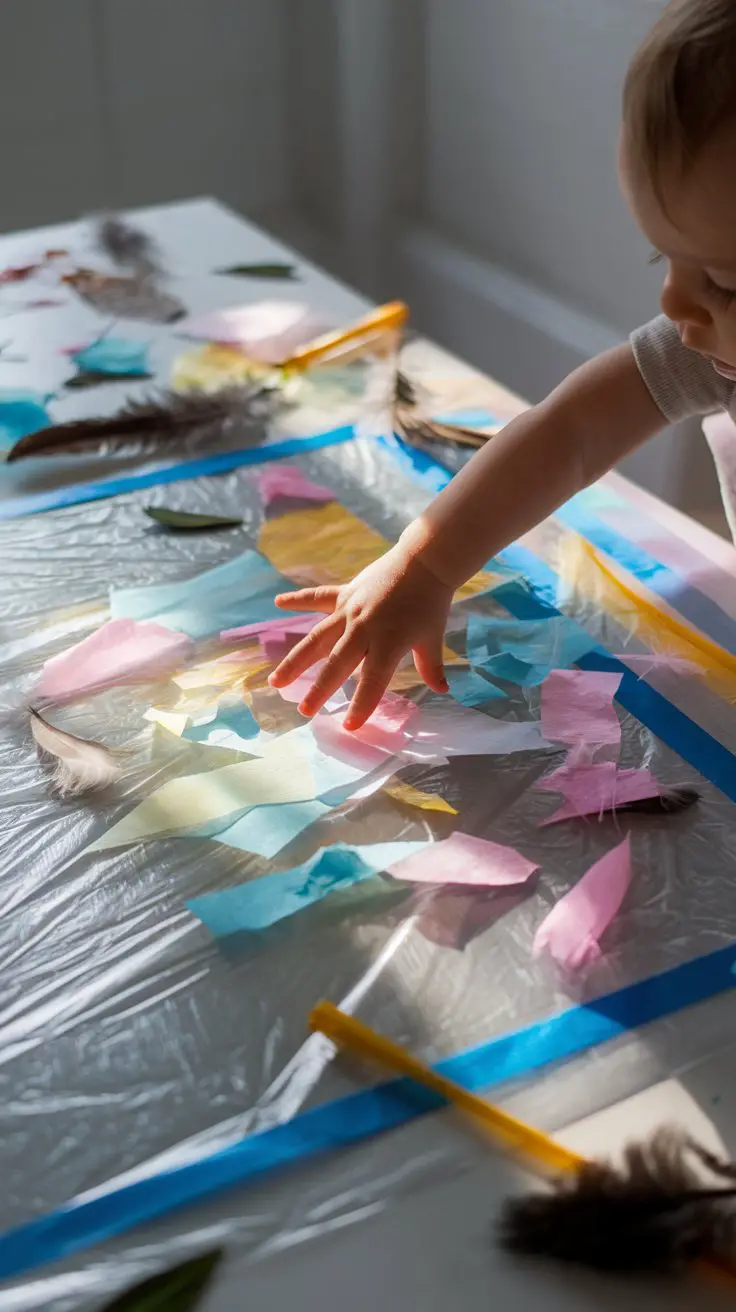
Clear contact paper taped sticky-side-up to the table is pure toddler magic. That sticky surface captures anything they press onto it — tissue paper scraps, feathers, googly eyes, leaves, or yarn pieces. They get the satisfaction of things actually sticking where they put them, which is incredibly rewarding for little hands still developing coordination.
FYI, this is one of those activities that looks impressively artistic when you peel it off and hang it in a window, so it doubles as a handmade gift for grandparents. You’re welcome.
How to Set This Up
- Materials: Clear contact paper, tape, tissue paper torn into small pieces, feathers, yarn scraps, googly eyes, small nature items like pressed flowers or leaves
- Setup steps: Cut a large piece of contact paper, tape it sticky-side-up to the table surface (securing all edges firmly), arrange collage materials in small bowls within reach, let your toddler press away
- Age range: 14 months-4 years (even very young toddlers can press items onto the sticky surface)
- Setup time: 3 minutes | Play duration: 10-30 minutes | Cleanup: 2 minutes — just peel up the contact paper with everything attached
- Mess level: Low — the contact paper actually contains the mess beautifully
- Developmental benefits: Fine motor skills, creativity, tactile exploration, color and texture awareness, early decision-making
- Pro tip: Place a second sheet of contact paper over the finished creation to seal it, then hang in a window for a gorgeous suncatcher
7. Frozen Toy Excavation
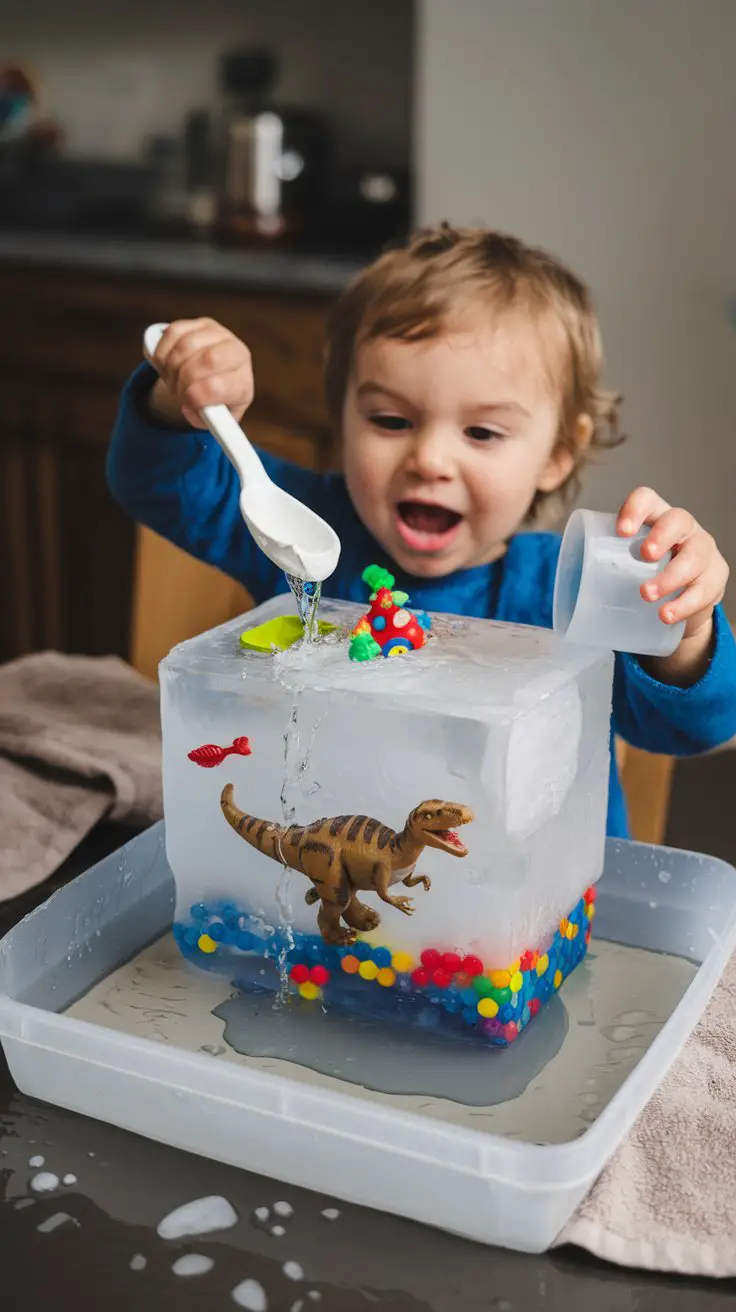
This one requires a tiny bit of advance planning, but the payoff is enormous. Freeze small toys in a container of water overnight, pop out the ice block at activity time, and hand your toddler tools to “rescue” the frozen treasures. Warm water cups, plastic spoons, and even salt for older kids make this a genuine excavation adventure.
My toddler once called this “saving the dinosaurs” and talked about it for three days straight. Three whole days. That’s a lifetime in toddler memory.
How to Set This Up
- Materials: Shallow plastic container, small waterproof toys (dinosaurs, cars, beads, plastic animals), water, plastic tools for excavation (spoons, spray bottles, cups of warm water), towel, tray or baking sheet
- Setup steps: Place toys in container, fill with water, freeze overnight (8+ hours), unmold by running warm water on the outside of the container, place ice block on a tray at the table with excavation tools
- Age range: 18 months-5 years (adjust tool complexity and supervision by age)
- Setup time: 5 minutes prep the night before, 2 minutes to unmold | Play duration: 20-40 minutes | Cleanup: 10 minutes (water gets everywhere, honestly)
- Mess level: High — embrace it with towels and a waterproof surface
- Developmental benefits: Problem-solving, patience, cause-and-effect understanding, temperature awareness, scientific thinking, hand strength
- Safety note: Supervise constantly — ice can be slippery and small toy pieces can be choking hazards
For parents organizing themed playdate groups, adventure group names has some fantastic inspiration for your little explorers’ club.
8. Threading and Lacing Practice
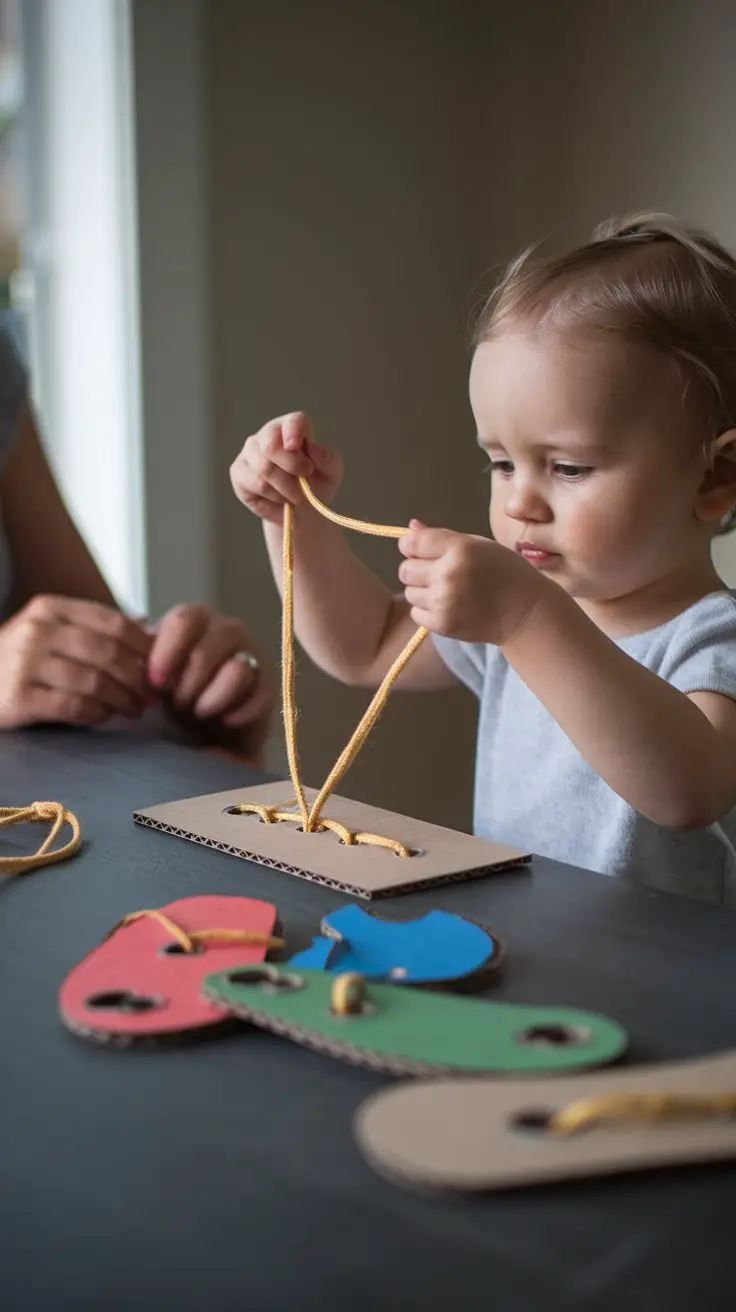
Threading a lace through holes sounds simple, but for a toddler, it’s a serious brain workout. You don’t need fancy lacing cards — a piece of thick cardboard with a hole punch and a shoelace with tape wrapped around the tip works perfectly.
This is the kind of quiet, focused activity that’s golden during sibling nap time or when you need 15 minutes of calm before dinner. It’s also secretly building all the hand control they’ll need for writing, buttoning, and tying shoes years from now.
How to Set This Up
- Materials: Thick cardboard or foam sheets, hole punch, shoelaces or thick yarn with taped ends, optional: large wooden beads for stringing
- Setup steps: Cut cardboard into simple shapes (circles, stars, hearts), punch holes around the edges spaced about an inch apart, wrap tape tightly around one end of the lace to create a stiff “needle,” demonstrate threading through one hole
- Age range: 2-4 years (start with large holes and thick laces for younger toddlers)
- Setup time: 10 minutes to make cards, reusable indefinitely | Play duration: 10-20 minutes | Cleanup: 1 minute
- Mess level: None — this is the cleanest activity on the list
- Developmental benefits: Bilateral coordination, fine motor precision, hand-eye coordination, concentration, pre-writing skills, patience
- Budget version: Poke holes in a paper plate with a pencil — instant lacing card for free
9. Tape Rescue Mission
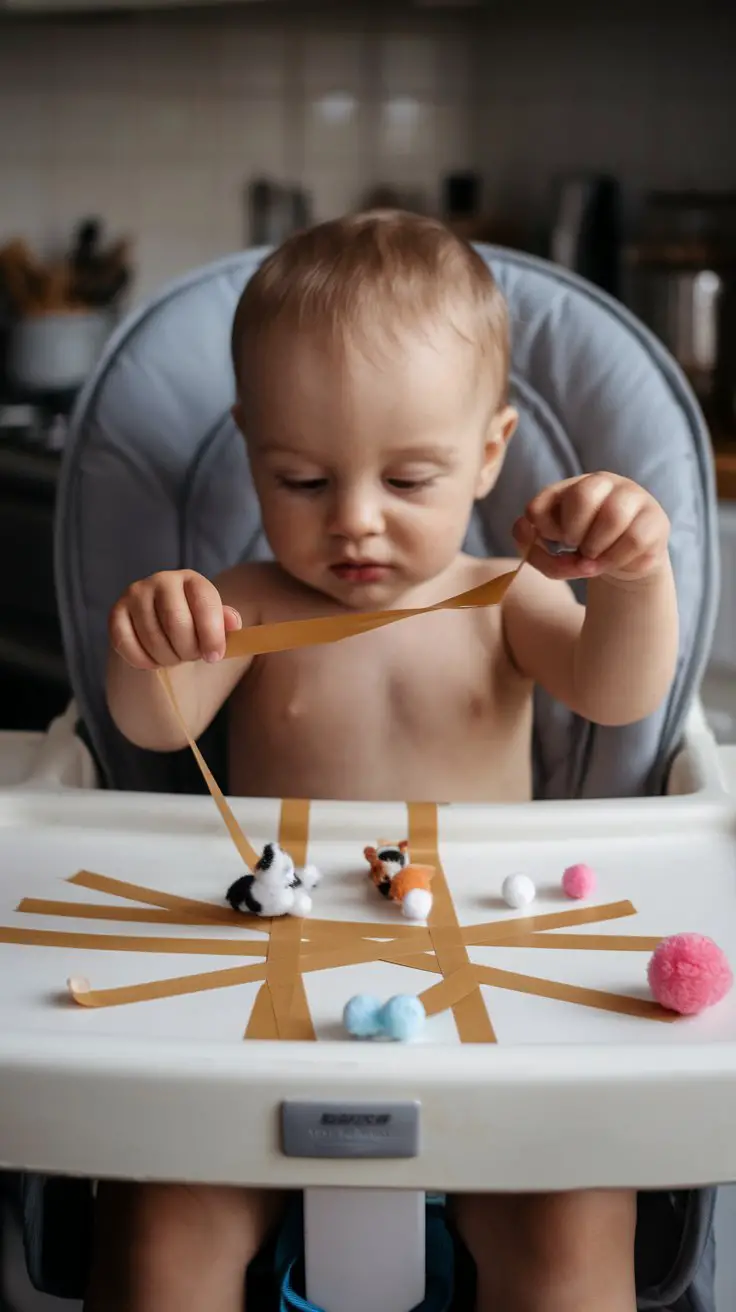
Stick painter’s tape across your toddler’s high chair tray or table in a crisscross pattern, trap small toys or pom-poms underneath, and challenge them to “rescue” the items by peeling off the tape. It sounds almost too simple, but the peeling sensation combined with the reward of freeing hidden treasures is genuinely thrilling for toddlers.
IMO, this is the perfect activity when you need to start dinner and want something that requires zero supervision beyond occasional glances. Setup takes about 90 seconds, and the entertainment value far exceeds the effort.
How to Set This Up
- Materials: Painter’s tape (gentler on surfaces than regular tape), small toys, pom-poms, or stickers to trap underneath
- Setup steps: Stick tape strips across the tray or table in various directions, press small items underneath the tape at intersections, show your toddler one item peeking out and encourage them to pull the tape to free it
- Age range: 12-30 months (perfect for young toddlers developing their pincer grasp)
- Setup time: 90 seconds | Play duration: 5-15 minutes | Cleanup: 1 minute
- Mess level: None
- Developmental benefits: Pincer grasp, problem-solving, hand strength, persistence, object discovery, fine motor control
- Variation: For older toddlers, tape items to the underside of a table and let them reach up to pull them free — adds a whole new physical dimension
Parents building community around shared activities might enjoy browsing mom group names for playgroup naming inspiration.
10. Simple Puzzle and Shape Sorting Rotation
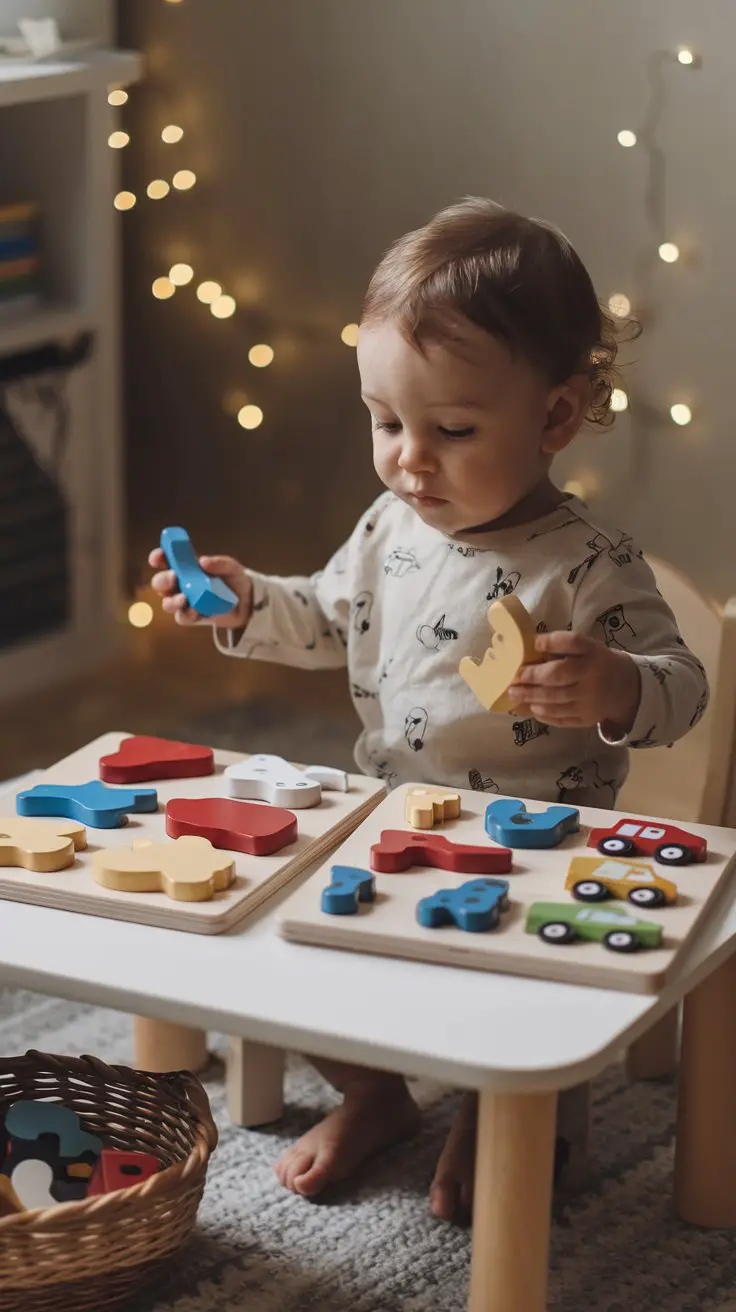
Here’s something I learned the hard way: toddlers get bored of the same puzzles quickly, but they’ll approach the exact same puzzle with fresh excitement if it disappears for two weeks and comes back. The rotation system is your friend. Keep 2-3 puzzles accessible and store the rest in a closet, swapping every week or two.
Table time with puzzles builds incredible spatial reasoning, and those chunky wooden pieces are perfectly designed for toddler hands. Start with simple 3-4 piece puzzles for younger toddlers and work up to 12+ piece puzzles for preschoolers.
How to Set This Up
- Materials: Age-appropriate wooden puzzles (chunky knob puzzles for 12-18 months, interlocking puzzles for 2-3 years, jigsaw puzzles for 3-4 years), a storage bin for rotation
- Setup steps: Select 2-3 puzzles for the current rotation, place them on the table during quiet play time, store remaining puzzles out of sight, rotate every 1-2 weeks
- Age range: 12 months-5 years (match puzzle complexity to developmental stage)
- Setup time: 1 minute | Play duration: 10-30 minutes | Cleanup: 2 minutes
- Mess level: None
- Developmental benefits: Spatial reasoning, shape recognition, problem-solving, hand-eye coordination, persistence, self-confidence through completion
- Budget tip: Thrift stores almost always have excellent wooden puzzles for $1-2, and they clean up beautifully with a disinfecting wipe
- Pro tip: Resist the urge to help immediately when they struggle — that moment of figuring it out independently builds real confidence
Wrapping It Up With a Deep Breath
Here’s what I want you to take away from all of this: the best toddler table activities aren’t complicated. They don’t require expensive supplies, art degrees, or infinite patience. A container of dyed rice, a sheet of stickers, or some painter’s tape can create genuinely meaningful play experiences that build real skills.
Some days, your toddler will sit engaged for 30 glorious minutes. Other days, they’ll dump the rice bin on the floor in 45 seconds flat and demand crackers. Both days are completely normal, and both days you’re doing an amazing job.
Trust your child’s curiosity. Follow their lead when they want to use the playdough tools “wrong” or sort the pom-poms by size instead of color. The learning happens in the doing, not in the perfection.
Keep a few go-to activities prepped and ready — a sealed container of rainbow rice, a stash of stickers, some playdough in the fridge — and you’ll always have something to pull out when the whining starts or the rain won’t stop. These small, simple moments at the table are where so much growth happens, even when it looks like nothing more than a toddler happily smashing dough with a fork.
You’ve got this. And your coffee? Reheat it one more time. You’ve earned it <3

Greetings, I’m Alex – an expert in the art of naming teams, groups or brands, and businesses. With years of experience as a consultant for some of the most recognized companies out there, I want to pass on my knowledge and share tips that will help you craft an unforgettable name for your project through TeamGroupNames.Com!