There’s a specific kind of chaos that hits every household the moment summer ends.
Suddenly, backpacks are everywhere, permission slips are mysteriously disappearing into the void, and someone is always running five minutes late while screaming, “Has anyone seen my shoes?” Sound familiar?
If your entryway, kitchen wall, or mudroom corner has been silently crying for help since August, this one’s for you.
A back-to-school command center isn’t just a pretty Pinterest project—it’s the organizational system your mornings have been desperately begging for.
Whether you’re working with a generous mudroom, a tiny hallway corner, or literally just one wall in your kitchen, there’s a setup here that will genuinely transform how your family moves through the school day.
Let’s talk about ten ideas that are creative, budget-conscious, and actually functional when life gets loud.
1. The Classic Corkboard and Calendar Wall

This is the tried-and-true foundation of any good command center—and honestly, there’s a reason it never goes out of style. A large corkboard (think at least 24″ x 36″) gives you a flexible surface for pinning school schedules, sports practice times, lunch menus, and those endless paper forms that seem to multiply overnight.
Pair it with a monthly dry-erase or printed paper calendar that every family member can see at a glance. Color-coding by child (red for Emma, blue for Jake) makes scanning it in a half-awake morning stupor infinitely easier.
How to Recreate This Look
- Shopping list:
- Natural wood-framed corkboard, 24″x36″ or larger (~$25–$60 at Target, IKEA, or Amazon)
- Printed monthly calendar template (free printables at Canva or Etsy downloads for ~$3–$5)
- Colored push pins or mini binder clips (~$5–$8)
- Narrow wooden bench with cubbies (~$80–$200 from IKEA’s KALLAX range or thrifted)
- Wall hooks (set of 4–6, ~$15–$35)
- Step-by-step:
- Mount the corkboard at adult eye level, centering it above your bench or surface.
- Attach your calendar to the top third of the board—this stays consistent.
- Use the bottom two-thirds for rotating items: weekly schedules, permission slips, reminders.
- Label cubbies or bins by child using wooden letter tags or a label maker.
- Install hooks just above the board or beside it for bags and jackets.
- Budget breakdown:
- Budget-friendly (under $100): Thrifted corkboard + free printable calendar + DIY painted bench from a garage sale find
- Mid-range ($100–$500): IKEA bench + new corkboard + labeled bins
- Investment-worthy ($500+): Custom built-in cubby unit with integrated corkboard panel
- Difficulty level: Beginner. If you can use a hammer and a level, you’re golden.
- Lifestyle note: With kids and pets, skip fabric-covered corkboards—plain cork wipes down much more easily.
- Seasonal swap: Switch the calendar insert monthly; swap out summer activity flyers for fall sports schedules.
2. The Chalkboard Wall Command Center
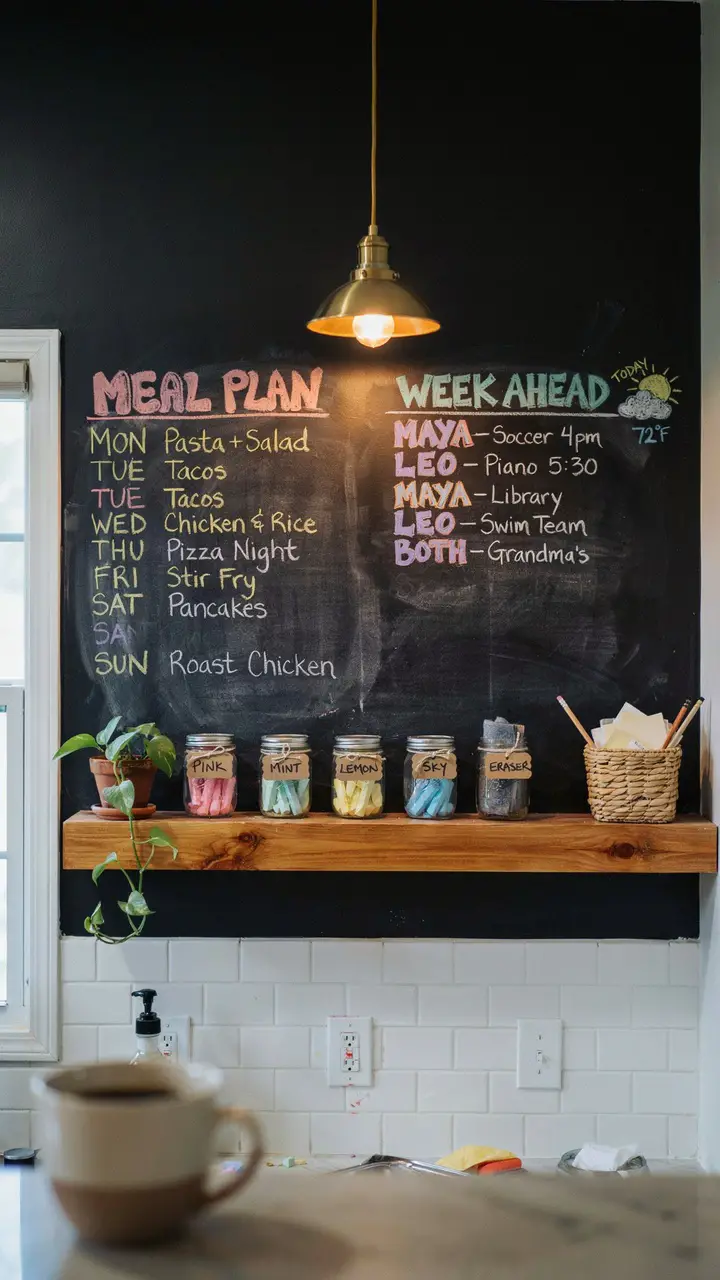
Okay, hear me out before you say “that sounds like a lot of work”—a chalkboard wall is one of the most flexible, endlessly customizable command center options you can create. One can of chalkboard paint (~$15–$25) transforms a single wall or even a cabinet door into an interactive family hub.
The real magic: kids actually want to interact with it. Letting them write their own after-school reminders or draw the weather forecast for the day? Suddenly they’re invested in the system, too.
How to Recreate This Look
- Shopping list:
- Chalkboard paint in black or dark green (~$15–$25 per quart at Home Depot)
- Colored chalk or chalk markers (~$8–$15)
- Floating wooden shelf (~$20–$45 at IKEA or Amazon)
- Small labeled glass jars or tin cups for chalk storage (~$10–$20)
- Chalk eraser or damp cloth
- Step-by-step:
- Clean and lightly sand your wall surface before painting.
- Apply 2–3 coats of chalkboard paint, allowing full drying time between coats (usually 2–4 hours each).
- “Season” the board by rubbing the side of a chalk piece across the whole surface and erasing it—this prevents ghost marks later.
- Mount your floating shelf below for supplies.
- Divide your chalkboard into zones using chalk: calendar, menu, reminders, daily tasks.
- Budget breakdown:
- Under $100: Paint + chalk + shelf from IKEA
- $100–$500: Larger dedicated wall with floating shelf system + chalk marker set
- $500+: Full chalkboard accent wall with built-in floating shelves and integrated lighting
- Difficulty level: Beginner to intermediate (painting is easy; getting clean chalk zones takes a little practice).
- Common mistake: Skipping the seasoning step—your first week of writing will leave permanent ghost marks if you do.
- Rental-friendly note: Use a large framed chalkboard panel instead of painting directly on the wall. You get 90% of the effect with zero security deposit risk.
For more creative kids’ space inspiration, check out these kids’ command center ideas that bring fun and function together beautifully.
3. The IKEA KALLAX Cubby System Reinvented
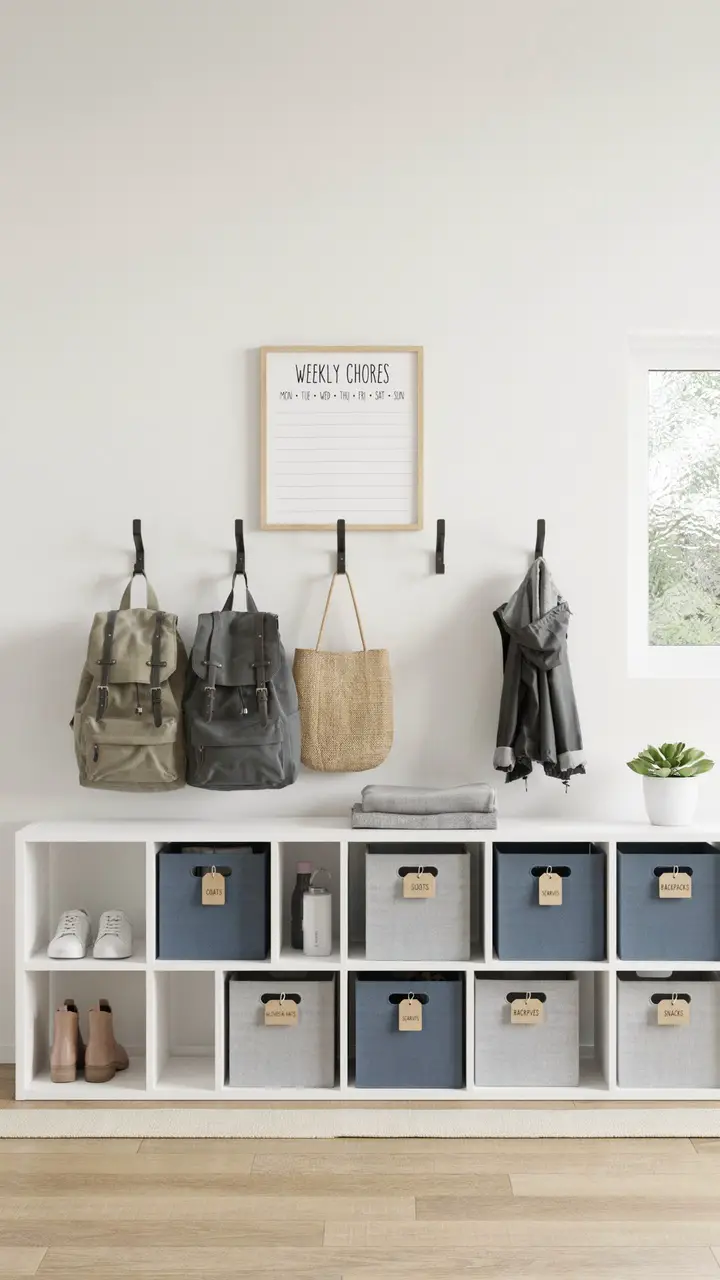
If you’ve ever stood inside an IKEA wondering why everyone keeps talking about the KALLAX, this is your moment of clarity. A horizontal 2×4 or 4×4 KALLAX unit functions as the perfect command center base: it’s a bench, a storage system, and a styling surface all in one.
Each cubby becomes one child’s personal zone—a labeled bin for their gear, a shelf for their shoes, and a hook above for their backpack. No more “that’s not my stuff!” arguments in the morning rush.
How to Recreate This Look
- Shopping list:
- IKEA KALLAX 2×4 unit (~$120–$160)
- Fabric storage inserts (~$7–$10 each, available at IKEA)
- Label maker or printable labels (~$5–$15)
- Wall-mounted hooks above the unit (~$15–$30)
- One small plant in a ceramic pot (~$10–$20)
- Step-by-step:
- Assemble the KALLAX horizontally and anchor it to the wall (always anchor furniture to walls, especially with kids around).
- Assign one full cubby section per child.
- Insert labeled fabric bins for shoes, sports gear, or miscellaneous school supplies.
- Mount hooks directly into studs above the unit, spaced shoulder-width apart.
- Use the top surface for a small plant, a charging station, or a decorative tray.
- Budget breakdown:
- Under $100: Thrifted cubby unit or secondhand KALLAX spray-painted and labeled
- $100–$500: New KALLAX + fabric inserts + hooks
- $500+: KALLAX paired with custom upper cabinet unit for additional storage
- Space requirement: Works in entryways at least 5 feet wide. You need at least 12 inches of depth clearance.
- Durability: Honestly very durable with regular kids—the KALLAX is designed for heavy use. Fabric bins can be washed.
- Difficulty level: Beginner. Assembly takes about 45 minutes; wall anchoring is the only slightly fiddly part.
4. The Floating Shelf Command Station
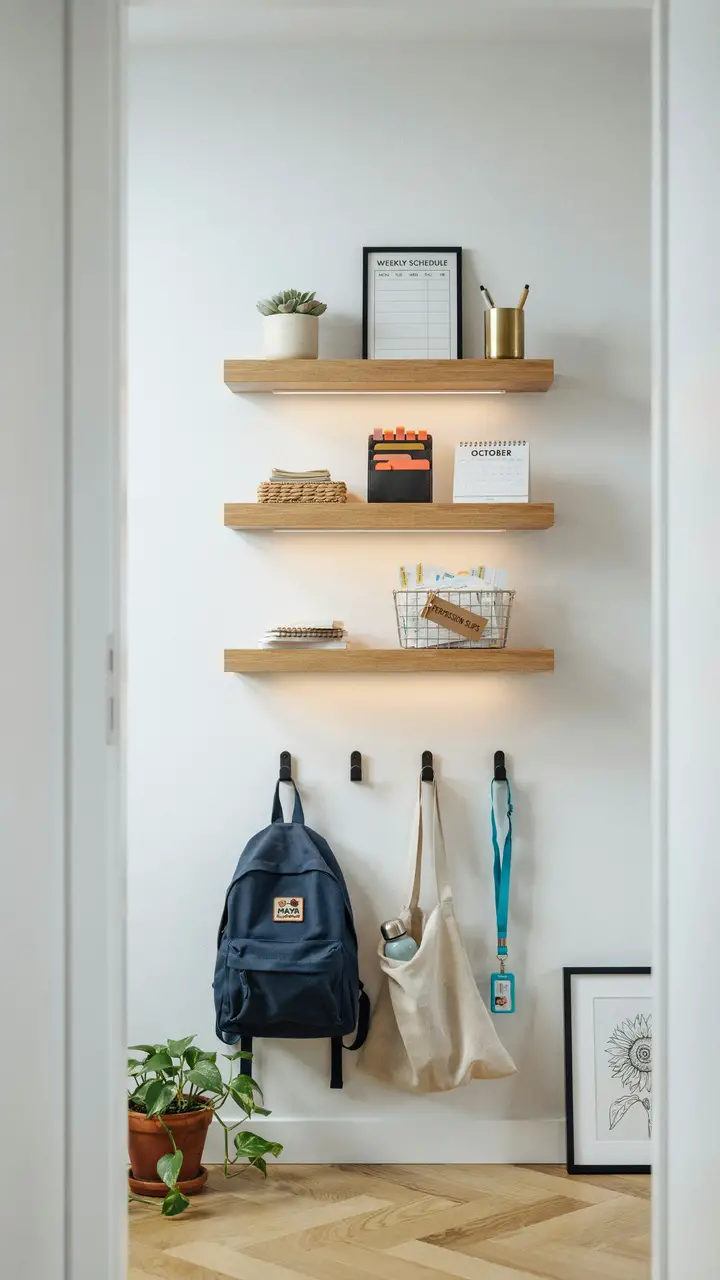
Not everyone has a mudroom or a large wall to dedicate to organization. If you’re working with a narrow hallway or a rental apartment with limited options, floating shelves are your best friend.
The trick is layering them at different heights to create visual interest while separating functions: top shelf for decor and framed schedules, middle for active papers and a pen caddy, bottom for the “grab it on your way out” basket.
How to Recreate This Look
- Shopping list:
- Floating shelves, 24″–36″ wide (~$15–$45 each at Amazon, IKEA LACK, or West Elm)
- Small wicker or wire baskets for each shelf (~$8–$15 each)
- Pegboard hooks or single wall hooks below (~$10–$25)
- Brass or matte black pen cup (~$10–$18)
- Framed weekly schedule printout (~$5–$15 total)
- Step-by-step:
- Map out shelf placement with painter’s tape before drilling—this saves so many do-overs.
- Find studs and mount your top bracket first, then work downward.
- Leave at least 10–12 inches between shelves for easy access.
- Assign each shelf a function before you start filling it in.
- Mount hooks below the bottom shelf for bags.
- Budget breakdown:
- Under $100: IKEA LACK shelves + small wire baskets + command hooks (rental-friendly!)
- $100–$500: Solid wood floating shelves + coordinating baskets + mounted pegboard section
- $500+: Custom built-in floating shelf unit with hidden cable management and integrated charging
- Rental-friendly option: Use adhesive-mounted floating shelves (like those from COMMAND) for lighter loads. Great for printout frames and small baskets.
- Difficulty level: Beginner to intermediate (finding studs confidently takes practice).
- Common mistake: Overcrowding every shelf. Resist the urge—negative space is what makes it look designed, not just stuffed.
5. The Pegboard Powerhouse
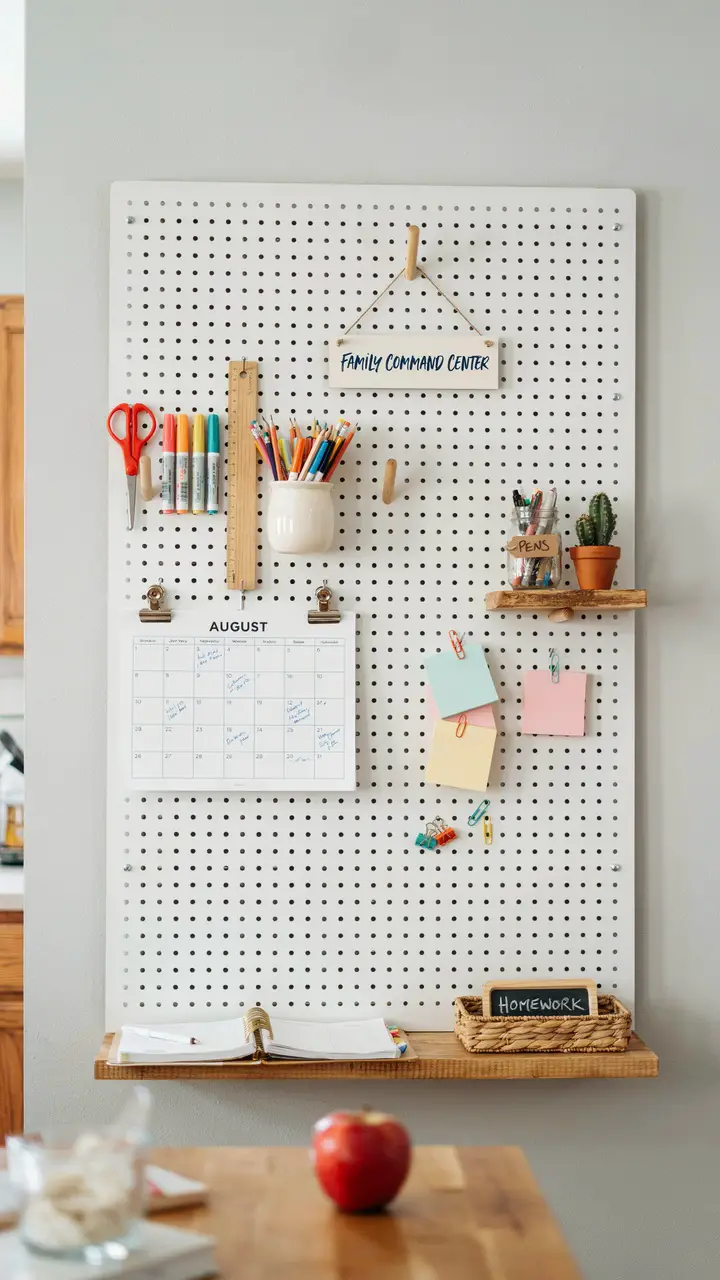
Pegboards are having an absolute moment in home organization—and for very good reason. They’re infinitely reconfigurable, surprisingly affordable, and genuinely good-looking when styled with care. A 24″x48″ pegboard panel gives you enough real estate to organize everything from homework supplies to sports schedules without taking up counter space.
The beauty of a pegboard command center is that it grows and changes with your family’s needs. What holds markers and scissors in September can easily be reconfigured to hold holiday card supplies in December.
How to Recreate This Look
- Shopping list:
- Pegboard panel, white or natural wood-toned (~$20–$50 at Home Depot or IKEA SKÅDIS ~$15)
- Assorted pegboard hooks and shelf attachments (~$10–$25)
- Small mason jars or tin cups for supply storage (~$5–$10)
- Mini binder clips for pinning papers (~$3–$5)
- Printed calendar insert (~$0–$5)
- Step-by-step:
- Mount pegboard at least ½ inch away from the wall using spacer screws—this allows hooks to insert properly from behind.
- Start with your largest attachment (like a shelf) and build outward.
- Group supplies by type: writing tools in one zone, paper supplies in another.
- Add a dedicated “school papers” clip or folder pocket.
- Leave one section open for pinning rotating notes and schedules.
- Budget breakdown:
- Under $100: IKEA SKÅDIS + basic hook set + repurposed glass jars
- $100–$500: Larger custom-cut pegboard + wooden accessories + integrated shelf
- $500+: Custom-built pegboard wall with integrated shelving, lighting, and painted surround
- Space requirement: Works in any space with at least a 2’x4′ wall section.
- Difficulty level: Beginner. Honestly one of the most beginner-friendly setups you’ll try.
- Seasonal adaptability: Swap hook placements seasonally—add a hook for umbrellas in monsoon season, a clip for field trip permission slips in spring.
For even more organizational inspiration, explore these DIY command center ideas that are perfect for hands-on families who love a creative weekend project.
6. The Homework Charging Station Hub
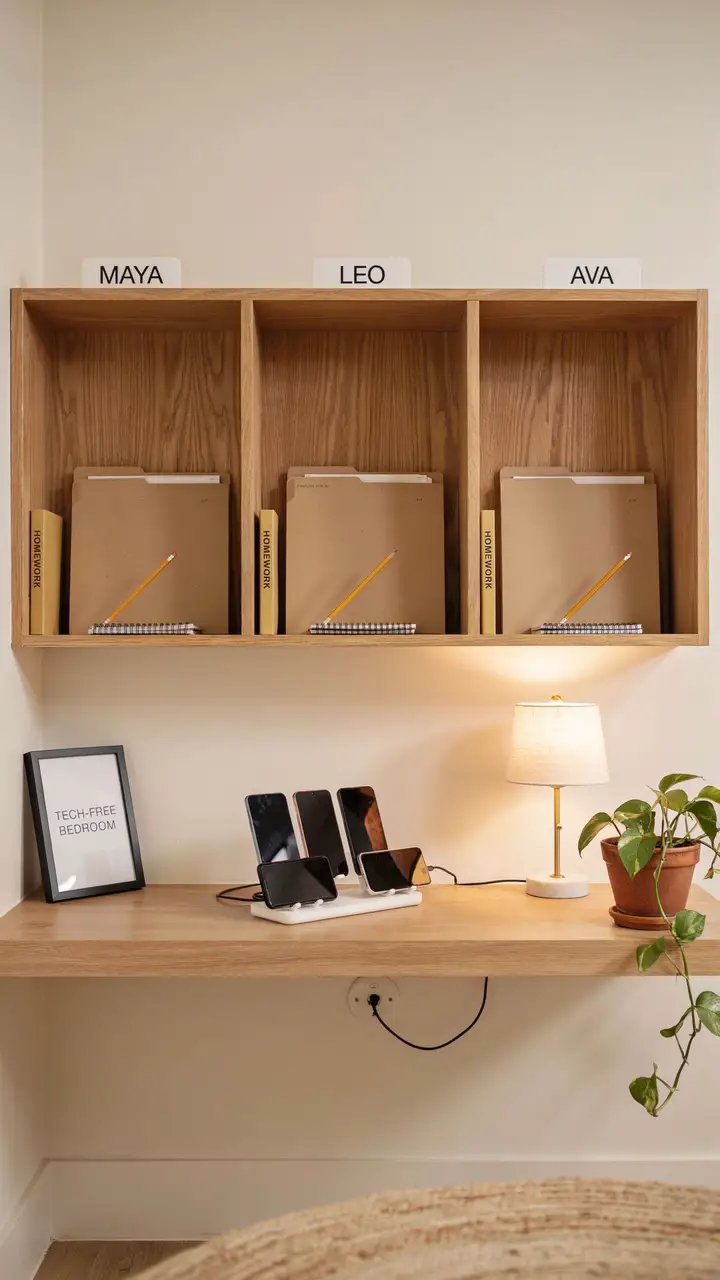
In an era where every kid has a tablet, a school-issued Chromebook, and possibly a phone they absolutely didn’t need yet (we’re not here to judge), a dedicated charging station that doubles as a homework drop zone is genuinely life-changing.
The rule that makes this work: devices charge here overnight—not in bedrooms. It sounds simple, but having a physical, designated place reinforces the habit.
How to Recreate This Look
- Shopping list:
- Labeled wall slots or individual magazine file holders (~$15–$30)
- Multi-port USB charging station (~$25–$60 at Amazon or Best Buy)
- Cable organizer clips (~$5–$10)
- Small table lamp or LED puck light (~$15–$30)
- Printed “device-free bedroom” sign (~$5–$10 at Etsy or DIY)
- Step-by-step:
- Choose a location outside bedrooms but accessible—kitchen counter or hallway shelf works well.
- Mount labeled file holders or slots at kid-reachable height.
- Set up your charging dock below or beside the file area with cables already routed.
- Establish the house rule before school starts so it’s a routine from day one.
- Add a small lamp to make the homework space feel intentionally inviting—not punitive.
- Budget breakdown:
- Under $100: Magazine file holders + budget charging strip + small clip light
- $100–$500: Wall-mounted open cabinet + quality multi-device dock + coordinating accessories
- $500+: Custom built-in cubby unit with integrated wiring and concealed charging
- Difficulty level: Beginner. No tools required beyond a label maker.
- Common mistake: Buying a charging station that doesn’t support your specific devices—check compatibility before purchasing.
- Lifestyle note: If pets are an issue, keep cords elevated and use a cord cover along the baseboard.
7. The Family Binder Wall Pocket System
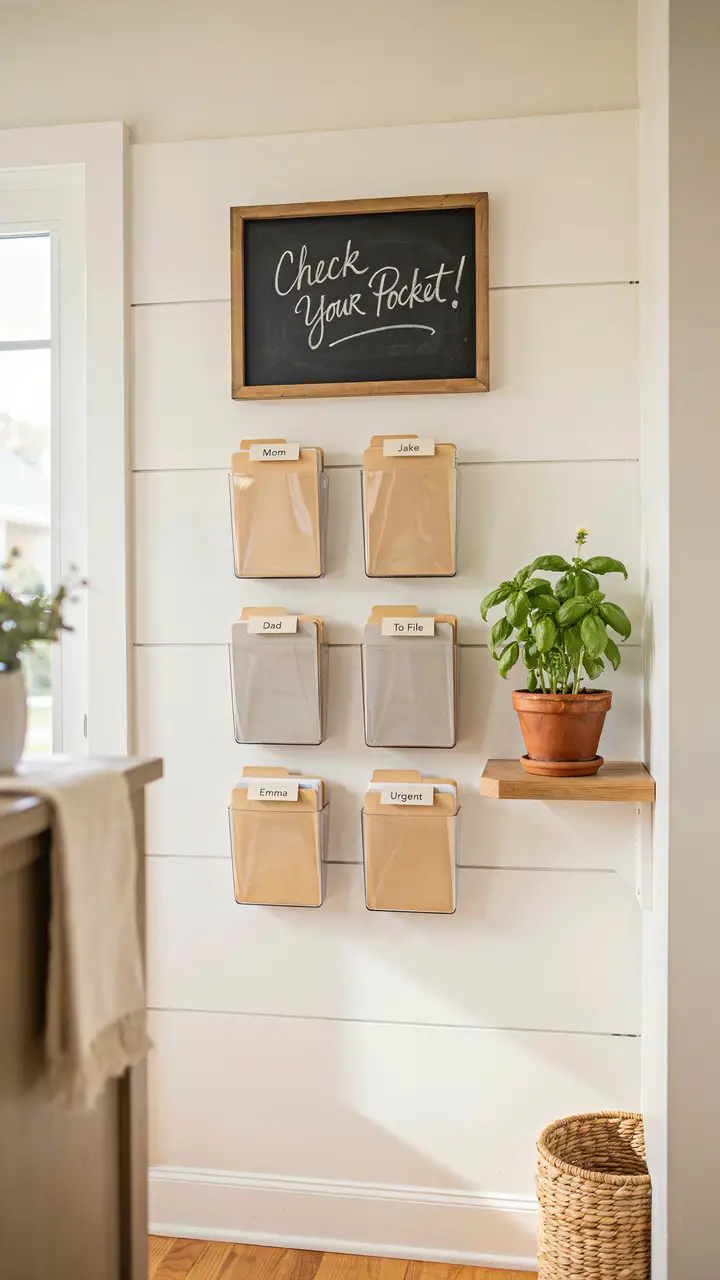
If paper chaos is your family’s nemesis (and let’s be honest, for most families it absolutely is), a wall pocket system is the most direct solution. Each family member gets their own labeled pocket—permission slips, newsletters, and notes get sorted the moment they come through the door, not scattered across every flat surface in the house.
This is especially brilliant for families where two parents have different schedules—you can leave notes, forms, and reminders for each other without the kitchen counter becoming a paper graveyard.
How to Recreate This Look
- Shopping list:
- Acrylic or metal wall file pockets (set of 4–6, ~$20–$50 at The Container Store, Amazon, or IKEA)
- Label maker or printable adhesive labels (~$5–$15)
- Shiplap peel-and-stick panel or painted accent wall (optional but elevates the look)
- Small framed sign for above the system (~$8–$15)
- Step-by-step:
- Mount pockets at adult eye level in an accessible but out-of-traffic location.
- Assign pockets before school starts and explain the system to every family member.
- Create a weekly habit of clearing each pocket—Sunday evenings work well.
- Add an “Urgent” pocket in a bright color so high-priority items stand out immediately.
- Budget breakdown:
- Under $100: Wire wall pockets from Amazon + label maker
- $100–$500: Acrylic pockets + shiplap accent panel behind them + framed sign
- $500+: Custom recessed wall pocket unit with integrated filing system
- Difficulty level: Beginner. If you can use a level and a drill, this takes under an hour.
- Common mistake: Not clearing pockets regularly—within two weeks they’ll overflow and the system collapses. Build the habit intentionally.
8. The Entryway Bench with Built-In Organization
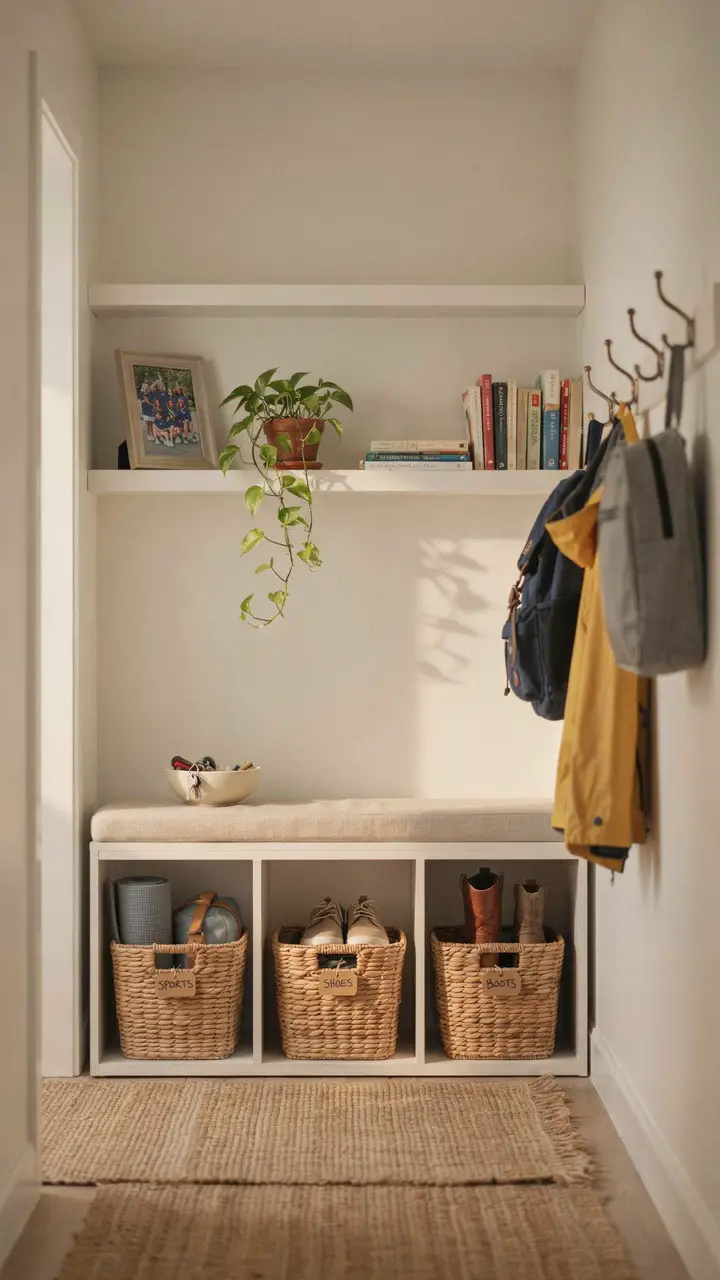
An entryway bench does triple duty: it’s a seat for putting on shoes, a storage unit for everything kids carry, and (when styled well) one of the most charming spots in your home. The key is making sure every item that comes through the front door has an assigned home—and the bench system makes that irresistible rather than effortful.
The trailing pothos on the shelf above isn’t just decorative, BTW—greenery at eye level in an entryway genuinely softens the visual chaos of everyday life.
How to Recreate This Look
- Shopping list:
- Storage bench with cubbies (~$120–$350 at IKEA, Wayfair, or Target)
- Labeled wicker baskets to fit cubbies (~$12–$20 each)
- Floating shelf unit for above the bench (~$35–$80)
- Wall hooks, bronze or matte black (~$15–$40 for a set)
- Trailing pothos in a terracotta pot (~$12–$25)
- Step-by-step:
- Position your bench against the wall with at least 18 inches of clearance in front for comfortable seating.
- Assign each cubby before school starts so habits form immediately.
- Mount your shelf unit 12–18 inches above the bench for comfortable reach.
- Install hooks at varying heights—lower for kids, higher for adults.
- Style the shelf with purpose: one plant, one framed photo, one functional item (like a small tray for keys and sunglasses).
- Budget breakdown:
- Under $100: Thrifted wooden bench + DIY paint + wire baskets
- $100–$500: IKEA HEMNES bench + new wicker baskets + wall hooks
- $500+: Custom-built bench with upholstered top and matching upper cabinetry
- Space requirement: Works in entryways at least 4 feet wide and 3 feet deep.
- Difficulty level: Beginner. Most storage benches require minimal assembly.
- With kids and pets: Choose wicker baskets over open fabric—they’re more durable and easier to wipe down.
For families who love this style of entryway organizing, these entryway command center ideas offer a whole world of beautifully functional setups worth exploring.
9. The Magnetic Whiteboard Weekly Planner
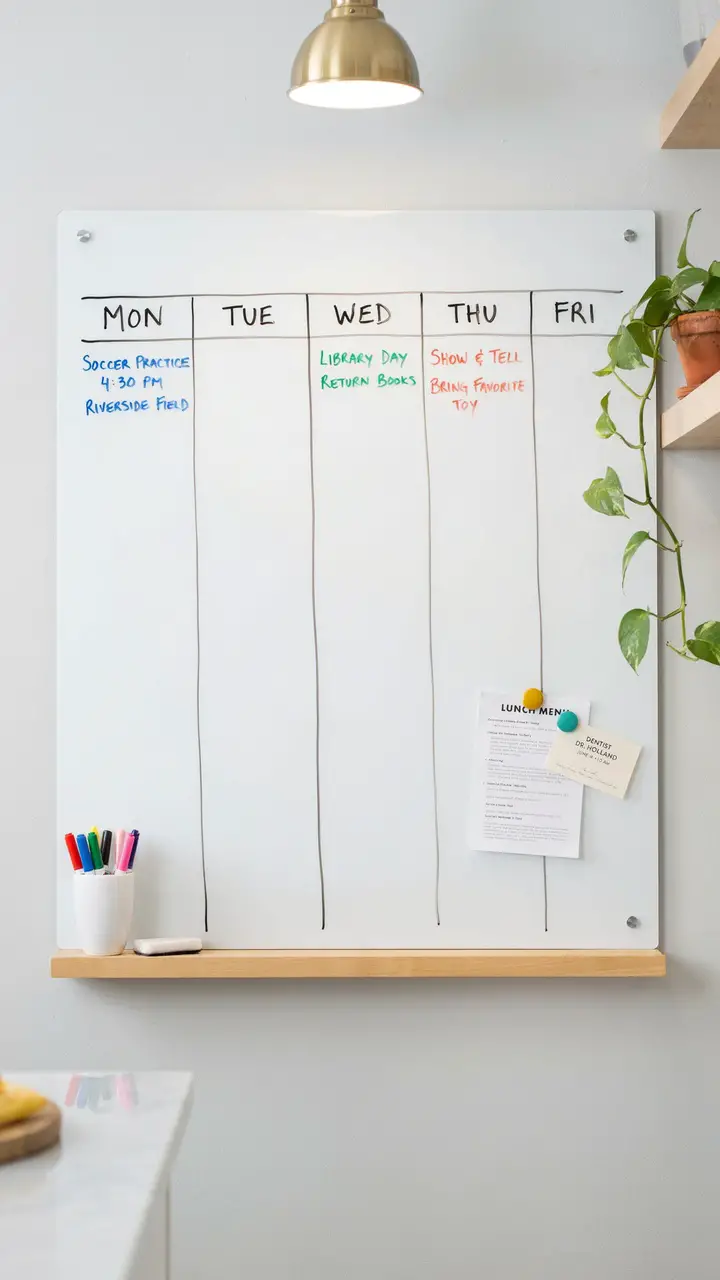
If your family runs on schedules the way most school-age families do, a large magnetic whiteboard weekly planner is the most visible, most usable command center tool you can install. A simple 5-column weekly layout—Monday through Friday—where each family member’s commitments are written in their color-coded marker takes under five minutes to update every Sunday night.
Worried you’ll pick the wrong paint color for the wall behind it? Don’t stress—a whiteboard this size essentially becomes the wall. 🙂
How to Recreate This Look
- Shopping list:
- Large magnetic whiteboard, 36″x48″ or larger (~$35–$90 at Amazon, Staples, or Office Depot)
- Dry-erase markers in 4–5 colors (~$8–$12)
- Small round magnets in assorted colors (~$5–$10)
- Wooden or acrylic ledge shelf (~$15–$35)
- White ceramic cup for marker storage (~$5–$12)
- Step-by-step:
- Mount at adult eye level in a high-visibility kitchen or hallway location.
- Divide the board into columns using a permanent fine-tip marker (yes, permanent—it won’t erase, and it keeps your structure visible always).
- Assign each family member a marker color at the start of the school year.
- Schedule a 10-minute “board update” every Sunday evening—make it a ritual, not a chore.
- Use magnets to attach printed items: lunch menus, sports schedules, appointment cards.
- Budget breakdown:
- Under $100: Budget whiteboard from Amazon + basic marker set
- $100–$500: Frameless glass whiteboard (more polished look) + premium markers + decorative ledge
- $500+: Custom wall-mounted glass whiteboard with built-in marker storage and integrated lighting above
- Difficulty level: Beginner. Mounting requires finding studs for a board this size—worth the 20-minute effort.
- Seasonal adaptability: Keep the structure but update the content—add after-school activity columns in fall, swap to holiday event tracking in December.
- Common mistake: Using ALL the space all the time. Leave intentional white space on the board—it helps the eye focus on what actually matters.
10. The Full Family Command Center Wall
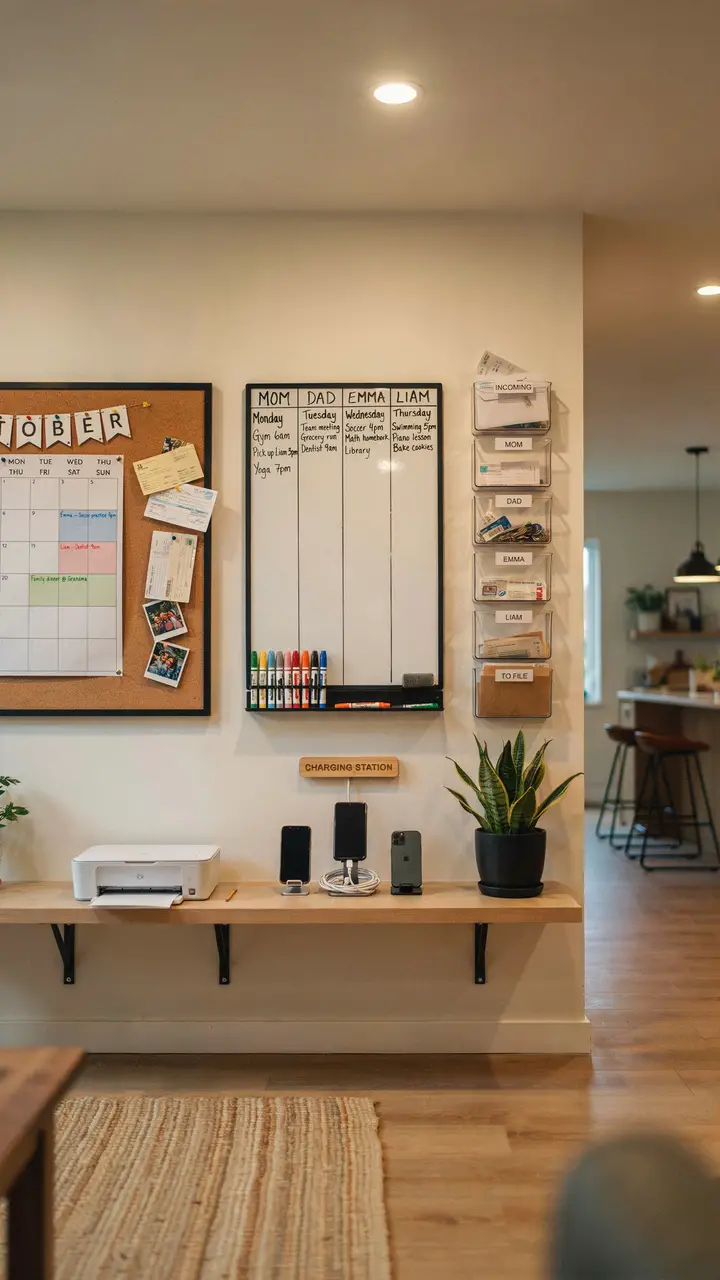
If you’ve made it this far and you’re thinking “I want ALL of these ideas in one place”—this one is for you. The full family command center wall combines every element we’ve talked about into one cohesive, genuinely powerful organizational system.
This isn’t just decoration—it’s infrastructure. Families who build a dedicated command center wall report fewer missed appointments, less morning chaos, and (perhaps most importantly) fewer of those panicked “where did I put the permission slip?” moments at 7:45 AM.
How to Recreate This Look
- Shopping list:
- Large corkboard (24″x36″ or larger, ~$30–$65)
- Magnetic whiteboard (36″x48″, ~$40–$90)
- Wall file pockets, set of 6 (~$25–$55)
- Narrow floating console table (~$80–$200)
- Multi-device charging dock (~$30–$60)
- Snake plant in matte planter (~$20–$35)
- Under-cabinet LED strip lighting for above the wall (~$15–$30)
- Label maker (~$15–$30)
- Step-by-step:
- Plan your wall layout on paper first—sketch out the three zones before you drill a single hole.
- Mount the heaviest item (corkboard or whiteboard) first, finding studs carefully.
- Work outward from center, keeping visual weight balanced across the wall.
- Install your console table below last, so the upper system dictates its placement.
- Run LED strip lighting along the top of the upper system for both function and polish.
- Style the console table with intention: charging dock, one plant, one tray—nothing more.
- Budget breakdown:
- Under $100: Thrifted corkboard + budget whiteboard + magazine file pockets + secondhand console table
- $100–$500: New corkboard + whiteboard + acrylic pockets + IKEA console + charging dock
- $500+: Custom-built wall unit with painted surround, built-in lighting, and personalized family signage
- Space requirement: Works best on a wall at least 6–8 feet wide. A 4-foot wall can work with a scaled-down version.
- Difficulty level: Intermediate. The planning stage is the most important—rushing the layout leads to mismatched heights and visual chaos.
- IMO, the single most important tip: Don’t try to install everything in one weekend. Do the corkboard first, live with it for a week, then add components. This prevents overcrowding and lets you see what you actually need.
- Common mistakes: Making it so elaborate that the family feels intimidated to use it. Functionality always beats aesthetics here—if it’s too precious to touch, it won’t work.
- Maintenance tip: Schedule a 15-minute weekly reset. Sunday evenings work beautifully—update the whiteboard, clear the file pockets, re-pin the current week’s schedule.
Want to explore how a family command center can work across different room layouts and family sizes? There are some genuinely brilliant variations that might fit your space perfectly.
Making Your Command Center Work All Year Long
Here’s the honest truth about command centers: the most beautiful one in the world is useless if your family doesn’t actually use it. The secret isn’t perfection—it’s consistency and buy-in.
Involve your kids in setting it up. Let them choose their color for the whiteboard, pick their basket, or decorate their file pocket. When kids feel ownership over a system, they’re dramatically more likely to use it. The same goes for partners who might be skeptical about whether a new “organization wall” will actually change anything—show them the weekly reset ritual, not just the finished product.
Give yourself permission to adjust the system after a few weeks. Maybe the wall pockets feel redundant now that you have a whiteboard. Maybe you need one more hook. A good command center evolves with your family—it’s not a one-time DIY project, it’s a living system.
And on those mornings when the backpack is still missing and someone didn’t check the board—take a breath. The system helps, but it doesn’t have to be perfect to be worth it. Even reducing morning chaos by 50% is a win worth celebrating.
Your home isn’t a magazine spread—and it doesn’t need to be. It just needs to work for the real, beautiful, occasionally chaotic family that lives in it. Start with one idea from this list, make it yours, and watch how much lighter the school year feels. You’ve absolutely got this. ❤

Greetings, I’m Alex – an expert in the art of naming teams, groups or brands, and businesses. With years of experience as a consultant for some of the most recognized companies out there, I want to pass on my knowledge and share tips that will help you craft an unforgettable name for your project through TeamGroupNames.Com!