
If you’ve ever watched a boy spend forty-five minutes fully absorbed in arranging rocks by size, building an elaborate block tower, or carefully pouring water from one cup to another, you’ve already witnessed the Montessori approach in action.
This educational philosophy — developed by Dr. Maria Montessori — centers on a simple but powerful idea: when children have access to the right environment, they teach themselves. Your job is to set the stage beautifully and then step back.
For boys specifically, Montessori playrooms address something that traditional toy-overloaded rooms often miss.
Boys tend to gravitate toward movement, construction, cause-and-effect, and mastery of physical skills.
A Montessori space channels those instincts into purposeful, independent activity — with open shelves displaying a rotating selection of real materials and activities, child-height workstations, and plenty of floor space for big movement.
The result is a room that actually gets used deeply rather than surface-level, and a boy who feels genuinely capable and competent.
The bonus for parents? These rooms are often the most beautiful in the house — clean, calm, and organized in a way that holds up even after a full afternoon of play.
These 10 Montessori boys playroom ideas give you a full range of setups, from minimal apartment-friendly approaches to more elaborate dedicated spaces.
Every one of them puts your son’s independence, curiosity, and growing capability at the center. 🙂
1. Classic Open Shelf Montessori Playroom
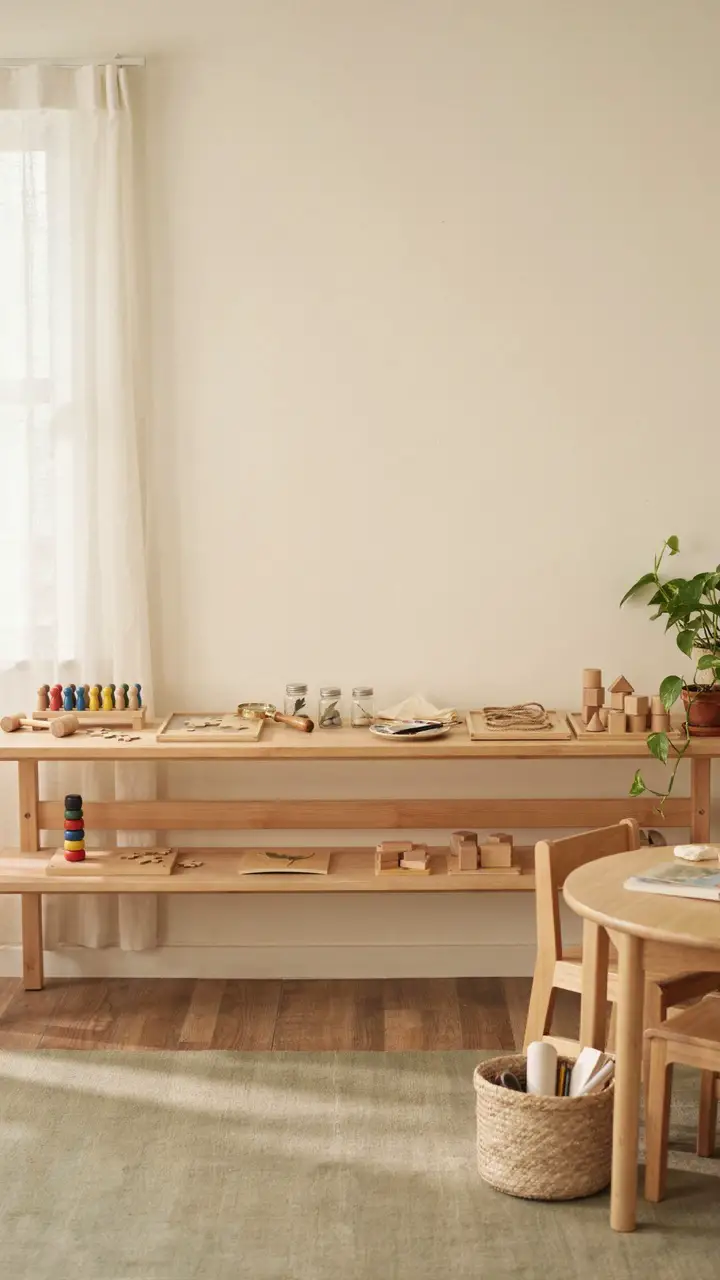
The open shelf is the beating heart of every Montessori environment. Low, accessible shelving — at your son’s shoulder height or below — displays a rotating selection of activities in individual trays or baskets, each one complete and ready to use. The visual order is as important as the physical order: activities arranged from left to right in order of complexity, with enough space between items that each one stands alone as an invitation to explore.
For boys, the shelf might include a wooden hammer and peg board, a simple building set with geometric pieces, a nature tray with magnifying glass and specimen jars, a small puzzle, a basic knot-tying activity with rope and wooden dowels, and a set of watercolor paints on a tray with paper. The key is quality over quantity — five or six genuinely interesting activities outperform thirty undifferentiated toy bins every time.
How to Recreate This Look
- Shopping list: Low open shelf unit ($60–$200, IKEA Kallax horizontal or Sprout Kids shelf), individual wooden trays ($8–$15 each), activity materials (wooden puzzle, peg board, building set, nature tray materials: $20–$100 total), child-height table and chairs ($60–$200), sage area rug ($40–$120), sheer window curtains ($20–$50)
- Step-by-step styling: Install shelf at or below child’s shoulder height. Place one activity per tray — complete and organized, ready to use. Arrange from simplest activity on the left to most complex on the right. Place table beside shelf. Lay rug in the center work area. Keep wall surfaces clear.
- Style compatibility: Works beautifully with Scandinavian, natural, minimal, and Reggio Emilia aesthetics; pairs with natural wood, linen, and cotton textiles
- Budget breakdown: Under $100 — basic shelf from IKEA, simple activity materials, DIY trays from a dollar store; $100–$500 — quality wooden shelf, curated activity set, child table; $500+ — custom solid wood shelving, premium Montessori material sets, handmade wooden table and chairs
- Space requirements: Works in rooms from 8×10 ft; shelf needs at least 4 ft of clear wall space
- Difficulty level: Beginner — the challenge is curation and restraint, not construction
- Durability/lifestyle: Open shelves work best when boys are taught from the start to return activities to their spot; introduce one new activity at a time to build this habit
- Seasonal adaptability: Rotate shelf activities every 2–4 weeks — introduce seasonal materials (autumn leaves for nature tray, seed-starting in spring) to keep interest fresh
- Common mistakes: Displaying too many activities at once — 5 to 8 is the sweet spot; more creates visual overwhelm and reduces engagement
- Maintenance tips: Check activities weekly; replace any missing pieces before returning to shelf; wipe trays with a damp cloth monthly
2. Practical Life Skills Station
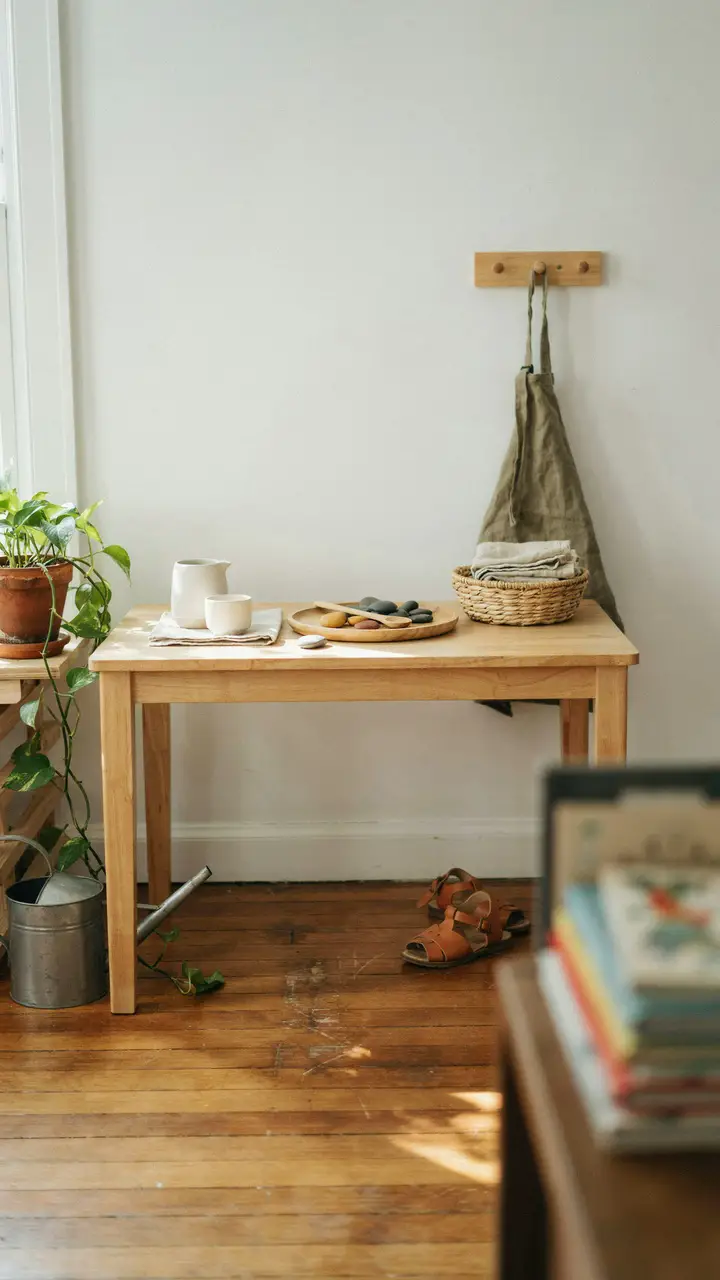
Montessori’s “practical life” curriculum is one of its most powerful components — and one of the most fun to set up at home. A practical life station gives boys real tasks that develop fine motor skills, concentration, and genuine competence. Think: a small table with a real pitcher of water for pouring practice, a transfer activity with tongs and colored pompoms, a spooning activity with a spoon and small objects, a simple folding station with cloths or fabric squares, and a shoe-polishing or plant-watering station.
Boys especially love practical life activities because they feel genuinely useful — and that feeling matters more than most parents realize. When a five-year-old pours his own water, folds his own cloth, or polishes his own shoes, he’s not playing — he’s working. And he knows it. Set up a small child-height side table near a wall with a hook board at his level, and watch him return to it again and again.
How to Recreate This Look
- Shopping list: Child-height table ($50–$150), small ceramic pitcher and cup set ($15–$30), wooden spooning/transfer trays ($10–$25 each), natural linen cloths ($10–$20 for a pack), child’s apron ($10–$20), hook board ($15–$35), small watering can ($8–$15), pothos plant ($5–$15)
- Step-by-step styling: Set up table against wall. Arrange activities left to right in order of water-use level (dry activities first, wet activities to the right near a small water tray). Mount hook board beside table at the child’s shoulder height. Place plant and watering can at the end of the activity sequence.
- Style compatibility: Works with any aesthetic since practical life stations are primarily functional; natural materials in cream, wood, and terracotta suit Montessori, Reggio, or Waldorf styles
- Budget breakdown: Under $100 — basic wooden table, dollar-store ceramic items, linen cloths from a fabric store; $100–$500 — quality child table, real ceramic materials, beautiful linen apron; $500+ — custom built-in practical life cabinet with sink access
- Space requirements: Works in a corner as small as 4×4 ft; needs proximity to a water source for refilling the pitcher
- Difficulty level: Beginner — setup is arrangement only; the harder work is teaching your son the proper care and use of each material
- Durability/lifestyle: Ceramic items teach care and respect; expect some breakage at first — it’s part of the learning; replace broken items with the same materials
- Seasonal adaptability: Swap practical life activities seasonally — seed planting in spring, leaf sorting in fall, snow observation in winter
- Common mistakes: Using plastic containers “because they won’t break” — real ceramic and glass teach real responsibility and feel genuinely satisfying to use
- Maintenance tips: Empty and dry the water pitcher daily; launder linen cloths weekly; refill activity materials before each play session
Explore more Montessori playroom ideas and setups →
3. Montessori Movement and Gross Motor Room
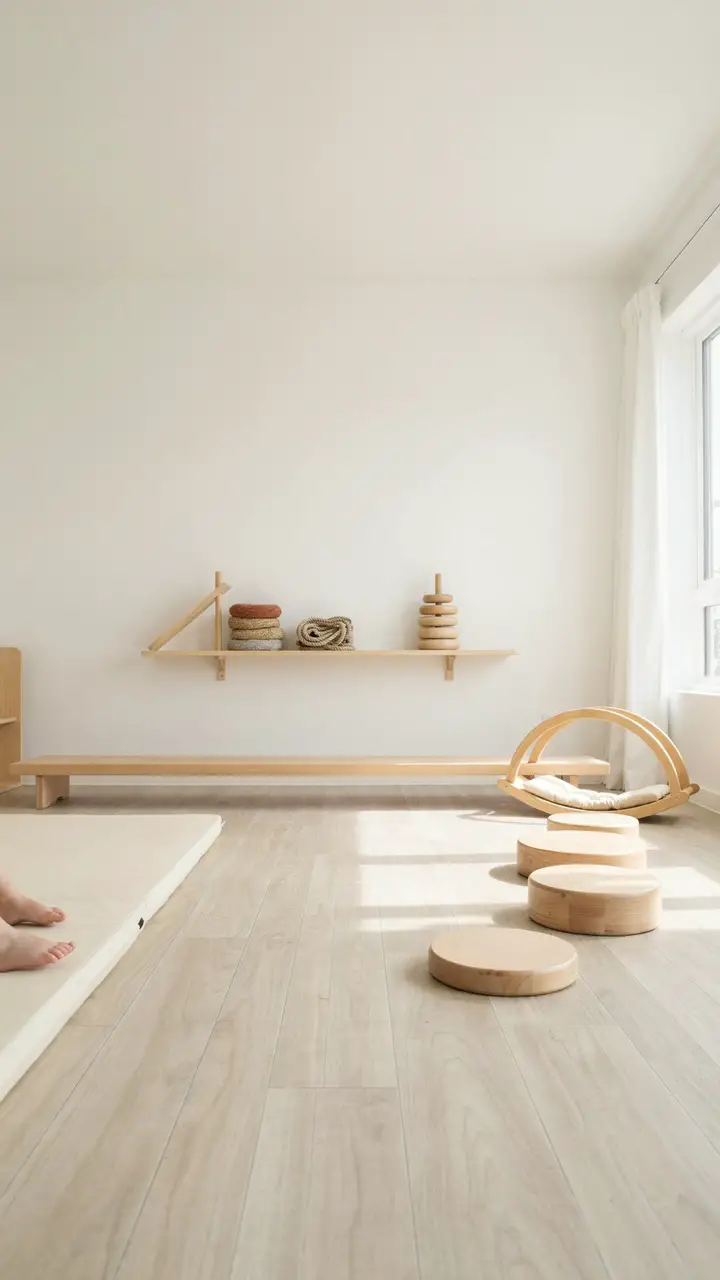
Boys need to move — this is not a suggestion, it’s a developmental fact. A Montessori-aligned gross motor space acknowledges this need and gives it beautiful, purposeful form. A wooden balance beam (low to the ground, sturdy) runs across one section of the room. A set of large wooden stepping stones in graduated heights offers a challenging gross motor circuit. A wooden arch rocker doubles as both a rocking toy and a challenging balance surface.
Keep the floor clear and the walls neutral. One padded mat area gives boys a safe surface for tumbling and rolling. A low wooden shelf in this section holds only gross motor materials — bean bags for tossing, a balance board, a set of wooden hoops for floor pattern games. The room feels purposeful and active without being cluttered or chaotic.
How to Recreate This Look
- Shopping list: Low balance beam ($50–$150), wooden stepping stones set ($80–$250), wooden arch rocker ($100–$300), gymnastics mat ($50–$150), balance board ($40–$100), bean bags set ($15–$30), wooden rings ($15–$30), low wooden shelf ($40–$100)
- Step-by-step styling: Clear the floor completely first. Place balance beam as the central feature running across the room. Arrange stepping stones in an arc to one side. Position arch rocker in a corner. Lay mat in a designated tumbling area. Mount or position shelf on one wall with only gross motor materials displayed.
- Style compatibility: Works with Montessori, Waldorf, and natural aesthetics; pairs with neutral walls, natural wood materials, and cotton textiles
- Budget breakdown: Under $100 — DIY balance beam from 2×4 lumber, basic bean bags, and a gymnastics mat; $100–$500 — quality wooden balance beam, stepping stones, and arch rocker; $500+ — full Pikler triangle set, premium wooden arch, custom balance circuit
- Space requirements: Minimum 12×12 ft for a meaningful movement circuit; works best with clear floor space in the center
- Difficulty level: Beginner — all items are freestanding; DIY balance beam requires basic carpentry
- Durability/lifestyle: Solid hardwood movement equipment is designed for years of active use; sand any rough spots annually and apply beeswax finish to maintain wood
- Seasonal adaptability: Rearrange equipment seasonally to create new circuits; swap bean bags for seasonal objects (pine cones for autumn sorting, cotton balls for winter)
- Common mistakes: Crowding too much equipment into a small space — clear floor is as important as the equipment itself; leave room to move
- Maintenance tips: Inspect all joints and connections monthly; tighten any loose hardware; sand rough surfaces before they splinter
4. Nature and Science Discovery Shelf
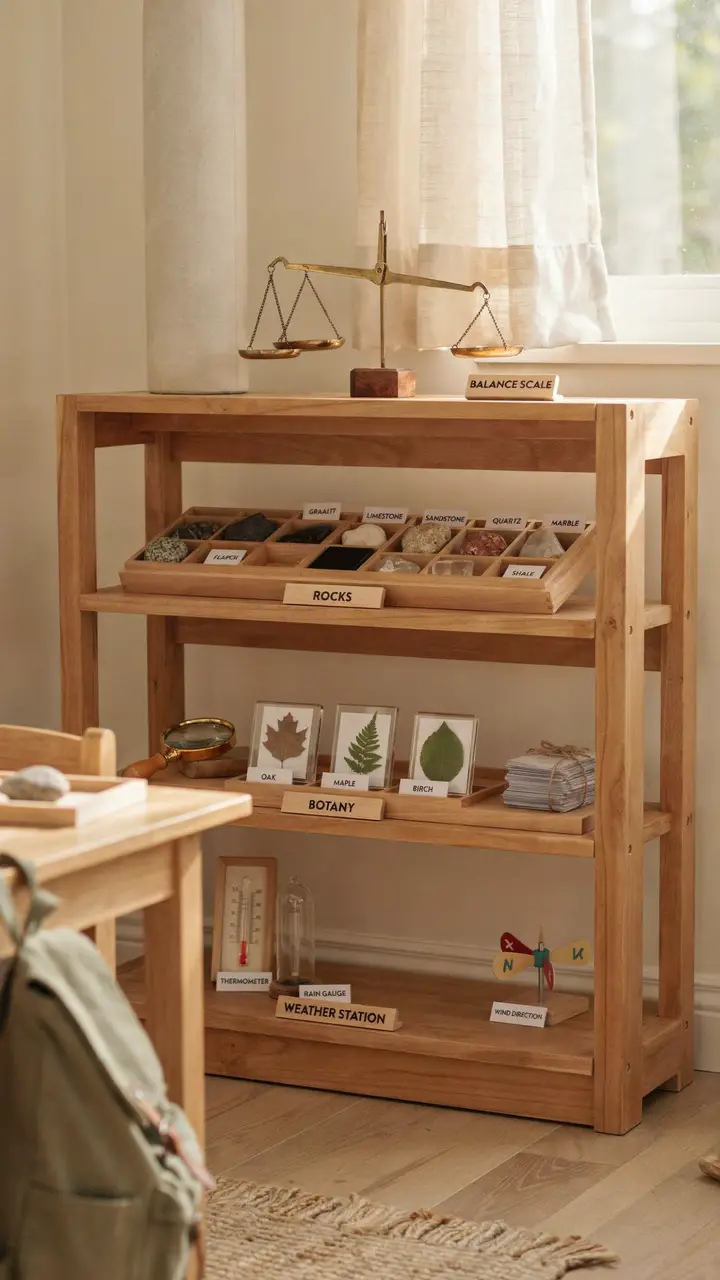
Boys and the natural world have a natural affinity — and a Montessori science shelf honors that relationship beautifully. Dedicate one low shelf exclusively to nature and science materials: a geology tray with labeled rock specimens, a botany tray with a magnifying glass and pressed leaves, a weather station with a basic thermometer and rain gauge, a simple balance scale with natural weights, and a collection of field guides appropriate for his age.
This shelf works best near a window so natural light illuminates specimens and inspires observation. A small wooden table beside the shelf serves as a “work mat” surface for examining materials. Label everything clearly with simple word cards — this supports reading development alongside scientific thinking. The combination of beauty, order, and genuine content makes this shelf one that boys return to spontaneously, again and again.
How to Recreate This Look
- Shopping list: Low pine shelf unit ($60–$180), balance scale ($30–$80), geology specimen set ($20–$60), magnifying glass ($8–$20), pressed leaf set or DIY with wax paper ($5–$15), basic weather instruments ($20–$50), field guides ($10–$25 each), word card materials ($5–$15), child-height work table ($50–$150)
- Step-by-step styling: Position shelf near window. Fill one shelf at a time — least complex materials at the bottom, most complex at the top. Label each item or tray with a simple word card in clear print. Set up work table beside shelf. Keep shelf fully organized — each item returns to its exact spot after use.
- Style compatibility: Works with Montessori, Reggio, natural, and academic aesthetics; pairs with natural wood and neutral linen
- Budget breakdown: Under $100 — basic shelf, printed labels, simple magnifying glass, and rocks collected from outside; $100–$500 — quality specimen sets, balance scale, basic weather instruments, and work table; $500+ — premium geological specimens, professional-grade instruments, custom built-in shelf
- Space requirements: Works in a corner from 6×6 ft; window proximity is ideal but not required
- Difficulty level: Beginner — setup is curation and labeling; teach your son the care and return process
- Durability/lifestyle: Glass magnifying glass teaches care; label cards in a protective sleeve; rotate materials as curiosity peaks and wanes
- Seasonal adaptability: Rotate nature specimens by season — autumn leaves, winter snowflake observation kit, spring seed collection, summer insect observation tray
- Common mistakes: Using plastic specimens instead of real ones — real rocks, real leaves, and real instruments create authentic sensory engagement that plastic can’t replicate
- Maintenance tips: Dust specimens with a soft brush monthly; replace damaged label cards; refresh specimen tray after collecting new materials
Find more Montessori playroom setup ideas for boys and girls →
5. Reading and Language Corner
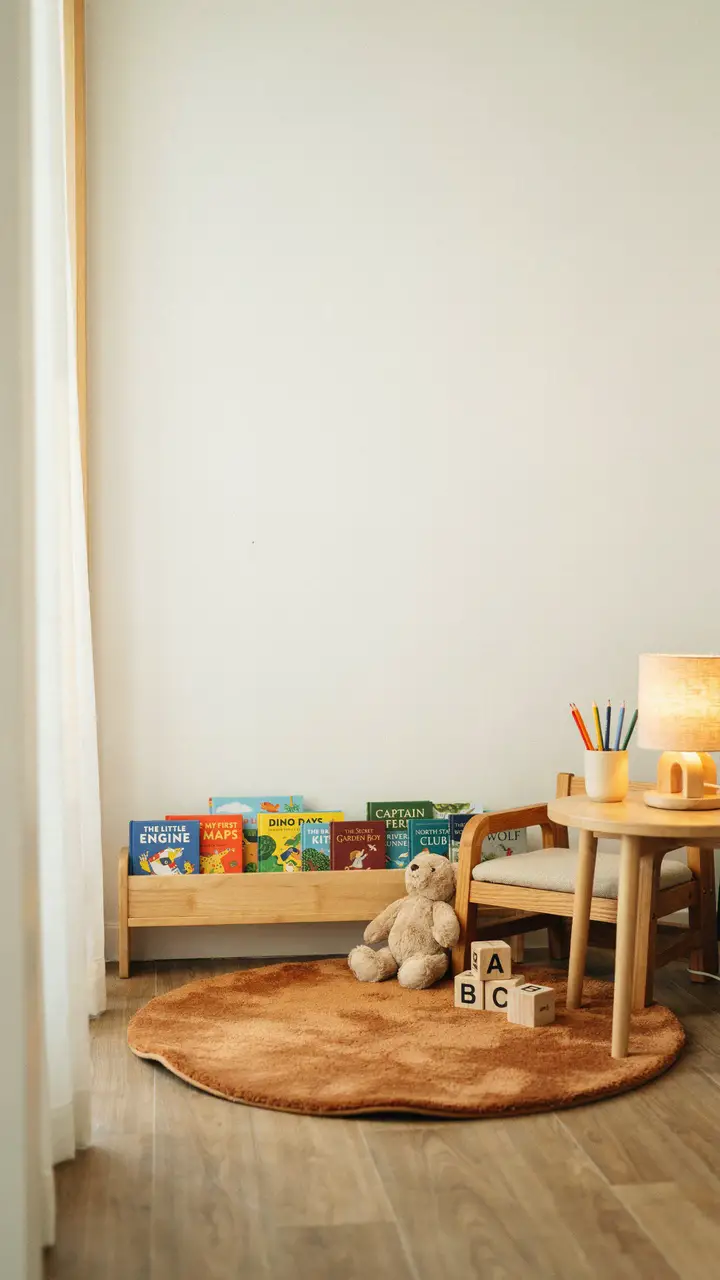
A dedicated reading corner in a Montessori boys playroom communicates something important: books are not just school — they’re a pleasure, a resource, and an adventure. Keep it low, accessible, and genuinely inviting. A forward-facing book display (where your son can see the cover rather than just the spine) is the Montessori standard, because seeing the cover is what draws a child to a book. Rotate 8 to 12 books at a time; store the rest out of sight.
A floor cushion or a low reading chair at boy-height makes the corner comfortable enough to stay a while. A small lamp on a low table beside the chair gives warm light for reading even on grey days. Avoid built-in nooks that boys can’t reach or enter independently — the corner should be completely accessible and self-contained.
How to Recreate This Look
- Shopping list: Forward-facing book display rack ($40–$150), low reading chair with cushion ($60–$200), round wool or cotton rug ($40–$120), small side table ($20–$60), warm LED reading lamp ($20–$50), alphabet blocks ($15–$30), curated book collection ($30–$100 for a starter set, libraries are free)
- Step-by-step styling: Position book rack against wall at child’s eye level when seated. Place reading chair beside rack. Set side table to the chair’s right or left. Place lamp on side table. Lay round rug to define the reading corner. Place only 8–12 books in the rack; store extras in a closed cabinet.
- Style compatibility: Works with any aesthetic — keep the corner textiles and furniture neutral to let the book covers provide the color
- Budget breakdown: Under $100 — DIY book rack from a shallow wall shelf, basic chair from a thrift store, lamp from a dollar store; $100–$500 — quality forward-facing rack, wooden reading chair, wool rug; $500+ — custom built-in reading alcove with integrated shelving and seating
- Space requirements: Works in a corner from 5×5 ft; doesn’t need much space to be deeply effective
- Difficulty level: Beginner — arrangement only; the work is in curating the right books for your son’s current interests and reading level
- Durability/lifestyle: Forward-facing racks hold up well; avoid fabric-seated chairs in homes with very messy eaters — opt for a wooden chair with a removable washable cushion
- Seasonal adaptability: Rotate books seasonally — winter adventure stories, spring nature books, summer travel picture books, autumn cozy classics
- Common mistakes: Displaying too many books at once — the selection should feel curated and digestible, not overwhelming; put the rest away and rotate every 2 weeks
- Maintenance tips: Return books to their display spots after each reading session; check for damaged or dirty pages monthly; dust rack with a dry cloth weekly
6. Montessori Art and Creation Studio
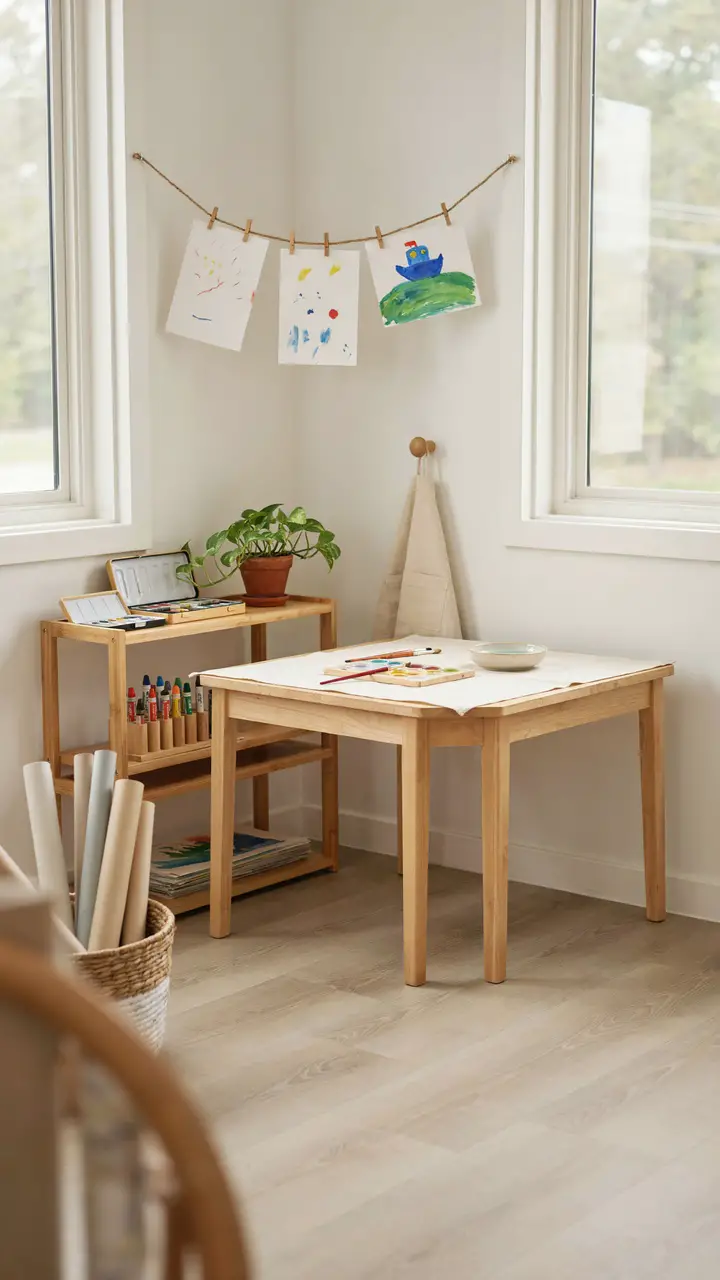
A Montessori art space for boys is not an “arts and crafts table” — it’s a genuine studio where real materials are stored accessibly and used independently. Set up a child-height table with a waterproof surface (or cover a simple table with a washable oilcloth). On an open shelf or in a rotating display, keep a small selection of real art materials: a set of real watercolor paints with a proper palette, oil pastels, colored pencils in a wooden holder, drawing paper in a proper holder, and a drying rack for finished work.
The goal is process over product — boys should be able to choose their materials, create freely, and clean up independently. A small apron hung on a hook beside the table and a low sink or water basin for cleaning brushes complete the setup. Hang a simple clothesline on one wall for displaying finished artwork with small clips — it looks wonderful and honors the work genuinely.
How to Recreate This Look
- Shopping list: Child-height table ($50–$150), oilcloth cover ($15–$30), low shelf unit ($40–$120), real watercolor paint set with palette ($15–$40), oil pastels ($10–$25), wooden pencil holder ($10–$20), paper holder ($10–$25), ceramic water bowl ($5–$15), linen apron ($10–$20), wooden wall hook ($8–$15), clothesline and clips ($10–$20)
- Step-by-step styling: Set up table and cover with oilcloth. Arrange supply shelf with one category of material per shelf, organized in trays. Hang hook beside supply shelf. String clothesline along one wall at adult reach height for displaying finished work. Place water bowl on the table permanently.
- Style compatibility: Works with Montessori, Waldorf, Reggio, and natural aesthetics; the natural materials make this look beautiful in any neutral-toned room
- Budget breakdown: Under $100 — basic table, dollar-store watercolors, printed paper, basic clothesline; $100–$500 — quality child table, real watercolor set, oil pastels, oilcloth, supply shelf; $500+ — custom built-in art studio with real sink access and premium materials
- Space requirements: Works in a corner from 6×8 ft; natural light is ideal but not required — a good task lamp works too
- Difficulty level: Beginner — setup is arrangement; the ongoing work is teaching materials use and independent cleanup
- Durability/lifestyle: Oilcloth tables are extremely easy to wipe clean; real watercolors wash off with water; oil pastels may require a bit more cleanup
- Seasonal adaptability: Introduce seasonal color palettes — warm autumn hues in fall, icy blues and whites in winter; feature seasonal subjects on the drawing prompt card
- Common mistakes: Starting with too many materials — launch with just watercolors and pencils, adding one new medium at a time as your son demonstrates care
- Maintenance tips: Replace dried-out watercolor pans individually rather than whole set; sharpen pencils before each session; wash palette and water bowl daily
See more Montessori playroom ideas for independent, curious learners →
7. Building and Construction Zone
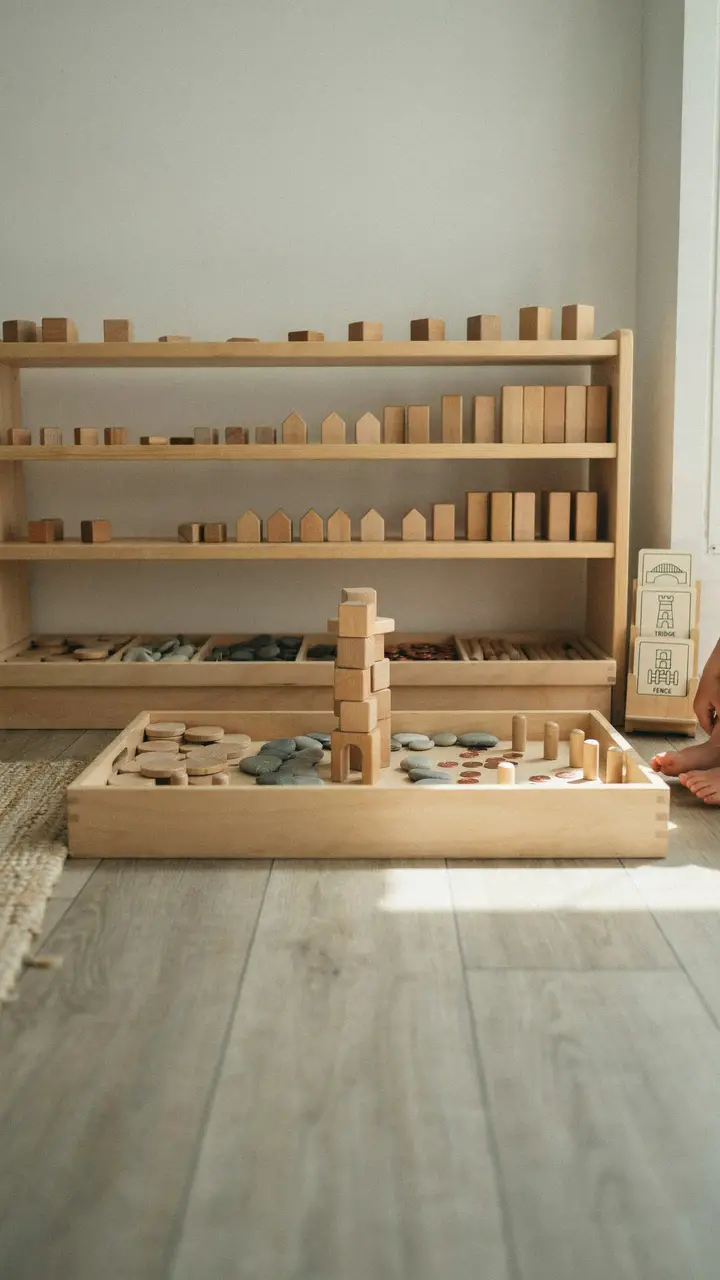
Montessori environments honor the deep drive to build — and for boys, this is often the most visited zone in the room. A solid set of unit blocks (the classic Froebel or Montessori hardwood variety) on a low open shelf, displayed organized by size, is the foundation. Add a set of loose parts in a separate tray: wooden discs, small stones, acorns, wooden dowels, metal washers — the kind of open-ended materials that can become anything in a boy’s imagination.
A large low wooden tray or a section of the floor covered with a building mat defines the construction zone visually and practically — it tells boys where building happens and prevents block sprawl across the entire room. A simple wooden building card set propped against the wall offers optional inspiration without being prescriptive.
How to Recreate This Look
- Shopping list: Hardwood unit block set ($80–$300 depending on piece count), low open shelf ($40–$150), wooden loose parts set ($20–$60) or DIY from nature and hardware store, large wooden building tray ($50–$150) or DIY with basic lumber, building inspiration cards ($10–$25, printable from Etsy)
- Step-by-step styling: Position shelf against wall. Organize blocks by size on shelves — consistent organization helps boys return them correctly. Set building tray in front of shelf as the work surface. Place loose parts tray in accessible position on lowest shelf. Prop inspiration cards beside shelf.
- Style compatibility: Works with Montessori, Waldorf, and natural aesthetics; the clean wooden materials look beautiful in any neutral-toned room
- Budget breakdown: Under $100 — basic wooden block set from a toy store, DIY building tray, natural loose parts from outside; $100–$500 — quality unit block set, solid pine shelf, and wooden building tray; $500+ — premium hardwood block set with full unit system, custom built-in storage
- Space requirements: Building tray needs a 3×4 ft clear floor area; shelf needs 4–5 ft of wall space
- Difficulty level: Beginner — setup is organization; teaching proper return of blocks to their shelving spot is the ongoing practice
- Durability/lifestyle: Hardwood blocks are essentially indestructible and last through multiple children; loose parts need occasional replenishment as pieces are lost
- Seasonal adaptability: Rotate loose parts seasonally — acorns and seed pods in fall, smooth ice-blue stones in winter, flower heads in spring, shells in summer
- Common mistakes: Buying foam blocks for durability — they don’t satisfy the tactile and weight needs that make building genuinely engaging; hardwood is worth the investment
- Maintenance tips: Sort and reorganize blocks monthly; sand any rough edges; wipe blocks with a barely damp cloth and dry immediately
8. Montessori Sensory and Math Materials Corner
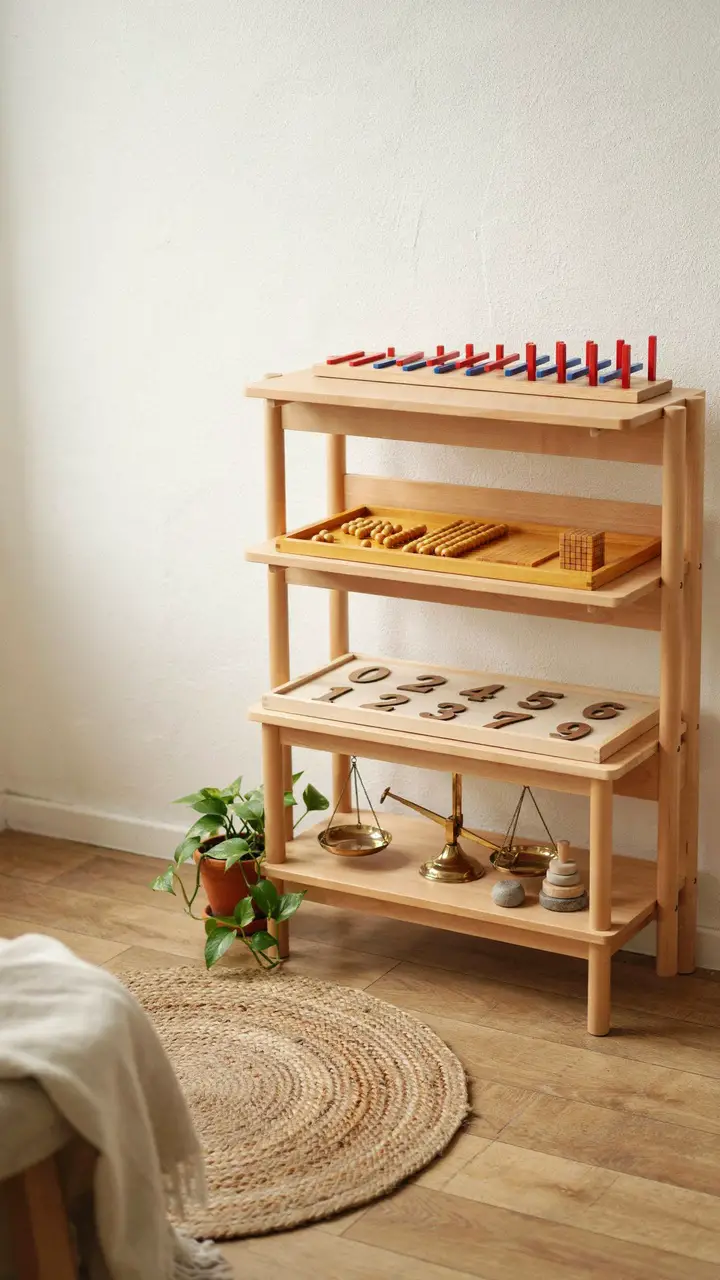
Montessori math materials are works of art in their own right — the beautiful red and blue rods, the golden bead material, the pink tower — and displaying them properly is both pedagogically important and genuinely lovely. Arrange these materials on a dedicated low shelf, each in its proper tray or container, introduced to your son one at a time from simplest to most complex.
For a home setting without a full Montessori material budget, excellent alternatives exist: a set of graduated cylinders for ordering, a simple bead chain for counting, a sand tray for numeral tracing, and a balance scale for early weight comparison. The key is that materials are tactile, beautiful, and self-correcting — your son can see and feel when something is right without needing you to tell him.
How to Recreate This Look
- Shopping list: Montessori counting rods ($30–$80), sandpaper numerals ($20–$50), golden bead material ($40–$120 for a basic set), balance scale ($30–$80), low pine shelf ($40–$120), small jute work mat ($15–$30)
- Step-by-step styling: Arrange materials on shelf from simplest (bottom) to most complex (top) — this is the reverse of standard Montessori presentation but works well visually; adjust based on your son’s current level. Place work mat in front of shelf. Introduce only one material at a time — demonstrate its use once, then let your son explore independently.
- Style compatibility: Montessori math materials are beautiful enough to work in any neutral, natural aesthetic room
- Budget breakdown: Under $100 — DIY sandpaper numerals on cardstock, printable bead chain, basic balance scale; $100–$500 — quality Montessori material set for home; $500+ — full Montessori Primary math sequence materials
- Space requirements: Works in a corner from 5×5 ft; work mat needs a 2×3 ft clear floor area in front of the shelf
- Difficulty level: Beginner to intermediate — the materials are self-explanatory; understanding how to introduce them one at a time in sequence requires reading a bit about the Montessori math sequence
- Durability/lifestyle: Montessori materials are designed for repeated use by many children; treat them with care and they last decades
- Seasonal adaptability: Math materials don’t change seasonally — but you can rotate which materials are on the shelf as your son’s skill level advances
- Common mistakes: Introducing all materials at once — this overwhelms children and defeats the purpose; each material deserves sole focus for days or weeks
- Maintenance tips: Check bead strings for breaks monthly; replace sandpaper numeral sheets when they’re no longer clearly tactile; keep materials dust-free
9. Outdoor-Inspired Nature Table
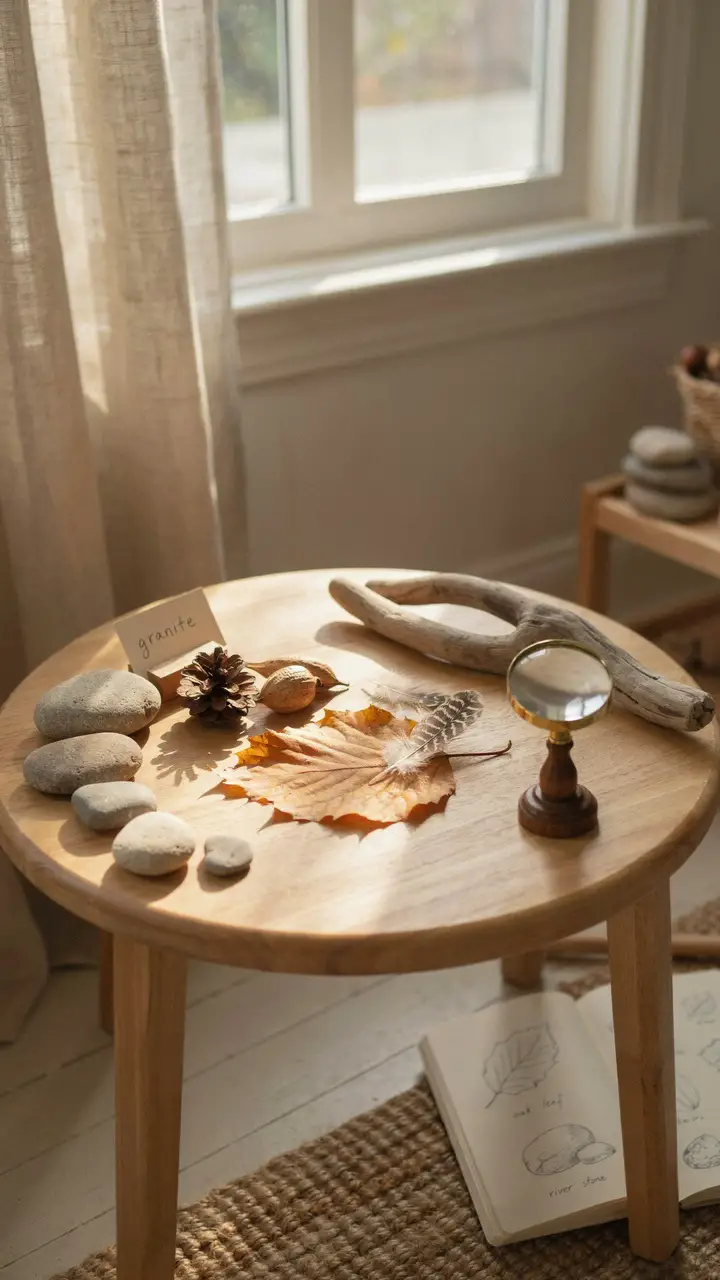
A Montessori nature table is one of the most beloved features of a well-designed boys playroom — and one of the simplest to create. A low child-height table designated exclusively for nature specimens becomes a living, seasonal museum that your son curates himself. He brings in rocks from the garden, seed pods from the park, feathers from the yard, and shells from the beach. Each item is placed carefully on the table, perhaps labeled with a homemade card, and becomes part of a rotating display that changes with the seasons and his explorations.
Add a magnifying glass on a stand so items can be examined immediately upon arrival. A simple field journal and colored pencils nearby encourage drawings and observations. The nature table requires almost no budget — the most precious items on it will be ones your son collected himself — and it creates a genuine connection between the natural world and his indoor environment.
How to Recreate This Look
- Shopping list: Low child-height round or rectangular table ($40–$150), magnifying glass on stand ($15–$35), small wooden card holders ($5–$15 for a set), field journal ($8–$15), colored pencils ($8–$20), nature specimens (free — collected with your son)
- Step-by-step styling: Place table near a window. Begin with a simple base cloth in natural linen or cotton. Add three to five nature specimens collected together with your son. Place magnifying glass, journal, and pencils within easy reach. Add name cards for identified items. Let the display grow organically — don’t pre-fill it.
- Style compatibility: Works in any aesthetic since nature materials are inherently beautiful; particularly suited to Montessori, Waldorf, and natural-style rooms
- Budget breakdown: Under $100 — all of it; the table might be the only cost, and specimens are free
- Space requirements: Works on a table as small as 24 inches in diameter; corner placement near a window maximizes natural light for observation
- Difficulty level: Beginner — the only challenge is maintaining it as a true nature table and resisting the urge to add manufactured items
- Durability/lifestyle: Natural specimens need occasional replacement as they deteriorate; dried items last longer than fresh ones
- Seasonal adaptability: This table is designed to change with the seasons — fully replace specimens at each season’s start to reflect what’s currently alive outside
- Common mistakes: Allowing the table to fill with manufactured toys or trinkets — it must remain exclusively natural materials to maintain its purpose and beauty
- Maintenance tips: Remove deteriorating specimens immediately; dust the table surface weekly; press fresh flowers and leaves before they wilt for longer display life
Browse more Montessori playroom ideas for your home →
10. Montessori Rest and Cozy Corner
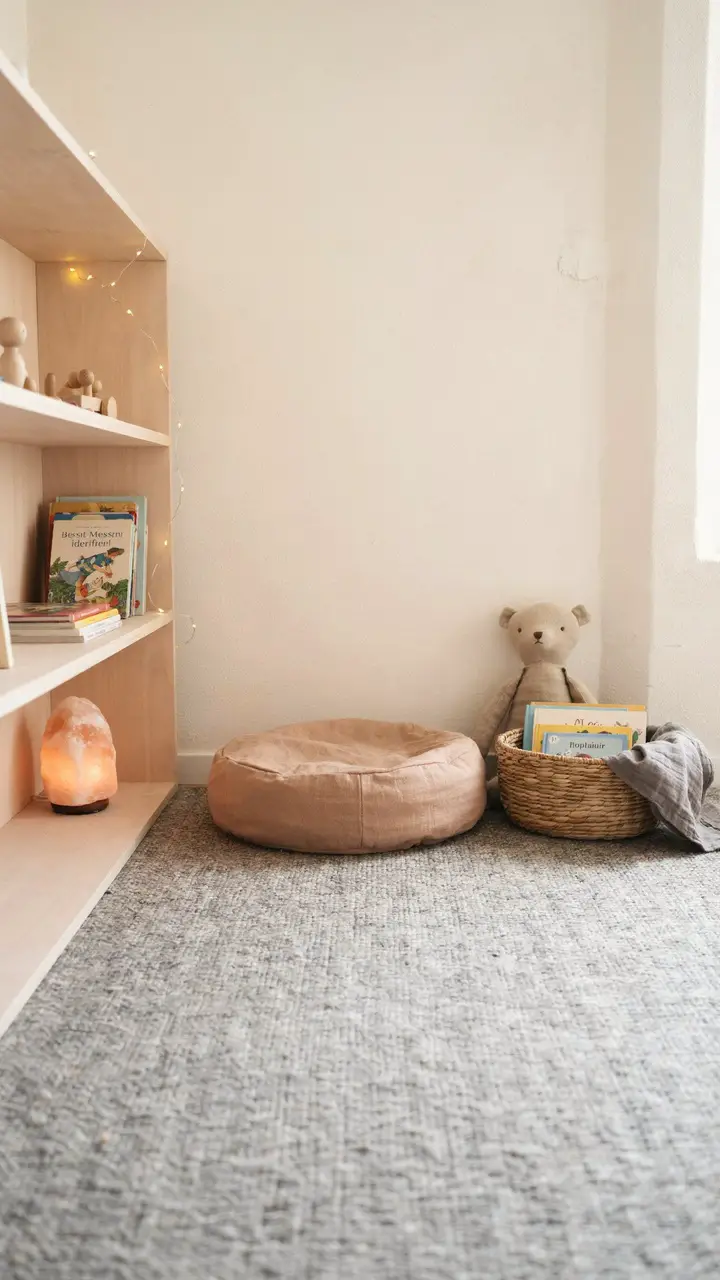
Montessori environments always include a calm corner — a place where a boy can step away from activity, regulate his emotions, and rest without it feeling like a punishment. A floor-level reading chair or a cushioned floor nook in a corner, partially enclosed by a bookshelf on one side, creates a gentle visual boundary that says “this is a quieter place.” A soft light source — a Himalayan salt lamp or a warm LED globe light — provides ambient glow without harshness.
A small selection of books, a soft blanket, and perhaps one stuffed animal or comfort object make the corner deeply welcoming without overloading it. The key is that the cozy corner belongs to him — he chooses when to use it, and it’s never imposed as a timeout or a consequence. Over time it becomes one of the most genuinely used spots in the entire playroom.
How to Recreate This Look
- Shopping list: Low open shelf for partial enclosure ($40–$120), round floor cushion in natural linen ($30–$80), woven basket ($15–$35), Himalayan salt lamp ($20–$50) or warm LED globe light ($15–$35), fairy lights ($10–$25), soft cotton blanket ($20–$50), small handmade stuffed animal ($15–$40)
- Step-by-step styling: Position shelf at a 90-degree angle to the room’s corner to create the enclosed effect. Place cushion in the resulting nook. Add basket with books and blanket. Mount fairy lights along interior shelf edge. Place salt lamp on lowest shelf. Keep the nook minimally furnished — its value is in simplicity.
- Style compatibility: Works with Montessori, Waldorf, Scandinavian, and natural aesthetics; pairs beautifully with neutral tones and natural materials
- Budget breakdown: Under $100 — basic IKEA shelf, floor cushion from a dollar or discount store, basic fairy lights; $100–$500 — quality linen cushion, wicker basket, salt lamp, and quality cotton blanket; $500+ — custom built-in reading nook with integrated lighting and bespoke cushioning
- Space requirements: Works in corners from 4×4 ft; smaller is actually cozier — the enclosed feeling is the point
- Difficulty level: Beginner — placement and arrangement only
- Durability/lifestyle: Linen cushion covers should be washable; remove and clean monthly; check fairy light cords regularly for safety
- Seasonal adaptability: Swap blanket weight by season — light cotton in summer, heavier knit in winter; add a small seasonal item to the basket (a snow globe in winter, a pressed flower in spring)
- Common mistakes: Using the cozy corner as a consequence or timeout space — this immediately destroys its purpose; it must remain entirely voluntary and positive
- Maintenance tips: Launder cushion cover monthly; vacuum rug in corner weekly; check fairy light connections seasonally
The Room That Trusts Him
A Montessori boys playroom is ultimately a statement of trust: trust that your son is capable, curious, and ready to engage with a thoughtfully prepared environment on his own terms. Getting there doesn’t require buying every item on a list or replicating a Pinterest-perfect setup. Start with one well-organized shelf, a clear work surface, and a small rotating selection of beautiful, real materials — and watch what happens.
The mess that follows isn’t failure; it’s evidence that the room is working. Boys who genuinely engage with their environment are always a bit messier than boys who don’t engage at all. What matters is that after the exploration, the materials come back to their spots — and that your son has the satisfaction of knowing he put them there himself.
That quiet, independent competence is the whole point. And it starts with a room that believes in him before he even walks through the door. <3

Greetings, I’m Alex – an expert in the art of naming teams, groups or brands, and businesses. With years of experience as a consultant for some of the most recognized companies out there, I want to pass on my knowledge and share tips that will help you craft an unforgettable name for your project through TeamGroupNames.Com!