There’s something deeply satisfying about walking into a room and knowing exactly where everything is. Not in a “I’ll find it eventually” kind of way—but in a genuine, reach-for-it-without-thinking kind of way.
If you’ve ever stood at your front door frantically patting your coat pockets for keys while your coffee gets cold, you already know why a rustic farmhouse command center might be the single best thing you add to your home this year.
A command center isn’t just a bulletin board with some hooks. Done well, it becomes the organizational heartbeat of your entire household—mail gets sorted, schedules get followed, keys actually get hung up, and somehow, mornings feel about 40% less chaotic.
Add the warm, weathered beauty of farmhouse styling, and you’ve got something that’s both incredibly functional and genuinely lovely to look at.
Whether you’re a busy parent juggling after-school schedules, a remote worker managing deadlines from home, or someone who simply wants their entryway to stop looking like a disaster zone, these 10 rustic farmhouse command center ideas will give you real, actionable inspiration—along with the specific details you need to actually pull them off.
1. The Classic Shiplap Wall Command Station
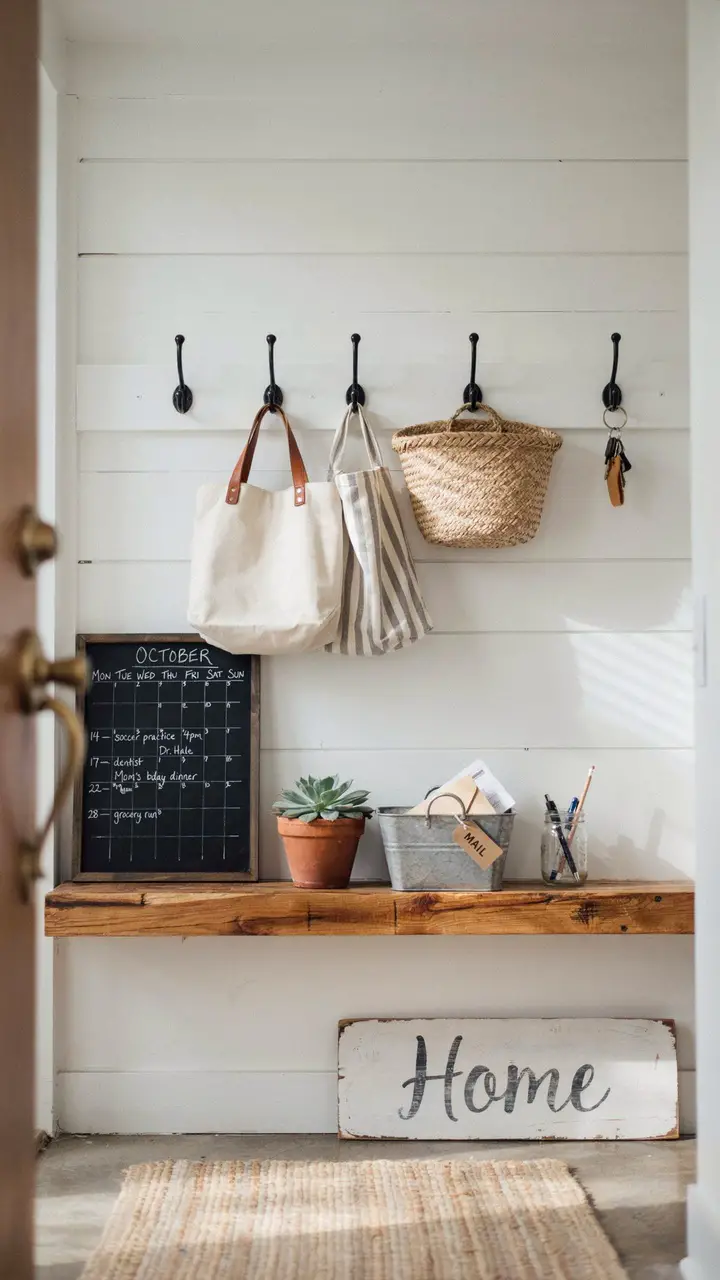
The shiplap command center is the gold standard of farmhouse organization, and honestly, it’s not hard to see why. That iconic horizontal wood plank texture adds instant depth and character to any wall—and it gives you an incredibly versatile backdrop to hang just about anything you need.
What makes this layout especially effective is the layering. You’re not just slapping hooks on a wall. You’re building a visual story with purpose behind every element—the chalkboard for scheduling, the hooks for daily-use items, and a shelf for things that need a “landing spot.”
How to Recreate This Look
Shopping List:
- Shiplap boards or peel-and-stick shiplap panels (much renter-friendlier): $30–$120 depending on wall size, available at Home Depot, Lowe’s, or Amazon
- Black iron wall hooks (set of 5–6): $15–$40 from Target, Walmart, or IKEA
- Framed chalkboard (18×24″ is ideal): $25–$60 from Amazon, Hobby Lobby, or HomeGoods
- Floating wooden shelf (24–36″ wide): $20–$50 from IKEA or Amazon
- Wire or woven baskets for mail sorting: $10–$25 each from Target or thrift stores
- Small ceramic planter with a succulent: $8–$15 from any garden center
Step-by-Step Styling Instructions:
- Mount your shiplap or install peel-and-stick panels on a clean, dry wall section at least 3 feet wide
- Install the floating shelf at about 48–52 inches from the floor—reachable for adults, safely above small children’s reach
- Space hooks evenly below the shelf, leaving at least 6 inches between each
- Hang your chalkboard at eye level to the left or right of the hook cluster
- Style the shelf: one succulent, one labeled basket for incoming mail, one small container for pens
- Add a “Home” or family name sign in distressed wood for that finishing touch
Budget Breakdown:
- Under $100: Use peel-and-stick shiplap wallpaper, a $10 chalkboard contact paper sheet, and IKEA SKÅDIS hooks
- $100–$500: Real shiplap boards, quality iron hooks, a wooden shelf with corbels, and a proper framed chalkboard
- $500+: Custom shiplap installation, built-in shelf with crown molding, and a magnetic chalkboard panel
Space Requirements: Works in a space as narrow as 3 feet wide. Ideal wall height is at least 7 feet.
Difficulty Level: Intermediate. Actual shiplap installation requires basic carpentry skills and a stud finder. Peel-and-stick panels drop this to beginner level.
Lifestyle Considerations: Black iron hooks are incredibly durable. Chalkboards do accumulate chalk dust, so wipe weekly. If you have small children, position the hooks higher to keep bags and keys out of their reach.
Seasonal Adaptability: Swap out the succulent for a small fall-toned arrangement in autumn, or add a small evergreen sprig in December. Change the chalkboard art monthly to keep the space feeling fresh.
Common Mistakes to Avoid: Don’t overload the shelf. Three to four items maximum—the moment it looks cluttered, the whole command center loses its calming effect.
2. The Repurposed Window Frame Organizer
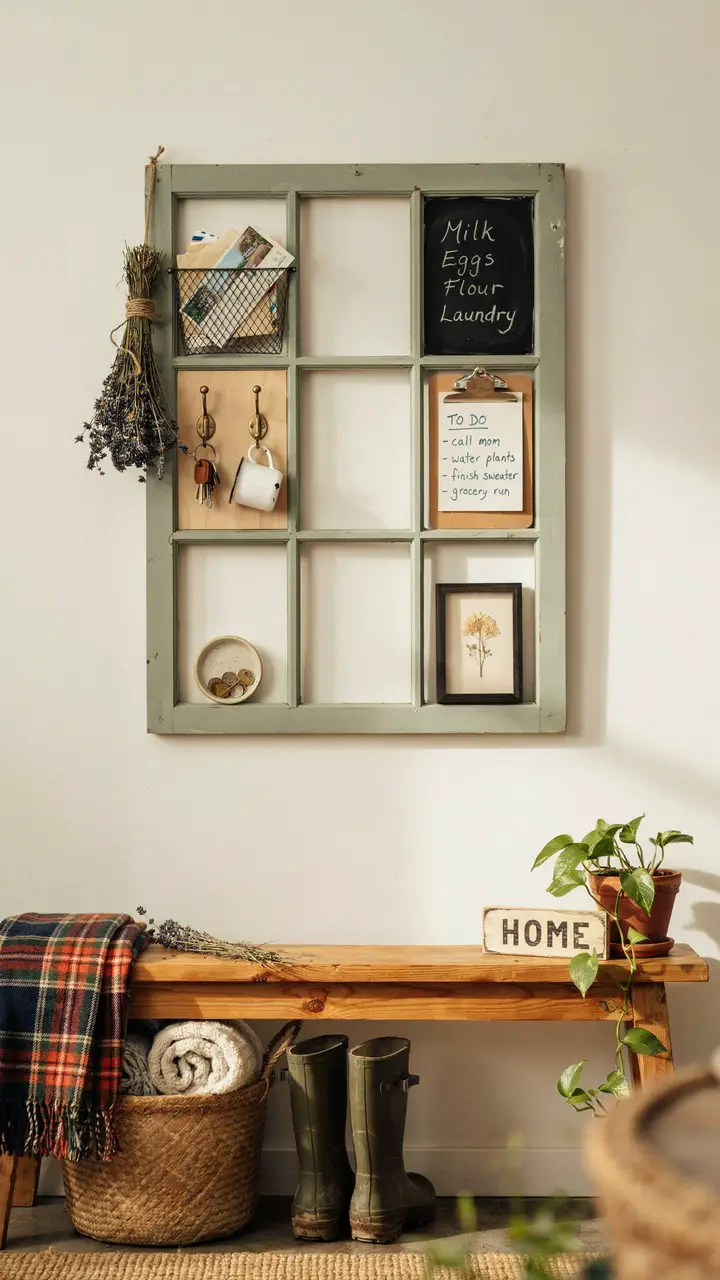
You know that moment when you spot an old window frame at a flea market and think, “I could use that for something”? This is that something. Repurposed window frames make genuinely brilliant command center bases—the individual panes naturally divide your organizational zones, and the weathered wood adds character no flat board can replicate.
FYI, this is also one of the most budget-friendly farmhouse command center approaches because the frame itself often costs next to nothing. I’ve seen gorgeous versions pulled together for under $40 total.
How to Recreate This Look
Shopping List:
- Old window frame (single or double): $5–$30 from thrift stores, flea markets, Habitat for Humanity ReStores, or Facebook Marketplace
- Sage green or antique white chalk paint: $12–$20 at craft stores
- Small wire mesh pockets (for mail): $8–$15 from Amazon or Anthropologie
- Mini chalkboard insert or chalkboard contact paper: $5–$10
- Small pegboard hooks or cup hooks for keys: $5–$10 at hardware stores
- Twine and dried lavender bundle: $6–$12 from craft stores
Step-by-Step Styling Instructions:
- Sand and chalk-paint your window frame in your chosen color—two thin coats work better than one thick one
- Decide which pane “zones” will hold which functions: notes, keys, mail, to-do lists
- Attach your organizational inserts to each pane section using small screws or strong adhesive strips
- Mount the finished frame to the wall using two sturdy picture-hanging brackets rated for its weight
- Add a narrow bench or shelf below for shoes, bags, or a basket
- Finish with a dried herb bundle tied to one corner—lavender, eucalyptus, or wheat all look beautiful
Budget Breakdown:
- Under $100: Thrifted frame + chalk paint + adhesive pockets + cup hooks = seriously under $50
- $100–$500: Multiple frames arranged in a triptych layout with coordinated accessories
- $500+: Custom-built window frame replica with built-in lighting strip along the top
Difficulty Level: Beginner. If you can operate a paintbrush and a level, you can build this.
Lifestyle Considerations: The painted wood may chip over time with heavy daily use. A coat of clear matte sealant after painting extends the life significantly. Not ideal for households with very young toddlers who might pull at the hanging elements.
Seasonal Adaptability: Change the dried bundle seasonally—cotton stems for fall, pine sprigs for winter, fresh eucalyptus for spring. Takes five minutes and makes the whole piece feel new.
🔗 Looking for more farmhouse-inspired DIY organization projects? Check out these DIY Command Center Ideas for even more creative ways to bring order and charm to your home.
3. The Barn Door Sliding Panel Command Center
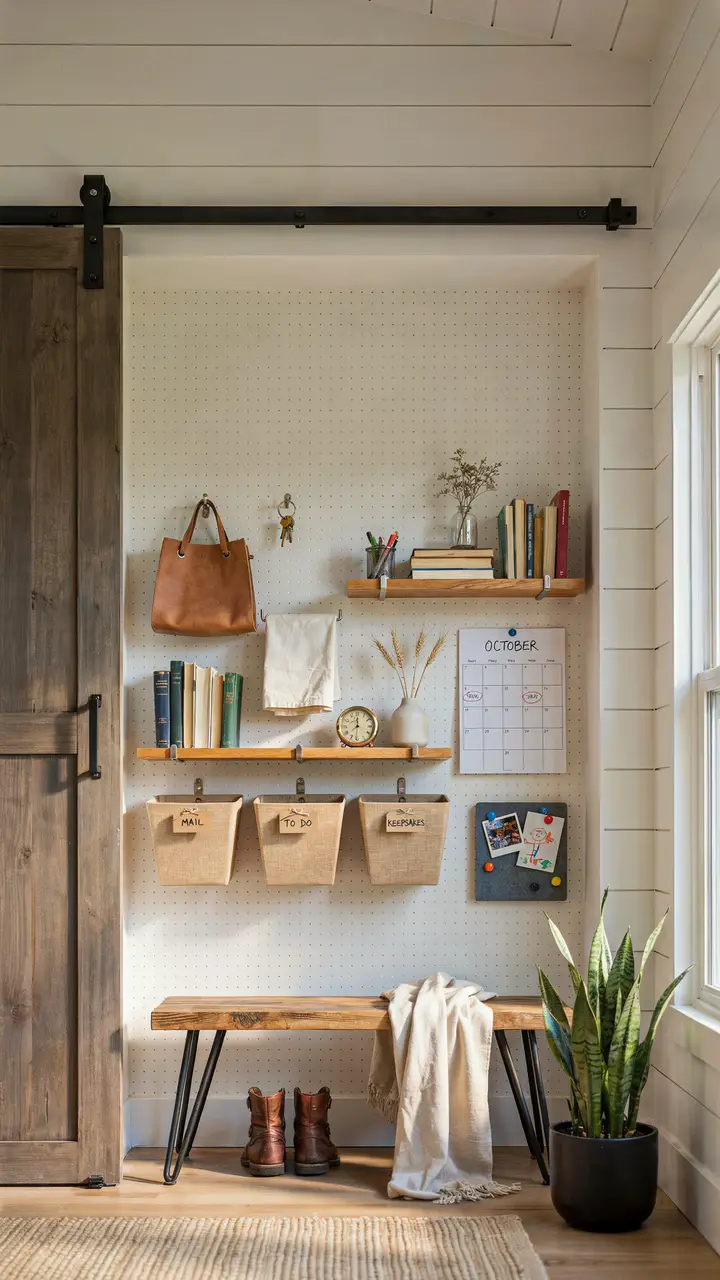
The barn door command center is honestly one of the cleverest solutions for people who want a fully functional organizational hub without it dominating the room’s visual energy. Slide it open when you need to check schedules or sort mail. Slide it closed for dinner parties when you’d rather not display the family’s entire week to your guests.
This is particularly brilliant for open-concept living spaces where your entryway or kitchen wall is visible from the main gathering area.
How to Recreate This Look
Shopping List:
- Barn door kit with track hardware: $80–$200 from Amazon, Wayfair, or Home Depot
- Reclaimed wood door panel or hollow-core door: $30–$150 depending on source
- White pegboard sheet (2×4 ft): $15–$25 from hardware stores
- Pegboard hooks and small shelves: $20–$40 from IKEA (SKÅDIS system is ideal)
- Kraft paper bins with labels: $15–$30 from Target or The Container Store
- Magnetic paint or a mounted magnetic board: $20–$40
- Wall-mount calendar: $12–$25 from Amazon
Step-by-Step Styling Instructions:
- Install your barn door track above the wall section where your command center will live
- Build or source your door panel and hang it on the track
- Mount the pegboard on the wall behind where the door slides open
- Arrange SKÅDIS hooks, small shelves, and baskets on the pegboard—group by function (keys together, mail sorted, school papers in labeled bins)
- Add the calendar at eye level and the magnetic board for urgent notes
- Style with one small plant on the floor nearby for warmth
Budget Breakdown:
- Under $100: Skip the barn door and use a simple curtain panel on a tension rod to conceal a wall-mounted pegboard—same “reveal” concept, fraction of the cost
- $100–$500: Full barn door kit with a hollow-core door painted in a contrasting color + pegboard command center behind it
- $500+: Custom reclaimed wood barn door with built-in organizational elements including built-in cubbies and charging station
Difficulty Level: Intermediate to Advanced. Installing barn door hardware requires precise measurements and wall anchoring into studs.
Seasonal Adaptability: The pegboard behind the door stays constant—just swap out the calendar inserts and add seasonal bins (like a “holiday cards” basket in December).
4. The Farmhouse Mail and Message Station

Mail is the silent chaos-creator of most households. It lands on the counter, migrates to a pile, and then somehow reproduces overnight until you have a stack so intimidating you start pretending you don’t see it. A dedicated farmhouse mail station with clearly labeled vertical slots solves this completely.
The key is making the system unavoidably obvious—when every piece of mail has an assigned home, the pile never forms in the first place.
How to Recreate This Look
Shopping List:
- Wooden wall-mount mail organizer with 3 slots: $20–$45 from Amazon, HomeGoods, or Etsy
- Small chalkboard panel (8×10″ or 10×14″): $10–$20 from Amazon or craft stores
- Floating narrow ledge shelf: $15–$25 from IKEA
- Terracotta pot with herbs: $8–$15 from garden centers
- Round wooden clock: $25–$50 from Target or HomeGoods
- Chalk markers for labeling: $8–$12
Step-by-Step Styling Instructions:
- Mount the mail sorter at comfortable arm-reach height (roughly 52–58 inches from floor)
- Label each slot clearly with chalk markers: “Action,” “Bills,” “File,” or whatever categories suit your household
- Mount the chalkboard panel directly to the right for notes, grocery additions, or urgent messages
- Install the narrow shelf below the sorter for decorative and functional accessories
- Add the clock above the entire arrangement—this becomes the visual anchor for the whole station
- Style the shelf with one small plant, one functional item (pen holder), and one purely decorative item (small sign or vintage tin)
Budget Breakdown:
- Under $100: Wooden mail sorter from Amazon + adhesive chalkboard contact paper + a $5 Goodwill shelf = well under $50
- $100–$500: Coordinated mail sorter, chalkboard frame, floating shelf with brackets, and a quality round clock
- $500+: Custom cabinetry with built-in mail slots, integrated chalkboard panel, and a vintage station clock
Difficulty Level: Beginner. This is genuinely one of the easiest command center setups to execute.
5. The Pegboard Command Center with Farmhouse Flair
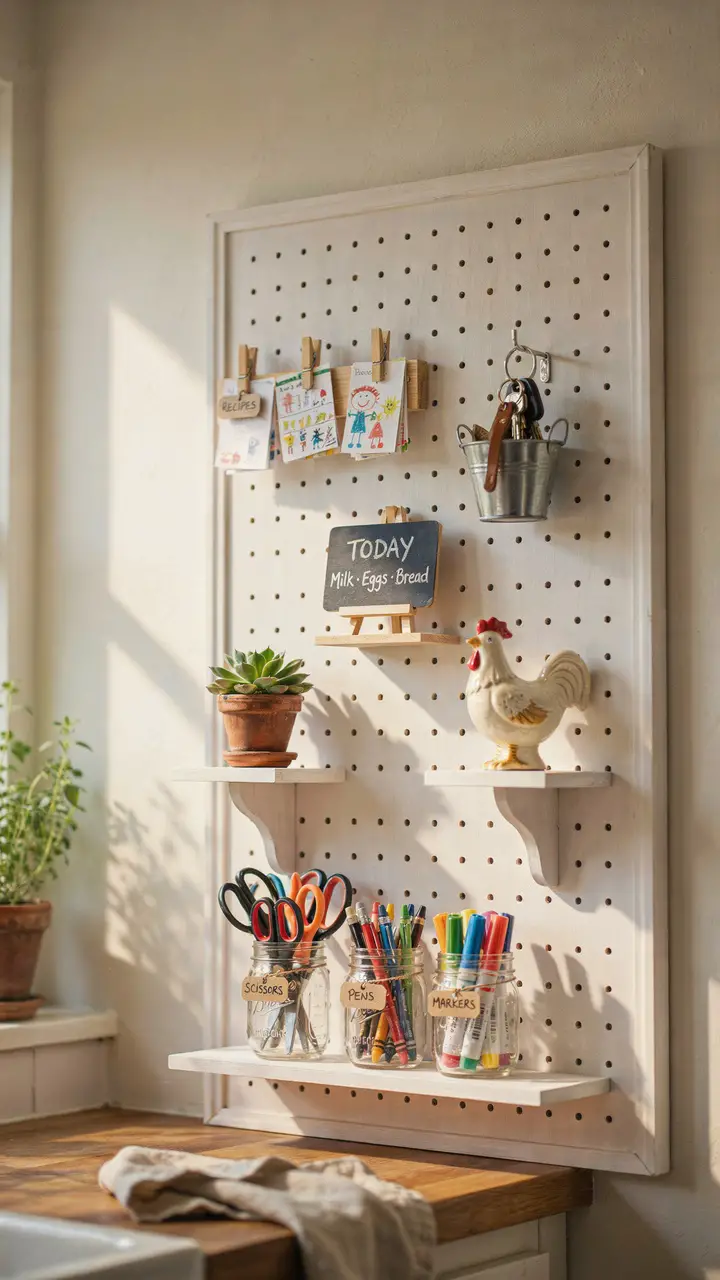
Pegboards have had a serious glow-up over the past few years—and honestly, it’s deserved. When you frame one in white trim and style it with farmhouse-appropriate accessories like mason jars, wooden clip holders, and small ceramic accents, it stops looking like a garage wall and starts looking like intentional, beautiful organization.
The magic of pegboard is pure flexibility. You can rearrange everything without touching a single wall anchor.
How to Recreate This Look
Shopping List:
- White painted pegboard panel (2×4 ft): $15–$25 from hardware stores
- White or natural wood trim pieces to frame it: $10–$20 from hardware stores
- Pegboard hooks, baskets, and small shelves: $20–$45 (IKEA SKÅDIS or Amazon pegboard accessories)
- Mason jars (wide-mouth pints): $8–$12 for a pack from grocery stores or Amazon
- Small chalkboard mini-easel: $8–$15 from craft stores
- Wooden clip holders: $10–$20 from Amazon or Etsy
Step-by-Step Styling Instructions:
- Paint your pegboard white and allow to dry fully (24 hours minimum)
- Frame the edges with thin white wood trim using strong adhesive or small finishing nails for a polished look
- Mount the framed pegboard to the wall using screws anchored into studs—pegboards get heavy when loaded
- Arrange your hooks and accessories before committing—lay it all out on the floor first and plan your zones
- Use mason jars mounted horizontally with pegboard jar holders for pens, scissors, and markers
- Position the small shelves strategically—heavier items lower, decorative pieces higher
Budget Breakdown:
- Under $100: One 2×4 pegboard panel + basic hook set + mason jars + chalk markers = around $60 total
- $100–$500: Full framed pegboard with SKÅDIS accessories, coordinated mason jars, and small wooden shelves
- $500+: Floor-to-ceiling pegboard installation with custom wood framing and integrated lighting strip
Difficulty Level: Beginner to Intermediate. Painting and framing is beginner-level; stud-finding and mounting properly is slightly more involved.
🔗 Want to create a dedicated organization hub that works for the whole household? These Family Command Center Ideas are full of practical layouts designed for real, busy family life.
6. The Chalkboard Wall Command Station
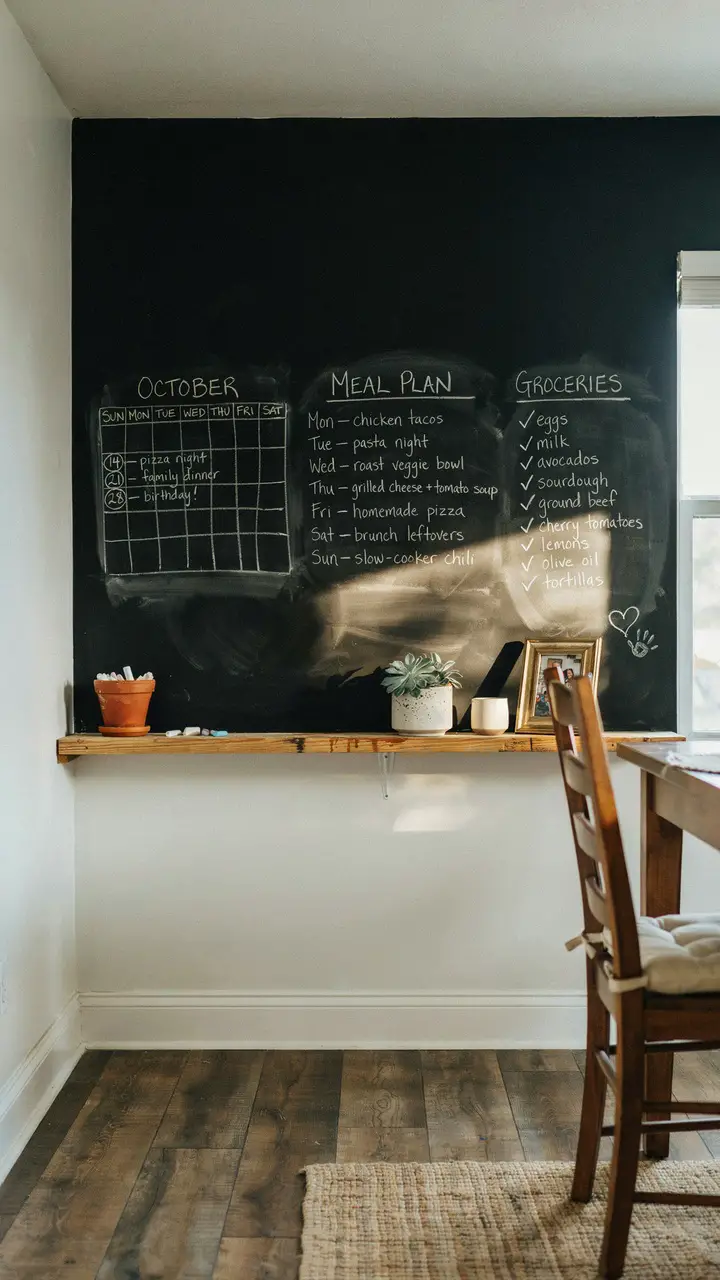
Chalkboard paint is genuinely one of the most satisfying investments you can make in a home command center, especially when you commit to a full section of wall. The moment you write the week’s meal plan and your kids’ activities in neat chalk handwriting, the whole room feels more intentional—like life is happening on your terms.
Fair warning: chalkboard walls do require a bit of upkeep. You’ll wipe and rewrite weekly, and that first month you’ll probably realize you need better chalk markers. But once you’re in the rhythm, it’s honestly kind of fun.
How to Recreate This Look
Shopping List:
- Chalkboard paint (1 quart covers roughly 25 sq ft): $15–$25 from Home Depot or Lowe’s
- Chalk markers (set of 6, white and colors): $12–$20 from Amazon or craft stores
- Reclaimed wood floating shelf: $20–$45 from Etsy, Amazon, or local lumber yards
- Small clay or terracotta pot for chalk storage: $5–$10
- Chalk eraser or small damp cloth for wiping: $3–$8
Step-by-Step Styling Instructions:
- Clean and lightly sand your wall section before painting
- Apply two to three coats of chalkboard paint, allowing full dry time between each coat
- “Season” the chalkboard by rubbing the side of a full piece of chalk across the entire surface, then erasing—this prevents permanent ghosting of your first drawings
- Plan your sections before writing: calendar left, meal plan center, grocery list right is a popular and logical layout
- Use chalk markers rather than stick chalk for cleaner, more defined lettering
- Mount your shelf below at about 40 inches from the floor—this creates a natural “frame” for the lower edge of your chalkboard station
Budget Breakdown:
- Under $100: One quart of chalkboard paint + chalk markers + a thrifted shelf = well under $60
- $100–$500: Painted wall section + reclaimed wood shelf with brackets + coordinated accessories
- $500+: Entire accent wall in chalkboard paint with custom built-in shelf and integrated chalk storage drawers
Difficulty Level: Beginner. If you can paint a wall, you can do this.
Common Mistakes to Avoid: Skipping the seasoning step is the most common mistake—and it results in permanent “ghost” marks that never fully erase. Season every new chalkboard surface before first use.
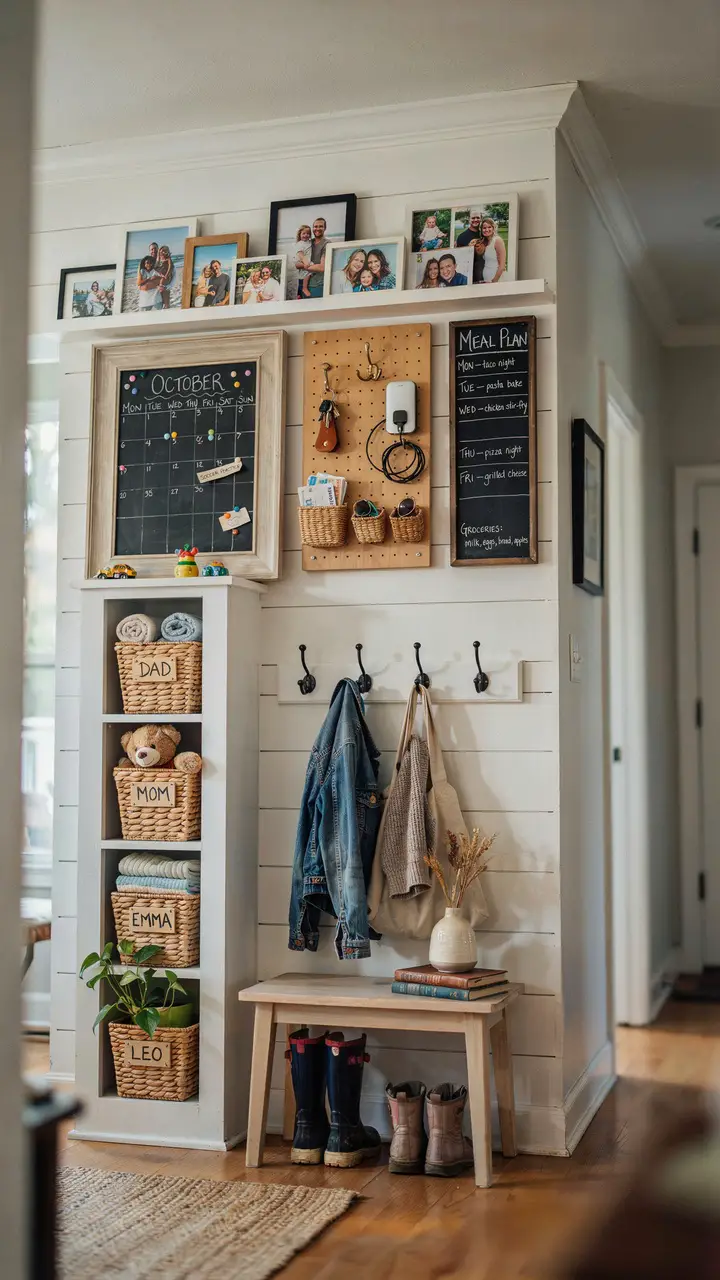
7. The Entryway Mudroom Command Center
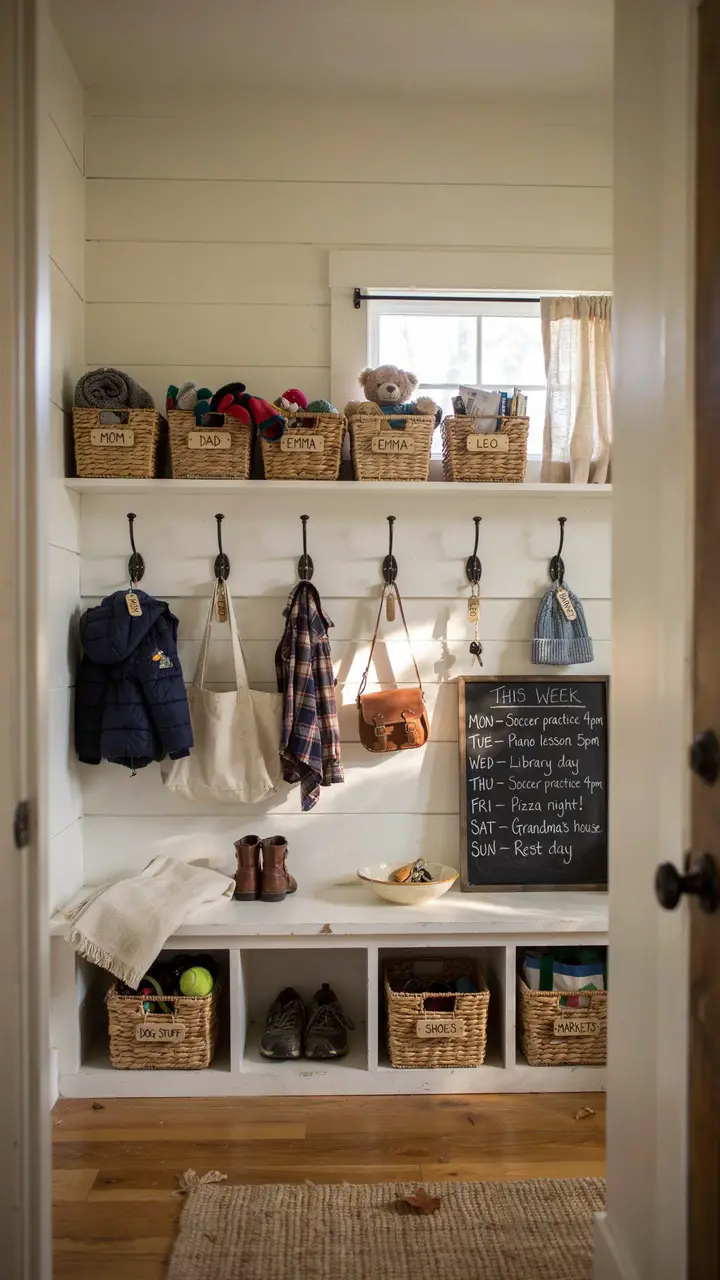
The entryway is where every household routine begins and ends—which makes it the single highest-impact location for a farmhouse command center. When everything has a designated spot right at the door, the frantic “where are my keys?” morning scramble simply… stops.
The most effective entryway command centers assign each family member their own zone—a hook for their bag, a cubby for their shoes, a basket for their school or work papers. Suddenly a shared family wall becomes something everyone actually uses.
How to Recreate This Look
Shopping List:
- Cast iron wall hooks (set of 5–6): $20–$45 from Amazon or hardware stores
- Narrow entryway bench with storage: $80–$200 from IKEA, Wayfair, or Target
- Wicker or seagrass baskets (one per family member): $12–$25 each from Target, TJ Maxx, or thrift stores
- Floating shelves (3–4, narrow depth): $15–$30 each from IKEA or Amazon
- Chalkboard panel or framed chalkboard: $20–$50
- Labels and a label maker: $20–$35 from Amazon
Step-by-Step Styling Instructions:
- Measure your entryway wall carefully—you need at least 4 feet of width for a full family command center
- Install your floating shelves first, working top to bottom—these require stud anchoring
- Mount hooks below the lowest shelf at varying heights (adults higher, kids lower if applicable)
- Position the bench directly below the hooks
- Slide labeled baskets into the bench cubbies and onto the shelves—one per household member
- Mount the chalkboard panel at one end for weekly schedules or notes
Budget Breakdown:
- Under $100: IKEA KALLAX unit repurposed as a cubby bench + Amazon hooks + baskets from TJ Maxx = approximately $90
- $100–$500: Quality entryway bench + cast iron hooks + coordinated wicker baskets + chalkboard
- $500+: Custom built-in bench with cubbies, crown molding, shiplap backing, and integrated lighting
Difficulty Level: Intermediate. A floating shelf installation is manageable for a confident beginner with a stud finder and level.
Lifestyle Considerations: Wicker baskets with handles make it easy for kids to pull out and replace their items independently—which is the whole goal. Opt for lined baskets if you’re storing wet items like gloves or scarves.
🔗 Designing for a small or tricky entryway? These Entryway Command Center Ideas offer creative solutions for spaces of every size and layout.
8. The Kitchen Wall Command Center
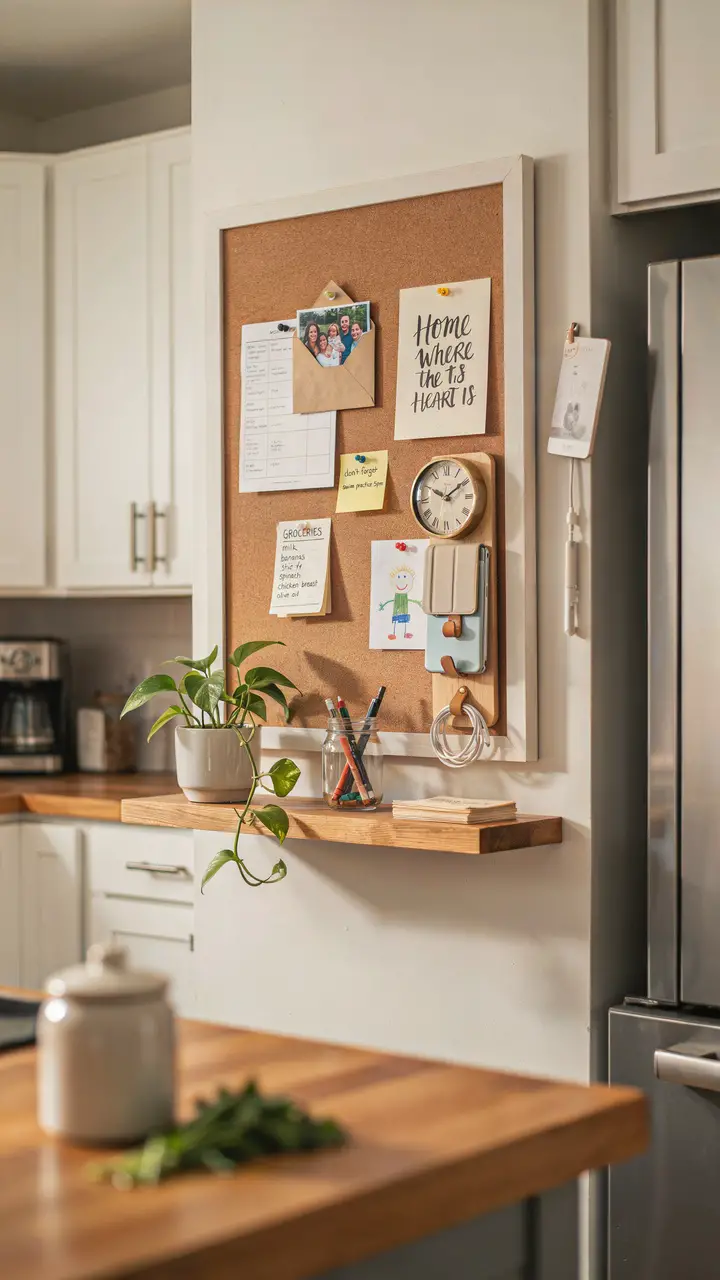
The kitchen is where most household decisions actually happen—meal planning, school permission slips, grocery lists, homework schedules. So positioning your command center on a kitchen wall (typically beside the fridge, which is prime unused real estate) puts your organizational hub exactly where your family already gathers.
A framed corkboard with a white shiplap-style frame looks intentional rather than office-y, and it pairs beautifully with farmhouse kitchen aesthetics.
How to Recreate This Look
Shopping List:
- Large framed corkboard (24×36″ ideal): $35–$80 from Amazon, Target, or Pottery Barn
- Narrow wooden wall organizer for devices: $25–$50 from Amazon or Etsy
- Floating shelf (12–18″ wide): $15–$30 from IKEA
- Vintage-style wall clock: $25–$50 from HomeGoods or Target
- Small white ceramic planter with herb or succulent: $10–$18
- Pushpins in natural or black tones: $6–$10
Step-by-Step Styling Instructions:
- Identify the wall section beside your refrigerator—this is typically 24–30 inches wide, which is perfect
- Mount the corkboard at eye level, centered on the wall section
- Install the device/charging organizer directly beside or below the corkboard
- Mount the floating shelf below everything at about 42 inches from the floor
- Style the shelf with one small plant, one functional container for pens, and one timepiece
- Pin a printed weekly meal plan template to the corkboard—you can find free farmhouse-style printable templates on Pinterest
Budget Breakdown:
- Under $100: Adhesive corkboard tiles arranged in a grid + a clip rail from IKEA + a $10 clock = approximately $50
- $100–$500: Quality framed corkboard + wooden device organizer + floating shelf + vintage clock
- $500+: Built-in kitchen nook with integrated corkboard, chalkboard, and device charging station with concealed wiring
Difficulty Level: Beginner. One of the easiest command centers to execute—no complex installation required.
9. The Freestanding Farmhouse Command Cabinet
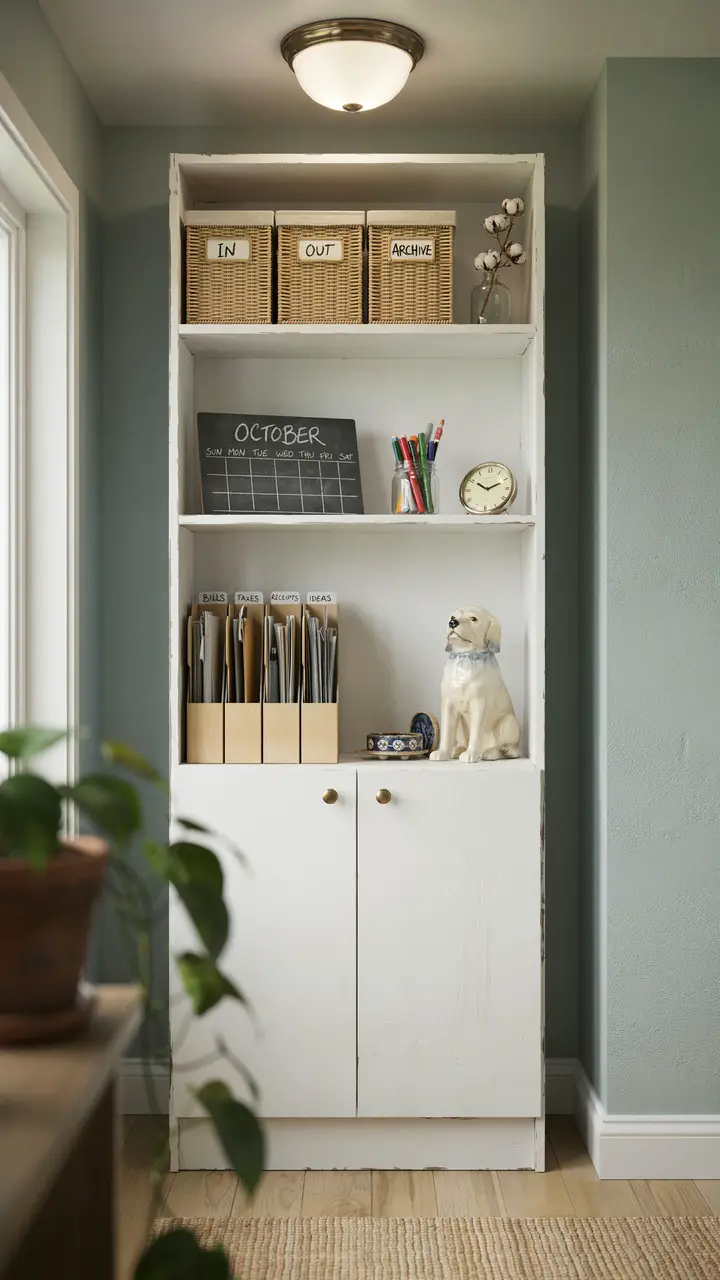
Not every home has an ideal wall for a mounted command center—and that’s completely okay. A freestanding farmhouse cabinet gives you all the same organizational power in a completely flexible, moveable format. This is especially wonderful for renters, apartment dwellers, or anyone who moves frequently.
The beauty of this approach is that your command center becomes a piece of furniture. It can migrate between rooms, come with you to a new home, and never requires a single wall anchor.
How to Recreate This Look
Shopping List:
- Freestanding open-shelf cabinet (thrifted or new): $40–$200 depending on source
- White chalk paint (if refinishing a thrifted piece): $12–$20
- Labeled wicker file boxes: $15–$30 each from Target or The Container Store
- Kraft paper file folders: $8–$15 for a pack from any office supply store
- Dried cotton stem arrangement: $12–$25 from craft stores or Amazon
- Small analog clock: $15–$35 from HomeGoods or Amazon
- Chalkboard calendar (propped, not mounted): $15–$30 from Amazon
Step-by-Step Styling Instructions:
- If refinishing a thrifted cabinet, sand lightly, apply two coats of white chalk paint, and seal with clear matte wax
- Assign each shelf a function before placing anything—top for archiving, middle for active scheduling, bottom for filing
- Use labeled wicker boxes consistently for a cohesive, uncluttered look
- Prop (don’t mount) your chalkboard calendar on the middle shelf for flexibility
- Add one purely decorative element per shelf—a small figurine, a dried stem, a family photo—to keep it feeling warm rather than purely utilitarian
Budget Breakdown:
- Under $100: Thrifted cabinet + chalk paint + basic wicker boxes + Dollar Tree accessories = under $70
- $100–$500: New farmhouse-style cabinet from Target or IKEA + coordinated accessories
- $500+: Custom-built or antique cabinet refinished by a professional + matching wicker file system
Difficulty Level: Beginner. If you can shop a thrift store and use chalk paint, this is entirely accessible.
10. The Full-Wall Family Command Center
The full-wall command center is the ultimate farmhouse organizational dream—and honestly, it’s more achievable than it looks. When you break it down into distinct functional zones and build each one independently, the whole thing comes together naturally over a few weekends rather than requiring one overwhelming installation day.
This approach works particularly well for families of three or more, where the volume of schedules, gear, mail, and daily-life logistics genuinely demands a dedicated wall.
How to Recreate This Look
Shopping List:
- Shiplap or peel-and-stick shiplap for full wall section: $60–$200
- Large framed chalkboard (24×36″ or larger): $50–$100
- Pegboard with full accessory set: $30–$80
- 4 deep open cubbies or one KALLAX-style shelving unit: $60–$150
- Wicker baskets (one per family member + one for general mail): $12–$25 each
- Narrow storage bench: $80–$180 from IKEA, Wayfair, or Target
- 5–6 cast iron coat hooks: $20–$40
- Vertical chalkboard panel for meal planning: $20–$40
- Small gallery frames for family photos: $5–$15 each from IKEA or thrift stores
- Charging station organizer: $25–$50
Step-by-Step Styling Instructions:
- Sketch the entire wall layout on paper before touching a single wall—zone allocation is everything here
- Install the shiplap backdrop first as the unifying canvas
- Build from the largest elements inward: install cubbies first, then mount the chalkboard, pegboard, and meal planning panel
- Mount the coat hooks and position the bench last, as these define the lower anchor of the entire system
- Run your photo gallery above the command center as a visual crown—this lifts the eye upward and makes the whole installation feel intentional rather than utilitarian
- Label everything—baskets, cubbies, pegboard zones—consistently using the same labeling style throughout
Budget Breakdown:
- Under $100: This scale of command center is genuinely difficult to execute under $100, but you can approximate it with peel-and-stick shiplap, one KALLAX unit from IKEA, and budget accessories from Target for approximately $180–$220
- $100–$500: A full DIY installation using peel-and-stick shiplap, IKEA KALLAX, a quality chalkboard, pegboard, and coordinated accessories
- $500+: True shiplap installation, custom-matched cabinetry, quality iron hardware, and professional-level styling
Difficulty Level: Advanced for the full DIY version. This is a multi-weekend project requiring stud finding, level installation, and careful planning. Worth every hour.
Seasonal Adaptability: Change out the chalkboard art and swap basket liners seasonally. A fall-toned arrangement of dried stems on one shelf and a winter wreath hung on a hook in December transforms the whole wall without changing anything structural.
Common Mistakes to Avoid: The biggest mistake with a full-wall system is overloading every zone from day one. Start with less and add as you identify actual daily needs. A command center that feels cluttered defeats its own purpose.
🔗 Ready to organize the whole home, not just one wall? These Home Command Center Ideas offer inspiration for every room, style, and household size.
Bringing It All Together
Here’s the honest truth about rustic farmhouse command centers: the system only works if it reflects how your household actually operates—not how you imagine it should. The most beautiful command center in the world won’t help if the mail still ends up on the kitchen counter because the mail station is in the hallway nobody uses.
Start with one small, high-impact area. A single hook rail and a labeled basket will do more for your daily routine than a full-wall installation you never quite finish. Build from there, adding zones as you identify genuine needs.
The farmhouse aesthetic makes this especially joyful because every element—the weathered wood, the handwritten chalk lettering, the woven baskets, the iron hooks—is warm, tactile, and genuinely beautiful. This isn’t just organization. It’s a corner of your home that says a thoughtful person lives here every single time someone walks through the door.
Your home doesn’t need to look like a Pinterest board to feel wonderful. It needs to work for you, look like you, and welcome you back every single day. Start wherever feels most manageable, embrace the imperfection of real life, and enjoy building a space that holds your whole world together—one labeled basket at a time. 🙂

Greetings, I’m Alex – an expert in the art of naming teams, groups or brands, and businesses. With years of experience as a consultant for some of the most recognized companies out there, I want to pass on my knowledge and share tips that will help you craft an unforgettable name for your project through TeamGroupNames.Com!