
There’s something magical about watching a child look up at a starry ceiling and genuinely believe they’re floating somewhere between Jupiter and a galaxy far, far away.
A space-themed playroom taps into that boundless curiosity kids have about the universe — and honestly, what better backdrop for imaginative play than the infinite cosmos?
Whether your little astronaut is three or ten, a whimsical space-themed playroom gives them a place to dream big, explore freely, and feel like the universe itself is their playground.
The best part? You don’t need a NASA budget or an aerospace engineering degree to pull this off.
With some creative planning, the right color palette, and a handful of stellar (pun intended) decor choices, you can transform any room into a launchpad for imagination.
Ready to blast off?
1. Galaxy Wall Mural with Glow-in-the-Dark Stars
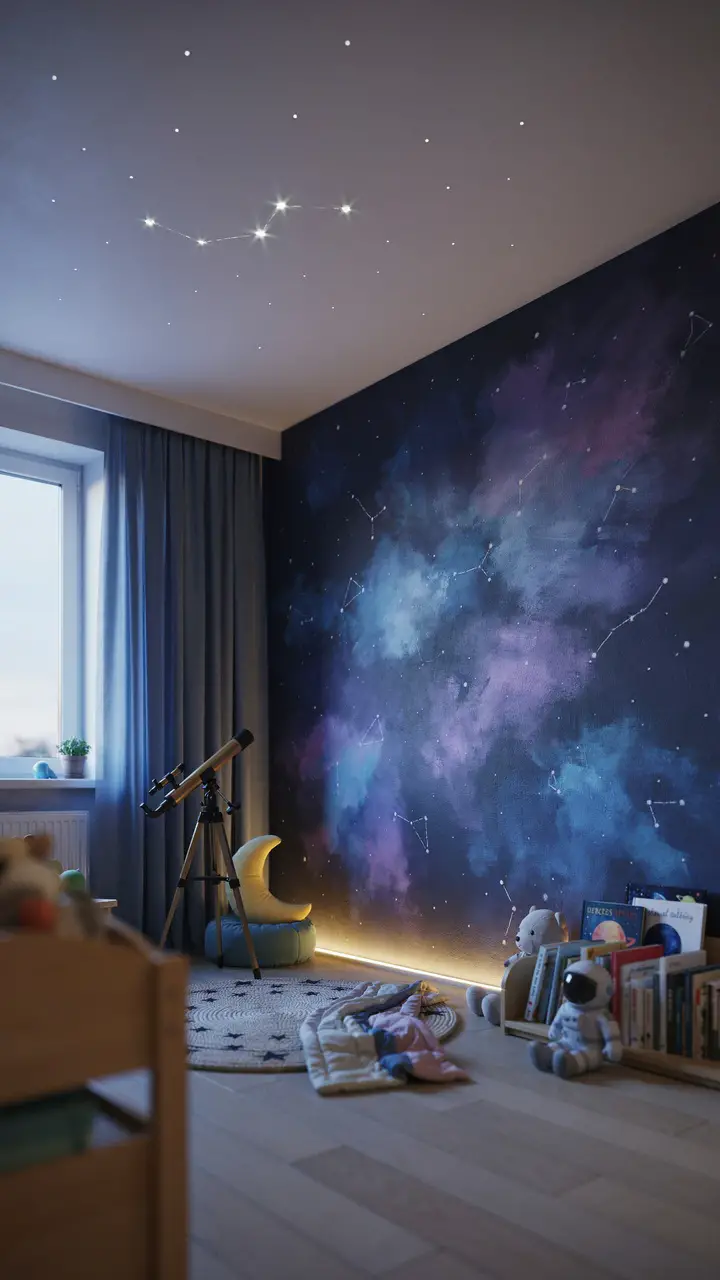
The walls are your biggest canvas, and in a space playroom, they deserve to do some serious work. A deep navy or midnight indigo galaxy mural creates an instant atmosphere — swirling nebulas, scattered constellations, and distant planets that make the whole room feel like an actual corner of the cosmos.
Pair the mural with peel-and-stick glow-in-the-dark stars applied in recognizable constellation patterns (Orion and the Big Dipper are always crowd favorites). When the lights go out at bedtime, those stars quietly glow, and suddenly the room transforms into something genuinely enchanting. Kids who normally resist bedtime suddenly want to lie still and stargaze — not a bad trade-off.
How to Recreate This Look
- Shopping list: Peel-and-stick galaxy mural or wall mural paint kit ($30–$150), glow-in-the-dark star stickers in constellation sets ($10–$25), navy and deep violet wall paint ($30–$60 per gallon), LED strip lighting in warm white or cool blue ($20–$40), a decorative children’s telescope ($30–$80)
- Step-by-step: Paint the base wall in deep navy first and let dry fully. Apply the mural wallpaper panel or use sponge painting with violet, teal, and white to create nebula effects. Once dry, apply glow stars using a constellation guide as reference. Add LED strip lighting along baseboards or ceiling trim.
- Style compatibility: Pairs beautifully with modern, Scandinavian, or adventurous explorer aesthetics. Works with gray, white, or black furniture.
- Budget breakdown: Budget ($30–$80) — star stickers + painted accent wall only; Mid-range ($80–$200) — peel-and-stick mural + glow stars + LED strips; Investment ($200–$400) — professional hand-painted mural + full star ceiling installation
- Space requirements: Works in rooms as small as 8×8 feet — even one accent wall makes an enormous impact
- Difficulty: Beginner to intermediate (peel-and-stick murals are genuinely forgiving)
- Durability: Glow stars hold up well; murals can be covered or removed for renters
- Seasonal adaptability: Timeless — no seasonal swaps needed; add asteroid or comet string lights for holidays
- Common mistakes: Don’t skip the primer coat under dark paint — it saves you two extra paint layers. Don’t crowd the glow stars; leave open “sky” space for realism.
- Maintenance: Wipe mural panels with a damp cloth; replace any peeled stars with craft glue
2. Rocket Ship Reading Nook
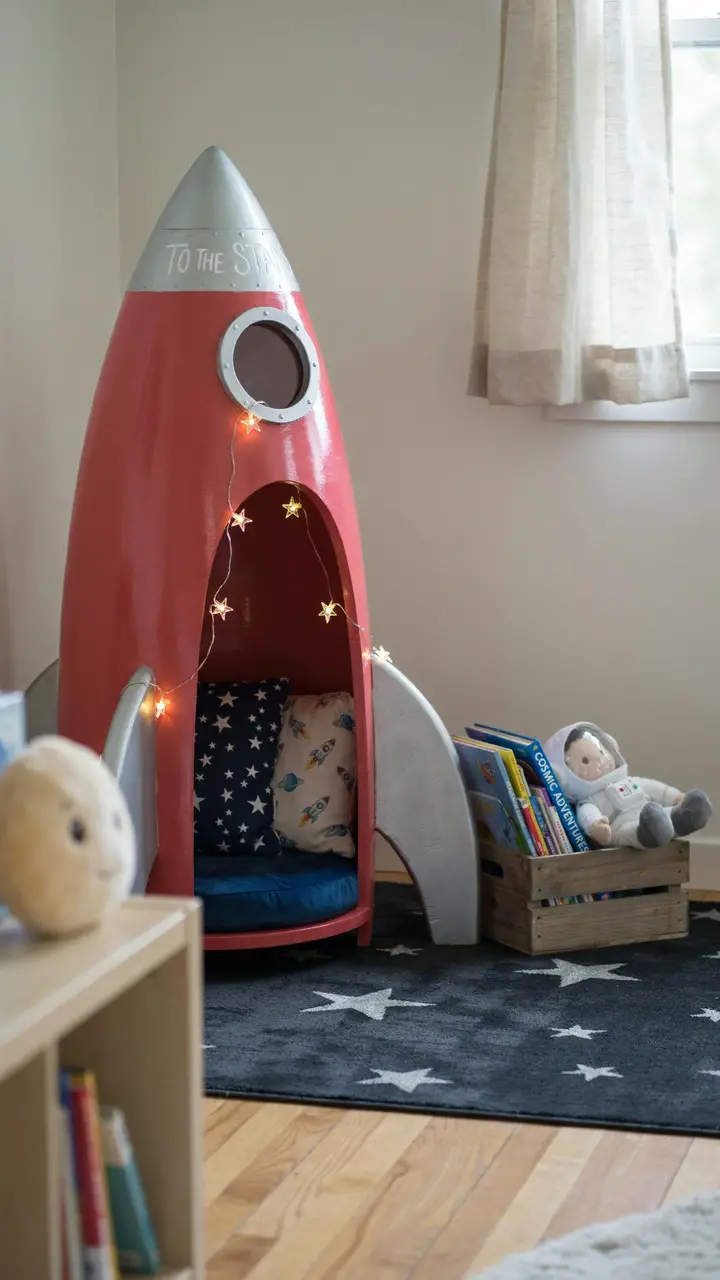
Every space explorer needs a command center, and a rocket ship reading nook delivers exactly that. Build or buy a playhouse-style rocket structure — even a cardboard version painted silver and red works brilliantly — and tuck it into a corner with a cozy cushioned interior stocked with space-themed books, a small LED lantern, and a plush astronaut buddy.
The nook becomes the child’s personal “launch pad” where they can read, daydream, or conduct very important intergalactic missions with their stuffed animals. It also doubles as a quiet retreat when the sensory overwhelm of play gets to be too much — a natural, calming cave within the room’s bigger energy.
How to Recreate This Look
- Shopping list: Prefab wooden playhouse or large cardboard rocket kit ($40–$300), silver and red paint ($15–$25), round cushion in navy or royal blue ($25–$60), space-print throw pillows ($15–$30 each), star-shaped fairy lights ($12–$20), space-themed children’s books ($5–$15 each), plush astronaut toy ($15–$30)
- Step-by-step: Position the rocket structure in a corner or against a wall. Paint with metallic silver and red — spray paint works great on cardboard. Add the cushion and pillows inside. Drape fairy lights along the interior rim. Arrange a small book crate beside it.
- Style compatibility: Works with adventurous, modern, and eclectic styles. Pairs well with primary-color furniture or all-neutral rooms.
- Budget breakdown: Budget ($40–$100) — painted cardboard rocket + thrifted cushions; Mid-range ($100–$250) — wooden playhouse kit + quality cushion + lights; Investment ($250–$500+) — custom-built rocket nook with built-in shelving
- Space requirements: Minimum 4×4 feet corner space; ideal in a room with at least 10×10 feet
- Difficulty: Beginner (cardboard kit) to Intermediate (wooden kit with painting)
- Durability: Cardboard lasts 1–2 years with care; wood lasts indefinitely with occasional touch-up paint
- Seasonal adaptability: Swap pillow covers seasonally (holiday prints, etc.) without changing the rocket itself
- Common mistakes: Don’t make the interior too dark — add lighting so kids actually want to sit inside. Don’t overcrowd with too many pillows.
- Maintenance: Wipe cushion covers as needed; spot-clean painted surfaces with a barely damp cloth
Looking for more space-inspired fun? Check out these space activities for kids that pair perfectly with your new space playroom!
3. Planet Mobile and Hanging Celestial Decor
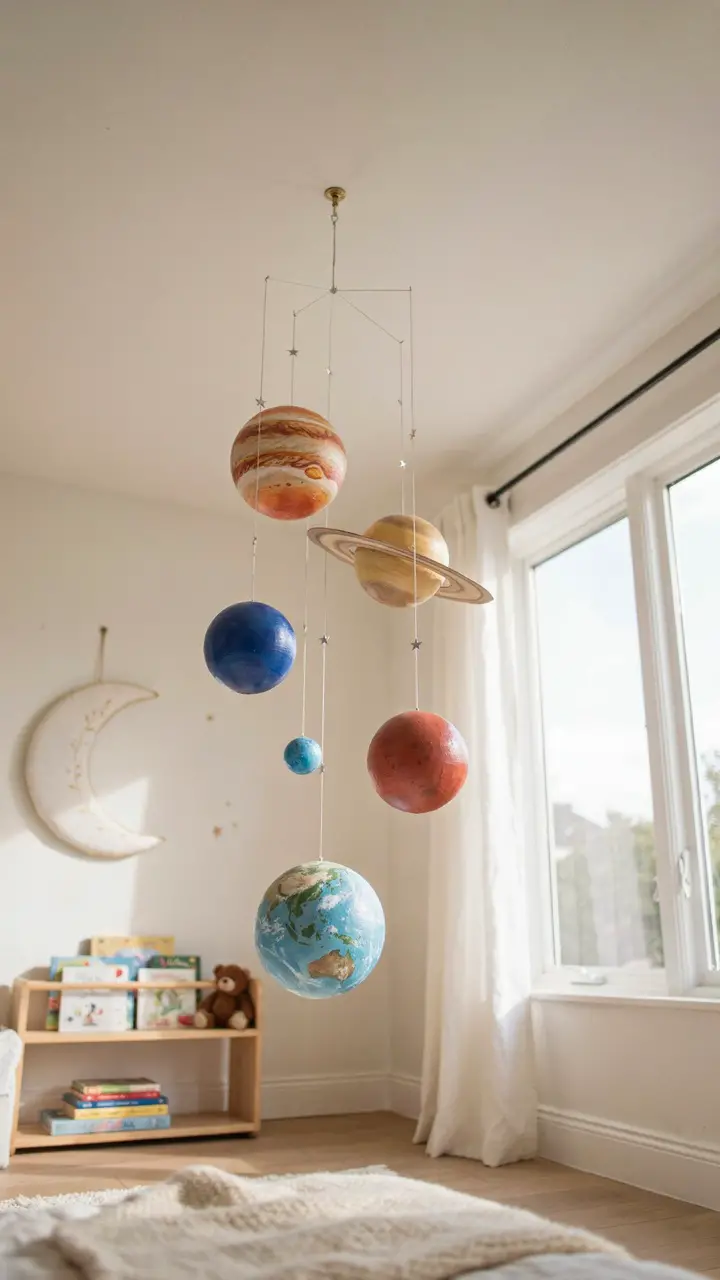
Ceilings in kids’ rooms are criminally underutilized. Suspend a mix of painted planet models, crescent moon hangings, and comet-tail garlands from the ceiling using clear fishing line, and suddenly the whole room becomes three-dimensional and alive.
You can buy pre-painted planet mobile sets or DIY your own with foam balls, acrylic paint, and a reference chart of the actual planet colors (kids are often surprisingly accurate judges here — Saturn’s rings had better look right, or you’ll hear about it). Group the planets at different heights to create depth, and mix in some metallic gold stars and silver asteroids for texture.
How to Recreate This Look
- Shopping list: Foam ball set in various sizes ($10–$25), acrylic craft paint set in planet-accurate colors ($15–$30), clear fishing line ($5), small command hooks rated for ceiling ($8–$15), crescent moon wall hanging ($20–$50), metallic star charms ($8–$15), planet mobile pre-made set as alternative ($25–$60)
- Step-by-step: Paint foam balls in planet colors using reference images. Let dry completely — at least two coats. Thread fishing line through each ball using a needle, knot securely. Attach command ceiling hooks in a scattered pattern and hang at varying heights. Add crescent moon to the wall nearby.
- Style compatibility: Works with eclectic, colorful, Montessori, and modern styles. Best with lighter ceiling colors (white, cream, pale gray).
- Budget breakdown: Budget ($15–$40) — DIY foam ball planets + basic hooks; Mid-range ($40–$100) — quality paint + pre-made mobile kit + moon hanging; Investment ($100–$200+) — custom resin planets or professionally painted set
- Space requirements: Works in any size room; just scale the number of planets to ceiling size
- Difficulty: Beginner (pre-made kit) to Intermediate (DIY painting)
- Durability: Foam balls with sealed paint last 3–5 years; keep away from moisture
- Seasonal adaptability: Swap a planet or two for a holiday-themed ornament during December
- Common mistakes: Don’t hang too low — aim for at least 6 feet clearance from floor so kids don’t grab them. Don’t use too-thin string that may break.
- Maintenance: Dust gently with a dry microfiber cloth; avoid wet cleaning
4. Astronaut Dress-Up Station
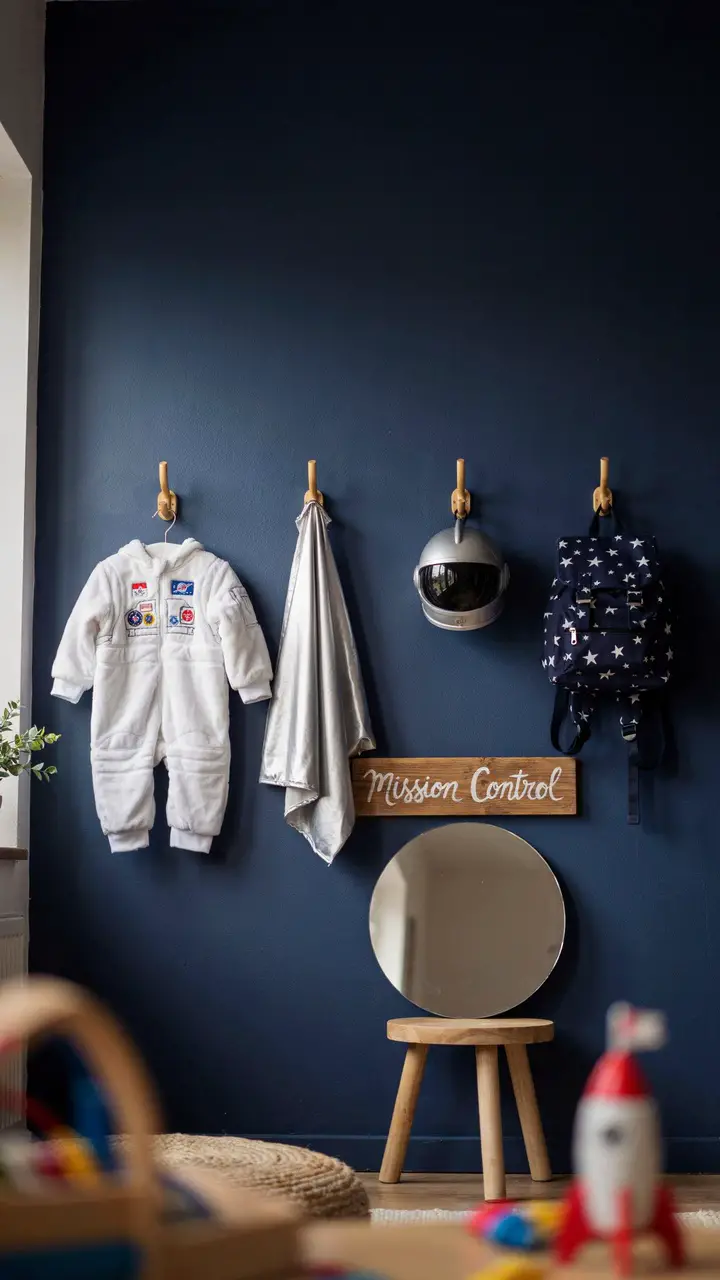
Imaginative play needs props, and a dedicated dress-up station makes all the difference. Mount a row of hooks on the wall and hang child-sized astronaut suits (fleece-based ones are wonderfully affordable and machine washable), silver capes, and space helmets — even repurposed colander helmets with sticker details are a total hit.
Add a small mirror at child height with a “Mission Control” sign above it, and maybe a clipboard with “mission briefing” sheets they can fill in. The station becomes a ritual — kids suit up before entering the playroom proper, which instantly signals that play mode is activated.
How to Recreate This Look
- Shopping list: Wooden wall hooks in matte black or silver ($15–$30 for a set of 4), child astronaut costume ($20–$50), silver cape ($10–$20), space helmet toy or repurposed colander + craft supplies ($5–$30), small round mirror ($15–$40), wooden sign or DIY painted MDF board ($10–$25), mission briefing printable sheets (free–$5 on Etsy)
- Step-by-step: Mount hooks evenly spaced on the wall at child height (around 3–4 feet from floor). Hang costumes and accessories on hooks. Mount mirror just below hook row. Hang the “Mission Control” sign above everything. Place clipboard with mission sheets nearby.
- Style compatibility: Works with almost any playroom style — especially adventurous, modern, and eclectic
- Budget breakdown: Budget ($30–$60) — thrifted costume + DIY sign + basic hooks; Mid-range ($60–$150) — quality costume set + mirror + custom wooden sign; Investment ($150–$300) — full built-in cubby unit with hooks, mirror, and storage
- Space requirements: Needs 3–4 feet of wall width; works in any size room
- Difficulty: Beginner
- Durability: Fleece suits wash well; helmet decor may need occasional touch-up
- Seasonal adaptability: Swap cape for a holiday version seasonally
- Common mistakes: Mount hooks too high and kids can’t reach; aim for 3–4 feet max. Don’t skip the mirror — it completes the ritual.
- Maintenance: Machine wash costumes regularly; wipe mirror with glass cleaner
Want even more inspiration for your little space explorer? Explore these fun space-themed team names for playgroup ideas that’ll spark even more cosmic creativity!
5. Constellation Sensory Table
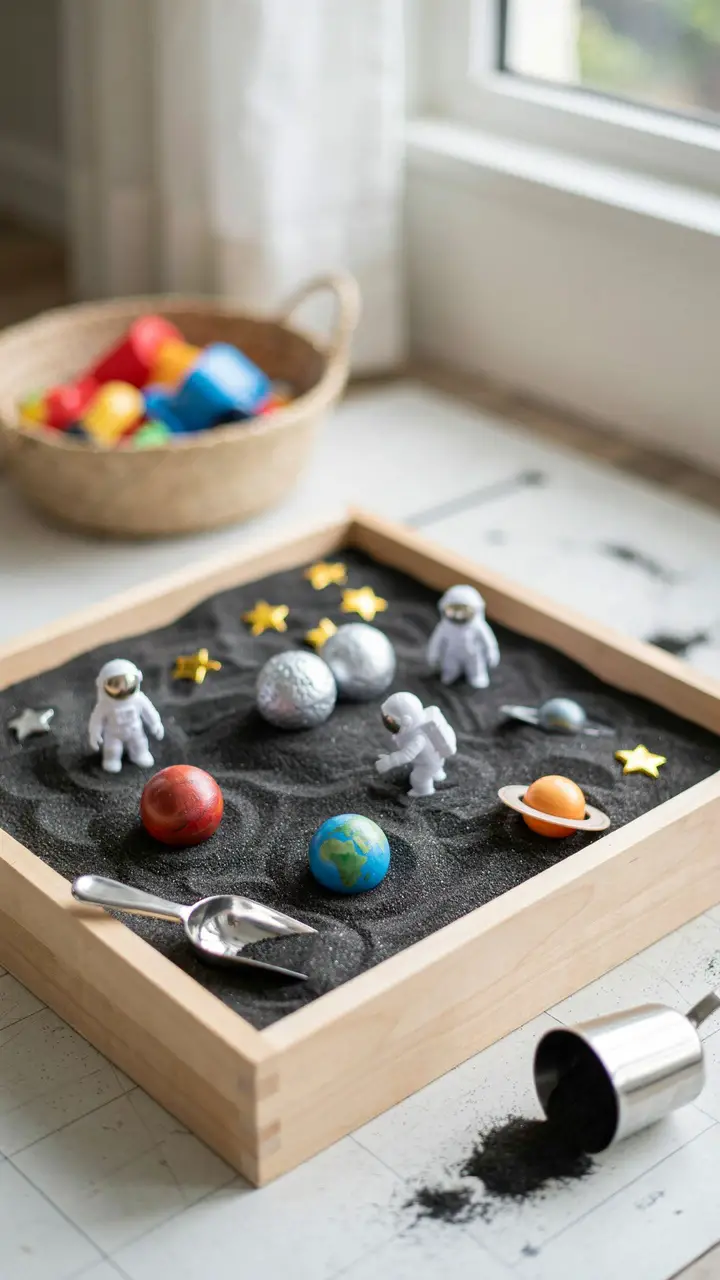
A space-themed sensory table brings the tactile experience of space exploration right to small hands. Fill a shallow bin or IKEA FLISAT table insert with black kinetic sand or black rice, then bury metallic gold star gems, small planet figurines, mini astronaut toys, and “moon rock” stones throughout for kids to discover.
Add measuring cups, small shovels, and a magnifying glass so they can “excavate” their finds like real scientists. The black sand against the shiny gold and silver objects is genuinely stunning — and endlessly engaging for kids who learn through touch and movement.
How to Recreate This Look
- Shopping list: IKEA FLISAT table or shallow plastic bin ($25–$100), black kinetic sand or black rice ($15–$30), metallic gold star gems ($8–$15), planet figurine set ($15–$25), small astronaut toy set ($10–$20), moon rock decorative stones ($8–$15), child shovels and measuring cups ($8–$15), craft mat for under the table ($15–$25)
- Step-by-step: Fill table or bin with black kinetic sand to about 2–3 inches depth. Bury figurines and gems at varying depths. Set tools at the side. Place craft mat beneath for easy cleanup.
- Style compatibility: Fits naturally in Montessori, eclectic, and playful modern spaces
- Budget breakdown: Budget ($30–$60) — plastic bin + black rice + thrifted figurines; Mid-range ($60–$150) — FLISAT table + quality kinetic sand + figurine set; Investment ($150–$300) — built-in sensory table with storage below
- Space requirements: Works in rooms as small as 8×8 feet with the table in a corner
- Difficulty: Beginner — setup takes 15 minutes
- Durability: Kinetic sand lasts 1–2 years with a lid to prevent drying; rice can be refreshed easily
- Seasonal adaptability: Swap sand color and buried items seasonally (white sand + snowflake gems for winter)
- Common mistakes: No lid means dried-out sand or very enthusiastic “excavation” all over the floor — get a bin with a lid.
- Maintenance: Sift for debris weekly; replace figurines as needed
6. Outer Space Art Wall with Rotating Artwork
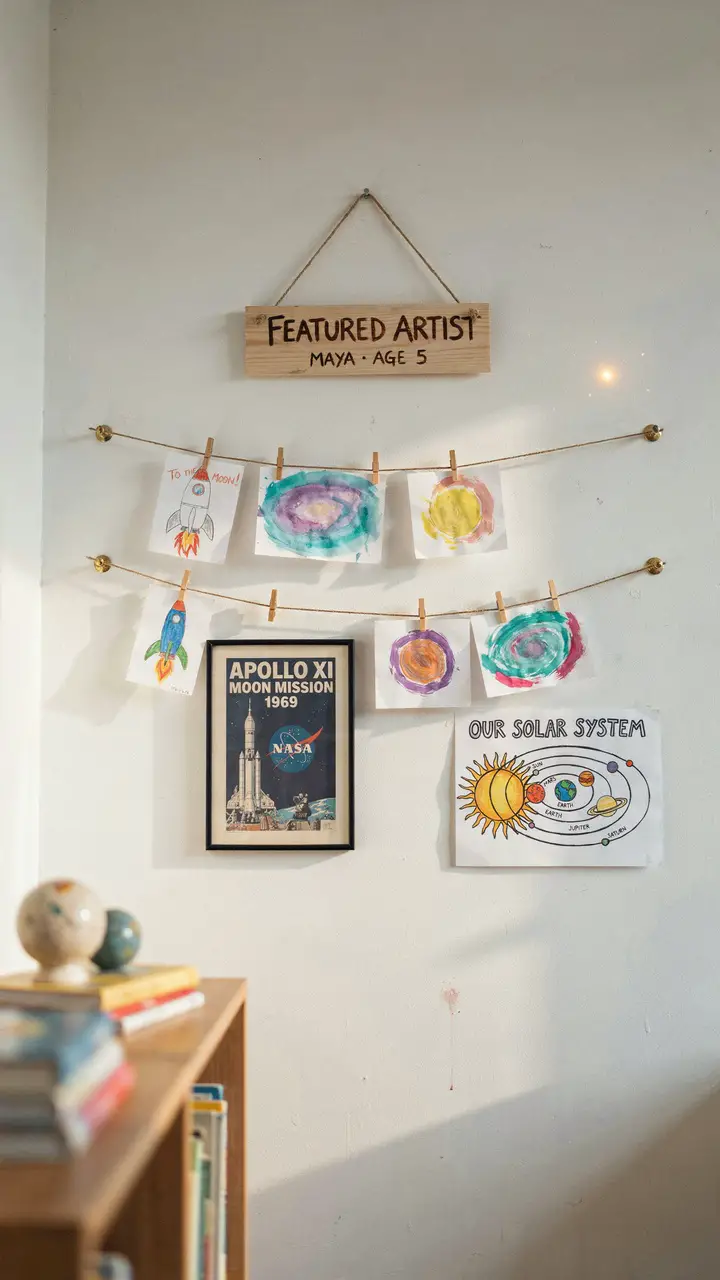
Kids make a LOT of art, and a rotating art wall gives their space-themed masterpieces a proper gallery moment. String a wire display system across one wall with mini clips, and swap in new space drawings, paintings, and collages regularly. Add a framed “Featured Artist” sign above it — because every small astronaut-artist deserves recognition.
Anchor the art wall with one or two permanent pieces: maybe a framed vintage NASA poster (they’re beautifully designed and surprisingly affordable as prints) or a gorgeous illustrated solar system chart. Mix the professional prints with the kid-made art and the whole wall feels both intentional and warmly personal.
How to Recreate This Look
- Shopping list: Wire picture display rail with clips ($25–$60), brass mini binder clips ($8–$15), vintage NASA poster prints ($10–$30), illustrated solar system art print ($15–$40), wooden “Featured Artist” sign ($15–$30 or DIY), small matching frames ($5–$15 each)
- Step-by-step: Mount the wire rail at eye-height for adults (so you can appreciate it too). Hang 2–3 permanent framed prints around the edges. Clip rotating kid artwork between them. Update the rotating pieces weekly or whenever a new masterpiece demands display.
- Style compatibility: Works in modern, eclectic, and adventurous rooms; especially beautiful against white or soft gray walls
- Budget breakdown: Budget ($20–$50) — DIY clothesline + bulldog clips + free printed NASA images; Mid-range ($50–$120) — proper display rail + quality prints + wooden sign; Investment ($120–$250) — custom gallery rail system with lighting
- Space requirements: Works on any wall 3 feet wide or more
- Difficulty: Beginner
- Durability: Wire rails last indefinitely; rotate artwork regularly to keep it fresh
- Seasonal adaptability: Swap some artwork for seasonal space-themed pieces (holiday rocket drawings, etc.)
- Common mistakes: Don’t overcrowd — leave breathing room between pieces. Don’t mix too many frame styles; pick one or two max.
- Maintenance: Dust frames monthly; replace clips as they wear
Your little one deserves a name as stellar as their playroom — browse these incredible galaxy names for out-of-this-world inspiration!
7. Space Mission Control Play Desk
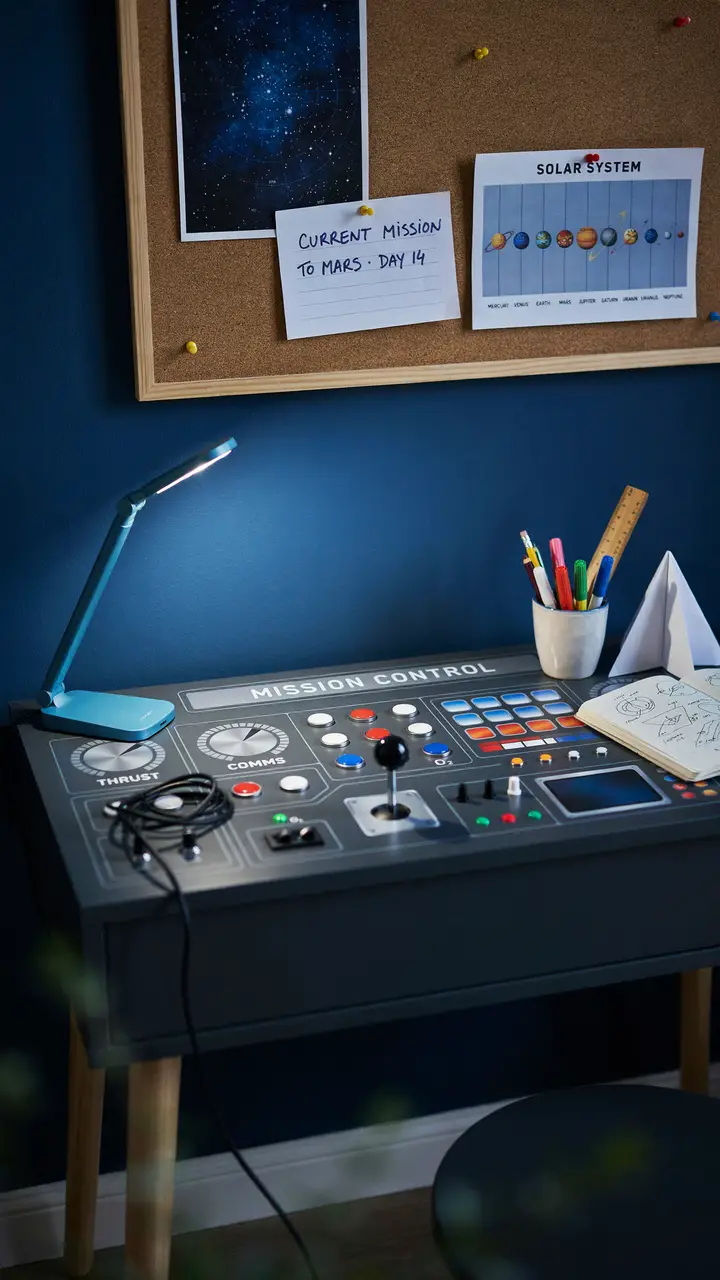
Every astronaut needs a command center, and a space-themed mission control desk makes homework and imaginative play equally exciting. Take a simple kids’ desk and transform it with contact paper in a sleek black or dark gray finish, add some printed “control panel” overlays (easily printable from Etsy or free educational sites), and mount a cork board above it where missions and star charts can be pinned.
Add a small LED desk lamp that changes color, a cup of “mission supplies” (pencils, crayons, and markers), and a label that says “Mission Control” on the front edge. What was once a homework desk becomes the coolest spot in the room.
How to Recreate This Look
- Shopping list: Basic kids’ desk ($40–$120), dark contact paper or furniture paint ($10–$30), printable control panel overlay (free–$8 on Etsy), color-changing LED desk lamp ($20–$50), cork board ($15–$30), mission supply cup ($5–$10), star chart and solar system print ($8–$20)
- Step-by-step: Apply dark contact paper to the desk surface for a clean slate. Print and laminate the control panel overlay and affix with clear tape. Mount cork board above. Add lamp, supplies, and prints. Attach a “Mission Control” label to the desk front.
- Style compatibility: Works in modern, industrial, and adventurous styles; best against darker walls
- Budget breakdown: Budget ($30–$70) — thrifted desk + contact paper + free printables; Mid-range ($70–$180) — quality desk + printed overlay + LED lamp + cork board; Investment ($180–$400) — custom built-in desk unit with overhead storage
- Space requirements: Minimum 4×3 feet floor space
- Difficulty: Beginner
- Durability: Contact paper lasts 2–3 years; refresh when peeling begins
- Seasonal adaptability: Swap out the cork board content seasonally with new mission themes
- Common mistakes: Don’t skip laminating the printables — kids will spill things. Don’t use a lamp without a solid base — active kids knock things over.
- Maintenance: Wipe contact paper with a damp cloth; replace cork board contents regularly to keep it engaging
8. Cosmic Rug and Cozy Floor Zone
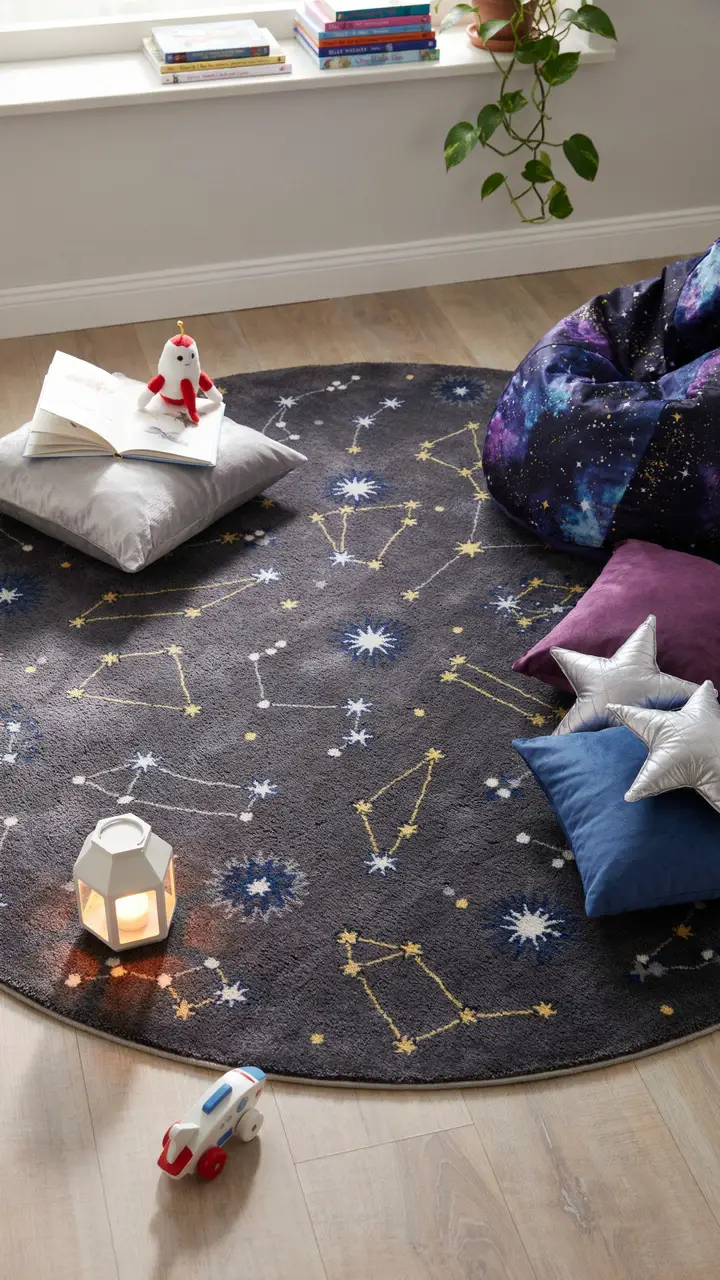
The floor is prime play real estate, and a great rug transforms the entire energy of the room. A deep navy or black circular rug with a solar system print or constellation map becomes both a visual anchor and a play surface — kids can trace the planets, name the stars, and launch their toy rockets across “space.”
Layer it with oversized floor cushions in metallic silver, deep blue, and violet for a cozy reading-and-lounging zone that feels like floating in zero gravity. Throw in a galaxy-print bean bag and you’ve created the most magnetic spot in the room.
How to Recreate This Look
- Shopping list: Large round constellation map rug ($60–$200), oversized floor cushions in navy/silver/violet ($25–$60 each), galaxy-print bean bag ($50–$120), star-shaped throw pillows ($15–$30 each), small LED lantern ($15–$30)
- Step-by-step: Center the rug in the room’s main play zone. Arrange floor cushions asymmetrically — too symmetrical feels stiff. Add the bean bag to one side. Scatter star pillows naturally. Place the lantern at the edge of the rug.
- Style compatibility: Works beautifully in eclectic, bohemian, and modern playroom styles
- Budget breakdown: Budget ($40–$100) — thrifted or discount cushions + dark painted floor cloth; Mid-range ($100–$250) — quality constellation rug + 2–3 cushions + lantern; Investment ($250–$500) — large premium rug + full floor lounge set
- Space requirements: Minimum 10×10 feet room for a generous floor zone
- Difficulty: Beginner — just arrange and enjoy
- Durability: Look for rugs with low pile for easier vacuuming; use washable covers on cushions
- Seasonal adaptability: Swap pillow covers seasonally; the dark rug works year-round
- Common mistakes: Don’t choose a rug that’s too small — it’ll look lost. Don’t overcrowd with too many cushions; leave play space in the center.
- Maintenance: Vacuum rug weekly; machine wash cushion covers monthly
Searching for the perfect name for your little space explorer? These space-inspired boy names are absolutely stellar!
9. Galaxy-Themed Storage Solutions
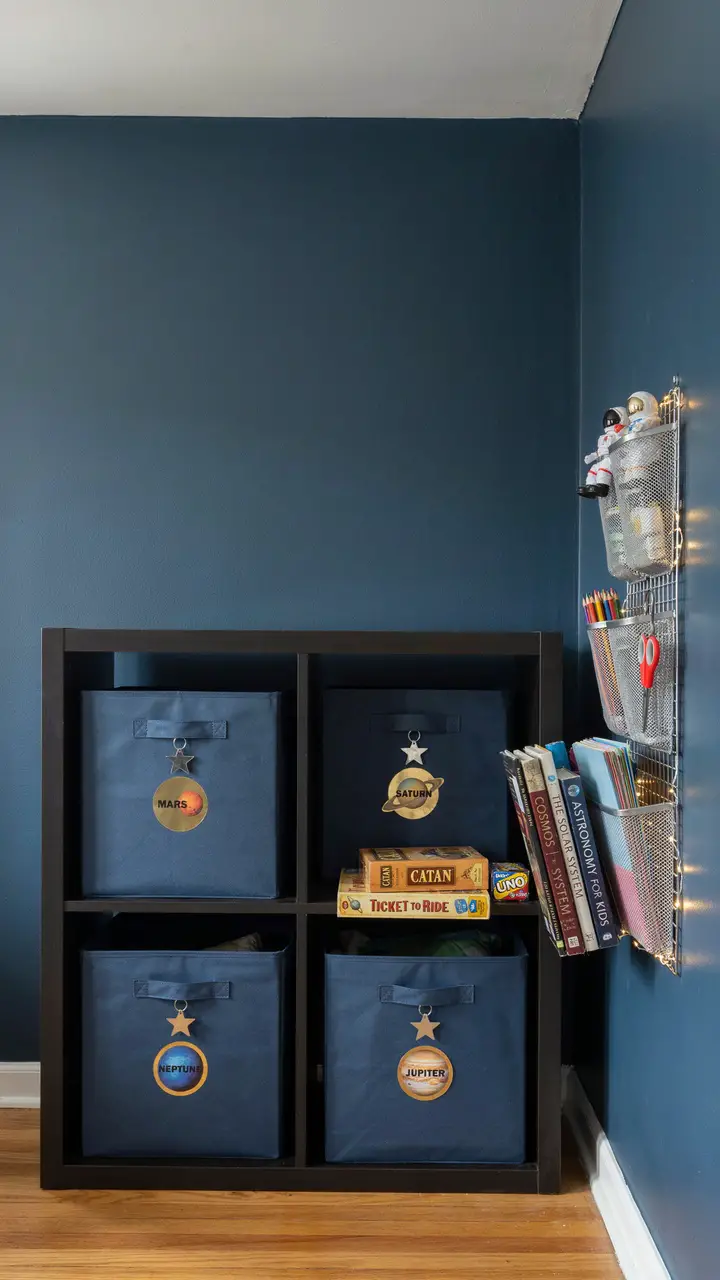
Storage in a space playroom doesn’t have to be an afterthought — it can be part of the magic. Paint IKEA KALLAX shelving units in deep navy or matte black and add metallic star handles to storage baskets. Label bins with planet names instead of toy categories: “Mars” for action figures, “Neptune” for art supplies, “Saturn” for blocks.
Hang metallic silver mesh organizers on the wall for smaller items, and use a repurposed vintage suitcase painted silver as a toy chest. The whole organizational system becomes an extension of the playroom theme — and kids are far more likely to actually put things away when the bins have cool planet labels.
How to Recreate This Look
- Shopping list: IKEA KALLAX unit ($60–$150), navy canvas storage bins ($8–$20 each), planet label printables or custom leather labels ($5–$20), metallic star drawer pulls ($10–$25 for a set), silver mesh wall organizer ($20–$40), matte black furniture paint for KALLAX ($15–$30)
- Step-by-step: Paint KALLAX in matte black — sand lightly first and use furniture-specific paint. Let dry 48 hours. Insert bins. Attach star pulls. Add planet labels. Mount mesh organizer beside unit. Fill with organized toys by category.
- Style compatibility: Works in modern, Scandinavian, and eclectic styles; especially clean against white or navy walls
- Budget breakdown: Budget ($40–$80) — thrifted shelving + painted + basic labels; Mid-range ($80–$200) — KALLAX + paint + quality bins + star pulls; Investment ($200–$500) — custom built-in shelving unit with integrated lighting
- Space requirements: KALLAX fits in rooms 8×8 feet and larger
- Difficulty: Intermediate (painting furniture requires patience)
- Durability: Painted KALLAX lasts years with proper prep; bins are washable
- Seasonal adaptability: Swap bin labels seasonally for a fresh feel without repainting
- Common mistakes: Don’t skip sanding before painting — it’s the difference between a lasting finish and a peeling disaster. Don’t overfill bins.
- Maintenance: Wipe down unit monthly; machine wash bin fabric covers
10. Starry Night Ceiling with Fiber Optic Lights
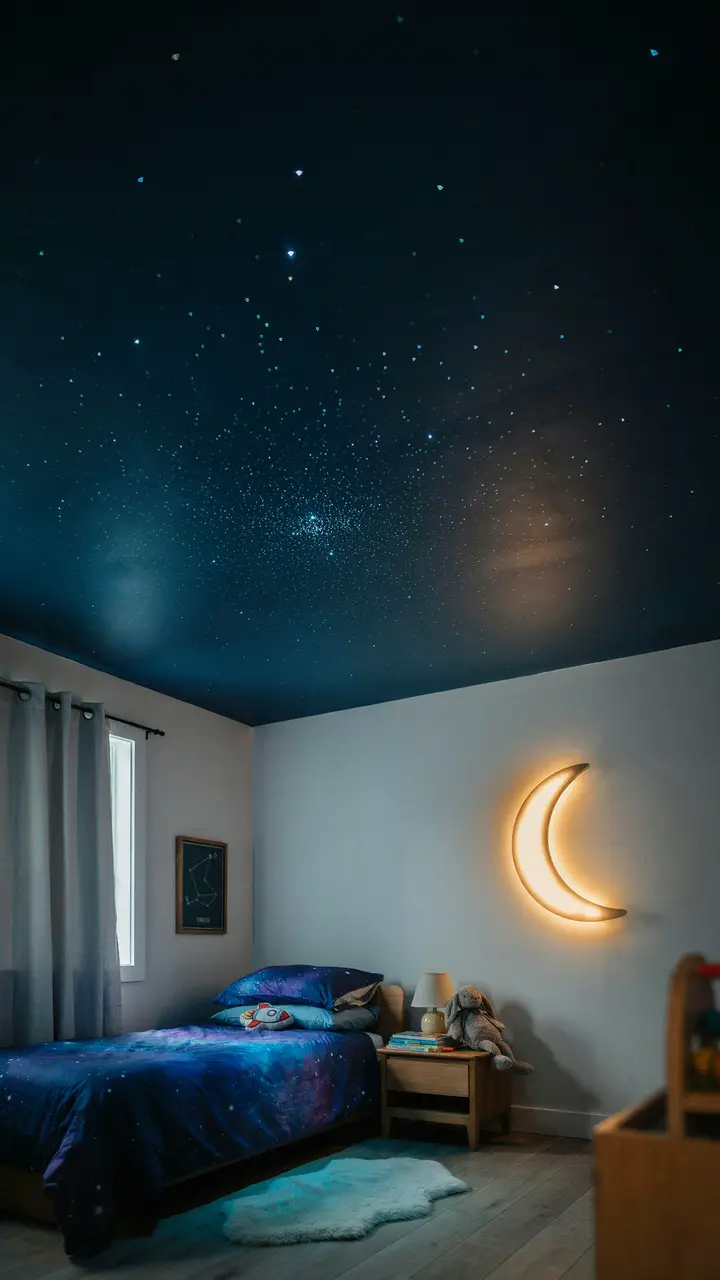
This is the showstopper — the one feature kids will describe to every friend who visits. A fiber optic star ceiling kit creates the effect of hundreds of tiny, twinkling stars embedded directly into the ceiling. The lights shimmer, dim, and change subtly, giving the impression of a genuine night sky indoors.
Pair the fiber optics with a deep navy or midnight blue ceiling paint (yes, just the ceiling — it’s a bold choice that pays off enormously), and maybe a large crescent moon LED wall light as the room’s main ambient source. At night, with just the stars and the moon glowing, the room becomes an experience that kids — and honestly most adults — will never want to leave.
How to Recreate This Look
- Shopping list: Fiber optic star ceiling kit ($50–$300 depending on fiber count), midnight navy ceiling paint ($30–$60), crescent moon LED wall light ($30–$80), blackout curtains in navy or charcoal ($40–$100), galaxy comforter set ($40–$100)
- Step-by-step: Paint ceiling in deep navy — two coats minimum. Install fiber optic kit per manufacturer instructions (most use a small projector box hidden in a corner with fibers threaded through). Mount crescent moon light on the feature wall. Hang blackout curtains so the star effect really shines.
- Style compatibility: Works in modern, romantic, bohemian, and eclectic styles — universally beloved
- Budget breakdown: Budget ($50–$100) — projector star light + navy paint + thrifted curtains; Mid-range ($100–$300) — quality fiber optic kit + paint + moon light + curtains; Investment ($300–$800) — professional fiber optic ceiling installation
- Space requirements: Works in rooms of any size; more dramatic in larger rooms
- Difficulty: Intermediate (fiber optic installation) to Advanced (professional-grade systems)
- Durability: Quality kits last 10+ years; fiber optic projectors may need bulb replacement after 5–7 years
- Seasonal adaptability: Completely timeless — works every night of the year
- Common mistakes: Don’t use a cheap projector star light and call it a fiber optic ceiling — the effect is completely different and far less convincing. Don’t forget blackout curtains.
- Maintenance: Dust ceiling periodically; check projector connections annually
Ready to give your little astronaut a name worthy of the stars? Discover these beautiful space-inspired girl names that are truly out of this world!
The Universe Is Waiting
Creating a whimsical space-themed playroom is one of those design projects that gives back more than you put in. Every element — the glowing stars, the rocket nook, the fiber optic ceiling — works together to tell a story. And the story it tells your child is a powerful one: the universe is vast, curiosity is a superpower, and this little corner of the cosmos is entirely yours.
The most important thing to remember is that you don’t have to do all ten ideas at once. Start with the wall mural and a set of glow stars. Add the reading nook next month. Build toward the fiber optic ceiling when the budget allows. A great space playroom grows with your child’s imagination — and that’s a journey worth savoring, one launchpad at a time.
Now go forth and make something stellar. 🙂

Greetings, I’m Alex – an expert in the art of naming teams, groups or brands, and businesses. With years of experience as a consultant for some of the most recognized companies out there, I want to pass on my knowledge and share tips that will help you craft an unforgettable name for your project through TeamGroupNames.Com!