There’s something about combining the magic of Disney with the anticipation of finding out your baby’s gender that just feels absolutely perfect.
Maybe it’s because both Disney and pregnancy are about believing in dreams coming true, or maybe it’s because you’ve been planning your little one’s first Disney trip since you saw that positive test.
Either way, if you grew up watching Disney movies and can quote entire scenes from The Lion King, a Disney-themed gender reveal might be exactly the magical moment you’re looking for.
I’ve watched friends transform their backyards into miniature Magic Kingdoms for these reveals, and honestly? The joy on everyone’s faces when Mickey balloons release pink or blue confetti, or when a “poison” apple gets sliced to reveal colored cake inside—it never gets old.
Whether you’re a casual Disney fan or someone who plans annual trips to the parks, these ideas work beautifully for intimate family moments or full-blown parties with dozens of guests dressed as their favorite characters.
The best part? Disney themes naturally lend themselves to anticipation and surprise. You’re already working with stories about magic, wishes coming true, and happily ever afters. Your gender reveal is just the beginning of your own fairy tale, and these ideas will help you celebrate it in a way that’s uniquely you.
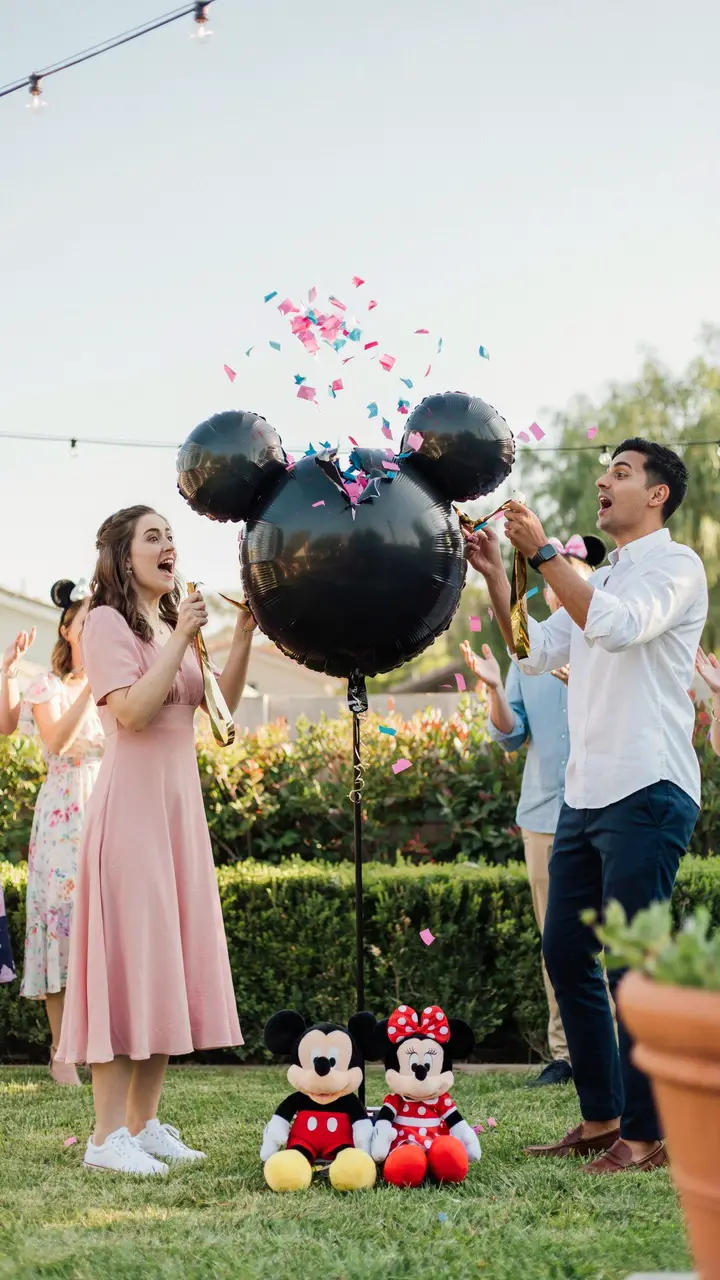
Classic Mickey and Minnie Balloon Pop
How to Pull This Off
- Purchase or create a Mickey-shaped balloon cluster using one large 36-inch black round balloon for the head and two 18-inch black balloons for the ears (around $15-25 for materials)
- Fill the main balloon with pink or blue confetti before inflation—use tissue paper confetti rather than metallic for easier cleanup
- Secure all three balloons together with strong fishing line or balloon tape to maintain the Mickey silhouette
- Order your confetti color from a trusted friend or baker who opens the envelope from your doctor—this person becomes your secret-keeper
- Set up 2-3 days before: inflate balloons the morning of the reveal for maximum float time
- Position cameras at multiple angles: have someone record from straight-on for reactions, and another person capturing the confetti explosion from the side where lighting is best
- Use a long pin attached to a decorative stick so you can pop it from a safe distance while both holding the ribbons
- Backup plan: if balloons deflate or pop prematurely, have a second Mickey-shaped piñata filled with the same colored confetti
- Budget alternative: create a Mickey silhouette using three black poster boards, cut a slit in the middle one, and fill the space behind with colored tissue paper that falls when you remove the board
- Pro tip: practice your balloon pop technique beforehand with a regular balloon—you want one clean pop, not multiple weak pokes that deflate the drama
Want a really beautiful moment? Have everyone make their guess by wearing either Mickey (boy) or Minnie (pink bow) ears. The photo of everyone in their ears before the reveal becomes an adorable keepsake.
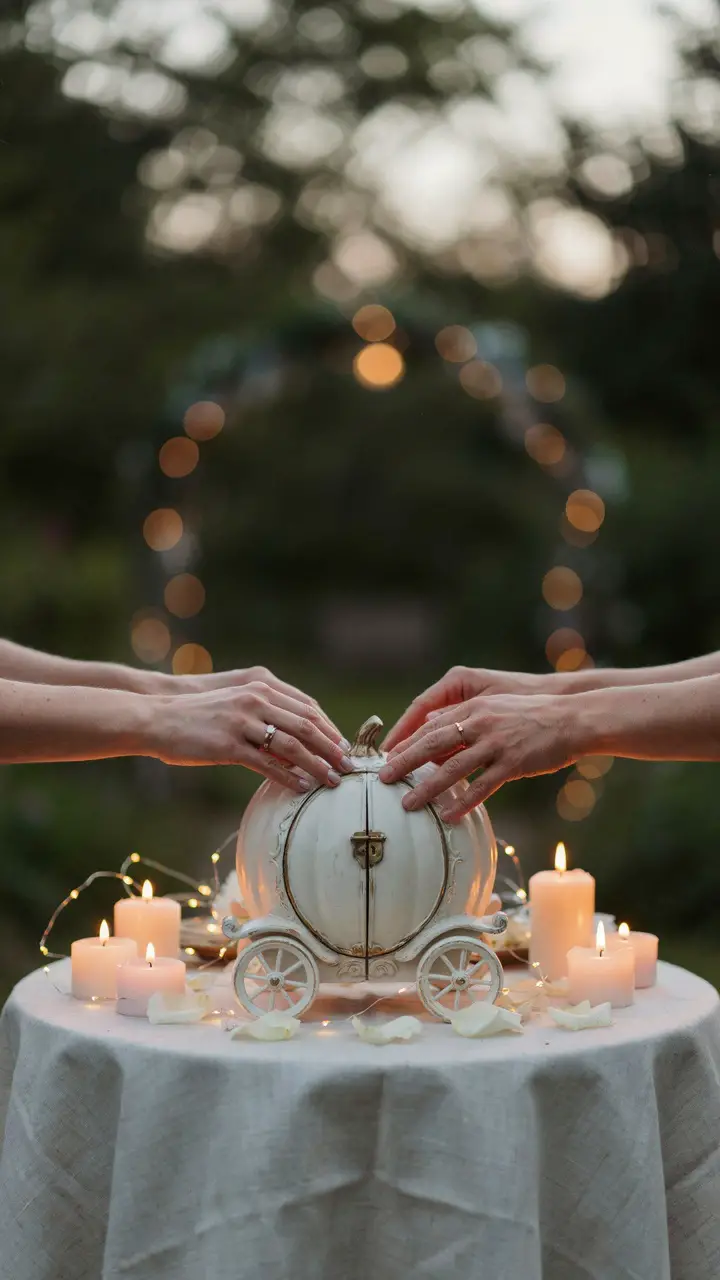
Cinderella’s Carriage Surprise
How to Pull This Off
- Source a decorative carriage: check party supply stores, Etsy, or create one from a large decorative box painted white with gold accents ($20-50 depending on DIY vs. purchased)
- Choose your reveal mechanism: either a small colored smoke bomb (check local fire regulations), battery-operated colored LED lights, or fresh flowers in pink or blue
- If using smoke: place a small, safe container inside the carriage, practice the ignition process beforehand, and ensure outdoor use only with a fire extinguisher nearby
- If using flowers: have someone you trust arrange pink or blue roses inside the carriage right before the reveal moment
- Preparation timeline: set up the carriage and surrounding decor 2-3 hours before guests arrive, but add the actual reveal element (smoke bomb or flowers) no more than 15 minutes before the big moment
- Have your secret-keeper present to set up the actual colored element while you’re greeting guests
- Position your videographer directly in front of the carriage to capture both your faces and the reveal simultaneously
- Lighting is crucial: if outdoors, plan for golden hour (hour before sunset); if indoors, use warm string lights or candles for that fairy tale glow
- Safety consideration: if using smoke, ensure all guests with respiratory issues are positioned upwind and at a comfortable distance
- Budget-friendly version: use a decorated shoebox painted white and gold, with colored tissue paper that “explodes” out when you lift the lid
- Pro tip: play the Cinderella soundtrack in the background, timing the carriage opening to coincide with “A Dream Is a Wish Your Heart Makes”—I’ve seen this reduce grown adults to happy tears
The Cinderella theme works beautifully because it’s about transformation and dreams coming true, which is exactly what parenthood is about. Plus, it’s elegant enough for the most sophisticated guests while still being pure Disney magic.
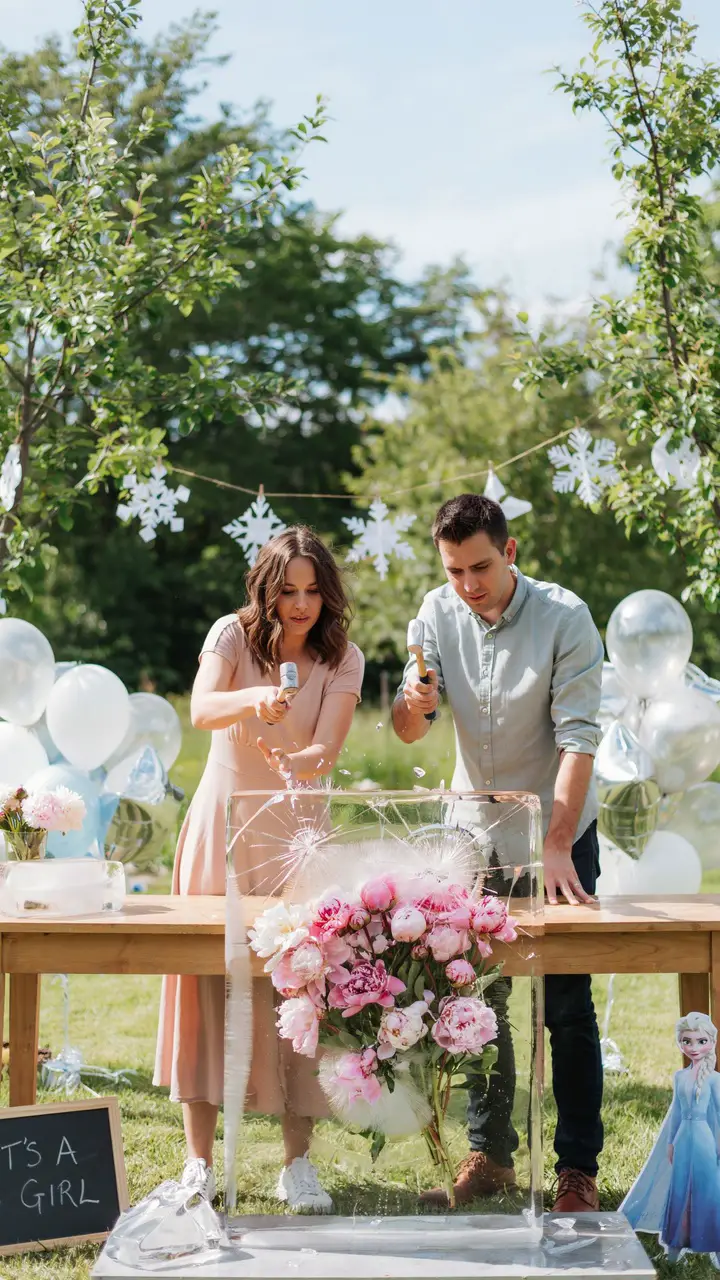
“Let It Grow” Frozen-Inspired Ice Block Reveal
How to Pull This Off
- Create the ice block 2-3 days in advance: you’ll need a large rectangular container or ice block mold (available online for $15-30)
- Freeze in layers: fill container halfway with water and freeze solid, add your colored element (flowers, fabric, or food-colored water in a sealed bag), then fill with remaining water and freeze again
- Have your secret-keeper add the colored element during the middle layer process
- Transport carefully: wrap the ice block in towels and keep in a cooler until 30 minutes before the reveal
- Set up outdoors in shade to prevent premature melting—test your setup location a week before at the same time of day
- Provide safety goggles and small mallets for both parents (around $10-15 for both items)
- Position cameras from multiple angles: side view captures the best ice-breaking action, while front view shows facial reactions
- Timing is everything: in warm weather, you have about 30-45 minutes before significant melting begins
- Backup plan: have a second reveal method ready (like a confetti box) in case the ice melts faster than expected or shatters in a way that obscures the color
- Safety reminder: clear the area of small children and pets during the ice-breaking, and ensure the table can handle water splashing
- Budget alternative: freeze colored water in multiple smaller containers and arrange them in a pyramid—guests can guess based on which layer you break first
- Pro tip: play “Let It Go” or “Show Yourself” during the setup, and time the first hammer strike to hit on a dramatic note in the music
I love this one because there’s genuine suspense as you chip away at the ice. Plus, the photos of you both wielding little hammers with intense concentration are absolutely hilarious and frame-worthy.
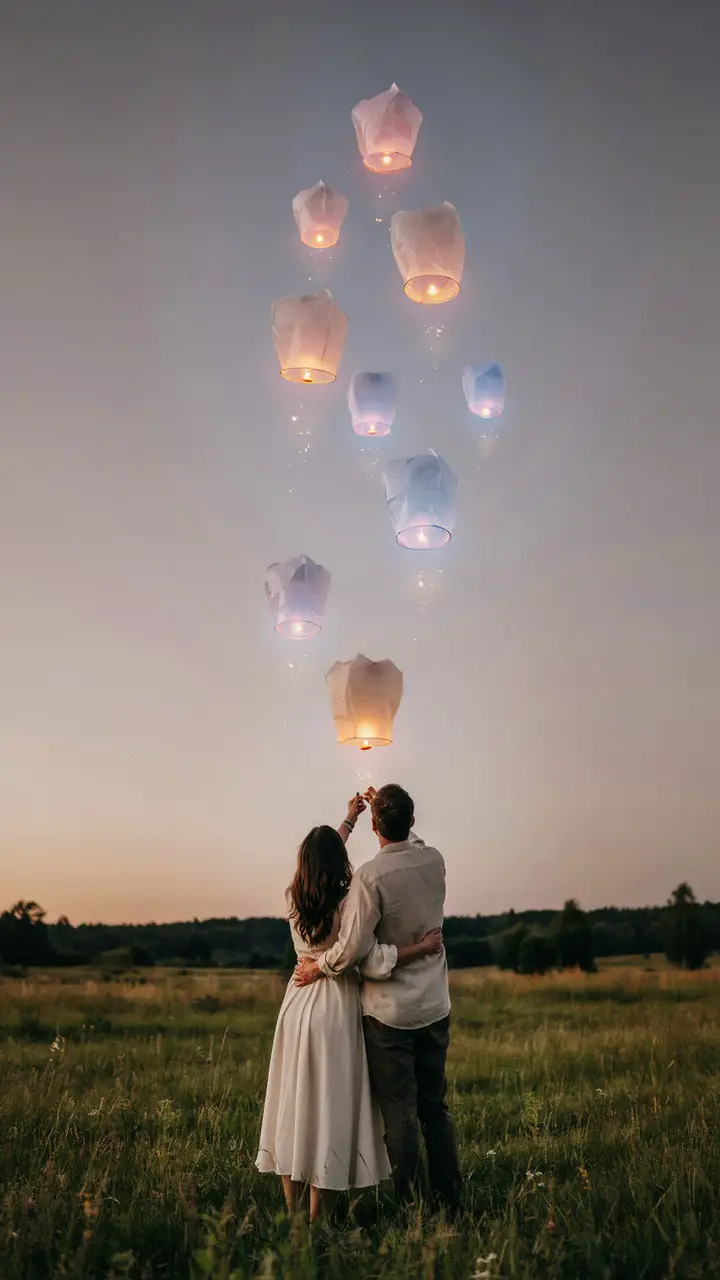
Tangled’s Floating Lantern Release
How to Pull This Off
- Check local regulations first: many areas restrict or ban open-flame sky lanterns, so use LED-powered paper lanterns instead (safer and legal in most places)
- Purchase 10-20 paper lanterns: cost around $30-50 for a pack, available online in white with LED lights you can place inside
- Use battery-operated LED lights in your reveal color: pink or blue LED tea lights ($10-15 for a pack) that your secret-keeper inserts before the event
- Practice with regular white-light lanterns a week before to understand timing and wind conditions at your location
- Timing is crucial: plan for 30 minutes before sunset when there’s still enough light for photos but the LED glow is visible
- Have 3-4 trusted helpers release the preliminary lanterns in waves to create the floating effect, while you and your partner release the reveal lantern together
- Hire or designate a photographer with twilight photography experience—this reveal needs someone who knows exposure settings
- Secure required permits if you’re using a public park or lake area (apply 4-6 weeks in advance)
- Weather backup plan: wind above 10 mph will ground this reveal; have an indoor alternative ready (like colored lanterns hanging from ceiling with pull-strings that “release” them)
- Environmental consideration: use only biodegradable materials and retrieve all lanterns after they land
- Budget alternative: use regular helium balloons with LED lights inside, released in a cluster at dusk
- Pro tip: play “I See the Light” from Tangled during the release—I’ve seen this combination make even the most stoic dad-to-be tear up
This reveal is breathtakingly beautiful but requires specific conditions. When it works, though? It’s absolutely magical, and your photos will look like something out of the movie itself.
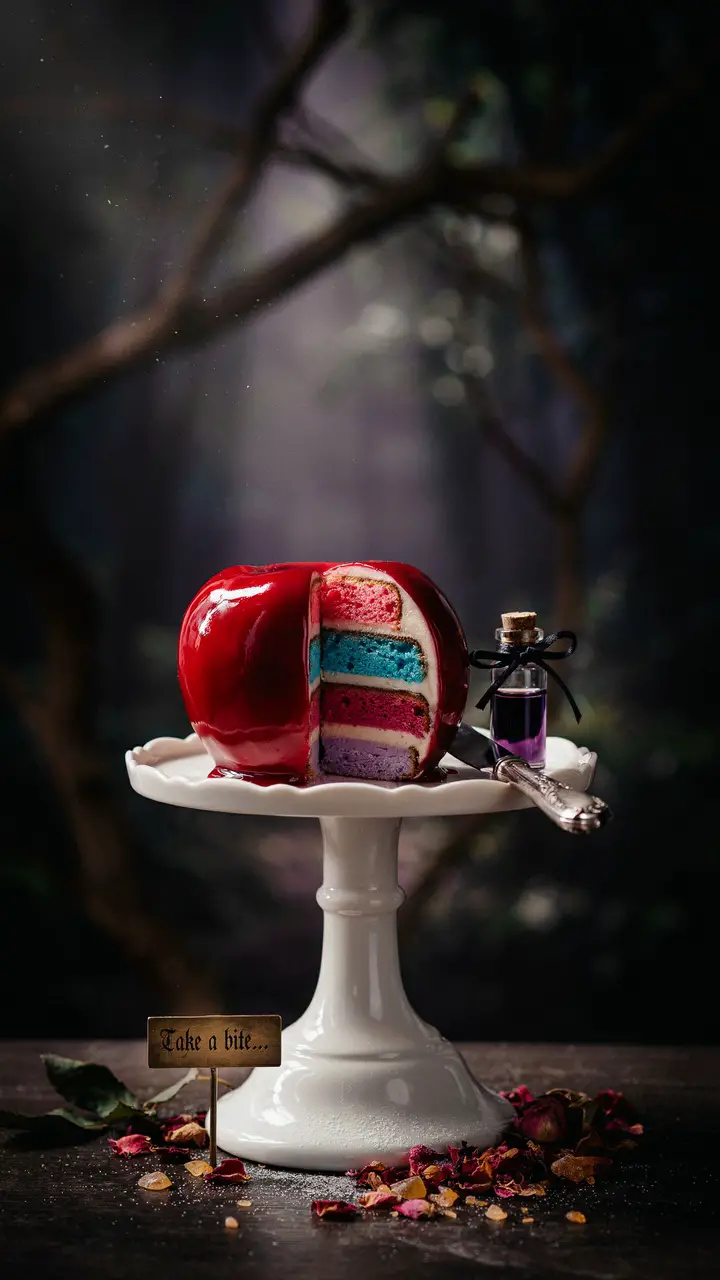
Poisoned Apple Reveal (Snow White)
How to Pull This Off
- Order a custom apple-shaped cake: work with a baker who can create a realistic candy-apple exterior with colored cake layers inside ($50-100)
- Provide the gender information in a sealed envelope to your baker at least one week before pickup
- DIY version: create a large cake shaped into a rounded apple form, covered with red fondant or frosting, with a brown fondant stem and green leaf
- The reveal cake should be dense and sturdy: ask for pound cake or chocolate cake that holds shape well when carved into rounded forms
- Set up your cutting station: elegant cake stand, sharp knife, small plates for serving, and thematic props like a small decorative “poison” bottle
- Lighting matters: position a spotlight or ring light above the cake to illuminate the colored layers dramatically when cut
- Have your videographer positioned to capture both the knife cutting through and your faces simultaneously—this requires two cameras or one wide-angle setup
- Practice your cutting technique on a regular round cake beforehand—you want one clean slice that reveals all layers clearly
- Timing: cut the cake within 1-2 hours of the reveal for best consistency, especially if you’re using buttercream rather than fondant
- Backup plan: have a second reveal method ready in case the cake melts (outdoor summer events) or if layers aren’t visible enough
- Safety note: ensure all guests know this is an edible cake, not an actual candy apple with a stick
- Budget alternative: make regular cupcakes with colored filling, topped with red frosting and arranged in an apple shape
- Pro tip: serve the cake immediately after the reveal so guests can verify the color themselves—it becomes a delicious part of the celebration
The Snow White theme is perfect if you want something a little darker and more dramatic than typical pastels. Plus, cake reveals are inherently crowd-pleasing because everyone gets dessert right after the big moment.
Aladdin’s Magic Lamp Smoke Reveal

How to Pull This Off
- Source or create a decorative lamp: check party supply stores, thrift stores, or craft one from a teapot painted gold ($10-25)
- Use a gender reveal smoke bomb: pink or blue smoke devices designed for photography (check local fire and safety regulations first)
- Have your secret-keeper purchase and place the correct colored smoke device inside or behind the lamp
- This reveal MUST be outdoors in an open area with no overhanging trees or structures
- Check weather conditions: wind affects smoke direction dramatically—you want calm conditions or very light breeze
- Position cameras upwind from the lamp so smoke blows away from videographers
- Test the smoke device activation beforehand with a neutral-colored one to understand timing and how much smoke to expect
- Keep a fire extinguisher nearby and clear the area of dry grass, leaves, or flammable materials
- Timing is quick: most smoke bombs last 45-90 seconds, so ensure everyone is in position before activation
- Alert guests with respiratory sensitivities beforehand and position them upwind at a comfortable distance
- Backup plan: if weather won’t cooperate, use a lamp filled with colored confetti that “poofs” out when you lift the lid
- Budget alternative: fill the lamp with colored powder (like Holi powder) that gets gently tossed into the air
- Pro tip: play “A Whole New World” in the background and time the smoke reveal to the song’s crescendo
I’ve watched this reveal create some of the most stunning photos because the smoke interacts with sunlight in beautiful ways. Just prioritize safety first—smoke bombs require careful handling and ideal conditions.
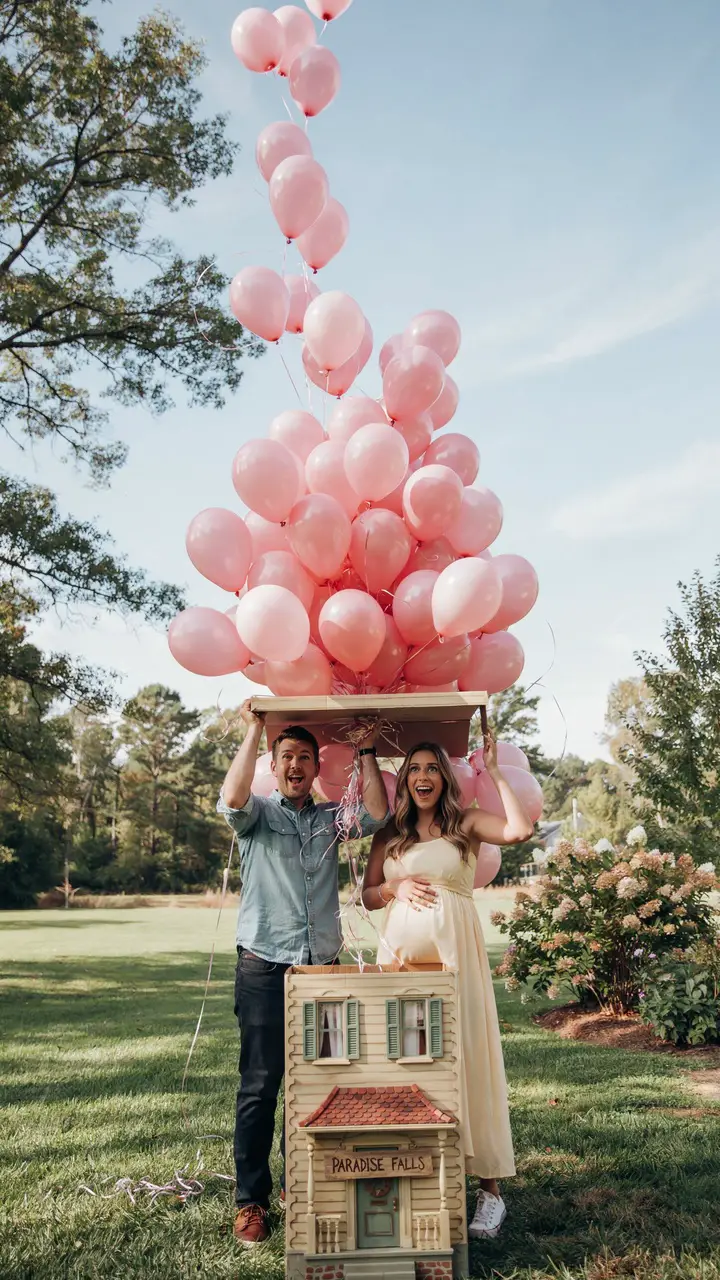
Up Balloon Box Reveal
How to Pull This Off
- Construct or source a large cardboard box: needs to be at least 3x3x4 feet to hold sufficient balloons ($15-20 for materials or find a free appliance box)
- Decorate the box: paint it to resemble Carl’s house using acrylic paints—include windows, door, colors, and details ($10-15 for paint and brushes)
- Order 100-150 helium balloons in your reveal color: this requires either renting a helium tank ($40-60) or hiring a balloon service to fill and pack them ($100-150)
- Have your secret-keeper coordinate the balloon color and arrange for filling the morning of the reveal
- Pack balloons carefully: use a large box with a removable top, ensuring ribbons are contained inside so balloons can escape freely when opened
- Weight the box down: place sand bags or weights at the base so it doesn’t tip when you open it
- Timing is critical: helium balloons last 8-12 hours at maximum float, so fill them the morning of your reveal
- Position cameras at multiple angles: one wide shot capturing the full balloon release, one close-up on your faces
- Open the lid with one swift motion: practice the opening movement beforehand for maximum dramatic effect
- Weather considerations: wind above 15 mph will scatter balloons unpredictably; have an indoor backup location
- Cleanup plan: assign volunteers to chase and retrieve balloons afterward, or use biodegradable balloon options
- Budget alternative: use 30-40 regular-sized balloons instead of 100+, or fill with colored paper airplanes that “fly” out
- Pro tip: attach small note cards to some balloon ribbons with guesses from guests before the reveal—adds a personal touch
This reveal creates incredible movement and energy in photos. The cascade of balloons feels both chaotic and joyful, perfectly capturing the adventure ahead.
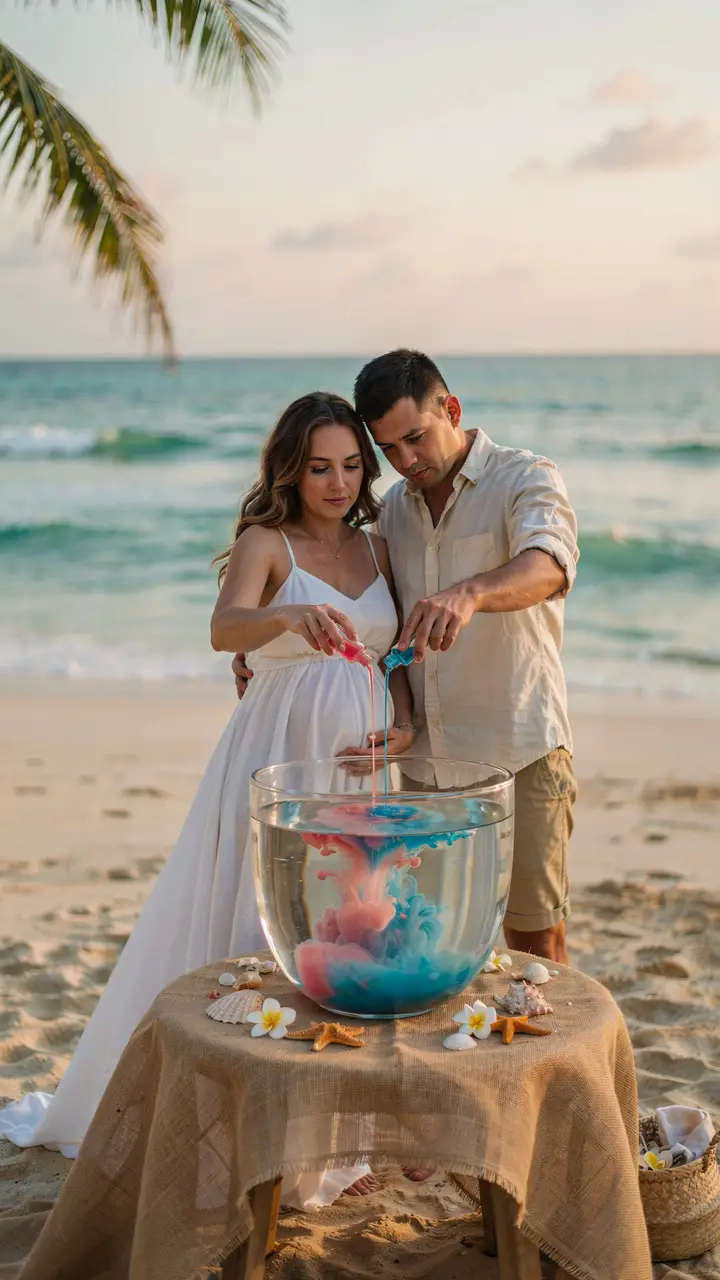
Moana Ocean Water Reveal
How to Pull This Off
- Source a large clear container: glass vase, hurricane candle holder, or large decorative bowl ($15-30)
- Fill with crystal-clear water the morning of the reveal—add a few drops of dish soap if you want more visible swirling effects
- Prepare small vials of colored water: use food coloring mixed with water (2-3 drops for intense color) in small decorative bottles
- Have your secret-keeper prepare the colored vials with the reveal color and mark them discreetly
- Set up near natural water: beach, lake, or pool for thematic consistency, though backyard works too with proper decor
- Position lighting carefully: natural sunlight from behind or side creates the best effect for seeing color swirls
- Use slow-motion video: most smartphones have this feature—the color mixing looks absolutely stunning in slow-mo
- Pour simultaneously from both sides of the container for a symmetrical swirling effect
- Consider water temperature: warm water creates gentler mixing, cold water creates more dramatic swirls
- Timing: the color mixing takes 10-15 seconds for full effect, ensure cameras are recording before you begin pouring
- Backup plan: if outdoor weather doesn’t cooperate, bring the setup indoors with a white backdrop
- Safety note: keep electrical devices (cameras, phones) away from water setup to prevent accidents
- Budget alternative: use a large clear pitcher with colored ice cubes that melt to reveal color
- Pro tip: play “How Far I’ll Go” during the reveal and pour to the rhythm of the music
This reveal is elegant, calming, and creates beautiful, organic visuals. It’s perfect for couples who want something understated but meaningful, and it works beautifully for intimate gatherings.
The Lion King Sun/Sunrise Reveal

How to Pull This Off
- Create a large sun prop: use two semi-circular pieces of painted foam board or cardboard (each 2-3 feet in diameter) that fit together ($15-20 for materials)
- Fill the center with your reveal element: colored fabric strips, streamers, or a small smoke device that activates when separated
- Have your secret-keeper set up the reveal element inside the sun prop the night before or early morning of the reveal
- Scout your location: you need a high point with clear eastern exposure and permissions for sunrise access
- Timing is non-negotiable: you must arrive 20 minutes before actual sunrise for setup and lighting checks
- Weather dependency is high: cloudy mornings won’t provide the backlit effect, so have a backup date ready
- Lighting is everything: position cameras facing west (toward you) so the sunrise creates the backlight effect
- Consider hiring a professional photographer for this one—the lighting conditions are tricky
- Use a tripod with timer or remote shutter to capture the reveal without needing someone else present
- Keep the prop sun lightweight: you’ll be holding it above your heads for several minutes during setup
- Backup plan: if sunrise conditions fail, recreate the effect using a large ring light or spotlight behind you indoors
- Safety reminder: ensure your elevated location has stable footing and safety rails if necessary
- Budget alternative: use large colored paper fans that open to reveal the color instead of a prop sun
- Pro tip: play “Circle of Life” from your phone speaker (bring a portable Bluetooth speaker) and time the reveal to Rafiki’s presentation moment
This reveal requires planning and early wake-up calls, but the photos are absolutely epic. The combination of natural beauty and your reveal creates images you’ll treasure forever.
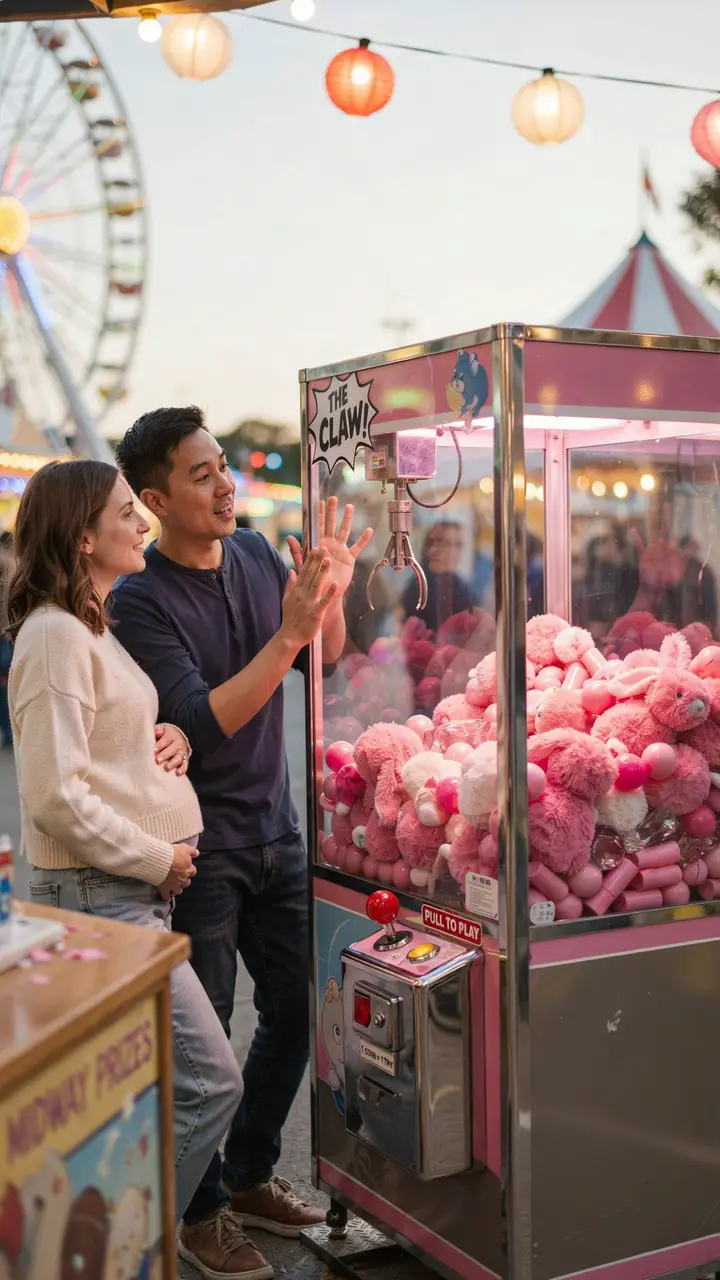
Toy Story Claw Machine Reveal
How to Pull This Off
- Rent or purchase a claw machine: small arcade-style machines can be rented for $75-150 per day, or buy a tabletop version for $100-200
- Fill entirely with pink or blue items: plush toys, bouncy balls, plastic prizes, or combination (aim for 50-100 items for full appearance)
- Have your secret-keeper source and fill the machine the day before your reveal
- Create suspense: cover the machine with a sheet or curtain until the reveal moment
- Position in a covered outdoor area or indoors where lighting can be controlled
- Set up photo opportunities: let guests try the claw after the reveal to win a prize (optional but fun)
- Consider the “oooooh” factor: when you unveil the machine, the color should be immediately and overwhelmingly obvious
- Record video from multiple angles: one capturing the machine unveiling, one focused on your reactions
- Add sound effects: play Toy Story music or the “the claw” voice clip from the movie
- Timing: set up the machine 1-2 hours before reveal to ensure everything works properly
- Backup plan: if you can’t secure a claw machine, create a “mystery box” decorated like Andy’s toy chest filled with colored toys
- Safety note: ensure the machine is stable and positioned away from small children who might try to climb it
- Budget alternative: fill a clear acrylic box or jar with colored gumballs or candies in your reveal color
- Pro tip: after the reveal, donate all the toys to a local children’s hospital or charity
This reveal is playful and immediately recognizable to any Toy Story fan. Plus, it doubles as both reveal and party decoration.
Finding Nemo Aquarium Reveal
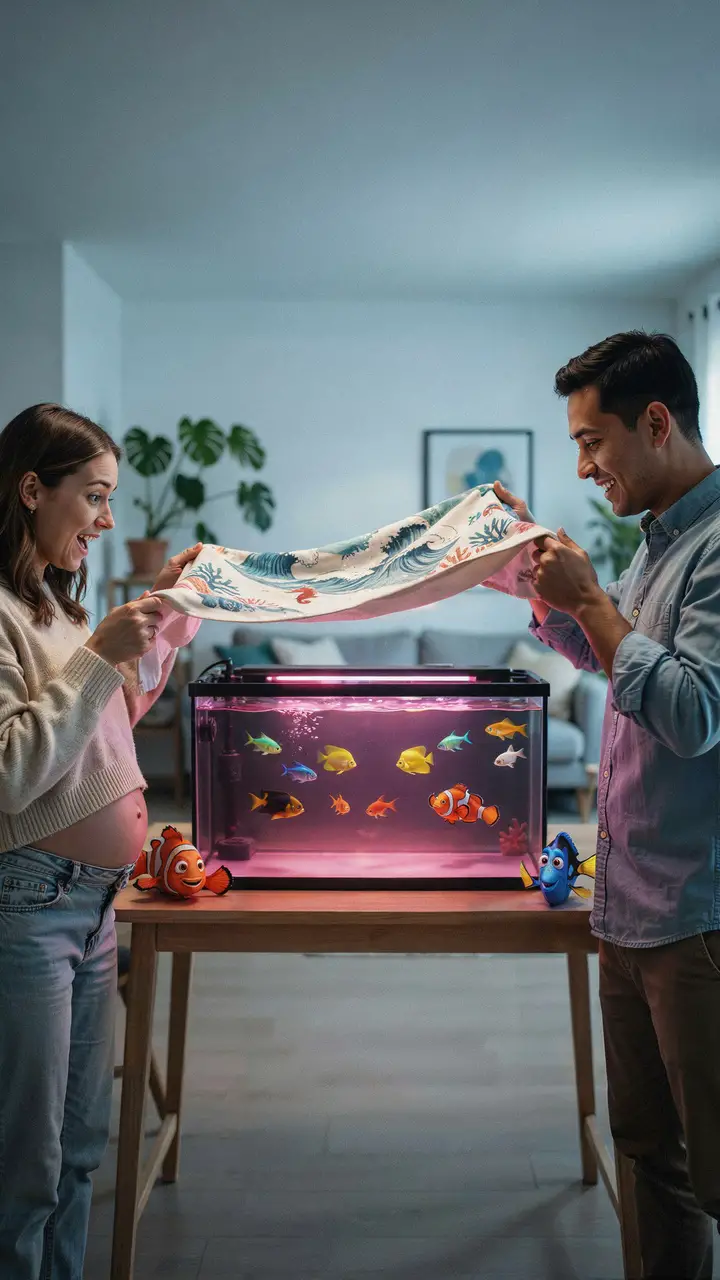
How to Pull This Off
- Rent or borrow a medium-sized aquarium: 20-30 gallon tank is ideal ($50-75 to rent or borrow from a friend)
- Fill with water and actual fish (optional): goldfish or small tropical fish in your reveal color if you’re comfortable maintaining them, or skip live fish entirely
- Use submersible LED lights in your reveal color: pink or blue LED aquarium lights ($15-30) that your secret-keeper sets up
- Cover the tank with decorative fabric: ocean-themed or solid-colored cloth that completely blocks the reveal color
- Set up 2-3 hours before guests arrive: ensure water is clear, lights are working, and any fish are acclimated
- Have your secret-keeper handle all aquarium setup including light color installation
- Test the lighting effect: ensure the colored LED is bright enough to be obvious through the water
- Position cameras directly in front of the tank to capture both the water’s glow and your reactions
- Unveil with a dramatic flourish: pull the cloth away simultaneously from both sides
- Consider water safety: keep the tank stable and away from areas where guests might bump it
- Backup plan: if live aquarium isn’t feasible, create a “fishbowl” effect using a large clear vase with colored water and floating decorative fish
- Fish welfare: if using live fish, have proper equipment and plans for their care after the event
- Budget alternative: use a clear plastic storage container, colored water, and floating rubber fish toys
- Pro tip: play the Finding Nemo soundtrack, particularly “Beyond the Sea,” during the reveal—the underwater theme enhances the whole atmosphere
This reveal is visually stunning and offers something unique that guests won’t forget. The glowing water effect creates magical photos and an immersive experience.
Beauty and the Beast Enchanted Rose Reveal
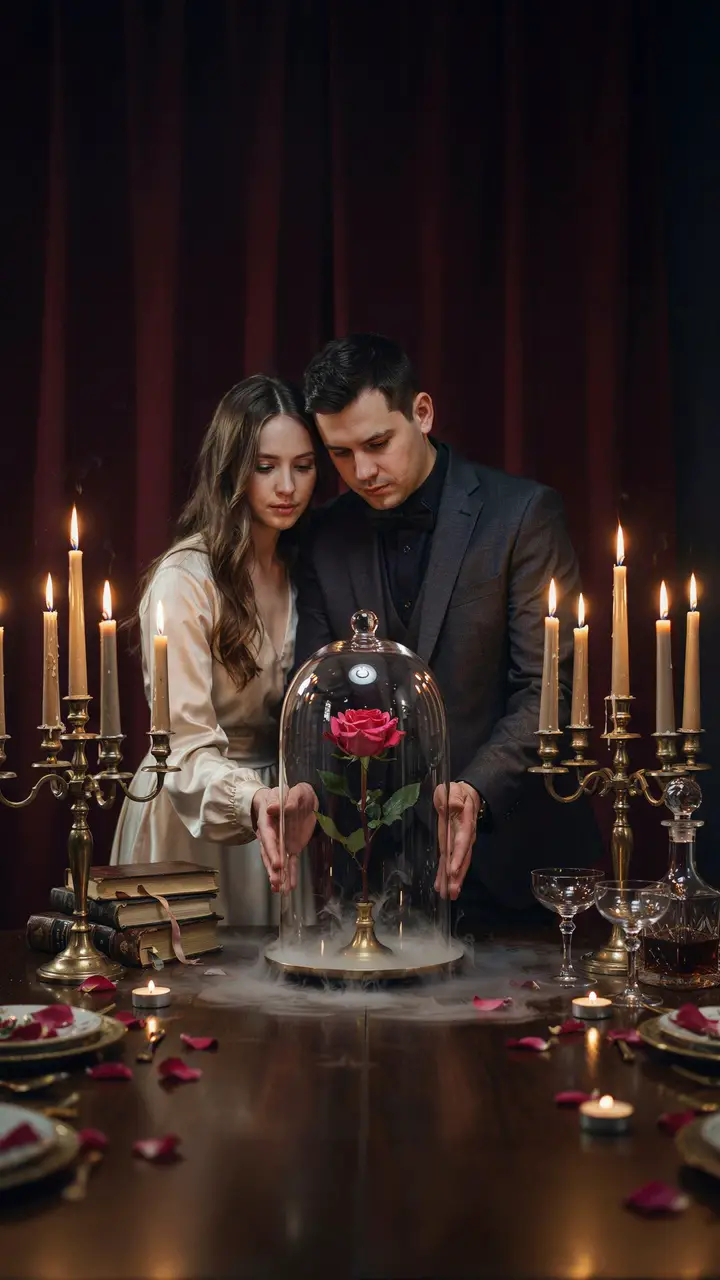
How to Pull This Off
- Source or create a glass dome: purchase a bell jar cloche online ($20-50) or check craft stores for available options
- Use a fresh or silk rose: real roses wilt quickly, so high-quality silk roses work better for setup that lasts all day ($10-15)
- Have your secret-keeper purchase a pink or blue rose and set up the dome 1-2 hours before the reveal
- Add atmospheric effects: battery-operated fairy lights wrapped around the rose base ($8-12), or dry ice for fog (requires careful handling)
- If using dry ice: add small amount right before the reveal (lasts 5-10 minutes), ensure proper ventilation, and never touch dry ice directly
- Create an elegant setup: use a vintage table, lace tablecloth, antique books, and candlesticks for ambiance
- Lighting is crucial: warm golden lighting (use Edison bulbs or warm-toned lamps) creates the enchanted castle atmosphere
- Position cameras at eye level with the dome to capture both the rose and your faces in the same shot
- Lift the dome slowly and together: this creates suspense and allows cameras to focus properly
- Timing considerations: if using fresh roses, set up no more than 2 hours before to prevent wilting
- Backup plan: have a second reveal method ready in case the rose isn’t clearly visible or gets damaged
- Safety note: if using dry ice, keep away from children and pets, handle with protective gloves only
- Budget alternative: use a clear glass vase with a pink or blue rose surrounded by LED candles
- Pro tip: time the reveal to the moment in “Beauty and the Beast” when the enchantment breaks—that orchestral swell is perfect
This reveal is sophisticated, romantic, and perfect for couples who want something more elegant and intimate. It works beautifully for small gatherings where everyone can see the delicate detail of the rose.
Peter Pan Pixie Dust Reveal

How to Pull This Off
- Use biodegradable or edible glitter only: regular craft glitter is terrible for the environment ($15-25 for sufficient quantity)
- Have your secret-keeper purchase the correct colored glitter and fill small decorative pouches or organza bags for you
- Practice your toss: you want a upward and outward motion that spreads the glitter in an arc above you
- Timing is everything: nighttime or dusk creates the best visual effect when glitter catches the light
- Set up string lights or spotlights: position lighting to illuminate the area where glitter will fall
- Use high-speed photography: most modern phones have burst mode—use it to capture multiple images of the glitter cloud
- Protect your clothing: glitter is notoriously difficult to remove, so wear clothes you’re okay getting sparkly
- Weather considerations: even light wind will blow glitter off-course; choose a calm evening
- Set up a clean tarp underneath: makes cleanup significantly easier afterward
- Position cameras with fast shutter speeds: you need at least 1/500 second to freeze glitter in motion
- Backup plan: if weather won’t cooperate, move indoors to a space where glitter cleanup is manageable
- Safety reminder: keep glitter away from eyes during the toss, and alert guests to step back
- Budget alternative: use colored confetti instead of glitter for similar effect with easier cleanup
- Pro tip: coordinate your toss with “You Can Fly” from Peter Pan—toss on the word “fly” for perfect timing
The pixie dust reveal creates ethereal, magical photos that look like something straight out of Neverland. Just commit to finding glitter in your hair for days afterward—it’s worth it. 🙂
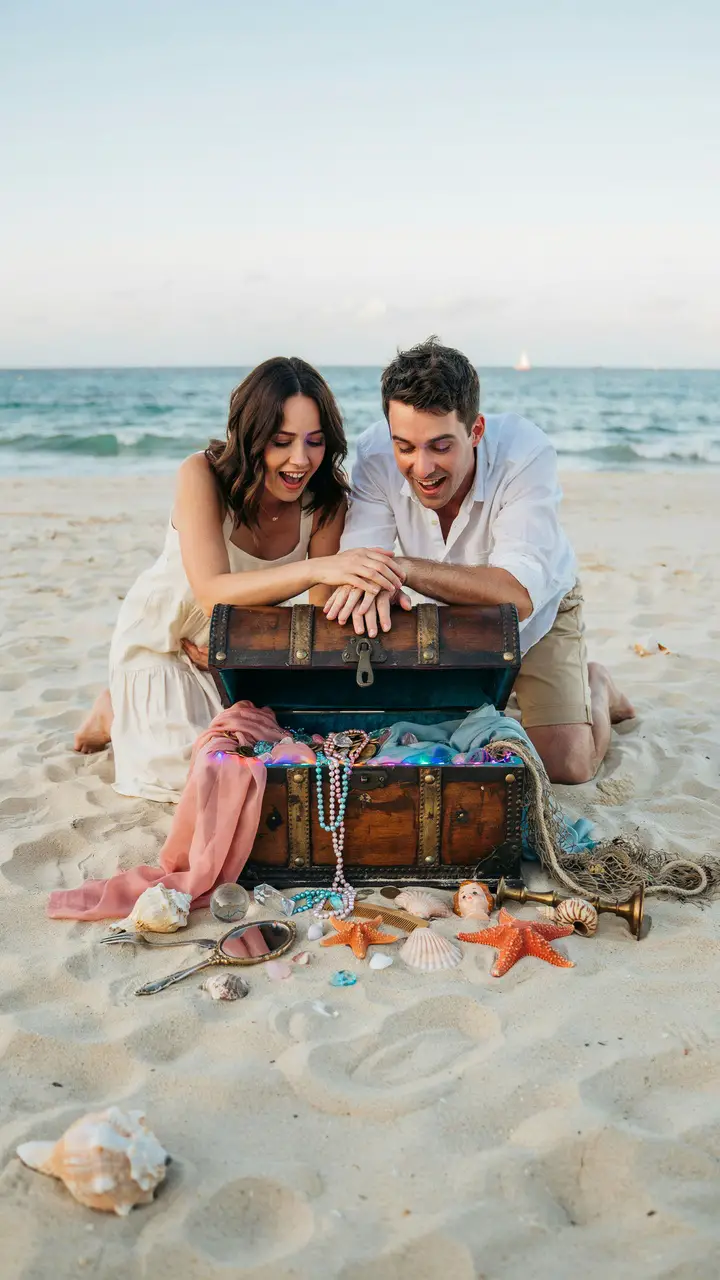
The Little Mermaid Treasure Chest Reveal
How to Pull This Off
- Source or build a treasure chest: purchase a decorative chest ($30-60) or build one from wood and paint it to look aged
- Install LED strip lights inside: battery-operated pink or blue LED strips ($10-15) that your secret-keeper attaches to the interior lid
- Fill with themed “treasures”: colored pearls, gem decorations, fabric in your reveal color, and optional Disney-themed items
- Weather the chest: use sandpaper and dark stain to create an authentic, aged appearance
- Have your secret-keeper set up all reveal elements inside the chest including activating the LED lights
- Set up at the beach or create a beach scene: use sand, shells, and nautical decor even if you’re in a backyard
- Test the lid opening: ensure it opens smoothly and won’t stick during the big moment
- Position cameras to capture the glowing interior: side angle works best to show both the contents and your reactions
- Consider adding fog effect: a small amount of dry ice creates a mystical treasure-opening effect (requires proper safety handling)
- Timing: set up the chest and activate LED lights no more than 30 minutes before reveal (to preserve battery life)
- Backup plan: if LED lights fail, fill chest completely with colored items so the reveal is still obvious
- Safety note: if using a real chest with metal hardware, ensure no sharp edges or pinch points
- Budget alternative: decorate a large cardboard box to look like a chest and fill with colored tissue paper
- Pro tip: play “Part of Your World” during the chest opening—the wonder in the song matches the treasure discovery perfectly
This reveal combines tactile interaction (opening the chest) with visual surprise (the glowing contents). It’s incredibly photogenic and works for both beach and inland locations.
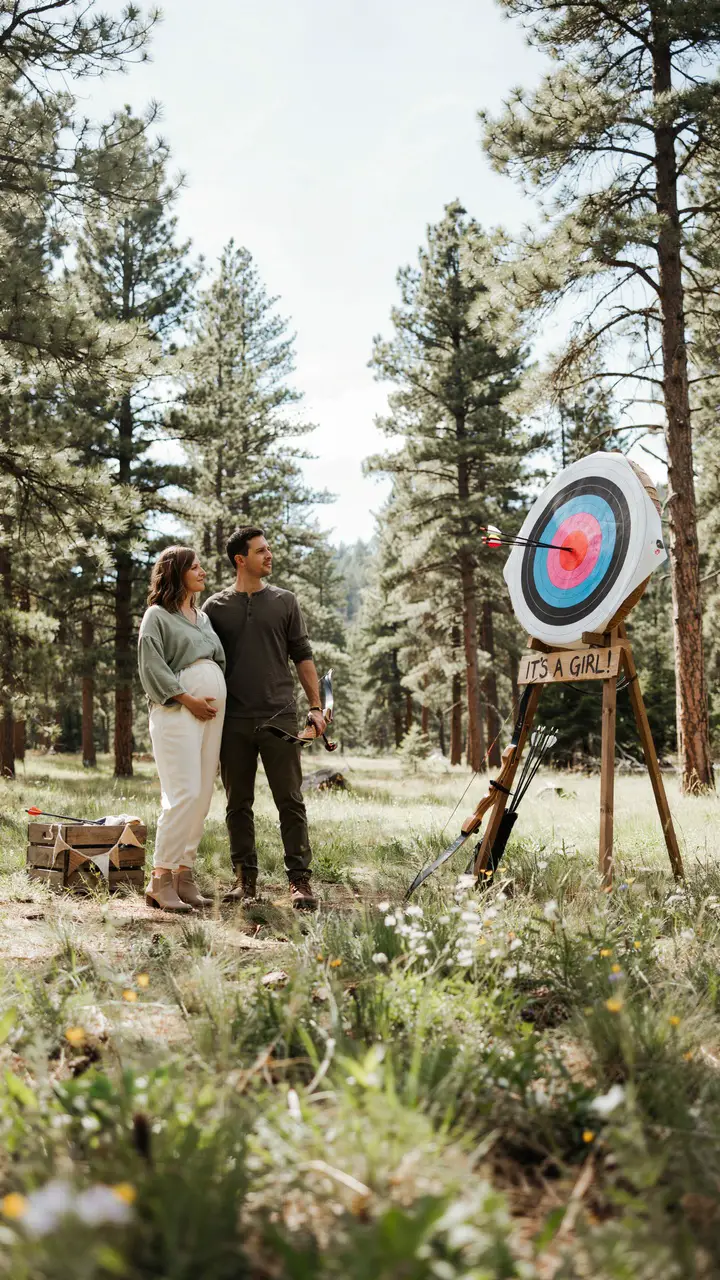
Brave Archery Target Reveal
How to Pull This Off
- Set up a safe archery area: requires at least 20 yards of clear space with a backstop behind the target (hay bales work well)
- Create or purchase an archery target: paint the bullseye in your reveal color, or create a layered target where arrows reveal colored layers underneath
- Use safe archery equipment: blunt-tipped arrows or suction-cup arrows for safety ($20-40 for basic bow and arrows)
- Have your secret-keeper paint the bullseye in the correct reveal color and set up the target
- Practice beforehand: if you’ve never shot a bow, practice with a differently-colored target to ensure you can actually hit it
- Consider hiring a professional archer: if accuracy is a concern, have someone demonstrate or assist ($50-100)
- Set up safety perimeters: ensure all guests are behind the shooting line and that children are supervised
- Position cameras behind and beside the shooting line: capture both the shot and the target impact
- Have a backup arrow ready: in case the first shot misses or doesn’t clearly reveal the color
- Weather considerations: wind affects arrows significantly; choose a calm day or move to an indoor archery range
- Backup plan: if shooting doesn’t reveal the color clearly, have balloons behind the target that pop to release confetti
- Safety is paramount: follow all archery safety protocols, never point bows at people, and clear the range before each shot
- Budget alternative: use a dart board with colored center or a slingshot with water balloons filled with colored water
- Pro tip: play the Brave soundtrack during setup—”Touch the Sky” creates perfect adventurous energy
This reveal is unique and perfect for couples who love adventure and outdoor activities. It requires proper safety setup, but the photos of you both shooting at the target are incredibly dynamic and memorable.
Choosing a Disney theme for your gender reveal adds layers of meaning and magic to an already special moment. Whether you connect with the adventure of Up, the romance of Beauty and the Beast, or the courage of Brave, these stories already hold emotional significance for you—and now they become part of your baby’s story too.
The best Disney reveals are the ones that genuinely reflect your personality as a couple. If you’re both Disney park enthusiasts, go big with the Mickey balloon pop. If you prefer intimate moments, the enchanted rose or Moana water reveal might be more your speed. And if you’re adventurous spirits, the archery target or pixie dust toss will capture that energy perfectly.
Remember that the actual reveal method is just one moment, but the anticipation, the setup, and the celebration afterward are what create lasting memories. Take photos of your preparations, capture candid reactions from guests, and don’t stress if something doesn’t go exactly as planned—some of the best reveal moments come from unexpected surprises or imperfections.
Your baby is already loved beyond measure, and celebrating this milestone with the magic of Disney just adds an extra touch of wonder to the journey ahead. Whether you’re expecting a little prince or princess (or however you choose to celebrate), this moment marks the beginning of your own happily ever after. Enjoy every second of it, and congratulations on your growing family! <3

Greetings, I’m Alex – an expert in the art of naming teams, groups or brands, and businesses. With years of experience as a consultant for some of the most recognized companies out there, I want to pass on my knowledge and share tips that will help you craft an unforgettable name for your project through TeamGroupNames.Com!