You know that moment when your five-year-old asks for help with their shoes for the hundredth time today, and you think, “When will they just… learn?” Or when your eight-year-old stares blankly at a pile of dirty dishes like they’ve never seen a kitchen before? Yeah, I’ve been there. We all have.
Here’s what I’ve discovered after years of parenting and working with families: kids want to be capable. They crave independence and the confidence that comes with knowing how to do things themselves. The trick is making life skills practice feel less like boring chores and more like the exciting challenges they actually are.
These 12 activities aren’t just about teaching kids to fold laundry or make a sandwich (though we’ll cover those too!). They’re about building confidence, fostering independence, and honestly? Making your life as a parent significantly easier in the long run.
Plus, most of these activities double as quality time together, which is pretty much the best win-win situation ever.
Let’s jump into practical, age-appropriate ways to teach life skills that actually stick. No Pinterest-perfect expectations here—just real activities that work for real families.
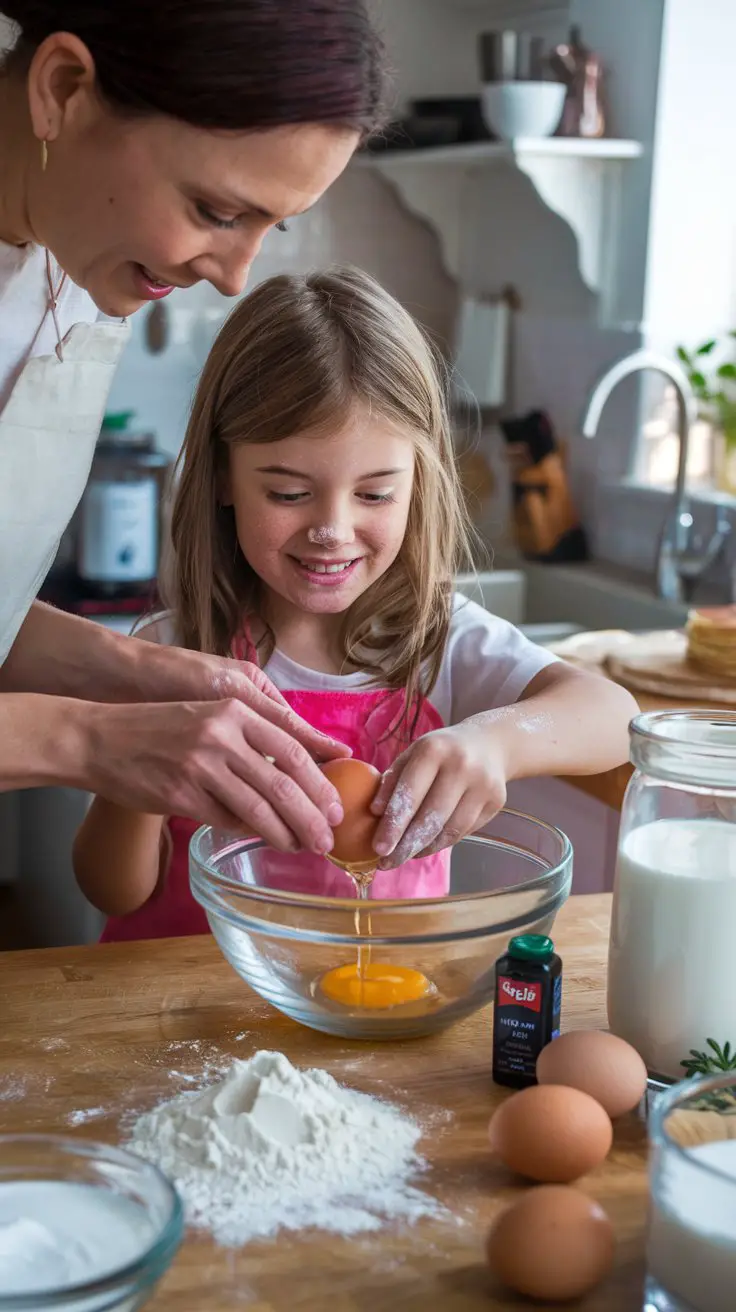
Cooking Simple Meals Together
Teaching kids to cook isn’t just about future survival skills (though hello, college-bound teens who can feed themselves!). It’s about math, following directions, safety awareness, and the pure joy of creating something delicious from scratch.
How to Set This Up
Materials needed:
- Age-appropriate recipe (start simple: scrambled eggs, toast, smoothies, no-bake energy balls)
- Necessary ingredients laid out in advance
- Child-safe cooking tools (plastic knives, sturdy measuring cups, wooden spoons)
- Step stool or learning tower for counter access
- Aprons or old t-shirts for mess protection
- Visual recipe cards with pictures for younger kids
Step-by-step setup:
- Choose a recipe together that your child can mostly complete with supervision
- Gather all ingredients before starting (this teaches prep work and organization)
- Assign specific tasks based on age: stirring, pouring pre-measured ingredients, spreading, arranging
- Let them make decisions: “Should we add chocolate chips or blueberries?”
- Build in small failures and problem-solving: slightly burned toast becomes a learning moment, not a disaster
Age appropriateness:
- 3-5 years: Washing vegetables, tearing lettuce, stirring cold ingredients, arranging toppings, spreading soft spreads
- 6-8 years: Measuring ingredients, cracking eggs (with supervision), using hand mixer, making simple sandwiches, operating microwave
- 9-12 years: Following basic recipes independently, using stovetop with supervision, planning simple meals, understanding food safety basics
Estimated time:
- Setup: 10-15 minutes
- Activity: 20-45 minutes depending on recipe complexity
- Cleanup: 15-20 minutes (have them help!)
Mess level: Medium to high—flour goes everywhere, eggs get dropped, counters need wiping. Totally worth it.
Developmental benefits:
- Math skills: Measuring, counting, understanding fractions (half cup, quarter teaspoon)
- Reading comprehension: Following recipe steps in order
- Fine motor skills: Cracking eggs, precise pouring, using utensils
- Executive function: Planning, sequencing, time management
- Confidence building: Creating something tangible and useful
- Nutrition awareness: Understanding where food comes from and what goes into meals
Safety considerations:
- Always supervise knife use, heat sources, and electrical appliances
- Teach proper hand-washing before and during cooking
- Explain food safety basics (raw eggs, meat handling, proper storage)
- Keep hot handles turned inward and pot holders accessible
- Establish clear kitchen rules about what requires adult help
Activity variations:
- Younger kids: Focus on assembly tasks like making trail mix, fruit kabobs, or DIY pizza with pre-made dough
- Older kids: Graduate to planning entire meals, checking what’s in the pantry, creating shopping lists
- Weekend challenge: Let them plan and prepare one family meal per month completely independently (with supervision available)
Cost-saving tips: Start with ingredients you already have. Breakfast foods (pancakes, eggs, oatmeal) are usually cheaper and more forgiving than complex dinner recipes.
Parent sanity tips: Accept that your kitchen will be messier, cooking will take three times longer, and results won’t be Instagram-worthy. The skills they’re building are worth every grain of spilled flour. I promise.
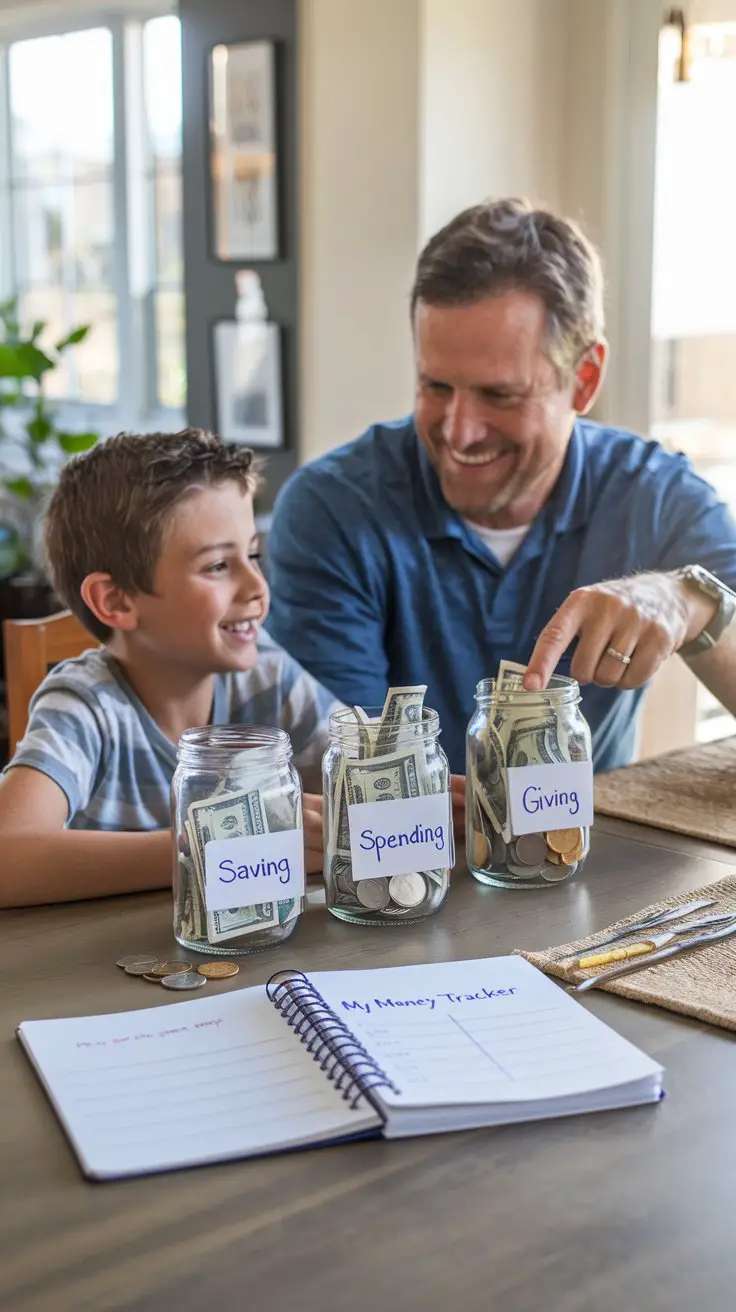
Money Management and Basic Budgeting
Nothing prepares kids for adult life quite like understanding that money is finite and choices have consequences. And honestly? The earlier they grasp this, the fewer frantic calls you’ll get during their first year of college asking how they spent their entire month’s budget in week one. (Been there, received those calls.)
How to Set This Up
Materials needed:
- Three clear jars or containers labeled “Save,” “Spend,” and “Give”
- Small amount of money to start (coins, small bills, or play money for younger children)
- Simple ledger notebook or printable tracking sheet
- Envelopes for specific savings goals
- Calculator for older kids
- Visual goal charts (pictures of items they’re saving toward)
Step-by-step setup:
- Start with allowance basics: decide on a reasonable amount based on age and your family’s budget
- Establish the three-jar system: suggest a split like 50% spending, 40% saving, 10% giving (adjust as needed)
- Connect allowance to age-appropriate responsibilities, not basic family contributions
- Help them identify a specific savings goal with a picture reminder
- Create a simple tracking system: money in, money out, current balance
- Schedule weekly “money meetings” to count, categorize, and talk about choices
Age appropriateness:
- 5-7 years: Simple coin recognition, basic counting, understanding that money buys things, choosing between two items
- 8-10 years: Using the three-jar system, saving toward specific goals, understanding basic earning vs. spending, helping compare prices at the store
- 11-13 years: Tracking expenses, understanding percentages, planning for larger purchases, learning about interest (even if just conceptually), beginning to understand bills and monthly expenses
Estimated time:
- Initial setup: 30 minutes to explain system and create tracking tools
- Weekly maintenance: 10-15 minutes for money meetings and tracking
- Ongoing conversations: 5 minutes as opportunities arise during shopping or when they want to buy something
Mess level: Low—just keep track of those coins that mysteriously disappear into couch cushions!
Developmental benefits:
- Math skills: Counting, addition, subtraction, percentages, basic multiplication
- Delayed gratification: Learning to wait and save for something meaningful
- Decision-making: Weighing wants vs. needs, comparing options
- Responsibility: Keeping track of their own resources
- Generosity: Understanding the importance of giving to others
- Long-term thinking: Planning ahead for future wants or needs
Safety considerations:
- Keep larger amounts of money stored securely
- Teach them that money is private—not something to brag about at school
- Discuss online safety if they eventually use digital money tools
- Talk about scams and “too good to be true” offers
Activity variations:
- Earning opportunities: Create age-appropriate ways to earn extra money beyond allowance (special projects, not regular chores)
- Shopping practice: Give them a budget for specific purchases and let them decide how to allocate it
- Family giving project: Let them choose a charity or cause for their “giving” jar together
- Needs vs. wants sorting: Go through toy catalogs or shopping apps together, categorizing items
Cost-saving tips: You don’t need to give a large allowance for this to work. Even $3-5 per week teaches the same principles. Some families use play money first for younger kids to practice the system before real money is involved.
Parent sanity tips: Resist the urge to rescue them when they blow all their spending money on something they regret two days later. Those natural consequences are the whole point. Just empathize: “That’s so frustrating! What might you do differently next time?” The lesson will stick far better than any lecture ever could.
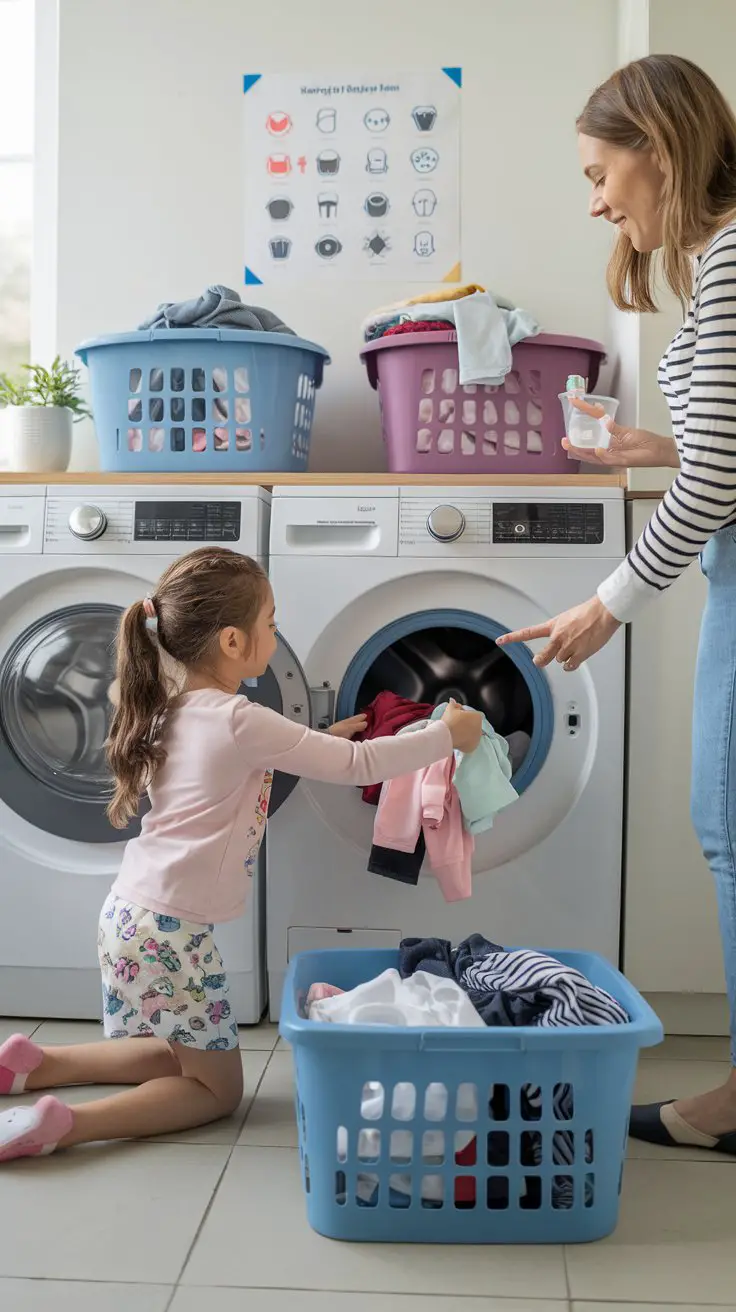
Laundry Basics: Sorting, Washing, and Folding
I’ll never forget my college roommate who called her mom crying because she’d turned all her white clothes pink. (True story—the culprit was one red sock.) Teaching kids laundry skills prevents future disasters and, bonus, gets you some help around the house!
How to Set This Up
Materials needed:
- Three laundry baskets or bins labeled “Whites,” “Darks,” and “Colors”
- Age-appropriate laundry detergent (consider pods for beginners, though teach proper handling)
- Visual guide showing laundry symbols and their meanings
- Folding surface (bed, table, or cleared floor space)
- Matching sock game supplies (optional but makes it more fun)
- Stain treatment stick (teach them to identify and treat stains immediately)
Step-by-step setup:
- Start with sorting: make it a game for younger kids (color scavenger hunt!)
- Create a simple visual reference guide: what goes in each basket and why
- For first-timers, do a practice run with supervision on every step
- Teach the washer/dryer basics: where detergent goes, which settings to use, why we don’t overload
- Make folding easier with a dedicated, uncluttered space
- Consider assigning each family member their own basket for sorted clean clothes
Age appropriateness:
- 4-6 years: Sorting by color, matching socks (seriously, it’s a toddler superpower), putting their own folded clothes away
- 7-9 years: Operating washer/dryer with supervision, folding simple items (towels, t-shirts, pants), understanding basic stain treatment
- 10-12 years: Doing their own laundry independently, checking pockets, treating stains, reading care labels, hanging delicates
Estimated time:
- Setup: 5-10 minutes to sort and prep load
- Wash/dry time: Standard cycle times (they can do other things meanwhile)
- Folding: 15-20 minutes per load
- Full cycle: About 2-3 hours start to finish including machine time
Mess level: Low to medium—occasional detergent spills, learning curve on how much soap to use, stray socks everywhere.
Developmental benefits:
- Categorization skills: Sorting by color, fabric type, person
- Reading comprehension: Understanding care labels and detergent instructions
- Responsibility: Taking care of their belongings
- Fine motor skills: Folding, buttoning, hanging
- Life readiness: Not becoming that college kid who ruins an entire load
- Math concepts: Measuring detergent, understanding fractions and water levels
Safety considerations:
- Laundry pods are NOT CANDY—store high and out of reach, supervise carefully
- Teach them hot water can burn; most loads wash fine in cold anyway
- Explain the dryer lint trap and why it must be cleaned (fire safety!)
- Never let young kids handle bleach without very close supervision
- Remind them to check all pockets (tissues in the wash are nobody’s friend)
Activity variations:
- Sock matching race: Time them to see how fast they can pair up all the socks
- Folding challenge: See who can fold the neatest t-shirt (you might actually lose this one)
- Laundry science: Explore why we separate colors, what happens to stains, how soap works
- Clothing care: Teach basic repairs like sewing on buttons or fixing small tears
Cost-saving tips: This one actually saves you money! Not only do you get help, but kids learn to treat clothes carefully when they understand the work involved in keeping them clean. Plus, teaching them to wash in cold water and line-dry when possible shows practical conservation.
Parent sanity tips: Yes, they’ll shrink something. They might even accidentally tie-dye your favorite shirt with a rogue red sock. Deep breaths. These mistakes are the best teachers. Just maybe don’t let them start with your irreplaceable cashmere sweater.
BTW, consider creating a “practice” load first with old towels or stuff that doesn’t matter—builds confidence without risking anyone’s favorite outfit!
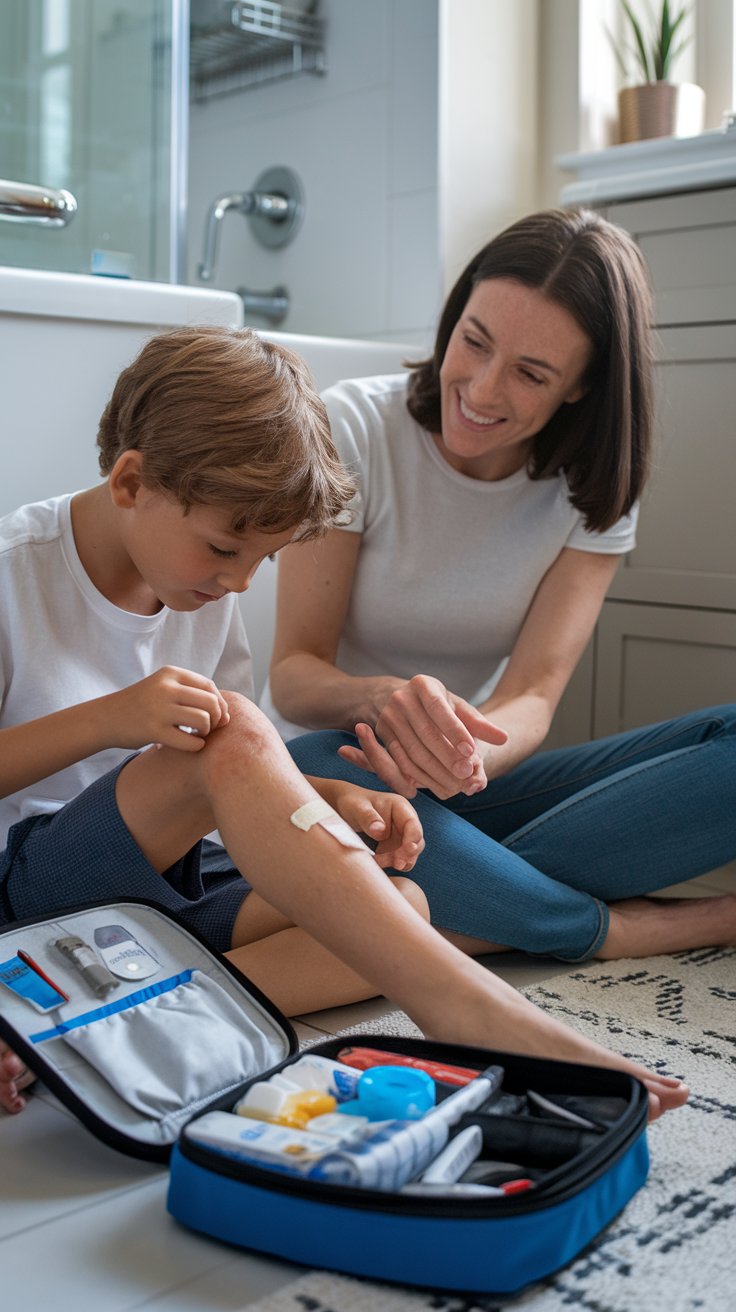
Basic First Aid and Safety Awareness
Kids get hurt. It’s basically their part-time job. Teaching them basic first aid turns scary moments into opportunities for calm problem-solving instead of instant panic. Plus, there’s something incredibly empowering about a child who knows they can help themselves or others in minor emergencies.
How to Set This Up
Materials needed:
- Well-stocked, organized first aid kit in an accessible location
- Visual guide showing basic first aid steps (printable or store-bought)
- Practice materials: bandages, gauze, medical tape for demonstrations
- Stuffed animal or doll for practicing techniques
- List of emergency numbers clearly posted
- Simple first aid book with pictures appropriate for kids
- Ice pack and instructions for various injuries
Step-by-step setup:
- Start by going through the first aid kit together: what each item is for and when to use it
- Practice on stuffed animals first: cleaning “wounds,” applying “bandages,” making ice packs
- Teach the difference between injuries they can handle and when to immediately get an adult
- Role-play common scenarios: scraped knee, minor burn, bumped head, nosebleed
- Create a simple decision tree: “Can I handle this myself? Should I tell an adult? Should I call 911?”
- Review regularly and after any actual incidents to reinforce learning
Age appropriateness:
- 5-7 years: Knowing how to get help, basic wound washing, applying simple bandages to themselves, understanding when to tell an adult immediately
- 8-10 years: Cleaning minor cuts, applying appropriate bandages, making ice packs, knowing emergency numbers, basic burn treatment (cool water)
- 11-13 years: Comprehensive first aid for minor injuries, recognizing serious situations, helping younger siblings, understanding basic CPR concepts (though formal training is ideal)
Estimated time:
- Initial teaching session: 30-45 minutes
- Practice scenarios: 15-20 minutes periodically
- Real-life application: 5-10 minutes per incident
- Review sessions: 15 minutes every few months
Mess level: Low—just some practice bandages to dispose of and maybe antiseptic wipes.
Developmental benefits:
- Problem-solving: Assessing situations and deciding on appropriate action
- Self-reliance: Knowing they can handle minor issues independently
- Empathy: Understanding how to help others who are hurt
- Anxiety reduction: Knowledge decreases fear of common childhood injuries
- Responsibility: Understanding when situations require adult help
- Confidence: Feeling capable in unexpected situations
Safety considerations:
- Emphasize that some situations ALWAYS need adult help: anything with heavy bleeding, head injuries with confusion, burns larger than a quarter, eye injuries, choking, difficulty breathing
- Teach them to never move someone who might have a back or neck injury
- Explain that calling for help is never wrong, even if it turns out to be less serious
- Keep first aid kit in consistent, accessible location
- Review expiration dates and replace supplies regularly
Activity variations:
- Emergency drill practice: Like fire drills, but for calling 911 or knowing what to do if they find someone hurt
- Outdoor first aid: Special focus on bug bites, poison ivy, twisted ankles, tick removal
- Recognizing serious situations: Teaching warning signs that require immediate adult/medical attention
- Comfort measures: What to do for someone who’s scared or in shock (stay calm, get help, offer comfort)
Cost-saving tips: Build your first aid kit gradually with items from dollar stores. The teaching and practice matter far more than expensive supplies. Most communities offer free or low-cost first aid and CPR classes for families.
Parent sanity tips: This one actually reduces stress! The first time your kid calmly cleans and bandages their own scraped knee without dramatics, you’ll feel ridiculously proud. Start with the smallest, least scary stuff and build up. And honestly? Sometimes the bravery of handling their own minor injury actually hurts less than the anticipation and drama of having someone else do it.
Creating fun team dynamics for family activities? Check out these cool team names for inspiration!
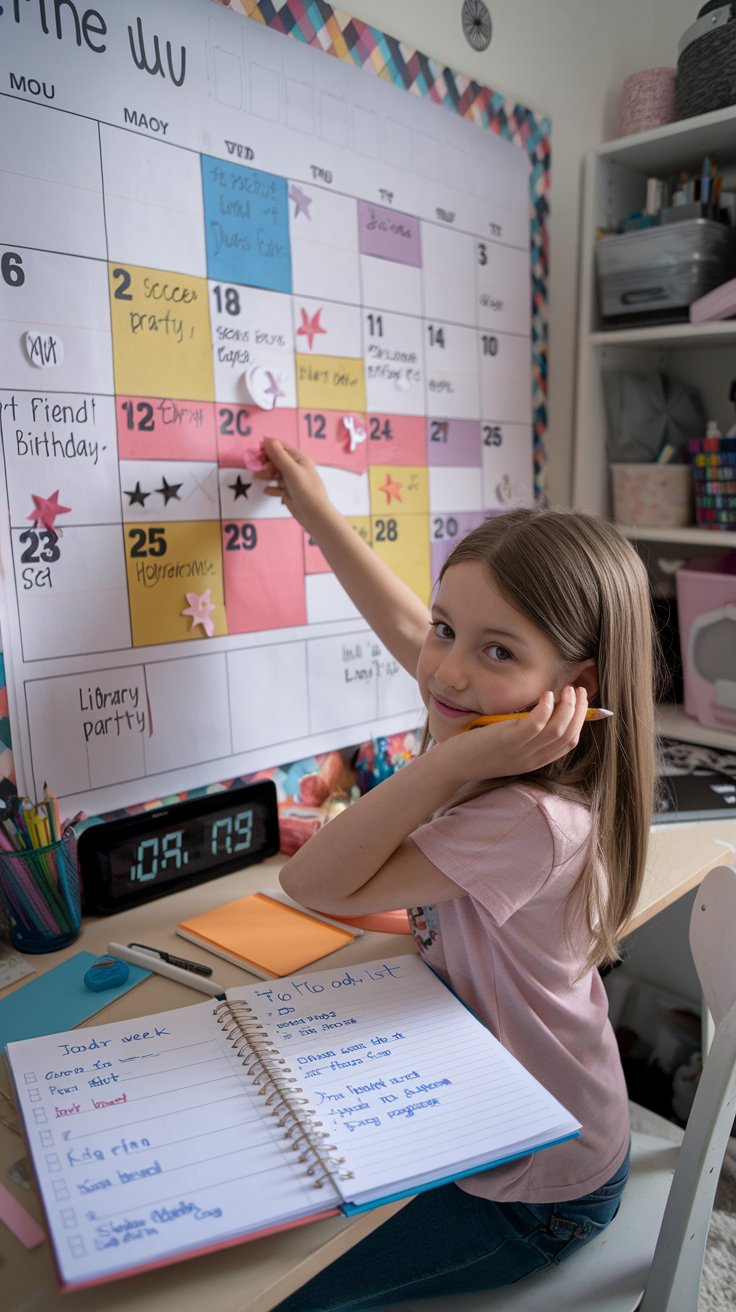
Time Management and Using a Calendar
If I had a dollar for every time my kids said “I forgot” about something important… well, I’d probably have enough money for a really nice vacation. Teaching time management isn’t about making kids into tiny productivity robots—it’s about reducing that awful last-minute stress for everyone.
How to Set This Up
Materials needed:
- Large wall calendar at kid’s eye level in their space or central family area
- Color-coded stickers or markers (different colors for different activities)
- Smaller weekly/daily planner for older kids
- Sticky notes for moveable reminders
- Dry erase board for daily priorities (optional)
- Timer or clock clearly visible
- Reward stickers for consistent use (for younger kids)
Step-by-step setup:
- Choose calendar format together: visual, digital, paper—whatever they’ll actually use
- Establish a color-coding system: school = blue, sports = green, social = pink, chores = yellow
- Start with just tracking existing commitments before adding new responsibilities
- Create a simple daily routine chart for younger kids (morning, after school, bedtime)
- Build in weekly planning time: Sunday evening works for many families
- Connect calendar use to things they care about: “If it’s not on the calendar, we might not remember to take you”
Age appropriateness:
- 5-7 years: Simple daily routine chart with pictures, understanding “today,” “tomorrow,” “next week,” marking special events
- 8-10 years: Using a weekly calendar, planning ahead for activities, breaking homework into smaller tasks, understanding time estimates
- 11-13 years: Monthly planning, managing multiple commitments, understanding deadlines, using digital tools, prioritizing competing activities
Estimated time:
- Initial setup: 30-45 minutes to create system and explain use
- Daily check-in: 5 minutes morning and evening
- Weekly planning: 15-20 minutes to review upcoming week
- Monthly review: 20-30 minutes to look ahead and adjust
Mess level: Low—just calendar supplies and occasional forgotten sticky notes.
Developmental benefits:
- Executive function: Planning, organizing, prioritizing, and following through
- Time perception: Understanding how long activities take and how time flows
- Responsibility: Owning their schedule and commitments
- Independence: Knowing what’s happening without constantly asking parents
- Stress reduction: Fewer surprises and last-minute panics
- Goal setting: Breaking larger goals into manageable steps
Safety considerations:
- For digital calendars, ensure privacy settings are appropriate
- Don’t overload schedules—kids need downtime too
- Balance activities with family time and rest
- Watch for signs of schedule-related stress or burnout
Activity variations:
- Visual countdown: For younger kids, create paper chains or countdown calendars for anticipated events
- Time estimation game: Guess how long activities take, then track actual time to improve awareness
- Morning/evening checklists: Break routines into specific steps they can independently follow
- Family command center: Central location where everyone’s schedules coordinate
- Backwards planning: For big events or projects, work backward from the deadline to create a plan
Cost-saving tips: Free printable calendars work perfectly. Dollar store supplies. Even a piece of paper taped to the wall works if they’ll actually look at it and use it consistently.
Parent sanity tips: Start with just one or two calendar uses rather than going all-in with every possible item. The goal is building a habit, not creating another thing for you to manage. And honestly? Let them experience the natural consequence of forgetting something once (if it’s safe and not too critical). That lesson sticks way better than 100 reminders ever would.
IMO, this is one of those skills where the payoff gets bigger as they get older. That teenager who can manage their own schedule and doesn’t need you to track their every assignment? Worth every minute invested in teaching calendar skills years earlier.
Meal Planning and Grocery Shopping
Want to know a secret? Kids who help plan meals and shop for groceries complain way less about what’s for dinner. They feel ownership. Plus, grocery shopping teaches so many hidden skills: math, nutrition, budgeting, decision-making, and comparing options.

How to Set This Up
Materials needed:
- Weekly meal planning template (printable or simple paper divided into days)
- Recipe collection or cookbook (kid-friendly options with pictures)
- Shopping list template organized by store sections
- Reusable shopping bags
- Calculator for price checking (or phone)
- Store loyalty card if applicable
- Budget guidelines appropriate for family finances
Step-by-step setup:
- Start with meal planning: look at the week ahead, consider activities, let them choose 1-2 meals
- Check what ingredients you already have vs. what you need to buy
- Create shopping list together, organized by store sections to make shopping more efficient
- Set a rough budget or spending goal
- Assign age-appropriate responsibilities: younger kids find items, older kids compare prices
- At the store, explain decisions: “Why might we choose this brand over that one?”
- Let them help unpack and organize groceries at home
Age appropriateness:
- 5-7 years: Helping find items on shelves (great for recognition skills), choosing between two options, learning produce names, putting away groceries
- 8-10 years: Writing shopping list, comparing prices, calculating simple costs, understanding nutrition labels basics, suggesting meal ideas
- 11-13 years: Planning complete meals, creating shopping list independently, managing a department budget (like $20 for produce), understanding unit pricing, identifying good deals
Estimated time:
- Meal planning: 20-30 minutes per week
- Creating shopping list: 10-15 minutes
- Shopping trip: 45-90 minutes depending on store and list length
- Unpacking and organizing: 15-20 minutes
Mess level: Low—mostly just making sure groceries get properly stored when you get home.
Developmental benefits:
- Planning skills: Thinking ahead for the week’s needs
- Math practice: Addition, estimation, comparing prices, understanding percentages (sales)
- Nutrition awareness: Reading labels, understanding food groups, making healthier choices
- Decision-making: Weighing options based on multiple factors (cost, nutrition, taste, family preferences)
- Budget consciousness: Understanding that money is limited and choices matter
- Independence: Ability to eventually shop for themselves
Safety considerations:
- Teach cart safety (fingers away from wheels, no climbing)
- Discuss stranger safety in stores
- Explain food safety: checking dates, avoiding damaged packaging
- Teach proper lifting techniques for heavier items
- Discuss reading allergen information if relevant
Activity variations:
- Theme weeks: Let them choose a cuisine theme and research recipes (Taco Tuesday becomes Taco Week!)
- Budget challenge: Give them a set amount for specific items and see how they do
- Nutrition hunt: Find foods from each food group or colors of the rainbow
- Seasonal eating: Discuss what’s in season and why it matters
- Store comparison: Visit different stores to compare prices and selection
- Coupon/sale hunting: Teach savvy shopping with store apps or weekly ads
Cost-saving tips: This activity actually saves money when kids understand budget constraints. They become allies in finding good deals rather than just grabbing whatever looks good. Teaching price per unit comparison is a seriously valuable skill.
Parent sanity tips: The first few trips will take longer. Like, noticeably longer. Plan accordingly and maybe don’t do this on your most rushed grocery run. Start with just part of the shop (produce section only, or 10 items max) and build up as they get comfortable. And honestly? When they suggest meals, resist the urge to veto every idea—negotiate and compromise. Their engagement matters more than having your perfect menu.
FYI, some stores have apps where kids can practice making virtual shopping lists before the real trip, which helps them feel more prepared and speeds up the actual shopping experience. Worth checking out!
Looking for creative names for your family cooking team? These cooking team names might inspire you!
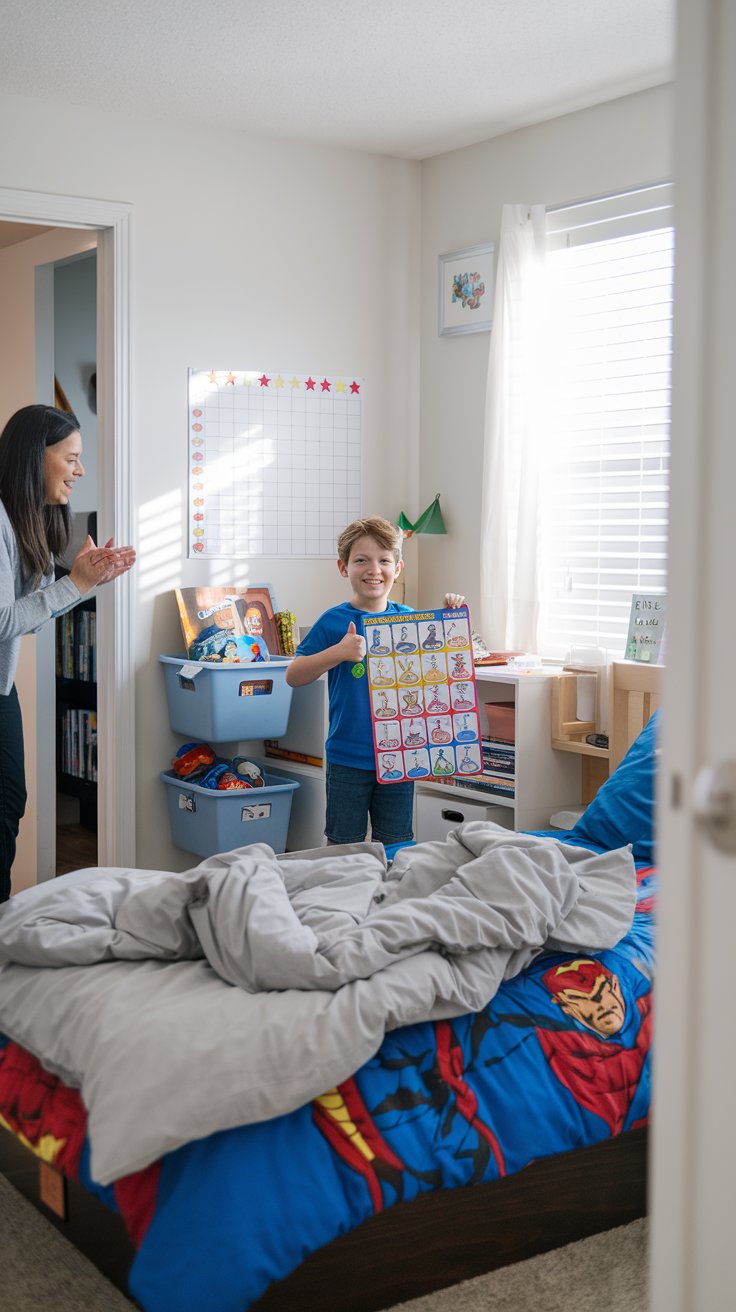
Basic Cleaning and Organization Skills
Here’s something nobody tells you before you have kids: teaching them to clean isn’t just about a tidy house (though let’s be honest, that would be nice). It’s about respect for shared spaces, taking responsibility for messes, and building habits that will save their future roommates from homicidal thoughts.
How to Set This Up
Materials needed:
- Age-appropriate cleaning supplies (child-size broom, dustpan, spray bottles with safe cleaners)
- Label maker or colorful labels for organization bins
- Storage solutions at kid height (bins, baskets, shelves they can reach)
- Visual chore chart with pictures
- Timer for time-based challenges
- Cleaning caddy they can carry room to room
- Music playlist to make cleaning more fun
Step-by-step setup:
- Start with one space: their room is usually best for learning ownership
- Create clear homes for everything: “This bin is for Legos, this one for stuffed animals”
- Demonstrate proper cleaning techniques: show them how, practice together, then let them try solo
- Break larger tasks into smaller steps: instead of “clean your room,” specify “make bed, put clothes in hamper, toys in bins”
- Establish daily vs. weekly tasks appropriate for their age
- Use visual guides—especially helpful for younger kids who can’t read yet
- Build in natural consequences: “We can’t go to the park until the playroom is safe to walk through”
Age appropriateness:
- 4-6 years: Making bed (even if imperfectly), putting toys away, placing dirty clothes in hamper, wiping up spills, simple dusting
- 7-9 years: Vacuuming, sweeping, mopping with supervision, organizing belongings, taking out trash, cleaning bathroom sinks, setting/clearing table
- 10-13 years: Complete bedroom maintenance, bathroom cleaning, kitchen cleanup, doing dishes, changing sheets, organizing closets, helping with larger household tasks
Estimated time:
- Daily quick tidy: 10-15 minutes
- Weekly deeper clean: 30-45 minutes
- Organization overhaul: 1-2 hours initially, then maintenance is quicker
- Total weekly contribution: Varies by age, but even young kids can do 20-30 minutes daily
Mess level: Ironically, cleaning creates temporary mess—things get pulled out before being organized. Embrace it.
Developmental benefits:
- Executive function: Planning, organizing, following multi-step processes
- Responsibility: Taking care of belongings and shared spaces
- Independence: Not relying on others to clean up after them
- Cause and effect: Understanding that mess doesn’t magically disappear
- Pride of ownership: Satisfaction in maintaining nice spaces
- Respect: Understanding that others’ time and effort matter
Safety considerations:
- Store cleaning chemicals safely, locked away from young children
- Teach proper ventilation when using any cleaners
- Demonstrate safe use of equipment (vacuum cords, broom handles)
- No mixing cleaning products—seriously, this is dangerous
- Heavy items on lower shelves to prevent tipping
Activity variations:
- Beat the clock: Set timer and see how much they can accomplish
- Cleaning relay races: For multiple kids, make it a team challenge
- Room inspection: Give them specific criteria and let them self-assess
- Deep clean days: Once a month, tackle one area thoroughly together
- Reorganization projects: Let them redesign and reorganize their space when needed
- Music motivation: Create cleaning playlists that make tasks more enjoyable
Cost-saving tips: Dollar store bins and supplies work perfectly. You don’t need fancy organizers—labeled cardboard boxes spray-painted work great. Focus on systems that work, not what looks Pinterest-worthy.
Parent sanity tips: Lower your standards. No, lower. Their “clean” will not look like your “clean” for a long time. That’s OK. The bed will be lumpy. Toys will be crammed in bins willy-nilly instead of sorted. Focus on effort and progress, not perfection.
When they say “I don’t know where this goes,” resist the urge to just do it for them. Walk over, look with them, help problem-solve: “Where would make sense? Where would you look for it next time?” Building those thinking skills matters more than saving 30 seconds.
And honestly? Sometimes the natural consequence of a messy room is stepping on Legos in the dark. After a few painful lessons, motivation usually improves. 😉
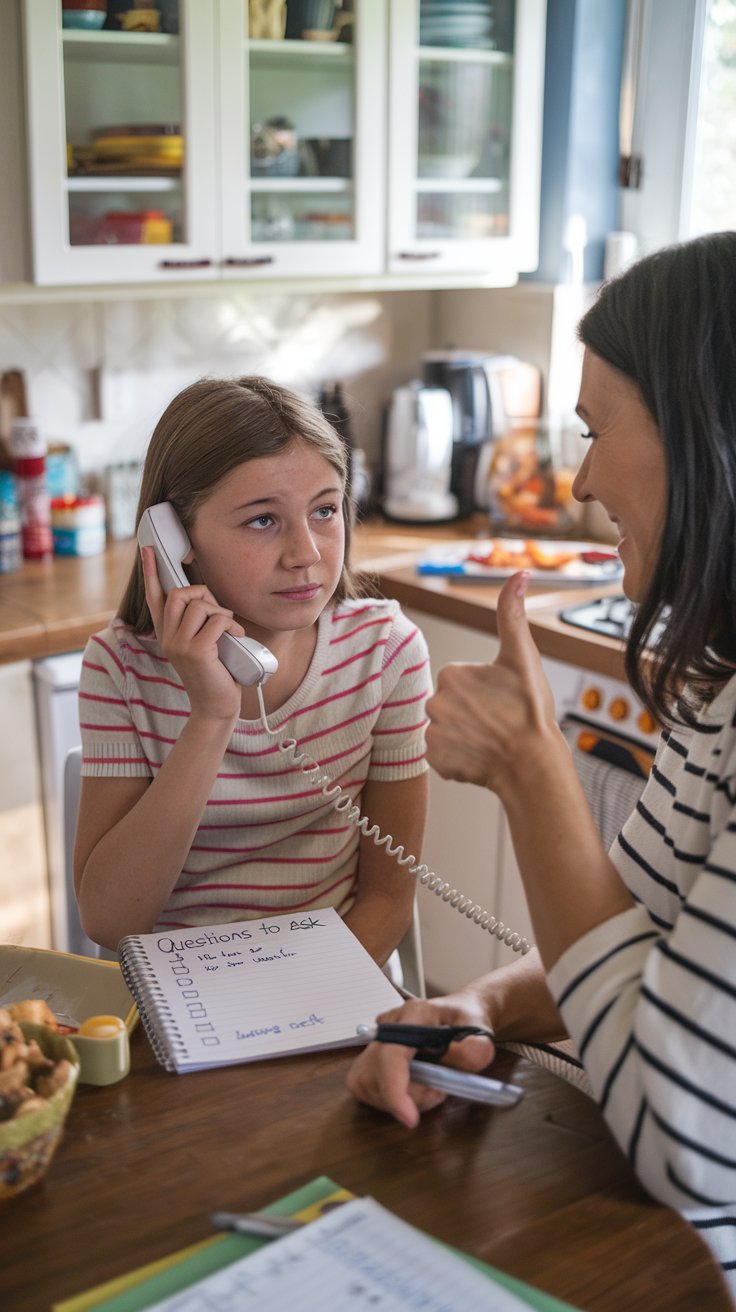
Phone Etiquette and Communication Skills
In a world of texting and emojis, actual phone conversations are becoming a lost art. But teaching kids proper phone etiquette isn’t just about being polite—it’s about advocating for themselves, asking questions confidently, and communicating clearly in situations that matter.
How to Set This Up
Materials needed:
- Working phone (landline, cell phone, or even two cell phones for practice)
- Script or note cards with conversation prompts
- List of important phone numbers
- Notepad and pen for taking messages or notes
- Sample scenarios to practice
- Role-play props if helpful (pretend you’re the doctor’s office, restaurant, etc.)
Step-by-step setup:
- Start with practice calls to family members who are “in on it” and can give gentle feedback
- Create scripts for common scenarios: ordering takeout, making appointments, asking questions at school
- Break down phone conversations into parts: greeting, stating purpose, questions, closing
- Practice taking messages: who called, what they wanted, callback number
- Role-play: you be the receptionist, they call to ask a question
- Graduate to real calls with you nearby for support: calling grandparents, confirming activity times, calling to find out store hours
Age appropriateness:
- 6-8 years: Answering phone politely at home, speaking to known relatives, calling parents in emergency, basic message-taking (with help)
- 9-11 years: Making simple calls for information (store hours, activity schedules), ordering food for pickup, calling friends independently, leaving voicemails
- 12-14 years: Scheduling own appointments, calling to clarify school assignments, calling businesses to ask questions, handling basic customer service calls
Estimated time:
- Initial teaching: 30-45 minutes for basics
- Practice session: 15-20 minutes per scenario
- Real calls: 5-10 minutes typically
- Ongoing practice: Built into daily life as opportunities arise
Mess level: None—unless you count the nervous sweating!
Developmental benefits:
- Confidence: Speaking to adults they don’t know becomes less intimidating
- Advocacy skills: Learning to ask for what they need
- Clarity: Organizing thoughts before and during conversation
- Listening: Paying attention to responses and asking follow-up questions
- Responsibility: Handling their own needs independently
- Professional readiness: Practice for future job applications and workplace communication
Safety considerations:
- Discuss phone safety: never giving out personal information to unknown callers
- Teach them when to get an adult: strange calls, someone asking invasive questions, pressure to provide information
- Explain caller ID and when it’s okay to answer unknown numbers
- Set guidelines for calling hours (not too early or late)
- Review what to do if they call 911 (real emergency only, stay calm, provide clear information)
Activity variations:
- Voicemail practice: Record and listen to their own voicemail greetings or messages
- Phone interview: Practice scenarios like calling about job opportunities (for teens)
- Customer service situations: How to politely address issues or ask for help with problems
- Social calls: Not everything is business—practice casual conversations with relatives
- Emergency preparedness: Know what to say if calling for help
- International calling: If relevant, practice with family in other countries (time zones, greetings)
Cost-saving tips: You don’t need actual phones for initial practice—pretend works great with young kids. Use your own phone for practice calls. Many businesses have automated systems first, making low-stakes practice opportunities.
Parent sanity tips: They will giggle. They will mess up. They might hang up in a panic mid-conversation. It’s all okay and part of learning. The receptionist at the dentist office has heard worse, I promise.
Start with the easiest possible calls: ordering pizza from a place with friendly staff is way less intimidating than calling to make a medical appointment. Build up gradually. And resist the urge to jump in and take over the second they struggle—nearby support is good, rescuing is not.
I’ve found that kids feel super proud after they successfully make their first “real” call. It’s this little moment of “I did that myself!” that’s genuinely rewarding. Plus, once they can call to ask what time gymnastics starts, you’re freed from being the family information hub. Win-win!
Need team names for your family projects? These creative team names might give you ideas!
Basic Repairs and Problem-Solving
There’s something incredibly empowering about knowing how to fix things instead of just accepting broken stuff or waiting for someone else. Teaching basic repairs isn’t about making kids into contractors—it’s about building confidence, resourcefulness, and the “I can figure this out” mindset.

How to Set This Up
Materials needed:
- Basic tool kit scaled for kids (screwdriver set, hammer, adjustable wrench, pliers, measuring tape)
- Safety equipment (safety glasses, work gloves when appropriate)
- Simple broken items for practice (old toys, household items destined for trash anyway)
- Instruction manuals or simple repair videos
- Storage system for tools (pegboard or labeled toolbox)
- First aid kit nearby (because learning sometimes involves minor mistakes)
- Visual guide showing tools and their uses
Step-by-step setup:
- Start with tool identification: what each tool does and when to use it
- Practice on safe, simple projects: tightening loose screws, hanging pictures, replacing batteries
- Work on real repairs together: fix a squeaky door, reassemble a toy, patch a hole
- Demonstrate proper tool use and safety first, always
- Let them take the lead while you supervise: “What do you think needs to happen next?”
- Celebrate successful repairs and troubleshoot failures together
- Keep a “fix it” list where everyone can add items that need attention
Age appropriateness:
- 5-7 years: Using screwdriver with supervision, hammering soft materials, tightening loose screws, learning tool names, helping hold things steady
- 8-10 years: Using basic tools more independently, following simple repair instructions, problem-solving with guidance, replacing batteries, tightening bike parts
- 11-13 years: Tackling repairs more independently, understanding basic mechanics, following video tutorials, using power tools with close supervision, conducting basic maintenance
Estimated time:
- Tool basics teaching: 30-45 minutes
- Simple repairs: 15-30 minutes each
- Complex projects: 1-2 hours
- Maintenance tasks: 10-15 minutes regularly
Mess level: Medium—expect some sawdust, dropped screws, fingerprints on everything. That’s normal workshop life.
Developmental benefits:
- Problem-solving: Analyzing what’s wrong and figuring out how to fix it
- Spatial reasoning: Understanding how parts fit together
- Fine motor skills: Precise use of tools requires coordination
- Patience: Some repairs take time and trial-and-error
- Resourcefulness: Learning to work with what you have
- Confidence: “I can fix things” is a powerful mindset
- Sustainability: Understanding that many things can be repaired rather than replaced
Safety considerations:
- ALWAYS use safety glasses when working with tools
- Teach proper tool use before they try independently
- Supervise closely, especially with sharp or power tools
- Establish workshop rules: clean workspace, return tools to their spots, ask before using unfamiliar tools
- Know when a project is beyond their skill level and needs adult help
- Teach them to stop if something feels unsafe
Activity variations:
- Disassembly learning: Take apart broken electronics (unplugged!) to see how things work inside
- Bike maintenance: Teach basic bike care—tire pressure, chain lubrication, brake adjustments
- Furniture assembly: Let them lead on putting together flat-pack furniture (with supervision)
- Seasonal maintenance: Changing air filters, testing smoke detectors, weatherstripping
- Upcycling projects: Repair and improve old items rather than buying new
- Building projects: Graduate from repairs to creating something from scratch
Cost-saving tips: Dollar store and garage sales often have great tool finds. You don’t need professional-grade equipment for learning—just safe, functional tools. Practice repairs literally save money by reducing replacement costs.
Parent sanity tips: Some things will get fixed worse before they get better. Some repairs will fail completely. That’s learning. My kid once “fixed” a drawer by screwing it shut permanently. We laughed, removed the screws, and tried again.
Start with broken items that don’t matter—old toys headed for donation, things already destined for trash. Zero-pressure practice is the best kind. And when something goes from broken to working because of their effort? The pride on their face is absolutely priceless.
Plus, honestly, there are fewer things more satisfying in parenting than the moment your kid says, “Don’t worry, I’ll fix it” and actually knows what they’re doing. You’ve created a capable human!
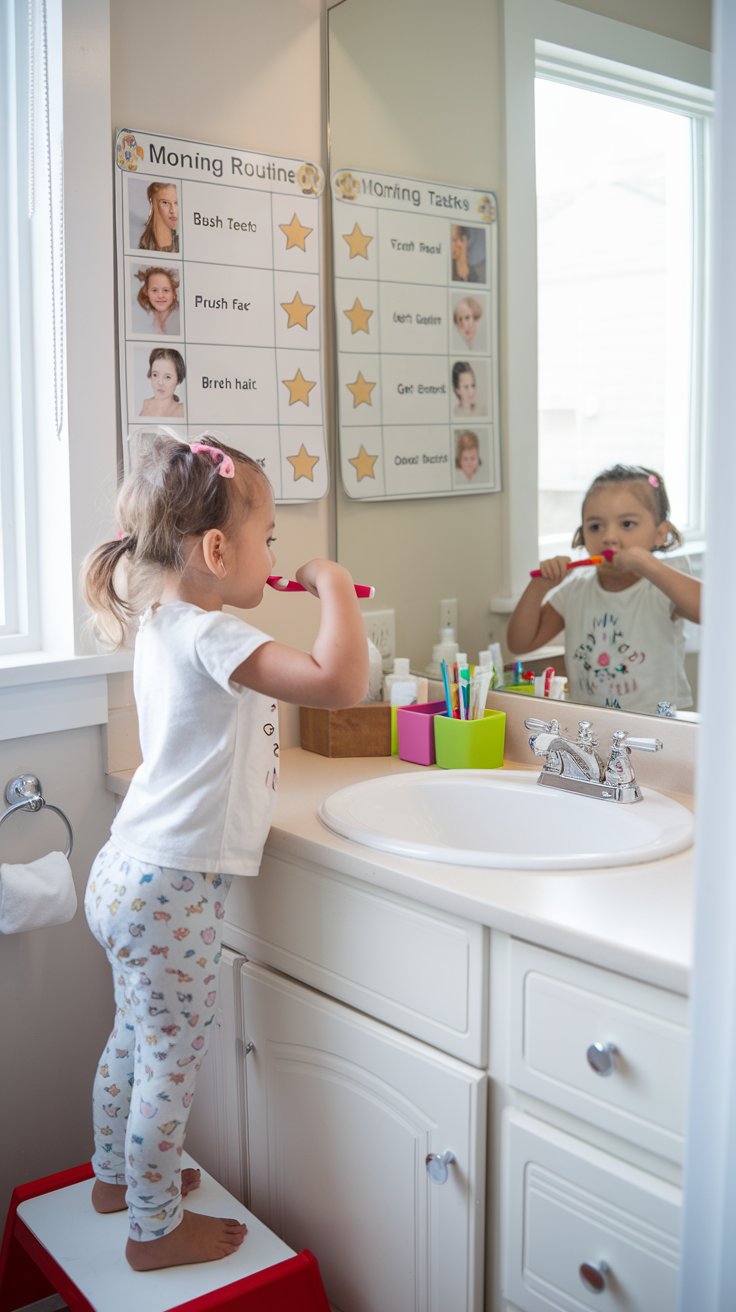
Personal Hygiene and Self-Care Routines
Teaching hygiene is one of those unglamorous parenting tasks that pays off in major ways—from fewer sick days to better social experiences. And honestly? The sooner kids own their own hygiene routines, the sooner you can stop reminding them forty times a day to brush their teeth.
How to Set This Up
Materials needed:
- Age-appropriate hygiene supplies (toothbrush, toothpaste, soap, shampoo, etc.)
- Step stool for sink access
- Visual routine chart with pictures
- Timer for teeth brushing (2 minutes) and other timed tasks
- Mirror at their eye level
- Storage system for their supplies (caddy, bins, designated drawer)
- Rewards chart for building new habits (optional, phase out as routine solidifies)
Step-by-step setup:
- Create morning and evening routine charts together—let them help choose pictures or stickers
- Set up bathroom space so everything is accessible without help
- Demonstrate proper techniques: tooth brushing method, thorough hand washing, gentle face washing
- Practice together initially, then supervise, then just check results
- Build in natural rhythms: “After breakfast, brush teeth” becomes automatic
- Address specific issues as they arise: dealing with tangles, proper deodorant use (for older kids), nail trimming
- Make it as pleasant as possible: fun toothbrush, favorite scent soap, music during routine
Age appropriateness:
- 4-6 years: Brushing teeth with supervision, washing hands independently, basic face washing, learning to blow nose, putting on clean clothes
- 7-9 years: Complete tooth brushing independently, showering with reminders, basic hair care, understanding why hygiene matters, nail care with help
- 10-12 years: Full hygiene independence, understanding deodorant, recognizing when they need to shower/wash hair, taking initiative without prompts, basic skincare if interested
Estimated time:
- Morning routine: 15-20 minutes once established
- Evening routine: 15-25 minutes including bath/shower
- Weekly tasks: 10-15 minutes for things like nail care
- Daily total: About 30-45 minutes of personal care time
Mess level: Medium—water splashes, toothpaste in sink, wet towels on floor. Standard bathroom chaos.
Developmental benefits:
- Independence: Taking care of personal needs without reminders
- Health awareness: Understanding the why behind hygiene practices
- Social preparedness: Better hygiene often means better peer interactions
- Self-respect: Taking pride in how they present themselves
- Routine building: Understanding the importance of daily habits
- Body autonomy: Learning to listen to and care for their own body
Safety considerations:
- Supervise younger kids around water—bath time especially
- Teach proper water temperature testing
- Store sharp items (razors, scissors) safely away from young children
- Discuss body privacy and appropriate boundaries
- Watch for signs of sensory issues that make certain hygiene tasks difficult
- Teach pool/beach hygiene if relevant (showering after swimming, etc.)
Activity variations:
- Teeth brushing songs: Two-minute songs make brushing more fun and ensure proper timing
- Hygiene science: Explore why soap works, what germs are, how deodorant functions
- Product choices: Let them select their own hygiene supplies (within reason) to increase ownership
- Mirror practice: Learning to check themselves—teeth clean? Face washed? Hair brushed?
- Routine adjustments: Modify as needed for sports, special occasions, seasonal changes
- Independence challenges: See if they can complete entire routine without any reminders
Cost-saving tips: Generic brands work perfectly fine. Hygiene doesn’t require expensive products. Many dollar stores carry kid-friendly hygiene supplies at fraction of brand-name costs.
Parent sanity tips: You will find toothbrush s in weird places. They will “forget” they just brushed their teeth five minutes ago when you ask if they did. Wet towels will migrate to bedroom floors. It’s all part of the learning process.
Natural consequences work well here: “Your teeth feel yucky when you don’t brush” teaches better than 100 lectures. Social feedback from peers is incredibly powerful—when kids enter elementary school and notice other kids’ hygiene, motivation often increases naturally.
For sensory-sensitive kids, some adjustments help: softer toothbrushes, unscented products, gradual introduction of new textures. Make it work for your specific child rather than forcing standard routines that cause genuine distress.
BTW, the transition from “you brush, I supervise” to “you brush independently” happens gradually over months. Don’t expect overnight perfection. Check their work, give feedback, and slowly reduce oversight as they improve.
Creating fun family routines? These motivational team names might inspire your household!
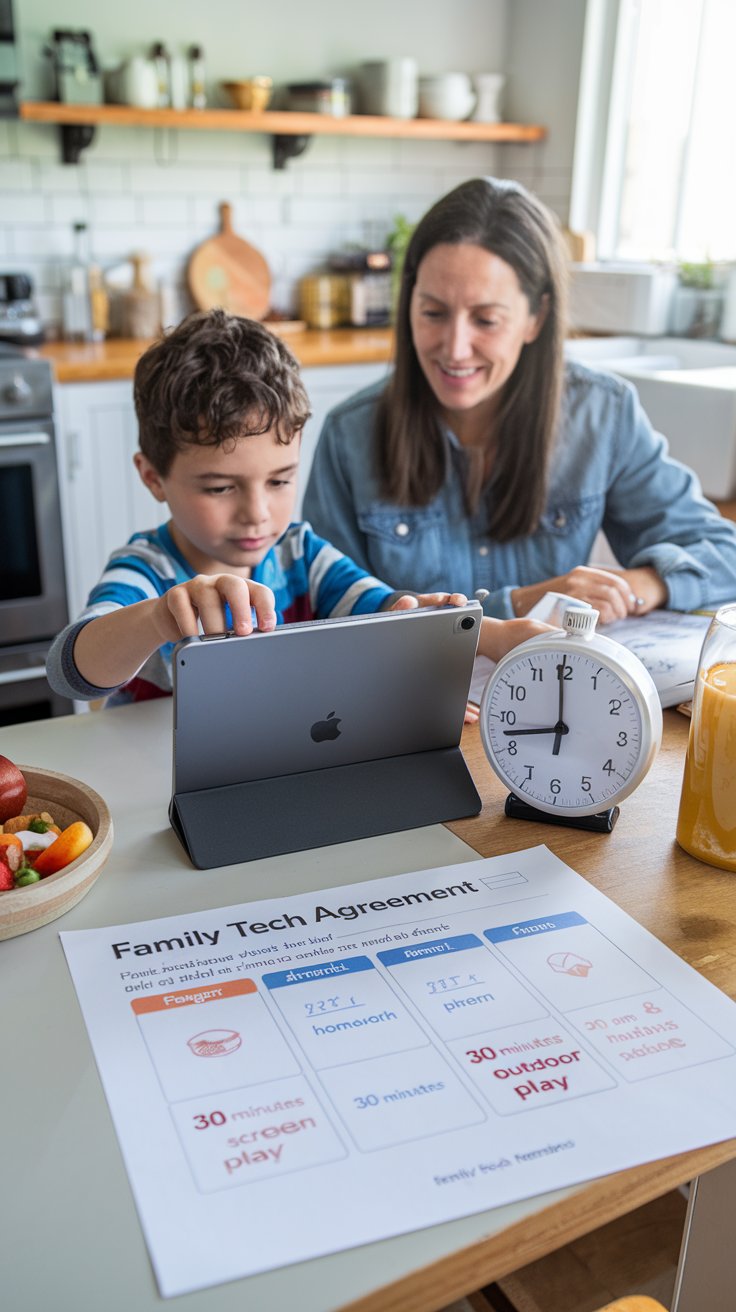
Managing Screen Time and Technology
Listen, I know screen time is controversial. But here’s the thing: we can’t prepare kids for a tech-free world because that world doesn’t exist. Instead, we can teach them to manage technology responsibly, recognize when they’ve had enough, and balance screen time with other important activities.
How to Set This Up
Materials needed:
- Family technology agreement (printed template or handmade version)
- Visible timers (kitchen timer, device timer, hourglass for younger kids)
- Daily schedule showing tech time alongside other activities
- Charging station in central location (not bedrooms)
- List of alternative activities easily visible
- Parental control settings adjusted appropriately for age
- Calendar tracking tech usage if needed
Step-by-step setup:
- Create family tech rules together—kids follow rules they help create more willingly
- Establish clear boundaries: when/where devices are allowed, time limits, content guidelines
- Set up tech-free zones: dinner table, bedrooms, during homework time
- Create a charging station where devices “sleep” overnight
- Use timers that kids can see and set themselves
- Build in natural stopping points: “You can play until your timer goes off, then we’re doing X”
- Review and adjust rules regularly as kids mature and demonstrate responsibility
Age appropriateness:
- 5-7 years: Simple time limits (30 minutes daily), parent-selected content only, no devices in bedroom, understanding when screen time is over
- 8-10 years: Learning to set own timers, agreeing on content with parent approval, earning additional time through responsibilities, recognizing when they’ve had enough
- 11-13 years: More independence with clear guidelines, understanding appropriate vs. inappropriate content, managing social media with oversight, participating in creating family tech policies
Estimated time:
- Initial agreement creation: 45-60 minutes for family discussion
- Daily tech time: Varies by family rules (many experts suggest 1-2 hours for school-age kids)
- Weekly review: 15 minutes to discuss what’s working and what needs adjusting
- Setup/enforcement: 5-10 minutes daily to maintain boundaries
Mess level: Low physically, but emotionally can be higher—expect some resistance initially as new habits form.
Developmental benefits:
- Self-regulation: Learning to stop when time is up, not just when forced
- Time awareness: Understanding how time passes during engaging activities
- Balance: Recognizing that life includes multiple important activities
- Digital literacy: Learning safe, appropriate technology use
- Negotiation skills: Discussing and agreeing on fair rules
- Consequences: Experiencing natural results of tech overuse (tired eyes, crankiness, missed activities)
Safety considerations:
- Discuss online safety: stranger danger applies online too, never share personal information
- Teach them to report uncomfortable interactions immediately
- Explain why privacy settings matter
- Review content appropriateness for their age
- Discuss digital footprint and permanent nature of online posts
- Set up parental controls but also build trust through conversation
Activity variations:
- Tech-free challenges: Whole family goes screen-free for specific times and celebrates together
- Earning system: Complete responsibilities to earn screen time (though basic time shouldn’t depend entirely on this)
- Educational tech: Distinguish between passive consumption and creative/learning technology use
- Content discussions: Talk about what they’re watching/playing—stay involved and interested
- Tech timeout spaces: When devices are frustrating, practice taking breaks
- Device-free days: Designate one day per week (or even per month) as completely screen-free
Cost-saving tips: Use free built-in parental controls rather than expensive third-party apps. Kitchen timers from dollar stores work perfectly. Free printable tech agreements are available online.
Parent sanity tips: This will be a constant negotiation. Kids will test boundaries. Devices will mysteriously reappear after bedtime. Stay consistent.
The good news? When kids help create the rules, they usually follow them better. When they learn to set their own timers and honor them, you’ve taught genuine self-regulation—not just forced compliance.
Model good tech habits yourself. If you’re constantly on your phone, they’ll notice the hypocrisy of restrictions that don’t apply to adults. Practice what you preach.
And honestly? Some flexibility is okay. Sick days might mean more screen time. Long car rides are perfect for devices. Rigid rules that never bend create more problems than they solve. The goal is balance, not perfection.
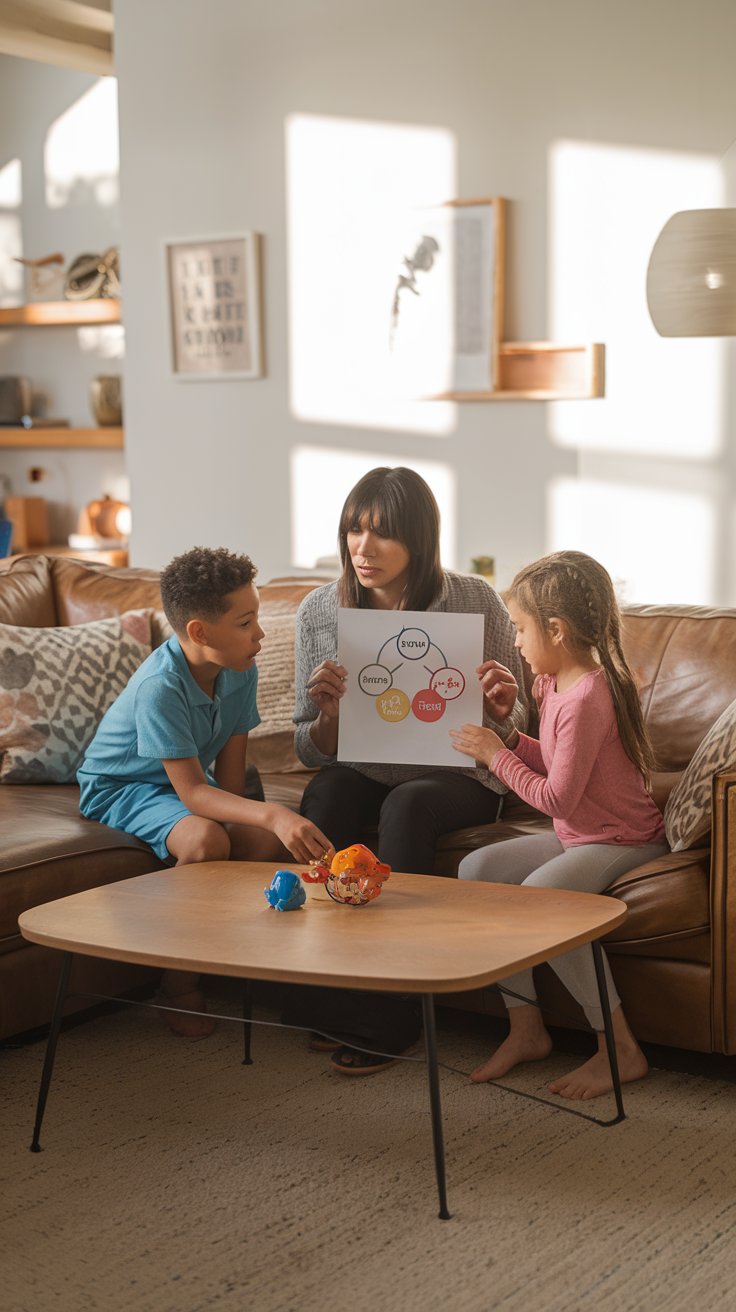
Conflict Resolution and Problem-Solving with Others
Kids fight. With siblings, friends, classmates—it’s universal. But what if we could teach them to resolve conflicts constructively instead of just separating them or solving problems for them? This skill literally impacts every future relationship they’ll have.
How to Set This Up
Materials needed:
- Visual conflict resolution steps chart (printable or handmade)
- “Cool down” space or tools (stress ball, breathing exercises poster, quiet corner)
- Timer for taking turns speaking without interruption
- “I feel” sentence starters printed and visible
- Problem-solving worksheet for more complex issues
- Feelings faces chart to help identify emotions
- Agreement forms where solutions can be written and signed (optional but kids love this official touch)
Step-by-step setup:
- Teach the process when everyone is calm, not during actual conflicts
- Practice with low-stakes disagreements first (who gets to choose the movie)
- Create clear steps: stop, cool down if needed, state the problem, listen to each other, brainstorm solutions, choose one, try it
- Model the process: when you have a disagreement with partner/co-parent, narrate how you’re resolving it
- Intervene less over time as kids demonstrate understanding
- Celebrate successful conflict resolution: “I love how you two worked that out!”
- Teach “I feel” statements: “I feel frustrated when you take my things without asking”
Age appropriateness:
- 4-6 years: Learning to use words instead of hitting, taking turns, understanding others have feelings too, simple negotiation with heavy adult facilitation
- 7-9 years: Using “I feel” statements, brainstorming multiple solutions, understanding compromise, resolving minor conflicts with decreasing adult involvement
- 10-12 years: Working through conflicts largely independently, understanding multiple perspectives, recognizing when to get adult help for serious issues, apologizing genuinely
Estimated time:
- Initial teaching: 30-45 minutes when everyone is calm
- Practice scenarios: 15-20 minutes periodically
- Real conflicts: 10-30 minutes depending on complexity
- Cool-down time: 5-15 minutes before resolution discussion
Mess level: Emotionally messy, physically clean. Expect tears, raised voices initially, frustration with the process.
Developmental benefits:
- Emotional intelligence: Recognizing and naming their own and others’ feelings
- Perspective-taking: Understanding that others see situations differently
- Communication: Expressing needs clearly without aggression
- Negotiation: Finding solutions that work for everyone involved
- Empathy: Caring about how their actions affect others
- Self-regulation: Calming down enough to think clearly
- Relationship skills: Maintaining friendships through disagreements
Safety considerations:
- Physical aggression is never allowed—stop conflicts that become physical immediately
- Teach them to recognize when conflicts are beyond their ability to resolve alone
- Discuss when to involve adults: bullying, feeling unsafe, repeated problems with no resolution
- Watch for power imbalances (older/younger siblings, larger/smaller kids)
- Ensure solutions are actually fair, not just dominant child getting their way
Activity variations:
- Role-playing: Act out common conflict scenarios and practice resolution steps
- Feelings charades: Help kids identify and express emotions
- Conflict resolution stories: Read books about characters resolving disagreements
- Family meetings: Regular time to address ongoing issues calmly
- Cool-down techniques: Teach deep breathing, counting, taking space when needed
- Apology practice: Understanding what genuine apologies include (acknowledging harm, taking responsibility, making amends)
Cost-saving tips: Printable charts are free online. All you really need is time, patience, and consistency. No special materials required to teach these essential life skills.
Parent sanity tips: This is HARD. You’ll want to just solve it for them a thousand times because it’s faster. Resist. The short-term time investment pays off exponentially when they can resolve conflicts independently.
Some conflicts don’t have perfect solutions where everyone gets exactly what they want. Teaching compromise—where everyone gets something, even if not everything—is valuable.
Don’t expect perfection. My kids sometimes use conflict resolution skills beautifully, other times they’re literally pulling each other’s hair before I can intervene. Progress isn’t linear, especially when emotions are high.
And honestly? When you see your kids work through a disagreement on their own without your intervention, using the exact language and steps you taught them? That moment is parenting gold. You’ve given them tools they’ll use for the rest of their lives.
Putting It All Together: Your Life Skills Toolkit
So there you have it—12 practical life skills that transform kids from tiny dependent humans into increasingly capable, confident people. And here’s the best part: you don’t have to tackle all of these at once. Pick one or two that feel most relevant to your child’s age and your family’s current needs. Master those, then add another.
Remember, teaching life skills isn’t about creating perfect little adults. It’s about gradually releasing responsibility as they demonstrate readiness. Some days they’ll nail it. Other days they’ll forget everything you taught them and need reminders. Both are completely normal.
These aren’t just chores or tasks we’re teaching—they’re building blocks of independence, confidence, and self-sufficiency. Every time your child learns to do something themselves, you’re giving them a gift that extends far beyond that specific skill. You’re teaching them they’re capable. That they can figure things out. That mistakes are part of learning, not failures to avoid.
The best part about life skills? They compound. The kid who learns to follow a recipe gains confidence that helps them tackle laundry instructions. The child who manages their own schedule feels empowered to manage their screen time. Skills build on skills.
So take a deep breath, lower your perfection expectations, and start small. That lumpy bed they made? Celebrate it. The slightly-too-salty meal they cooked? Eat it with enthusiasm and gratitude. The conflict they resolved without your intervention? That’s worth recognizing out loud.
You’re not just raising children—you’re raising future adults who will need these exact skills to navigate life successfully. And honestly? The time you invest now in teaching, modeling, and patiently coaching through mistakes will come back to you tenfold when you have teenagers and young adults who can legitimately take care of themselves.
Your kids are more capable than they (or you) probably realize. Give them the chance to prove it, support them through the inevitable stumbles, and celebrate every small victory along the way. Life skills might not be the flashiest part of parenting, but they’re definitely among the most important.
Now go forth and empower some small humans. You’ve got this! <3

Greetings, I’m Alex – an expert in the art of naming teams, groups or brands, and businesses. With years of experience as a consultant for some of the most recognized companies out there, I want to pass on my knowledge and share tips that will help you craft an unforgettable name for your project through TeamGroupNames.Com!