Picture this: you walk into a baby shower and the cake is sitting front and center on the dessert table — layers of dreamy blue, fading from the deepest navy at the base to the softest sky blue at the top, with little silver stars cascading down the side.
Every single guest stops to take a photo before anyone dares cut into it.
That’s the power of a blue ombre baby shower cake, and honestly? Once you see one in person, you’ll never go back to a plain frosted sheet cake again.
Whether you’re the mama-to-be, the host with the most, or the bestie on a mission to make this shower unforgettable, you’ve landed in the right place.
I’ve been obsessed with baby shower cake aesthetics for years — I once spent three hours on a Saturday watching cake decorating tutorials purely because a friend asked me to “look into some ideas.” Safe to say I fell down a beautiful rabbit hole.
These 10 blue ombre baby shower cake ideas run the gamut from elegant and simple to totally showstopping, so there’s something here for every style, skill level, and budget.
1. Classic Three-Tier Blue Watercolor Ombre Cake
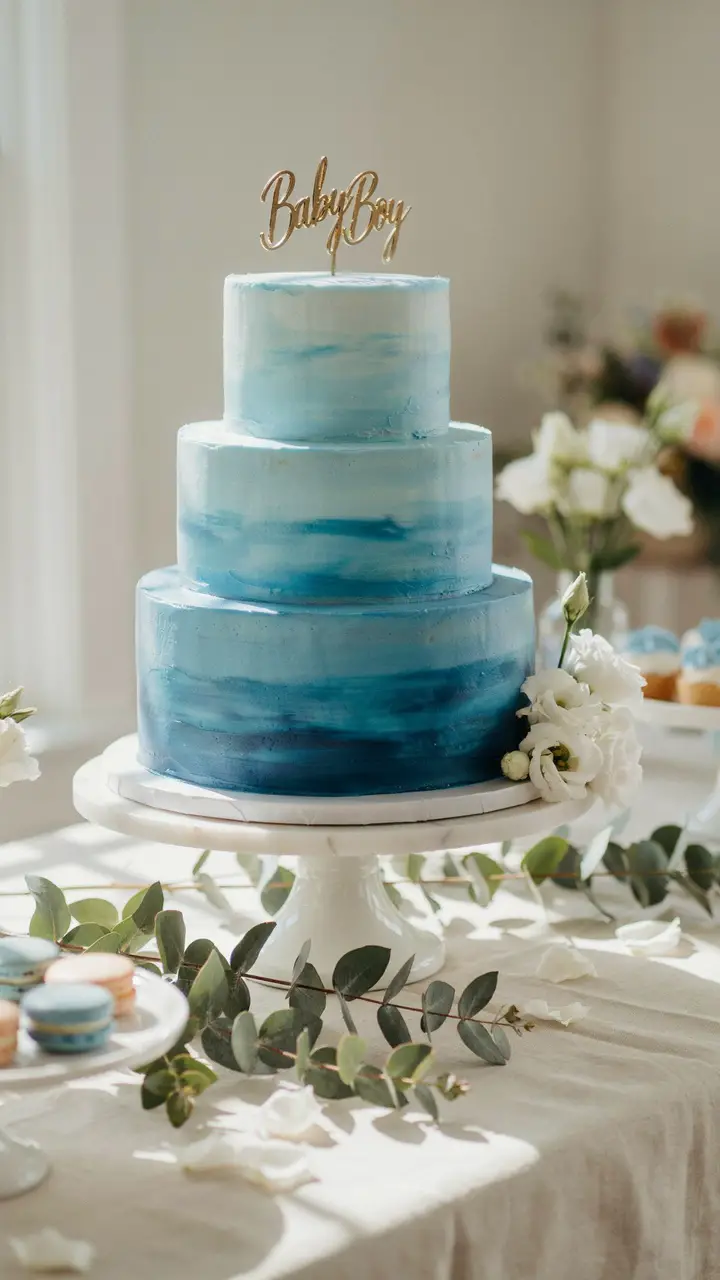
This is the one. If you’re looking for the classic blue ombre baby shower cake that photographs like a dream and works with virtually any theme, this is your answer. The watercolor technique gives it that soft, painterly quality that feels modern without trying too hard. I’ve seen this cake show up at everything from minimalist boho showers to formal afternoon teas, and it always fits right in.
How to Do It
- Skill level: Intermediate — best attempted by someone with basic cake decorating experience, or ordered from a bakery
- Materials needed: Three round cake layers (6″, 8″, and 10″ work well), white buttercream base, navy blue and sky blue gel food coloring, an offset spatula, and a bench scraper
- Time estimate: 3–4 hours if baking from scratch, or 1–2 hours if using bakery layers
- Start by dividing your buttercream into three bowls — one deep navy, one medium blue, one pale blue — plus a small amount of white for the very top
- Apply each color in horizontal bands around the corresponding tier, then drag a bench scraper around the cake while spinning the turntable to blend the colors into a smooth gradient
- Use a soft-bristled brush dipped in water or clear piping gel to feather out any hard lines for that watercolor look
- Budget tip: Order naked layers from a grocery store bakery and do the frosting yourself — this can cut costs nearly in half
- Pro tip: Gel food coloring blends far more smoothly than liquid coloring and gives you truer, more saturated blues
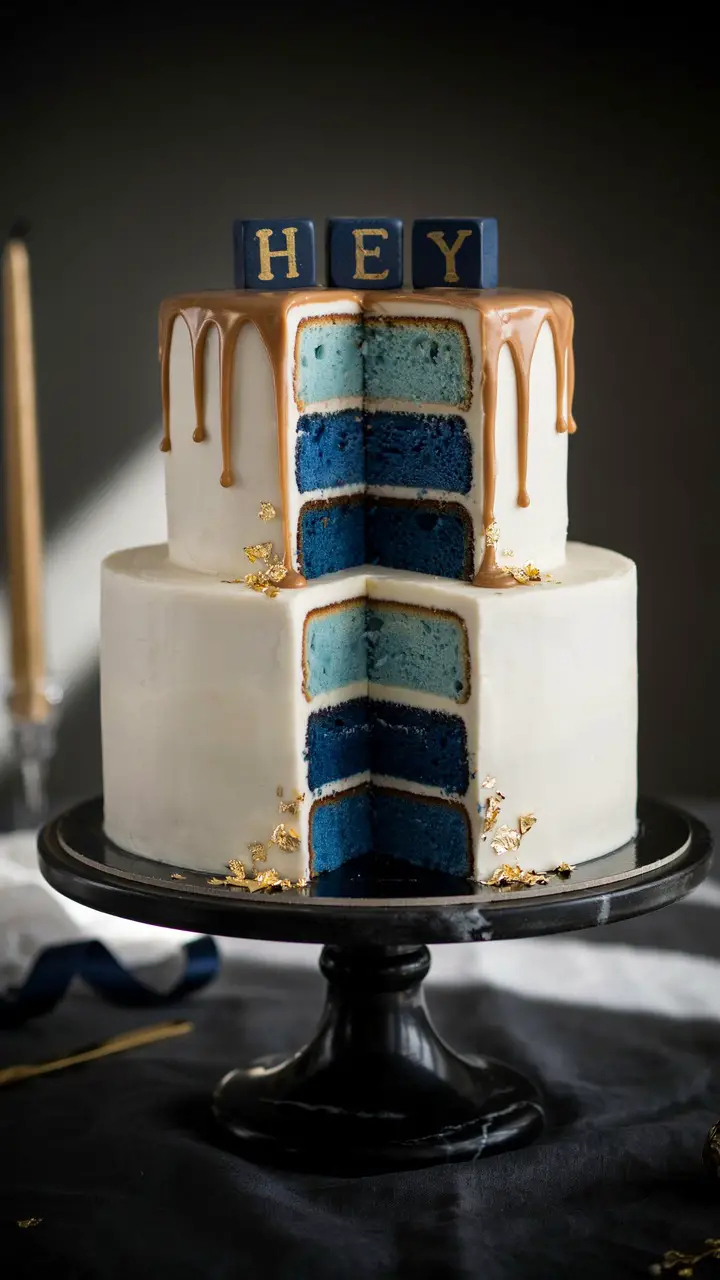
If the mama-to-be has a flair for the dramatic (and honestly, don’t we all?), this navy and gold drip cake is pure elegance with a little edge. The contrast between the rich navy at the base and the gold drip creates that high-end bakery look that guests will absolutely rave about. BTW — this one works especially well for a royal prince theme or a more formal evening shower.
How to Do It
- Skill level: Advanced — recommend ordering from a specialty cake decorator unless you’re confident with drip technique
- Materials needed: Square cake pans (optional, round works too), gold candy melts or white chocolate dyed gold, navy gel food coloring, gold luster dust, and gold leaf sheets
- Bake your cake layers and tint the buttercream in graduating shades from navy (bottom) through cobalt, royal blue, to powder blue (top)
- Frost the outside in smooth white or very pale blue buttercream, creating a clean, gallery-worthy exterior
- Melt gold candy melts, let cool slightly until it reaches a thick but pourable consistency, then slowly pour around the top edge of the cake, nudging it over to create drips at irregular intervals
- Once the drip sets (about 30 minutes in the refrigerator), apply gold leaf flakes to the base using a clean dry brush
- Budget alternative: Use gold-painted fondant panels instead of actual drip technique — equally stunning, easier to execute
3. Ombre Blue Waterfall Ruffle Cake
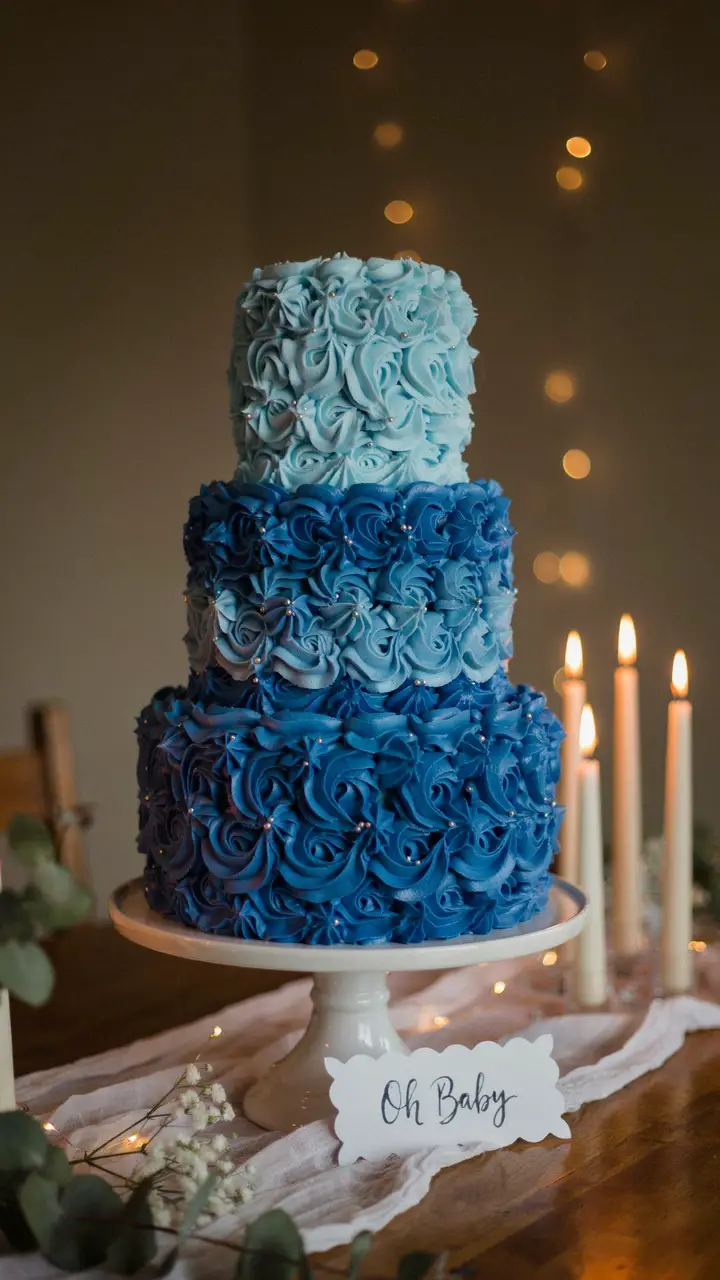
There is something deeply satisfying about a ruffle cake. All those layered petals of buttercream, each one slightly lighter than the last as you move upward — it looks incredibly intricate but is actually more forgiving than a smooth finish because the texture hides small imperfections. IMO, this is actually one of the best options for a confident home baker who wants to impress without mastering the bench-scraper technique.
How to Do It
- Skill level: Intermediate — anyone comfortable with a piping bag can tackle this
- Materials needed: A petal piping tip (Wilton #104 works beautifully), four to five shades of blue buttercream, and a turntable
- Mix five separate shades of blue buttercream — progress from dark (navy or sapphire) at the bottom through cobalt, royal blue, cornflower blue, and ending in pale baby blue at the top
- Starting at the very base, hold your petal tip at a slight angle and pipe ruffles in rows, working in horizontal bands around the cake
- Rotate your color as you move upward, changing shades every 1.5 to 2 inches
- Layer ruffles slightly overlapping each previous row — this creates that lush, full waterfall effect
- Time estimate: Expect 2–3 hours of decorating time alone, so build this into your schedule
- Pro tip: Chill the cake between color transitions to prevent the buttercream from smearing — 20 minutes in the fridge between each shade is your best friend
4. Geode-Inspired Blue Ombre Cake
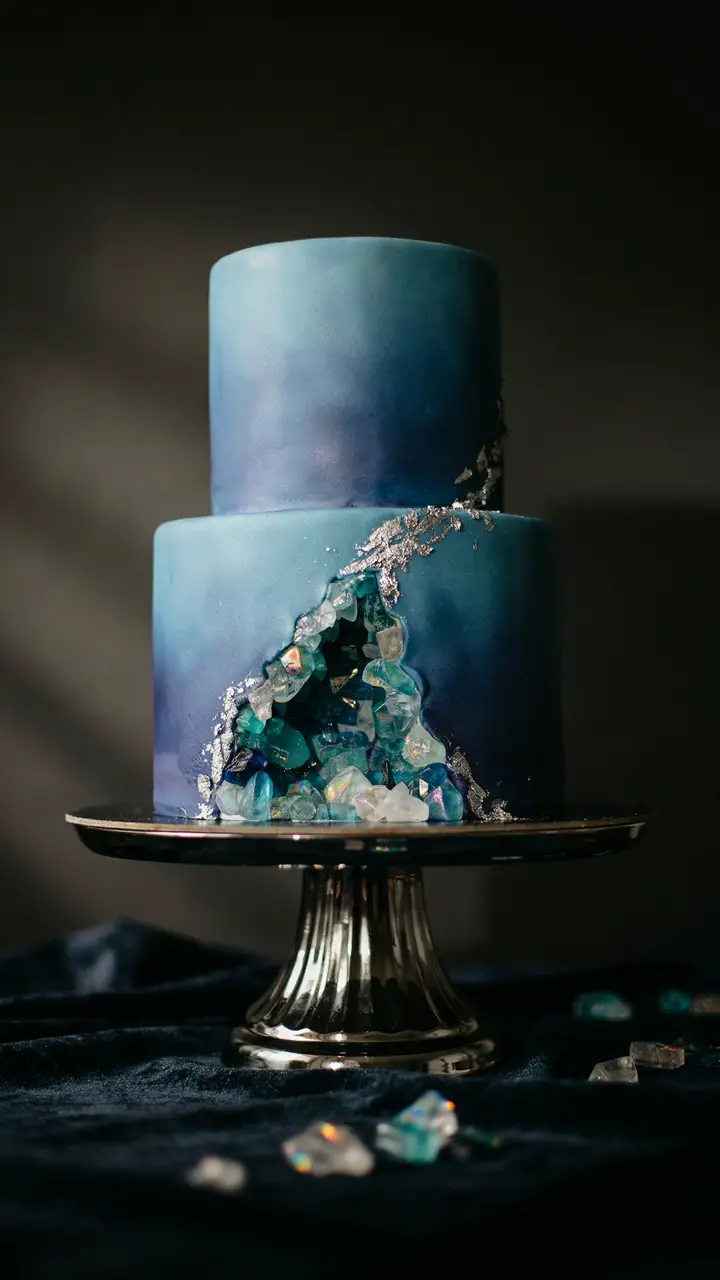
Okay, this one is genuinely a conversation starter. A geode cake looks like someone cracked open a piece of the earth and found something magical inside — and when you incorporate a blue ombre exterior with teal and navy rock candy crystals inside the geode opening, the effect is absolutely jaw-dropping. I saw one of these at a shower last spring and people were still talking about it at the gift-opening portion of the afternoon.
How to Do It
- Skill level: Advanced — this is a labor of love, or a premium bakery order
- Materials needed: Rock candy in navy, teal, and clear shades; edible silver luster dust; a small sculpting tool or melon baller; fondant or modeling chocolate to build up the geode frame
- Frost the cake in smooth ombre blue buttercream, then carve an oval opening into the front of the top tier using a small sharp knife or spoon
- Build up the edges of the opening with small pieces of tinted fondant or modeling chocolate to create a raised, natural-looking rim
- Fill the interior of the geode with rock candy pieces, packing them tightly and varying the sizes for a realistic crystal effect
- Dust the interior and rim with edible silver and gold luster dust for that unmistakable mineral sparkle
- Budget alternative: Use tinted isomalt poured into a mold rather than rock candy — it creates an even more translucent crystal effect and can be made ahead
- Pro tip: This cake is stunning without fondant covering — the ombre buttercream contrasts beautifully against the raw crystal interior
5. Blue Ombre Naked Cake with Fresh Flowers
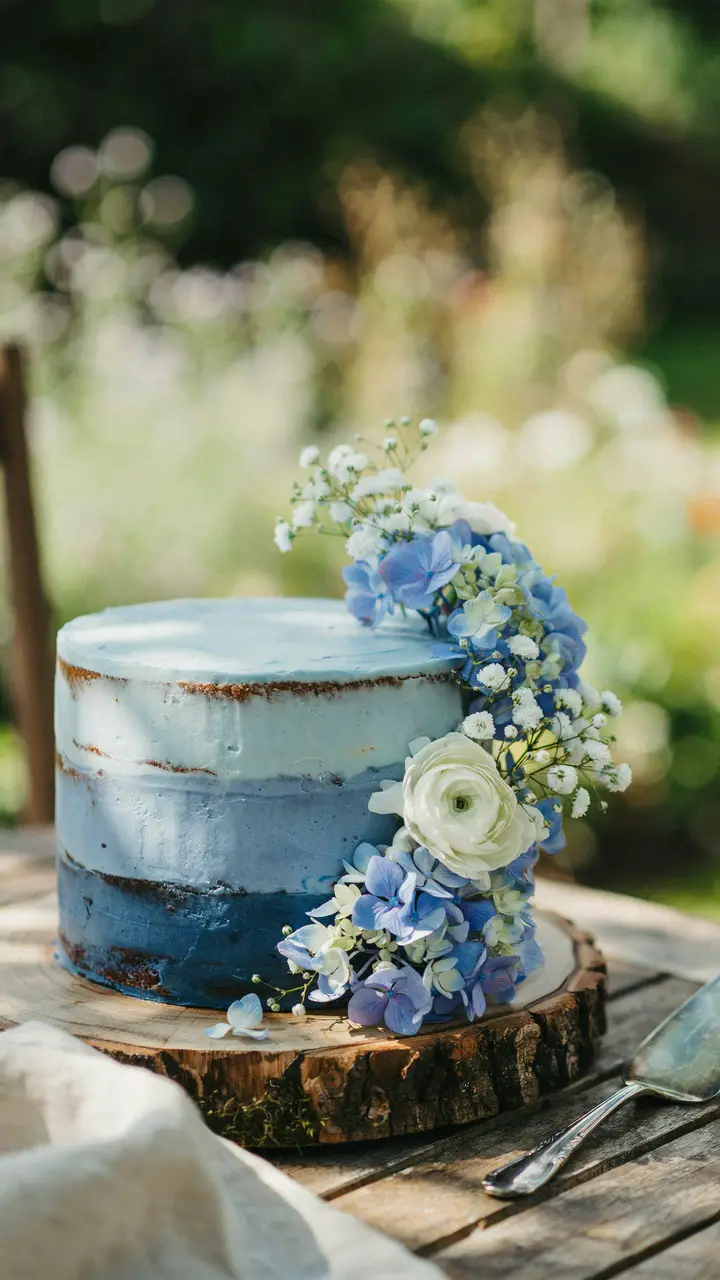
This one might be my personal favorite, and here’s why: the color is in the cake itself, not just the frosting. When guests see that first slice cut and the layers reveal this stunning gradient of blue — it genuinely gets a gasp. A naked cake also means less frosting work, which is a gift if you’re baking on a budget or short on time. Wondering how to make a small budget stretch? This is genuinely one of the most impactful looks for the least decorating effort.
How to Do It
- Skill level: Beginner to intermediate — accessible for a first-time cake decorator
- Materials needed: Three or four cake layers tinted in graduating blue shades, white buttercream for filling, fresh flowers (confirm they’re food-safe or use a flower pick), a wood slice or rustic cake stand
- Divide your batter into three to four portions before baking and tint each a different shade of blue — from darkest at the bottom to lightest at the top
- Fill between layers with white buttercream and stack carefully, chilling between each layer if needed
- Apply a very thin, intentionally imperfect exterior crumb coat — you want those beautiful blue layers peeking through
- Arrange fresh blooms starting at the top and cascading down one side using clean flower picks to keep stems from touching the cake
- Budget tip: Blue hydrangeas, baby’s breath, and white daisies are among the most affordable fresh flowers and look absolutely beautiful together
- Time estimate: 2 hours baking, 1 hour decorating — very manageable for a home baker
6. Blue Ombre Gender Reveal Cake
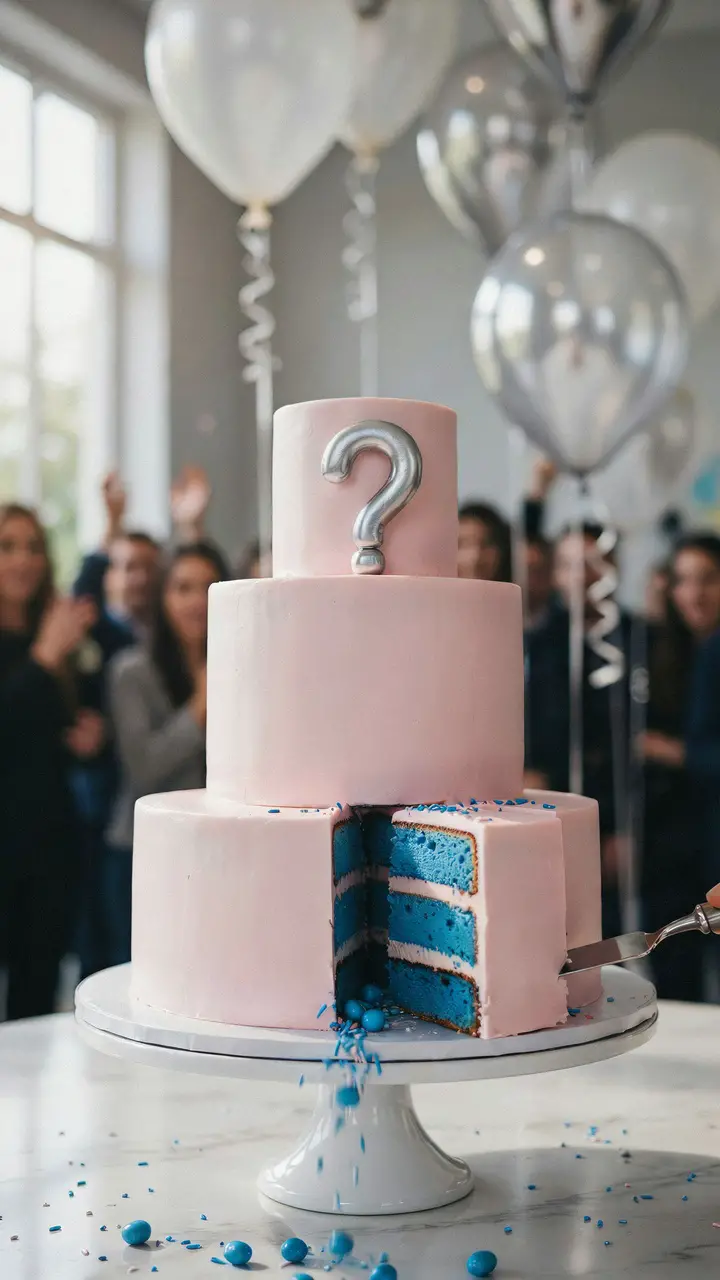
Not sure whether to combine your gender reveal with the shower? Totally a personal call. But if you do — a blue ombre reveal cake is one of the most satisfying moments a party can deliver. The outside stays neutral, the inside is your secret. I once watched an entire room erupt when someone cut into what looked like a plain white cake and found brilliant blue inside. The screaming was entirely appropriate. 🙂
How to Do It
- Skill level: Beginner — the magic is in the prep, not the decorating
- Materials needed: Blue gel food coloring, blue candy confetti (like Sixlets or M&Ms), neutral-colored exterior frosting, and a “?” topper
- Tint all your cake batter a vibrant royal blue and fill between layers with blue-tinted buttercream
- Pack blue candy confetti or sprinkles into a hollow carved into the center of the top layer — when the cake is cut, they’ll tumble out dramatically
- Frost the outside in white, cream, or a soft neutral color that gives no hint of what’s inside
- Use a “?” or “What Will It Be?” topper to build suspense
- Pro tip: Do a test cut at home first — you want to confirm the interior is vivid enough to read clearly in photos
- Budget tip: This is a fully DIY-able cake — box mix tinted blue looks just as stunning as scratch baking in this case
7. Blue Ombre Buttercream Textured Palette Knife Cake
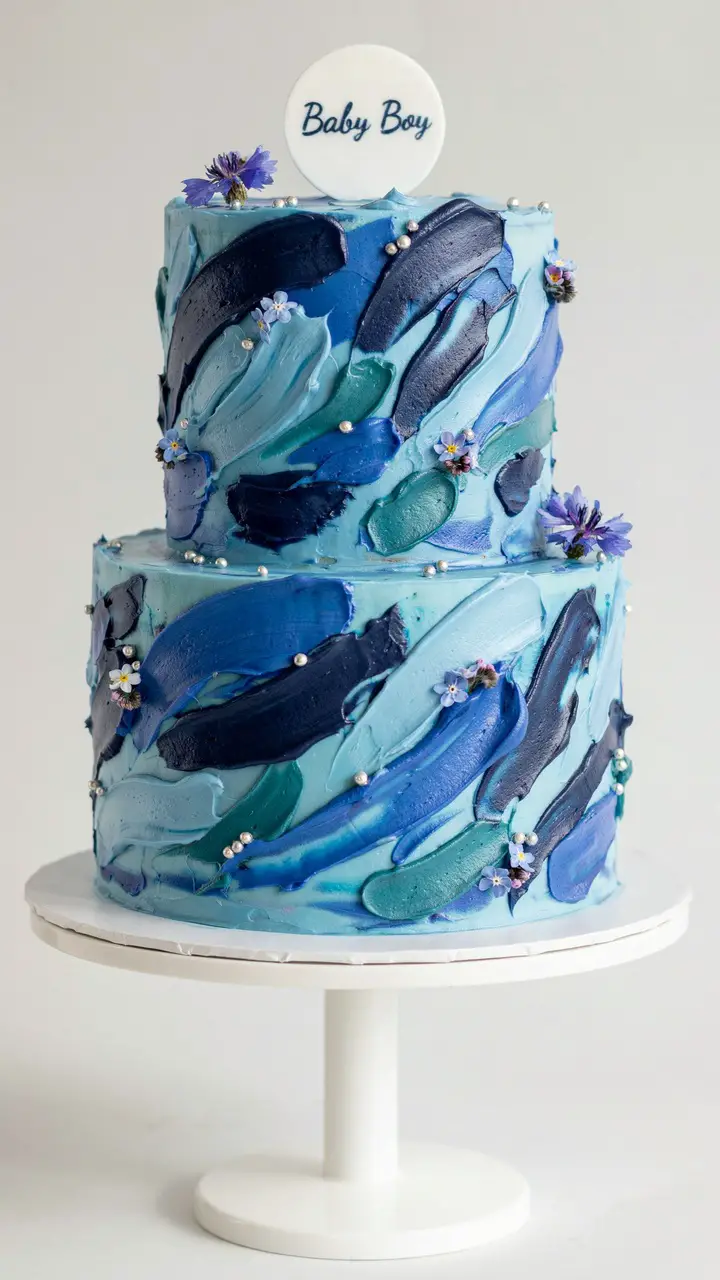
This is the cake for the mom who loves modern art, interior design, or anything that feels intentional but effortlessly chic. The palette knife technique involves literally painting with buttercream — and because no two cakes ever look alike, yours will be completely one of a kind. Every baby deserves a completely one-of-a-kind welcome, don’t you think? <3
How to Do It
- Skill level: Beginner to intermediate — this technique is actually more forgiving the less “perfect” it looks
- Materials needed: A small offset palette knife, five or more shades of blue buttercream, a base-coated frosted cake, and small decorative elements (dried flowers, sugar pearls, edible glitter)
- Apply a smooth white or pale blue base coat to your cake and let it chill for 30 minutes
- Load small amounts of varying blue buttercreams onto your palette knife and press them against the cake in sweeping, overlapping strokes — work quickly before the buttercream warms up
- Layer colors over each other, allowing some base coat to peek through in areas for depth and contrast
- While the buttercream is still soft, press in a few dried flowers, dragées, or edible pearls in clusters
- Time estimate: 45 minutes to 1 hour of decorating — one of the fastest options on this list
- Pro tip: Watch one or two “palette knife cake” tutorials on YouTube before you start — seeing the technique in motion makes it click immediately
8. Blue Ombre Floral Fondant Cake

This is the cake people save photos of for years. It’s the one that shows up on Pinterest boards for baby shower inspiration a decade later. A blue ombre fondant cake with handcrafted sugar flowers is an investment — in time, money, or both — but the payoff is genuinely stunning. FYI, if you’re ordering this from a bakery, book at least three to four weeks out, because sugar flower work takes serious advance time.
How to Do It
- Skill level: Advanced — best ordered from a specialty cake artist, or attempted only if you’re experienced with fondant
- Materials needed: Three tiers of cake, navy/cornflower/sky blue fondant, white and pale blue gum paste for flowers, petal wire, and floral tape
- Cover each tier in smooth, separately colored fondant — press seams to the back and smooth with fondant smoothers
- Make sugar peonies, roses, and small filler flowers from gum paste at least two to three days ahead (they need to dry and hold their shape)
- Assemble flowers on a small foam block that inserts into the top tier to prevent blooms from touching the cake directly
- Add a gold or silver fondant rope border around each tier base for a finished, polished edge
- Budget alternative: Use large silk flowers on food-safe picks instead of sugar flowers — at a glance, they’re indistinguishable and cost a fraction of the price
- RSVP tip: If you’re ordering this beauty from a baker, collect your guest count first — this cake scales beautifully from 20 to 150 servings
9. Minimalist Blue Ombre Cake with Edible Lettering
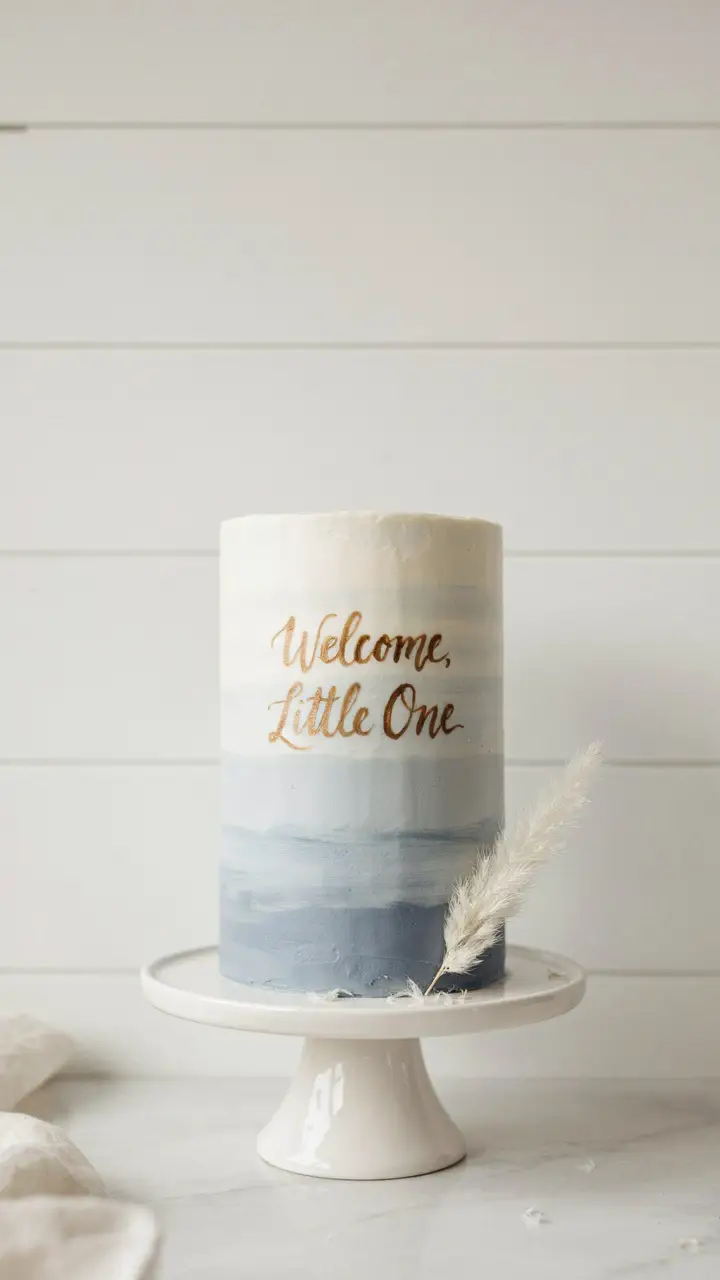
Not every shower needs a towering four-tiered spectacular — and honestly, there is something incredibly sophisticated about a perfectly executed single-tier ombre cake. This works beautifully for smaller intimate showers (think: 15 people at a cozy home brunch) and fits neatly into a tighter budget without looking like a compromise. Less is genuinely more here.
How to Do It
- Skill level: Beginner — excellent first cake decorating project
- Materials needed: A tall 6″ or 8″ round cake, navy through pale blue buttercream, bench scraper, edible ink pen or pre-made edible lettering wafer paper
- Frost your cake in smooth ombre buttercream using the bench scraper technique — three to four shades of blue is plenty
- Either use a food-safe edible ink pen to write directly on the frosted cake (practice first on parchment!) or order custom edible wafer paper lettering online — many Etsy sellers offer these for under $10
- Add a single decorative element: one sprig of pampas grass, a ribbon tied around the base, or a minimal fondant star
- Time estimate: 1.5 to 2 hours total, including baking
- Pro tip: Chilling the frosted cake for a full hour before adding lettering ensures the surface is firm enough that your pen won’t drag
10. Blue Ombre Cupcake Tower Cake
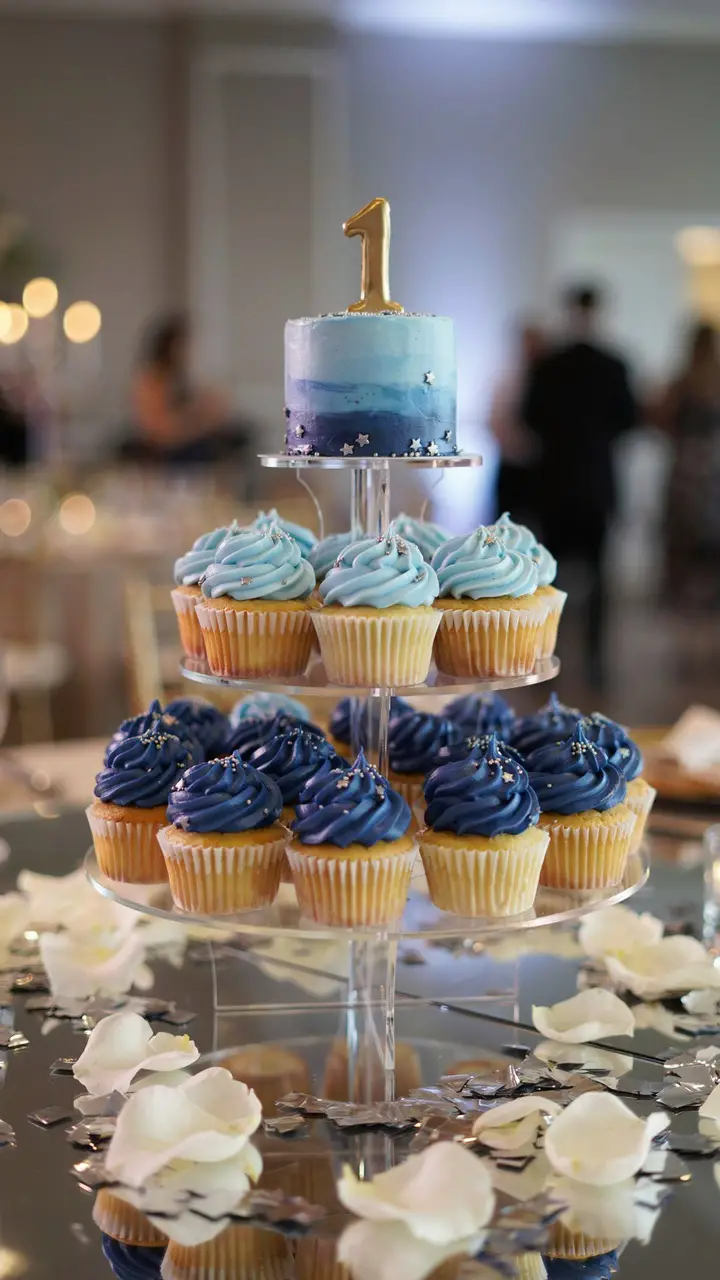
Here’s the secret weapon for anyone feeding a crowd or navigating guests with dietary restrictions: a cupcake tower looks just as celebratory as a traditional tiered cake — but you can easily mix in gluten-free, dairy-free, or allergy-friendly cupcakes on different tiers without anyone feeling singled out. Worried about keeping different dietary needs happy at your shower? This is genuinely one of the most thoughtful solutions. Plus, cleanup is about one-fifth the effort of slicing and plating a real tiered cake.
How to Do It
- Skill level: Beginner — piping swirls of buttercream is one of the most forgiving cake decorating skills
- Materials needed: 24–48 cupcakes, a cupcake tower stand, three to four shades of blue buttercream, a large star or round piping tip (Wilton 1M creates gorgeous swirls), and a small 4″ smash cake for the center
- Bake your cupcakes in white liners or blue ombre gradient liners for an extra touch of detail
- Pipe large, generous swirls of buttercream in graduating blue shades — deepest at the bottom of the tower, lightest at the top
- Fill the center top spot with a mini smash cake frosted in the same ombre palette
- Finish each cupcake with silver star sprinkles, edible pearls, or a small fondant star — consistency across the tower makes the whole display look intentional and polished
- Budget tip: Box mix cupcakes taste just as good as scratch for 95% of guests, and the frosting is where all the visual magic lives anyway
- Pro tip: Use a cookie scoop to portion batter for perfectly uniform cupcakes — even heights mean your tower display will look much more cohesive
Bringing It All Together
Planning a baby shower cake — especially a blue ombre one — is one of those details that sounds complicated right up until you realize it’s mostly just a matter of choosing your style and committing to it. Whether you go full show-stopper with a multi-tiered geode cake or keep it beautifully restrained with a single minimalist tier, the blue ombre palette lends itself to everything from rustic and casual to formal and breathtaking.
The most important thing? That the cake feels like a genuine celebration of the little one on the way. Every one of these ideas — from the cupcake tower to the palette knife masterpiece — carries that same spirit: this baby is worth celebrating in the most beautiful, memorable way possible.
So pick the idea that makes you smile the biggest, grab your piping bags (or call your favorite local bakery), and get ready to create something that guests will be talking about long after the last gift is unwrapped. You’ve got this. <3

Greetings, I’m Alex – an expert in the art of naming teams, groups or brands, and businesses. With years of experience as a consultant for some of the most recognized companies out there, I want to pass on my knowledge and share tips that will help you craft an unforgettable name for your project through TeamGroupNames.Com!