There’s something quietly thrilling about opening a closet that actually works — where everything has a place, the morning routine stops feeling like an archaeological dig, and the whole wall in front of you looks intentional instead of chaotic.
If you’ve been staring at that long, empty wall in your bedroom wondering what to do with it, or you’ve outgrown your single wardrobe and need a real storage solution, a whole wall closet might be exactly what your space (and your sanity) has been asking for.
The best part? You don’t need to tear down walls, hire a contractor, or spend a small fortune to pull this off.
Whether you’re renting, working with a tight budget, or just starting to explore what “built-in storage” even means, there’s a whole wall closet idea here for you.
Let’s talk about ten approaches that genuinely transform a bedroom wall into the most hardworking, beautiful part of the room.
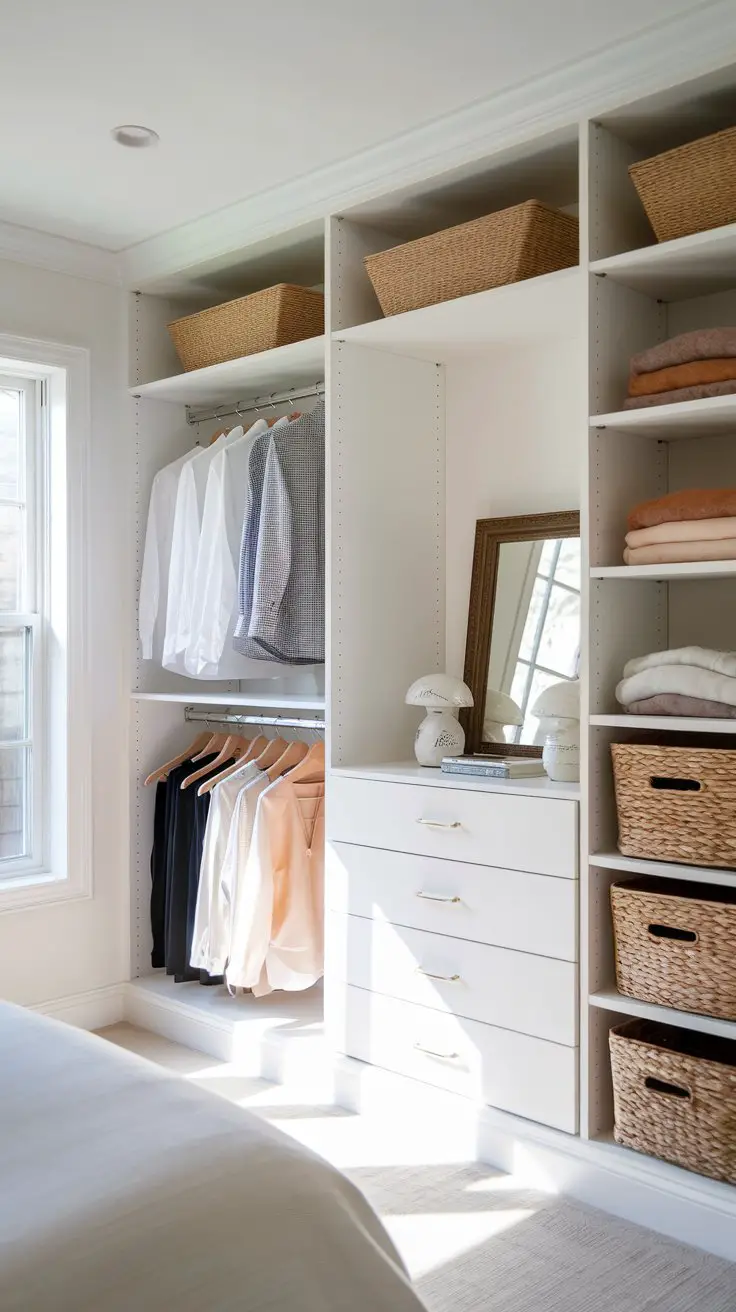
1. The Classic Reach-In Closet with Built-In Shelving
How to Recreate This Look
This is the workhorse of whole wall closet ideas — a reach-in configuration that uses every inch from floor to ceiling without feeling cold or institutional.
Shopping List:
- Pre-built modular shelving units (IKEA PAX system or similar): $150–$400 depending on configuration
- MDF shelf boards for custom spans: $20–$40 per board at home improvement stores
- Matching drawer inserts: $60–$150
- Double hang rod hardware (chrome or matte black): $15–$30
- Woven baskets for open cubby storage (Target, TJ Maxx, HomeGoods): $10–$25 each
- Paint to match surrounding walls or contrast in crisp white: $30–$50 per gallon
Step-by-Step Styling Instructions:
- Measure your wall width and ceiling height before purchasing anything. (Sounds obvious, but you’d be amazed.)
- Decide on your zone split: typically 60% hanging, 40% shelving works well for mixed wardrobes.
- Install double hang rods on one side for shorter garments — this literally doubles hanging capacity overnight.
- Use the upper shelves (above eye level) for seasonal storage and woven baskets.
- Add a small framed mirror or a piece of art leaned against the back panel to make the closet feel designed rather than purely utilitarian.
Budget Breakdown:
- Under $100: Use tension rods and freestanding cube organizers from IKEA or Amazon. Not quite built-in, but absolutely functional.
- $100–$500: IKEA PAX system with standard add-ons covers most walls beautifully.
- $500+: Custom MDF built-ins painted to match your trim for a truly seamless, high-end look.
Space Requirements: Works best on walls at least 6 feet wide. Minimum 24-inch depth for standard hanging.
Difficulty Level: Beginner to Intermediate — PAX installation is genuinely manageable for a weekend DIYer; custom MDF requires basic carpentry confidence.
Lifestyle Considerations: Closed sections handle pets and kids beautifully. Open shelving requires a bit more tidying discipline.
Common Mistakes: Underestimating how many hanging sections you need. Always add more rods than you think — you’ll fill them faster than you expect.
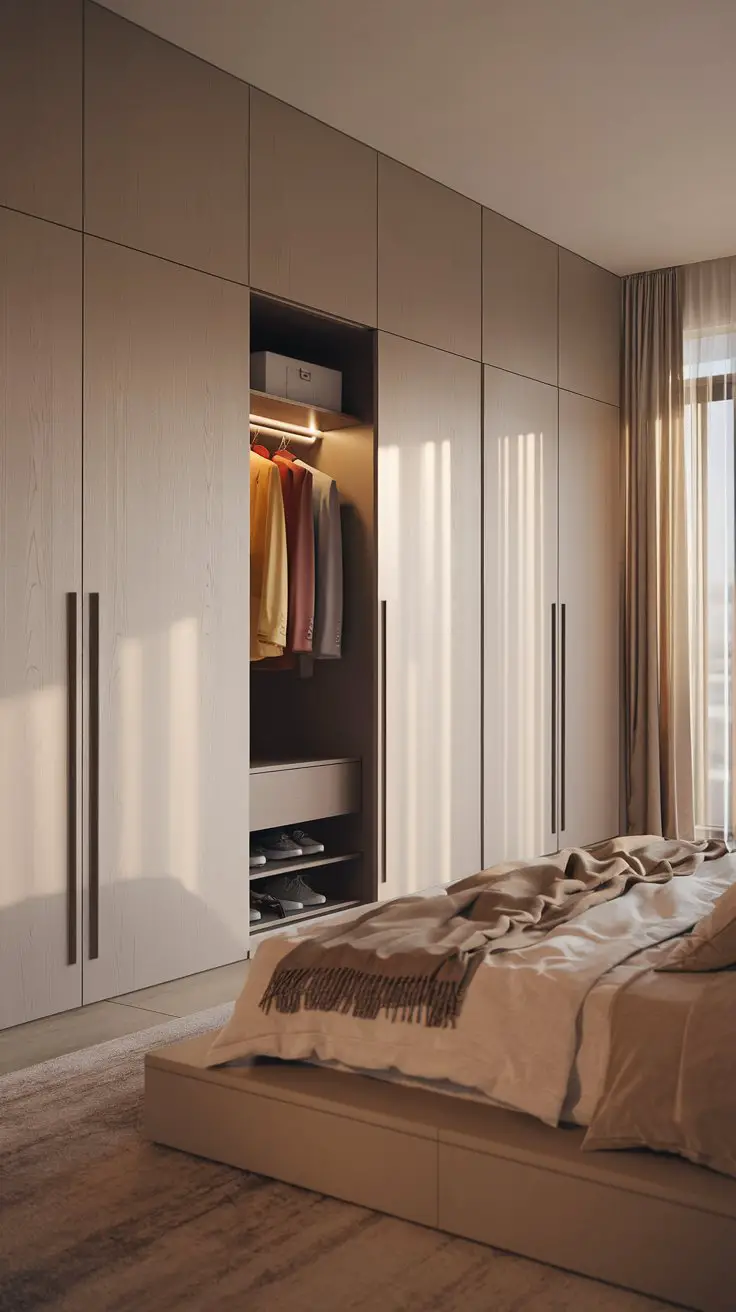
2. Floor-to-Ceiling Wardrobe with Sliding Doors
How to Recreate This Look
Sliding doors are the single best choice for bedrooms where swing-out doors would eat into your floor space. They also do something wonderful: they make the wall disappear into the room’s architecture.
Shopping List:
- Sliding door wardrobe system (IKEA PAX with sliding door add-on, or Spacepro, or custom): $300–$1,200+
- LED interior strip lighting (battery-operated or plug-in): $15–$40
- Pull-out shoe rack inserts: $30–$80
- Velvet non-slip hangers for a cohesive interior look: $15–$25 for a set of 50
Step-by-Step Styling Instructions:
- Choose door finishes that connect to at least one other element in your room — wood-tone doors pair with warm flooring; white doors work with crisp trim and walls.
- Install LED strips along the top interior rail so the inside glows when you open the door. FYI, this small detail makes the whole setup feel significantly more luxurious.
- Organize the interior by category AND color — it takes one focused afternoon and saves you time every single morning.
- Keep the exterior wall completely clear of any surrounding furniture to let the doors slide freely and maintain the seamless look.
Budget Breakdown:
- Under $100: Tension-rod curtain panels hung ceiling to floor in front of open shelving create a soft, budget-friendly door alternative.
- $100–$500: IKEA PAX with Hokksund or Auli sliding doors is the sweet spot — looks genuinely high-end.
- $500+: Custom sliding doors with mirror panels or frosted glass fronts for a true built-in effect.
Space Requirements: Needs clear floor space in front of doors equal to about one door panel width. Ideal for walls 8 feet or wider.
Difficulty Level: Intermediate — the track system requires precise leveling, but most systems come with solid instructions.
Seasonal Adaptability: Rotate seasonal clothing behind less-accessible panels. Use vacuum storage bags on upper shelves for out-of-season pieces.
Common Mistakes: Choosing doors that are too light or flimsy — they’ll rattle and warp. Invest in the sturdier track system from the start.
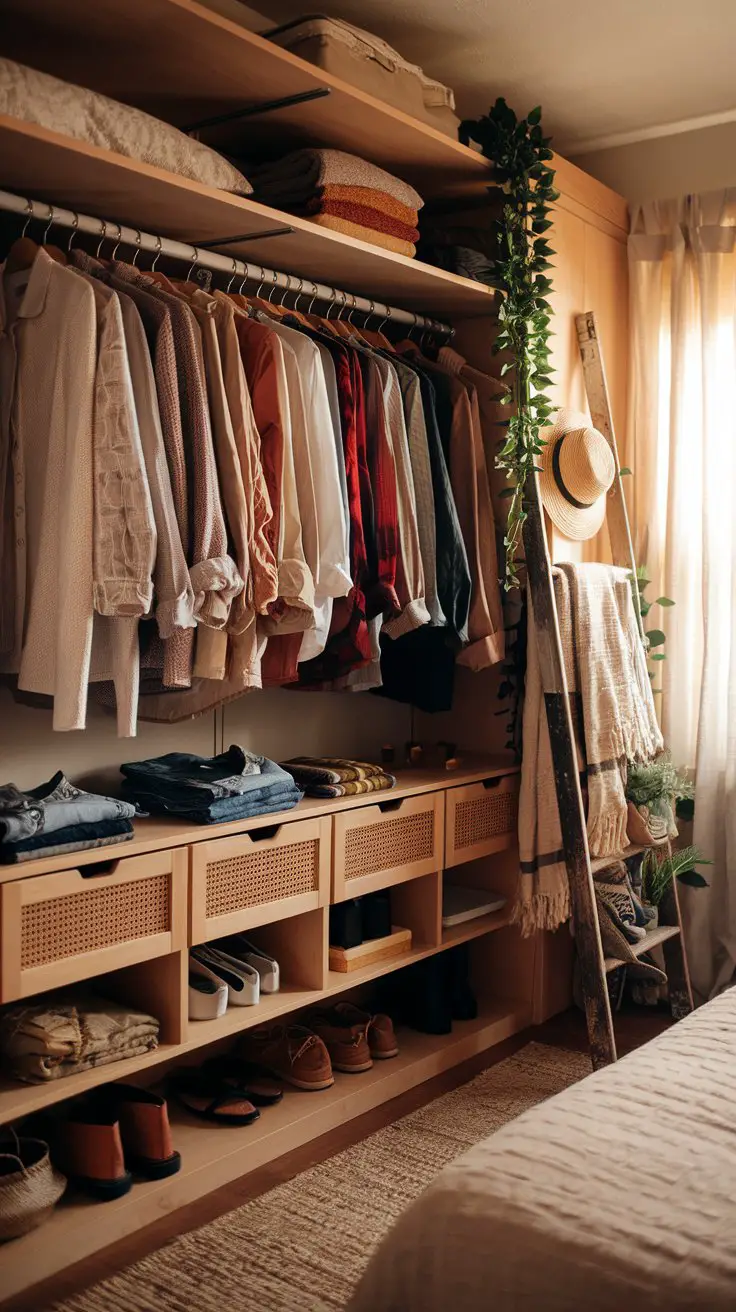
3. Open Wardrobe Wall with Clothing as Decor
How to Recreate This Look
This approach only works if you’re willing to keep things genuinely tidy — because your clothing literally becomes the decor. Done well, it looks intentional and editorial. Done carelessly, it just looks messy. The key is color coordination and editing ruthlessly.
Shopping List:
- Freestanding clothing rail system (MUJI, H&M Home, Amazon): $80–$250
- Wooden or acrylic hangers in matching style: $20–$40 for a set
- Cane-front storage cubbies or baskets: $15–$50 each
- Small trailing plants (pothos, string of pearls): $8–$20 each
- Wooden ladder (thrifted or new): $30–$100
Step-by-Step Styling Instructions:
- Edit your wardrobe ruthlessly first — the open wall approach exposes everything, so anything you don’t love needs to go.
- Organize remaining pieces by color gradient: it instantly makes the whole wall look deliberately styled rather than just… full.
- Store off-season clothing elsewhere entirely — under the bed in flat storage boxes works well.
- Add 2–3 small plants at varying heights to soften the look and add life.
- Keep shoes in baskets or boxes rather than lined up on the floor; it looks significantly more polished.
Budget Breakdown:
- Under $100: A single tension-mounted clothing rail from Amazon + color-sorted hangers achieves the basic version beautifully.
- $100–$500: Modular freestanding system with multiple rails, shelving, and cubby sections.
- $500+: Custom wall-mounted rail system in brass or walnut with built-in LED lighting.
Space Requirements: Works in rooms as small as 10×10 feet, but you’ll need to be very selective about what you display.
Difficulty Level: Beginner — this is one of the most renter-friendly options since nothing needs to be fixed to the wall permanently.
Lifestyle Considerations: Honestly? This is a tough one with pets. Cat hair on hanging garments is a very real consequence. A linen curtain panel you can pull across the front solves this completely.
Common Mistakes: Keeping too many items on display. Less is genuinely more here — if your rail looks crammed, the effect is lost entirely.
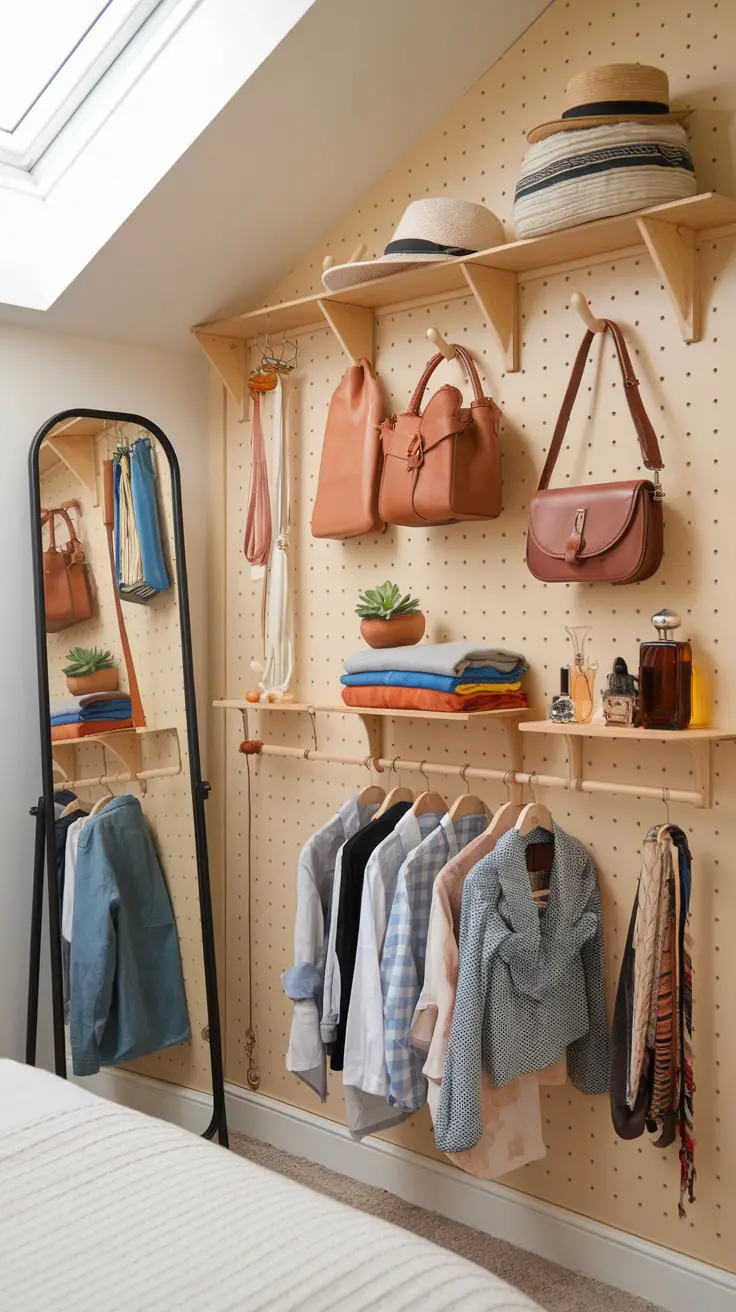
4. The DIY Pegboard Closet Wall
How to Recreate This Look
Pegboard closet walls are one of the most genuinely satisfying DIY projects you can tackle on a weekend. They’re infinitely customizable, budget-friendly, and — importantly — they make rearranging your storage as easy as pulling out a hook and moving it three inches to the left. Which, BTW, feels unreasonably satisfying.
Shopping List:
- Pegboard panels (4×8 feet, from any hardware store): $15–$30 each
- Pegboard hooks and accessories kit: $20–$40
- Wooden shelf attachments for pegboard: $10–$25
- Spray paint in your chosen color: $8–$12 per can
- Standoff mounting hardware (keeps pegboard 1 inch from wall so hooks can insert): $10–$20
- Wooden dowel hooks (upgrade from standard metal for a warmer look): $15–$30 for a set
Step-by-Step Styling Instructions:
- Paint your pegboard panels before mounting — spray paint gives the smoothest finish.
- Mount panels using standoff hardware so you can actually use the holes all the way to the edges.
- Sketch your layout on paper first: hooks for bags and hats at top, clothing rails in the middle, shelf accessories lower.
- Mix functional hooks with decorative elements — a small plant, a framed print clipped to the board, a small mirror — so it reads as designed rather than purely practical.
- Update the configuration freely as your storage needs change. That’s the whole joy of this system.
Budget Breakdown:
- Under $100: Two 4×8 panels + hooks + paint covers a significant wall section for under $80 total.
- $100–$500: Multiple panels, premium wooden accessories, and integrated lighting.
- $500+: Custom painted pegboard with built-in shelving units flanking either side.
Space Requirements: Works on any wall, any room size. Particularly brilliant for small bedrooms or studio apartments.
Difficulty Level: Beginner — truly. If you can use a drill, you can build this.
Common Mistakes: Mounting directly against the wall without standoff hardware. The hooks won’t fit in the holes properly and the whole system becomes useless. Don’t skip this step.
5. The Luxury Walk-In Look on a Bedroom Wall
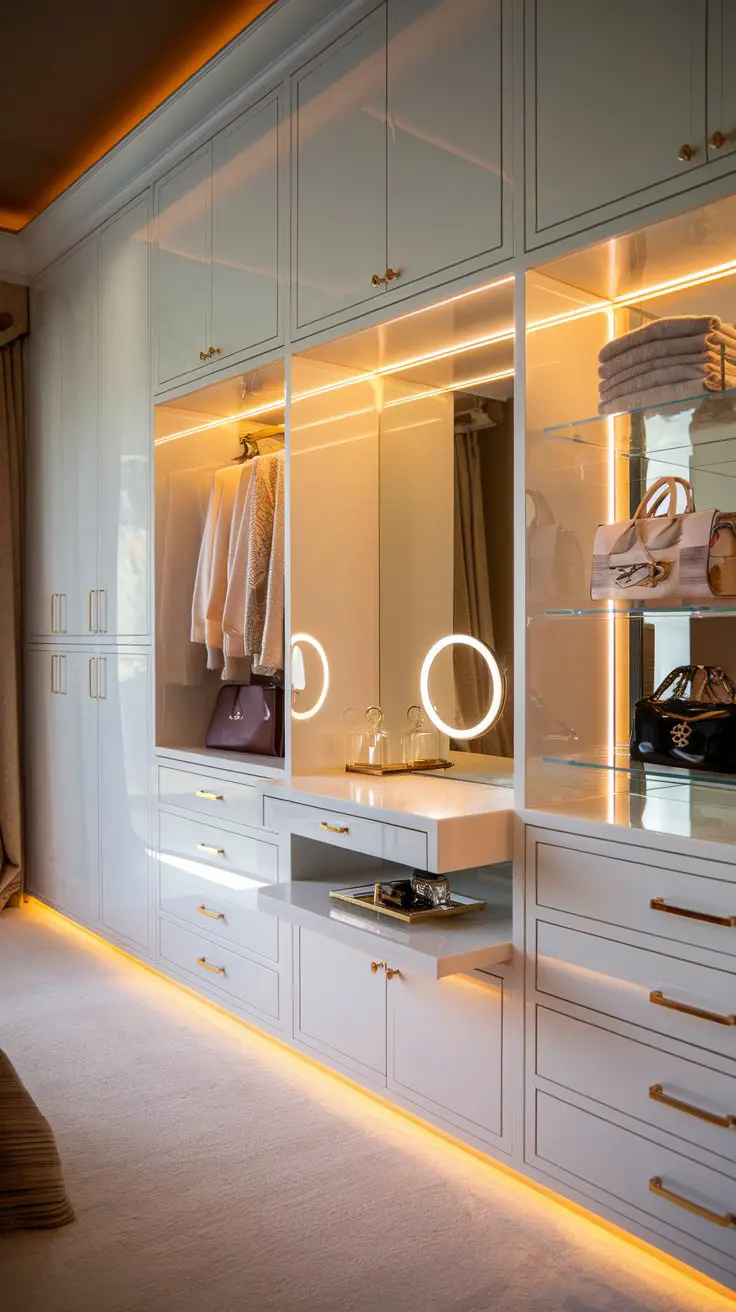
How to Recreate This Look
You don’t need a separate room to get the walk-in closet feeling. This approach brings that same sense of dedicated, beautiful dressing space to a single bedroom wall — and it works remarkably well.
Shopping List:
- Floor-to-ceiling cabinetry (IKEA PAX with Grimo or Forsand doors, or custom): $500–$2,000+
- Gold or brushed brass cabinet hardware: $3–$8 per handle
- Acrylic bag/shoe risers: $15–$40 per set
- Integrated LED cabinet lighting: $25–$60
- Small floating vanity surface (marble-look laminate is convincing and affordable): $50–$200
- Illuminated round mirror: $80–$300
Step-by-Step Styling Instructions:
- Plan a mix of closed storage (for everyday items you don’t want visible) and open display niches (for beautiful pieces you genuinely love looking at).
- Create a dedicated vanity moment in the center of the wall — even a 24-inch section with a small surface and mirror makes the whole wall feel intentional.
- Use matching risers and organizers inside open sections to keep the display portion looking curated.
- Install integrated LED strips inside open niches — this single detail elevates the entire look from “nice storage” to “boutique dressing room.”
- Edit display items ruthlessly: show only your most beautiful bags, shoes, or accessories. The rest goes behind closed doors.
Budget Breakdown:
- Under $100: Not realistic for this specific look — redirect toward the pegboard or open rail approach.
- $100–$500: IKEA PAX base units with prettier doors and gold hardware gets you 70% of the effect.
- $500+: Where this look genuinely lives — custom cabinetry with integrated lighting and a built-in vanity section.
Difficulty Level: Intermediate to Advanced — particularly if you’re adding the vanity section and lighting.
Seasonal Adaptability: Swap display items seasonally. Summer: linen bags, light scarves, straw hats. Winter: structured totes, richer textures, cashmere folded beautifully on open shelves.
6. The Rental-Friendly Freestanding System
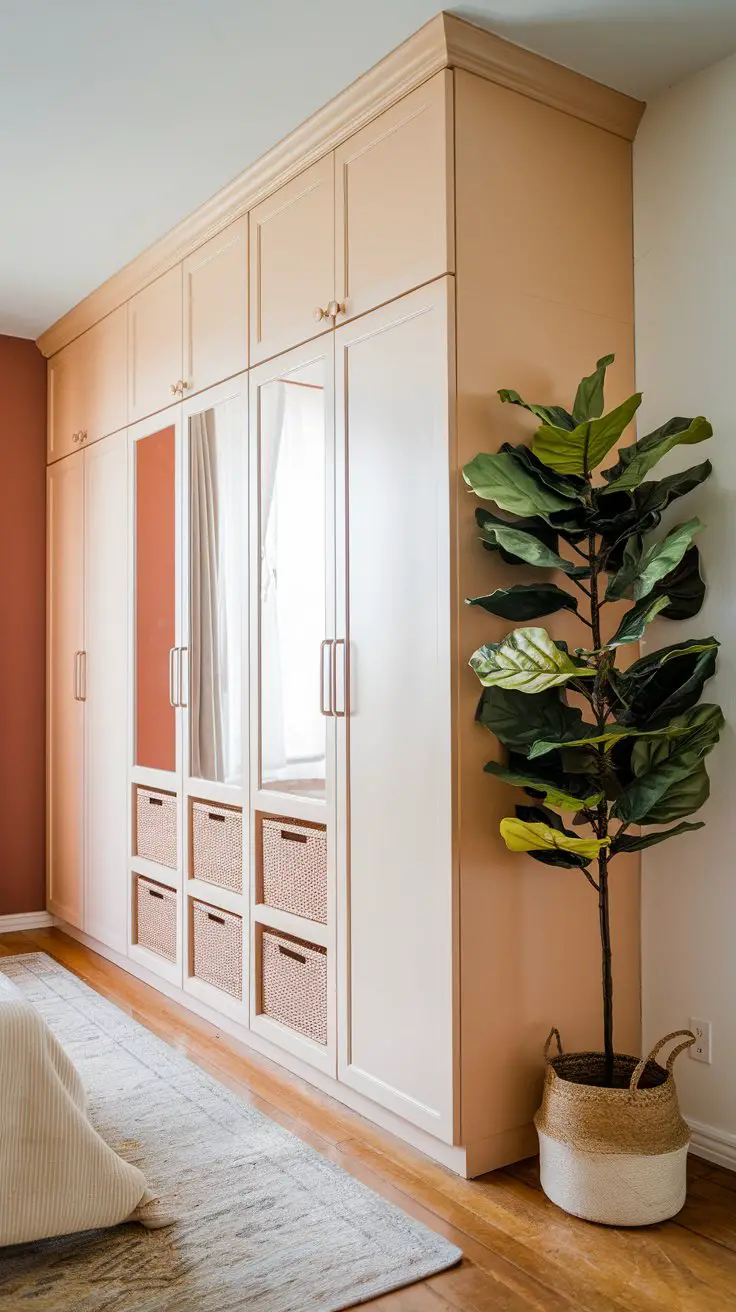
How to Recreate This Look
Renters, this one’s for you. The secret to making freestanding units look built-in is the valance board — that simple board bridging the gap between cabinet top and ceiling makes the whole arrangement read as intentional architecture rather than furniture you can take with you when you move. (Which you absolutely can.)
Shopping List:
- Freestanding wardrobe units (IKEA PAX, Argos, Wayfair): $100–$300 per unit
- MDF valance board cut to length, painted to match units: $20–$40
- L-brackets to secure valance board to ceiling without wall damage: $10–$20
- Filler panels for gaps between units and side walls: $20–$50
- Woven storage baskets for open sections: $10–$25 each
- Removable wallpaper for inside cabinet backs if desired: $30–$80
Step-by-Step Styling Instructions:
- Measure your wall precisely and choose units that fill the space with minimal gaps — 1–2 inch gaps on each side are easy to fill with painted MDF strips.
- Secure units together laterally using connector bolts through side panels — this prevents wobbling and helps the row feel like one unified piece.
- Install the valance board across the top: this is the move that makes everything look built-in. It’s a relatively simple cut-and-paint job that delivers an enormous visual payoff.
- Add removable wallpaper or peel-and-stick contact paper inside open shelving sections for a personal touch.
- Secure the back of the top units to the wall with furniture anchor straps — they’re invisible and keep everything safe, without causing any rental-damaging holes that a landlord would notice.
Budget Breakdown:
- Under $100: One or two freestanding cube organizers in a row with a curtain panel hung from a ceiling-mounted tension rod in front.
- $100–$500: Two to three IKEA PAX units with valance board treatment — genuinely the sweet spot.
- $500+: Five or six units spanning an entire bedroom wall with mixed door styles and interior customization.
Difficulty Level: Beginner — if you’re comfortable assembling flat-pack furniture, you can do this.
Common Mistakes: Forgetting the valance board. The units look great without it, but WITH it they look genuinely architectural. Don’t skip it.
7. The Capsule Wardrobe Display Wall
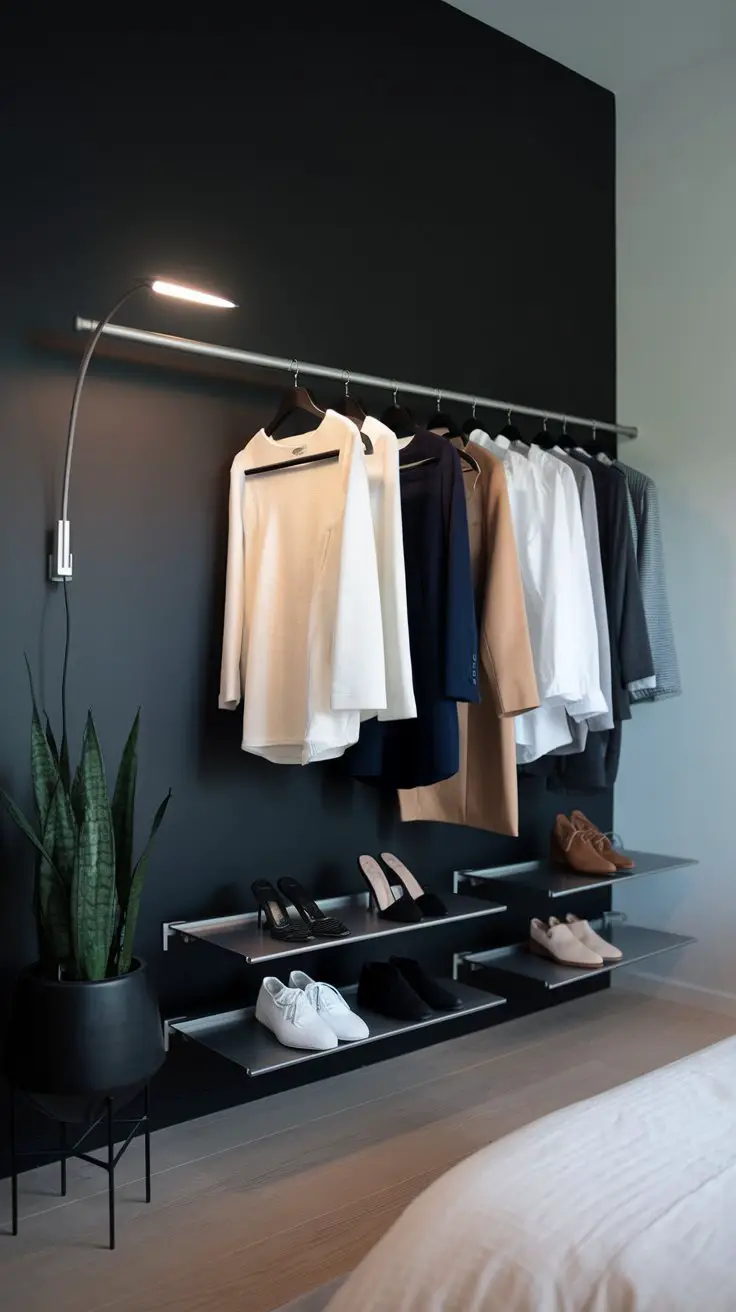
How to Recreate This Look
This isn’t just a storage solution — it’s a commitment to owning less and wearing it more. If the idea of a capsule wardrobe appeals to you, designing your wall display around it makes the whole philosophy feel tangible and beautiful rather than restrictive.
Shopping List:
- Wall-mounted single clothing rail in brushed steel or matte black: $40–$120
- Matching slim velvet hangers (crucial — mismatched hangers ruin this aesthetic): $15–$25 for 50 pieces
- Floating shelves for shoes (IKEA Lack or similar): $10–$20 each
- Small wooden shoe risers: $15–$30 per set
- One statement plant in a considered pot: $20–$60 total
- Dark accent paint for the wall behind the rail: $30–$50
Step-by-Step Styling Instructions:
- Commit to the edit before you set up the rail — the capsule display only works with a genuinely reduced wardrobe. Donate everything that doesn’t fit the color palette or serve a real purpose in your life.
- Install your rail at approximately 6.5 feet from the floor for standard hanging clearance.
- Arrange garments in color order — not by category. The color gradient is what makes this look editorial.
- Limit shoes on floating shelves to only the pairs you wear regularly. Everything else goes in boxes underneath the bed.
- Paint the wall behind the rail in a deeper tone than the rest of your room — it creates a gallery-like backdrop that makes the clothing pop.
Budget Breakdown:
- Under $100: Tension-mounted rail from Amazon + existing paint + velvet hangers.
- $100–$500: Proper wall-mounted rail, floating shelves, accent paint, and a quality plant.
- $500+: Custom rail system with integrated shelf and lighting, and a full room repaint.
Difficulty Level: Beginner for the physical installation. The harder part is the mindset shift around owning less. 🙂
8. The Modular Cube Storage Wall
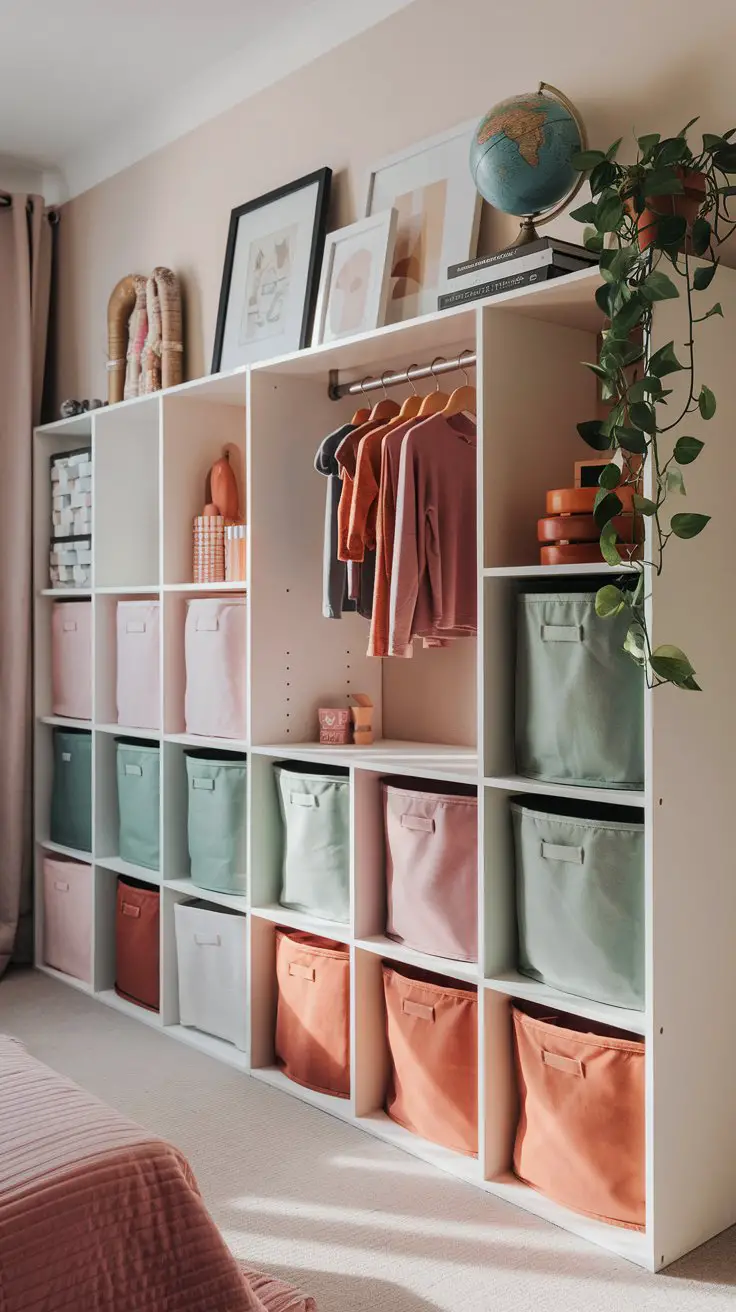
How to Recreate This Look
Cube storage systems are the most adaptable whole wall closet solution you can invest in, because they genuinely evolve with you. What holds stuffed animals today can hold vinyl records in five years. The configuration is always yours to rearrange.
Shopping List:
- Cube storage units (IKEA Kallax, Way Basics, or similar): $50–$200 per unit depending on size
- Fabric drawer inserts in coordinating colors: $8–$15 each
- Hanging rod to mount between cube columns: $15–$30
- Wooden hangers: $15–$25 for a set
- Decorative baskets for open upper cubes: $10–$25 each
Step-by-Step Styling Instructions:
- Map out your cube grid on paper first — decide which cubes will be open display, which will get fabric drawers, and where your hanging section will go.
- Keep the top row entirely decorative: books, plants, framed prints, meaningful objects. This is what transforms the unit from “storage furniture” to “room feature.”
- Use fabric drawer inserts in a limited color palette — three coordinating tones maximum. More than that and it starts to look chaotic.
- Leave at least one or two cubes open and empty — negative space in the grid makes the whole wall look curated rather than stuffed.
- Anchor the bottom row with your heaviest items and make sure all taller units are wall-anchored for safety.
Budget Breakdown:
- Under $100: Two 2×2 Kallax units placed side by side with a hanging rod mounted between them.
- $100–$500: Multiple units spanning a full wall with mixed open and drawer configurations.
- $500+: Custom-built cube system in painted MDF with integrated lighting.
Difficulty Level: Beginner — flat-pack assembly with no special tools required.
Lifestyle Considerations: Outstanding choice for families with young children. The low cubes are accessible for kids to independently put away their own things — a genuine daily life improvement.
9. The Curtained Closet Wall
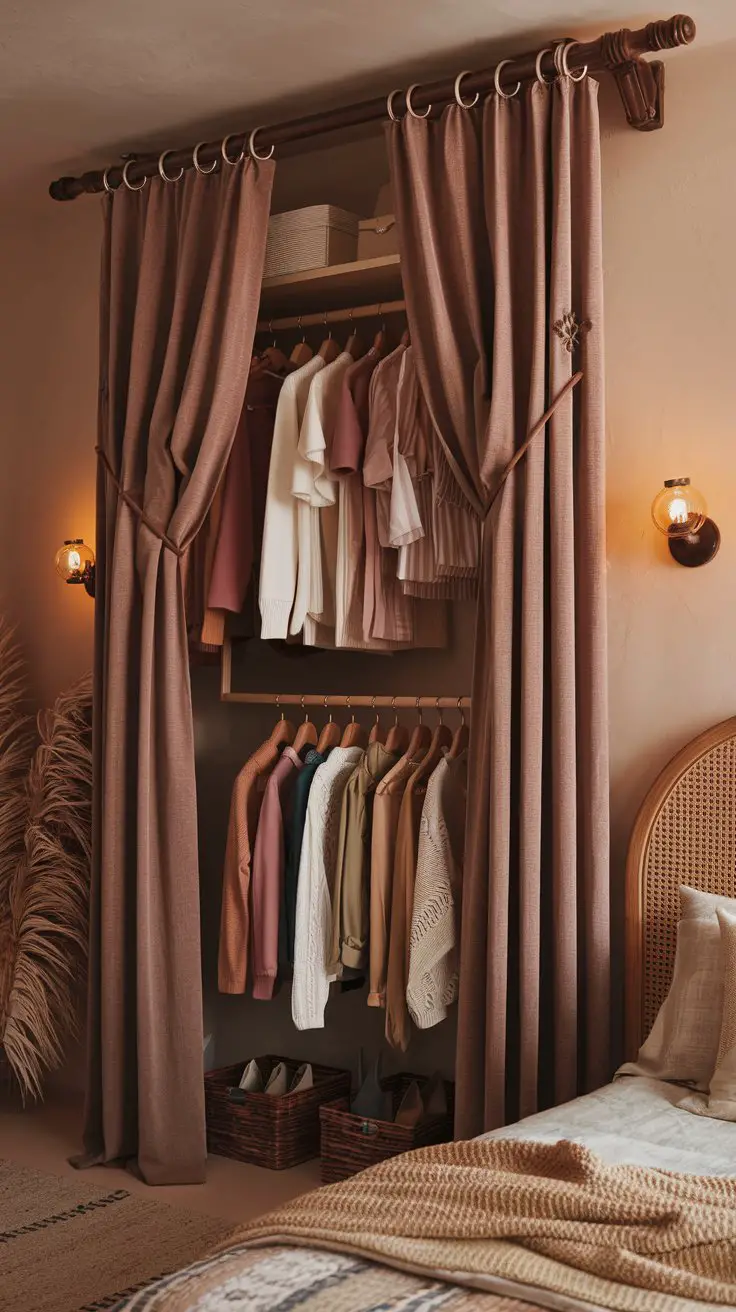
How to Recreate This Look
This is the most rental-friendly, budget-friendly, and frankly most romantic whole wall closet solution on this entire list. A thick curtain rod mounted at ceiling height and beautiful linen or velvet curtains hung to the floor can hide an enormous amount of storage while making a bedroom feel genuinely lush and layered.
Shopping List:
- Ceiling-mounted curtain rod in wood or brass: $30–$80
- Floor-length curtains in linen, velvet, or cotton (needs to be 2–2.5x the wall width for fullness): $40–$200 depending on fabric and source
- Curtain rings in matching metal finish: $10–$20
- Clothing rails to mount on the wall behind the curtain: $30–$80 each
- Floating shelves for the curtained section: $15–$40 each
Step-by-Step Styling Instructions:
- Mount your curtain rod as close to the ceiling as possible — this elongates the entire wall and makes the ceiling feel higher.
- Choose curtains in a fabric that relates to your existing bedding or soft furnishings — this is what keeps it looking designed rather than improvised.
- Mount 1–2 clothing rails on the wall behind the curtain zone, along with 2–3 floating shelves for folded items and shoes.
- Use matching hangers behind the curtain — even though they’re mostly hidden, opening the curtain and finding a neat, organized interior is deeply satisfying.
- Keep the curtains slightly open on one side for an intentionally styled peek at the interior — it signals “this is a design choice” rather than “I’m hiding a mess.” (Although honestly? Both are valid.)
Budget Breakdown:
- Under $100: Tension rod + budget curtains from IKEA or Amazon + existing rail or hooks.
- $100–$500: Quality fabric curtains + proper ceiling-mounted hardware + 1–2 rails and shelves.
- $500+: Custom linen or velvet curtains in a statement color with premium rod and hardware.
Difficulty Level: Beginner — truly one of the easiest whole wall closet transformations possible.
Common Mistakes: Choosing curtains that are too thin or short. They need to reach the floor and have enough weight to hang beautifully. Skimping on fabric makes the whole thing look unfinished.
10. The Statement Mirror and Storage Wall
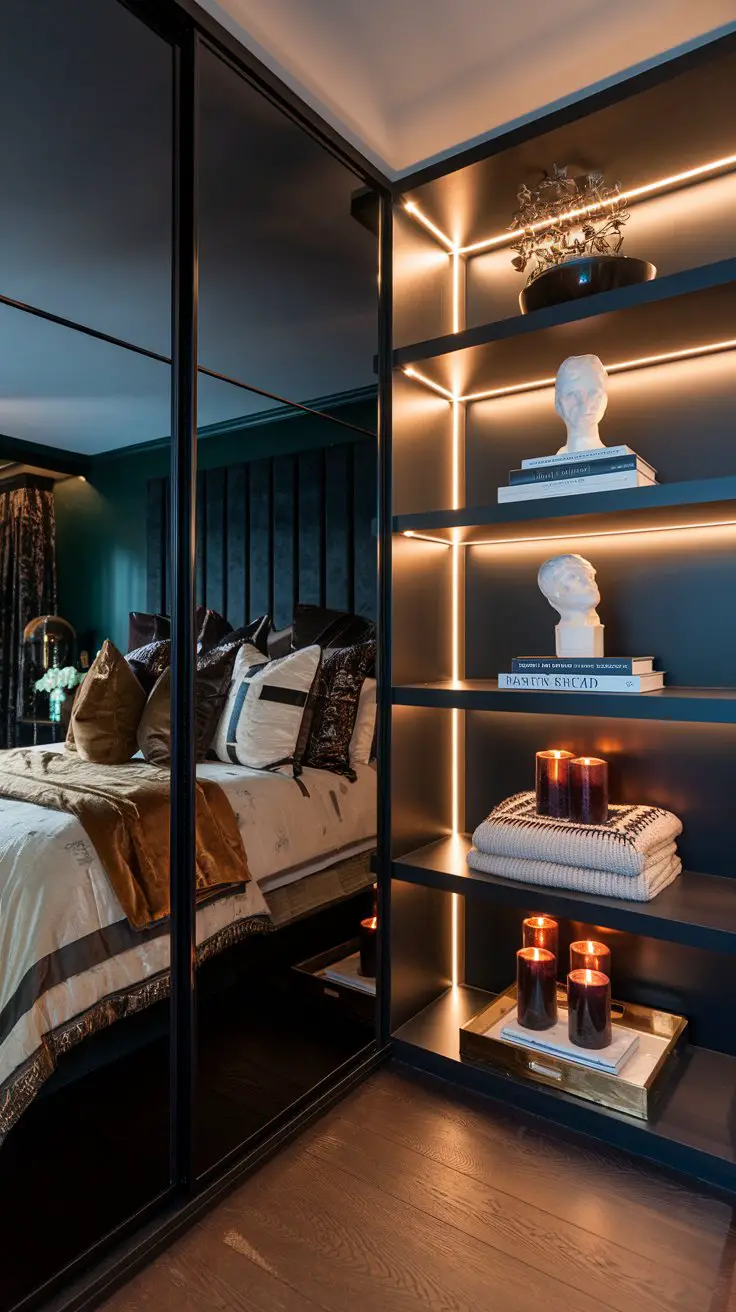
How to Recreate This Look
Mirrored wardrobe panels are the decorator’s not-so-secret weapon for small bedrooms. They double the perceived size of a room, bounce light around beautifully, and give you a full-length mirror in the most convenient possible location. Pairing mirrored sliding doors with an open display section on one side creates a wall that balances function and genuine visual drama.
Shopping List:
- Mirrored sliding wardrobe system (IKEA PAX with Auli mirror door, or custom): $300–$1,500+
- Open shelving unit to pair alongside: $80–$300
- LED strip lighting for under each shelf: $15–$40
- Decorative display objects (ceramic sculpture, fashion books, candles): $30–$150 total
- Marble-look tray for candle/accessory grouping: $20–$60
Step-by-Step Styling Instructions:
- Plan your wall split thoughtfully: if you have a smaller room, allocate more wall to the mirrored section to maximize the light-bouncing effect.
- Install the open shelving section to the side rather than above the mirror panels — height consistency across the wall makes everything look more architectural.
- Style open shelves with the “rule of three”: group objects in odd numbers, vary heights, and include something living (a plant), something reflective (a tray or vase), and something textural (a folded textile or ceramic).
- Point a warm-toned floor lamp or wall sconce toward the mirrored panels — the reflected light will fill the entire room with a warm glow.
- Keep the open display section genuinely curated. A mirrored wall draws the eye powerfully, so anything displayed nearby gets scrutinized closely. Only show pieces you truly love.
Budget Breakdown:
- Under $100: Full-length leaning mirror propped against the wall beside a small cube shelving unit achieves a simplified version of this concept.
- $100–$500: IKEA PAX with Auli mirror doors + a Kallax or Billy unit alongside.
- $500+: Custom sliding mirror panels spanning the full wall height with professional installation.
Difficulty Level: Intermediate — mirror panel installation requires two people and precise leveling.
Common Mistakes: Positioning the mirrored section to reflect something unflattering — like the back of a door or a cluttered area of the room. Before installation, hold a large mirror in position and check what it’ll reflect. Adjust accordingly.
Your Walls Are Waiting
Here’s something worth remembering as you flip back through these ideas: the best whole wall closet isn’t the most expensive one, the trendiest one, or the one that photographs most beautifully. It’s the one that makes your mornings calmer, your evenings tidier, and your space feel genuinely like yours.
Whether you’re going all-in with custom cabinetry and integrated LED lighting, or you’re spending a Saturday afternoon hanging a curtain rod and a couple of rails in your rental apartment, you’re doing the same essential thing — taking a wall that wasn’t working and turning it into something that works beautifully for your actual life.
Start with what bothers you most about your current setup, pick the idea that excites you most from this list, and take one small step this weekend. Buy the curtain rod. Measure the wall. Order the hangers. The whole transformation starts with that first decision, and from there, the momentum builds surprisingly quickly.
You’ve absolutely got this. Now go make your walls work harder. <3

Greetings, I’m Alex – an expert in the art of naming teams, groups or brands, and businesses. With years of experience as a consultant for some of the most recognized companies out there, I want to pass on my knowledge and share tips that will help you craft an unforgettable name for your project through TeamGroupNames.Com!