
Let me paint you a familiar picture: you spend an entire Saturday organizing the playroom. Every LEGO has a home. Every Hot Wheel is in its lane.
You stand back, hands on hips, genuinely proud of yourself. It looks incredible. You take a photo. You might even frame it.
Then Monday happens.
By Wednesday, the room looks like a category five toy storm made landfall directly in your home. How? Why? What cosmic law governs the entropy of children’s spaces?
Here’s the thing — the rooms that stay organized aren’t the ones that were organized hardest. They’re the ones that were organized smartly.
That means systems that make it easier to put something away than to leave it out, storage that kids can actually operate independently, and a layout that works with how boys naturally play rather than against it.
Let’s talk about 10 organization ideas that genuinely hold up under real daily use.
1. The Zone-and-Bin System
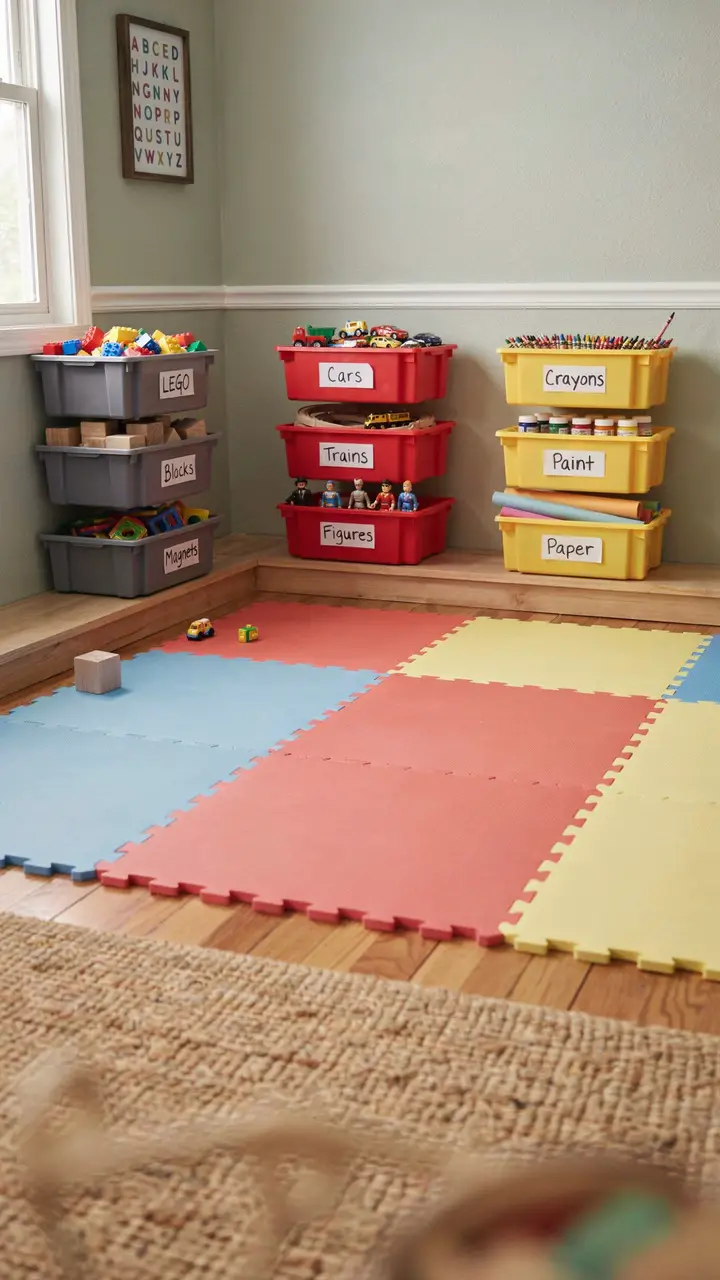
How to Recreate This Look
Shopping List:
- Open-top storage bins (6–9 bins, in 2–3 colors): $8–$20 each
- Low wooden shelving unit for each zone: $40–$120 each
- Foam floor tiles in coordinating zone colors: $30–$80 per zone
- Adhesive chalkboard labels (for labeling bins): $8–$15
- Chalk marker for labels: $5–$10
Step-by-Step Instructions: - Map the room into activity zones on paper — building, active play, creative/art, etc.
- Assign a bin color to each zone for instant visual coding.
- Sort all existing toys into categories before purchasing any storage — know what you have before buying bins.
- Purchase bins sized appropriately for each toy category (deep bins for bulky items, shallow bins for small parts).
- Install shelving in each zone at child-accessible height (no higher than 36″ for the bottom shelf).
- Label every bin clearly — use pictures alongside words for pre-readers.
- Lay coordinating foam tiles to define zone boundaries on the floor.
Style Compatibility: Works with any room aesthetic — choose bin colors that coordinate with your room palette.
Budget Breakdown:
- Budget-friendly (under $100): Repurpose existing bins + labels + foam tiles from a dollar store
- Mid-range ($100–$500): Full bin system with coordinated colors and proper shelving = $200–$350
- Investment-worthy ($500+): Custom built-in shelving with integrated labeled bins per zone
Space Requirements: Works in any room — even small spaces benefit from zone definition. Adapt to two zones if space is tight.
Difficulty Level: Beginner — this is purely sorting, labeling, and arrangement.
Durability: The system’s durability depends on consistency. Works best when kids are taught the system and expected to use it independently.
Seasonal Adaptability: Rotate toy bins seasonally — store off-season or less-used toys in labeled bins out of the main display area.
Common Mistakes: Creating too many zones (3 is ideal; 5 is confusing), labeling bins with only text when kids can’t read yet, and using lidded bins that take too much effort to open (kids leave them wherever).
Maintenance Tips: Quick 10-minute tidy at the end of each day returns items to their zones. Full organization audit every 3 months.
2. Height-Appropriate Shelving for Kid Independence
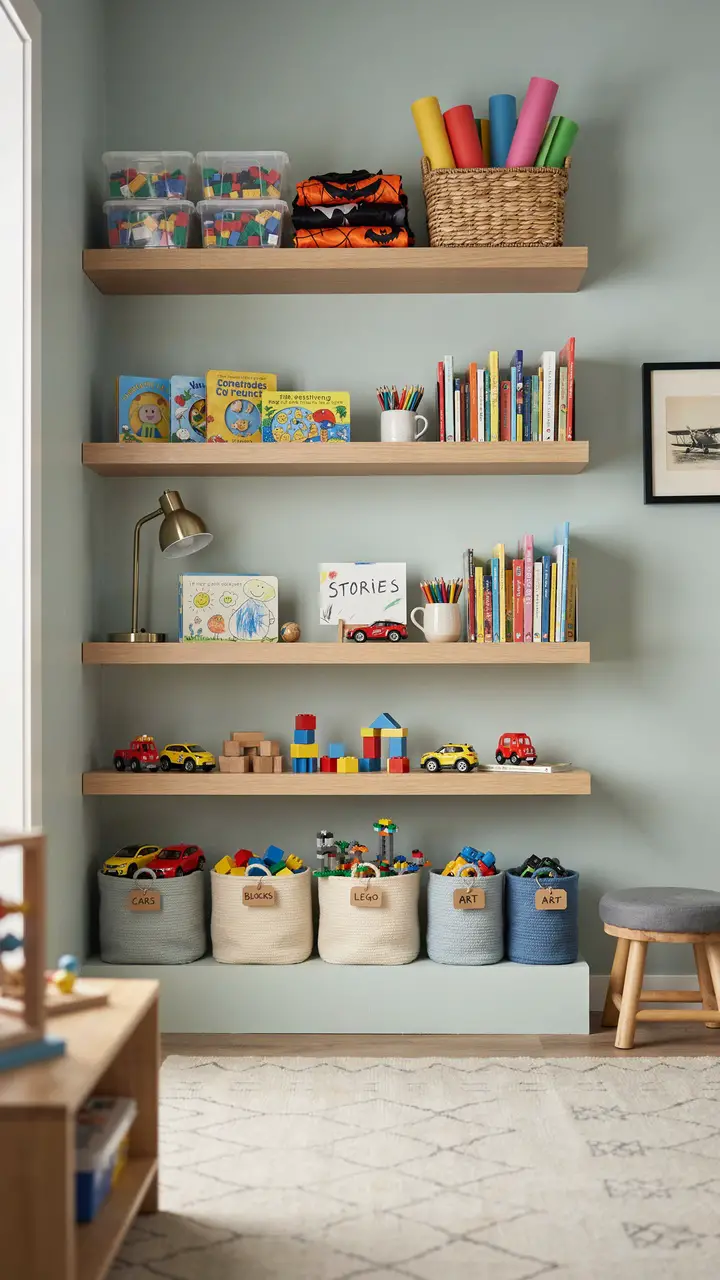
How to Recreate This Look
Shopping List:
- Tall bookshelf unit (or built-in style shelving, 72″+ tall): $80–$300
- Open bins for bottom shelf: $8–$20 each
- Face-out book rails or regular shelving for middle level: Already part of unit
- Small wooden step stool: $20–$50
- Labels for each shelf level: $5–$15
- Shelf liner or foam pad for fragile items on upper shelf: $5–$15
Step-by-Step Instructions: - Install or position your shelving unit — anchor to the wall per manufacturer instructions (anti-tip is non-negotiable).
- Divide the shelving mentally into three levels: child-accessible (floor to 36″), kid-reachable-with-stool (36″–54″), and adult-only (above 54″).
- Load the bottom bins with the 10–15 toys your son plays with every single day.
- Arrange books on the middle shelf face-out for browsability — this dramatically increases how often kids choose and return books.
- Store spare supplies, seasonal items, and adult-managed toys on the upper shelf.
- Position the step stool nearby for the middle-level access.
Style Compatibility: Works with all room aesthetics — choose a shelving unit that matches your room’s wood tones and finish.
Budget Breakdown:
- Budget-friendly (under $100): IKEA Billy bookshelf ($50–$80) + existing bins
- Mid-range ($100–$500): Quality tall shelving unit + full open bin system for $200–$350
- Investment-worthy ($500+): Custom built-in floor-to-ceiling shelving with integrated lighting
Space Requirements: A 8-foot-wide shelving wall needs approximately 12 linear feet of wall space. Scale to your room.
Difficulty Level: Beginner — furniture placement and bin loading. Anti-tip anchoring is critical and easy to execute.
Durability: Excellent. The system works as long as the height-appropriate loading is maintained.
Seasonal Adaptability: Rotate seasonal toys from the top shelf (adult-only zone) into the daily-use bottom bins as seasons and interests change.
Common Mistakes: Loading the most-used toys onto the highest shelves (kids won’t put them back), skipping anti-tip anchoring (serious safety risk), and not revisiting the loading scheme as the child grows and becomes more capable of reaching higher shelves.
Maintenance Tips: Reassess the height-appropriate loading every 6 months. Declutter the top shelf quarterly to prevent it from becoming a graveyard for forgotten toys.
3. The “One In, One Out” Donation Station
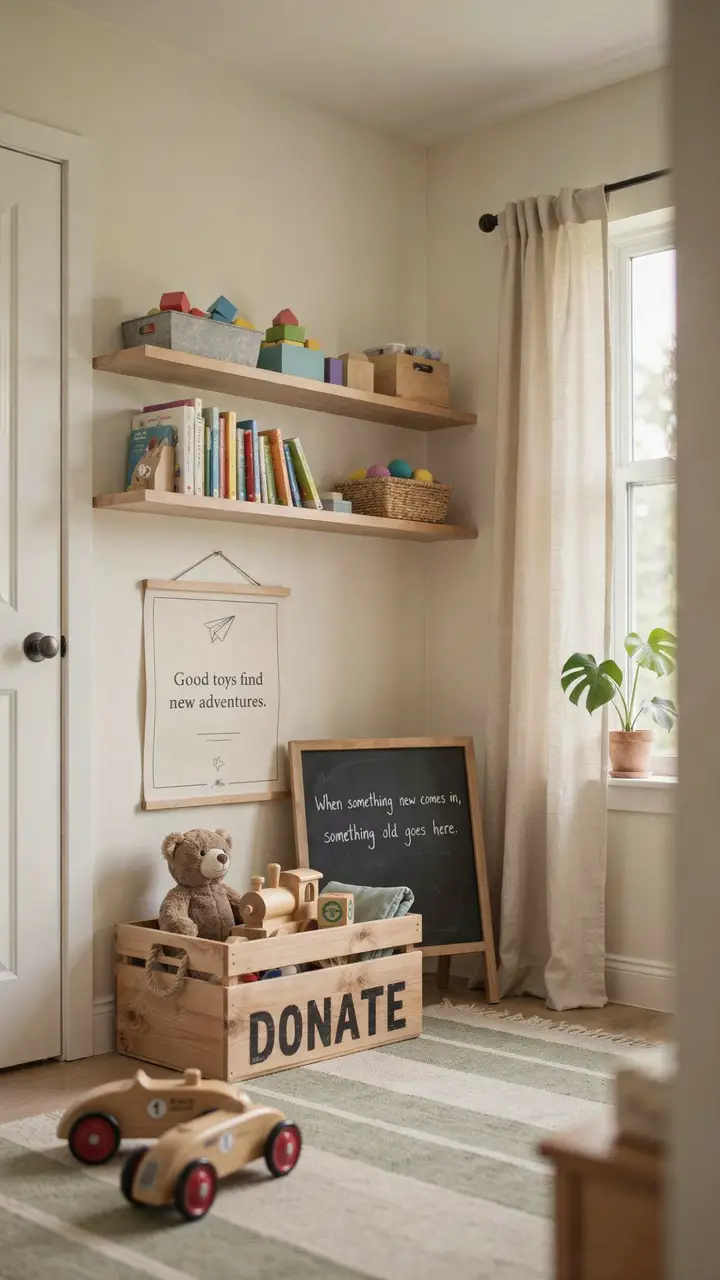
How to Recreate This Look
Shopping List:
- Wooden crate or wicker basket (large, labeled): $15–$40
- Chalkboard paint or label for crate: $5–$15
- Bold paint or vinyl letters for “DONATE”: $5–$15
- Small printed poster for the “Good toys find new adventures” sign: $0 (print at home)
- Frame for the poster: $5–$15
Step-by-Step Instructions: - Position the donation crate near the playroom entrance — proximity to the door is intentional, since it makes donation easy to act on.
- Label the crate clearly with “DONATE” in large, readable text.
- Introduce the concept to your son: “When something new comes in, we find something old that can have a new adventure with another kid.”
- Make the first donation together — fill the crate yourself the first time so he sees the ritual in action.
- When the crate is full, go donate together as a regular family activity, not a punishment.
- Replace the crate immediately after donating so the system is always ready.
Style Compatibility: The donation station is a system element — adapt the crate style to the room’s aesthetic.
Budget Breakdown:
- Budget-friendly (under $100): A cardboard box labeled with a marker works perfectly. Cost: $0.
- Mid-range ($100–$500): Not necessary — this system is inherently low-cost.
- Investment-worthy ($500+): Not applicable.
Space Requirements: Needs approximately 18″x18″ of floor space near the door.
Difficulty Level: Beginner — it’s a crate and a label.
Durability: As durable as the family’s commitment to the one-in-one-out habit. The crate itself lasts indefinitely.
Seasonal Adaptability: Use seasonal toy arrival (birthday, holidays) as natural trigger points for the one-in-one-out practice.
Common Mistakes: Placing the donation crate in an inconvenient location, using the concept as a threat (“if you don’t clean up, we’ll donate your toys”), and waiting until the donation crate overflows before going to donate.
Maintenance Tips: Empty the crate every 4–6 weeks. Never let it sit full for more than a month or kids stop trusting the system.
4. Drawer Dividers for Small Part Chaos
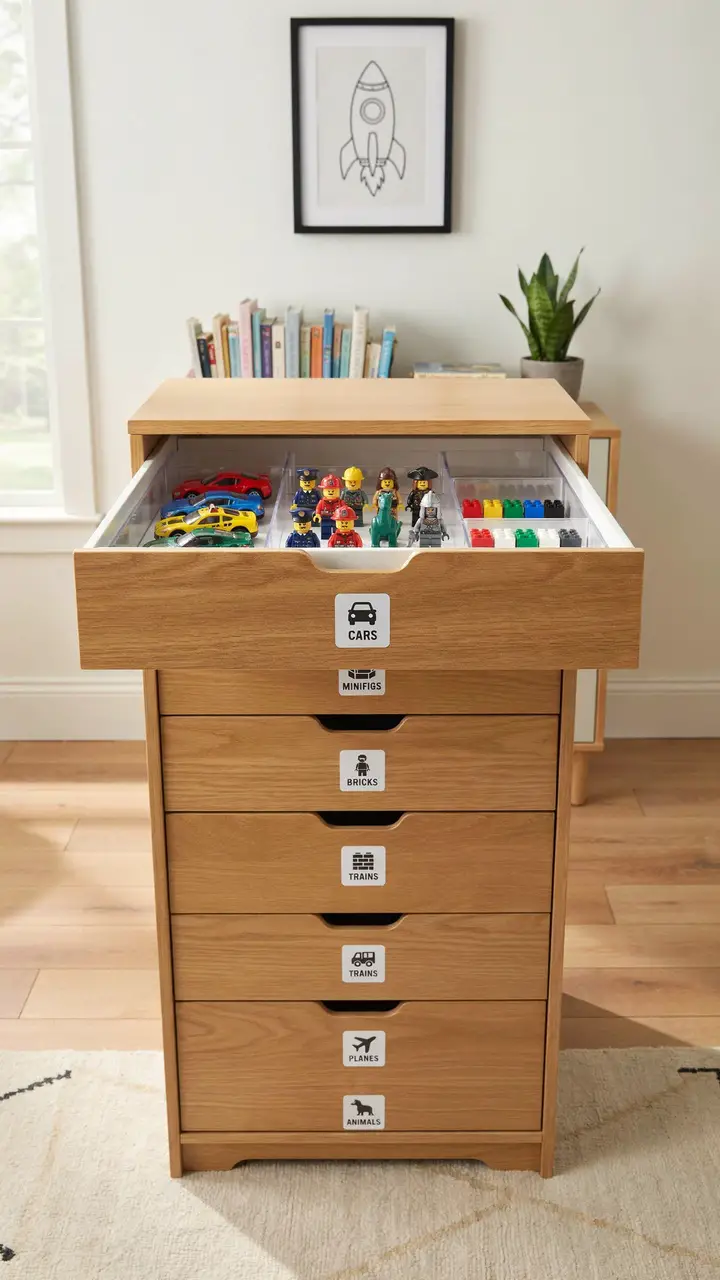
How to Recreate This Look
Shopping List:
- 6-drawer storage unit (medium size): $40–$120
- Adjustable drawer dividers (bamboo or plastic): $10–$30 per drawer
- Label maker or pre-printed labels: $10–$30
- Clear divider inserts for LEGO minifigures: $10–$20
- Foam insert material for custom-cutting: $5–$15
Step-by-Step Instructions: - Sort ALL small parts before installing any dividers — you need to know what categories exist and roughly how many items per category before sizing compartments.
- Install adjustable dividers based on your category list — configure each drawer for its specific purpose.
- The deepest, widest drawers handle bulkiest items; shallow drawers handle the smallest sorted parts.
- Label every drawer with both a picture and a word — pictures help early readers and add clarity.
- Fill the sorted compartments — resist the urge to dump miscellaneous items in any available space.
- Leave a “staging” drawer intentionally empty as a temporary holding zone for new items awaiting sorting.
Style Compatibility: Drawer units work in any style — choose the finish that matches your room.
Budget Breakdown:
- Budget-friendly (under $100): Repurpose a thrifted dresser with DIY cardboard dividers
- Mid-range ($100–$500): New drawer unit + quality dividers = $100–$180
- Investment-worthy ($500+): Custom drawer inserts with premium dividers, professionally labeled
Space Requirements: A 6-drawer unit typically occupies 24″W x 18″D x 30″H of floor space.
Difficulty Level: Beginner — sorting and installing dividers requires only time and patience.
Durability: Excellent when maintained consistently. The sorting habit is the system’s most important durability factor.
Seasonal Adaptability: Reorganize drawer assignments as toy collections evolve. Add new drawers as the collection grows.
Common Mistakes: Creating too many tiny compartments (maintenance becomes overwhelming), using unlabeled drawers (system collapses in two weeks), and putting the small-part drawer unit out of child reach.
Maintenance Tips: Full drawer re-sort every 3 months. Spot-check and reroute misplaced items weekly.
5. The Daily Tidy Basket
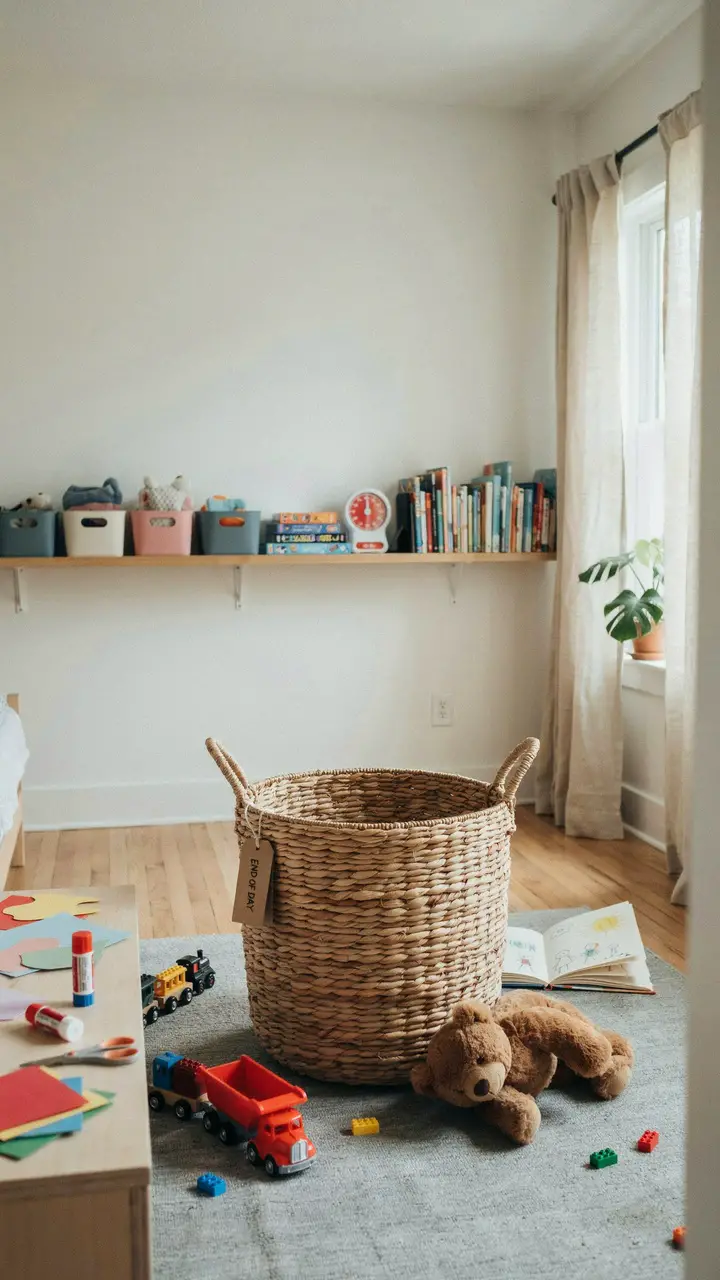
How to Recreate This Look
Shopping List:
- Large woven seagrass basket (18″+ diameter): $25–$60
- Vinyl or painted label for basket: $5–$10
- Visual timer (for tidy time): $15–$40
- Consistent placement location in the center of the room: Free
Step-by-Step Instructions: - Position the basket in the center of the playroom — it should be the first thing seen when entering the room.
- Label it “END OF DAY” or “TIDY BASKET” clearly.
- Set the visual timer for 10 minutes at a consistent time each evening.
- Kids sweep the room and drop stray items into the basket — anything that’s out of place goes in.
- After 10 minutes, return basket items to their actual homes (this step takes another 5 minutes with help).
- The habit, repeated daily, keeps the room from ever reaching total chaos.
Style Compatibility: A woven basket works in virtually every aesthetic — seagrass and rattan are especially versatile.
Budget Breakdown:
- Budget-friendly (under $100): A thrifted laundry basket repurposed = $0–$10
- Mid-range ($100–$500): Quality woven basket + visual timer = $50–$80
- Investment-worthy ($500+): Not applicable for a basket.
Space Requirements: Needs floor space for a roughly 20″x20″ basket. Can be moved to a corner when not in active tidy mode.
Difficulty Level: Beginner — this is a habit, not a construction project.
Durability: The basket is permanent; the habit is what requires reinforcement.
Seasonal Adaptability: No changes needed — the daily tidy habit is year-round.
Common Mistakes: Skipping the second step (returning items to actual homes) and letting the basket become permanent storage, using too small a basket, and inconsistent tidy time (the habit only forms if it happens at the same time daily).
Maintenance Tips: Wipe basket interior monthly. Replace worn labels. Maintain the consistent tidy time even on weekends.
6. Color-Coded Library System for Books
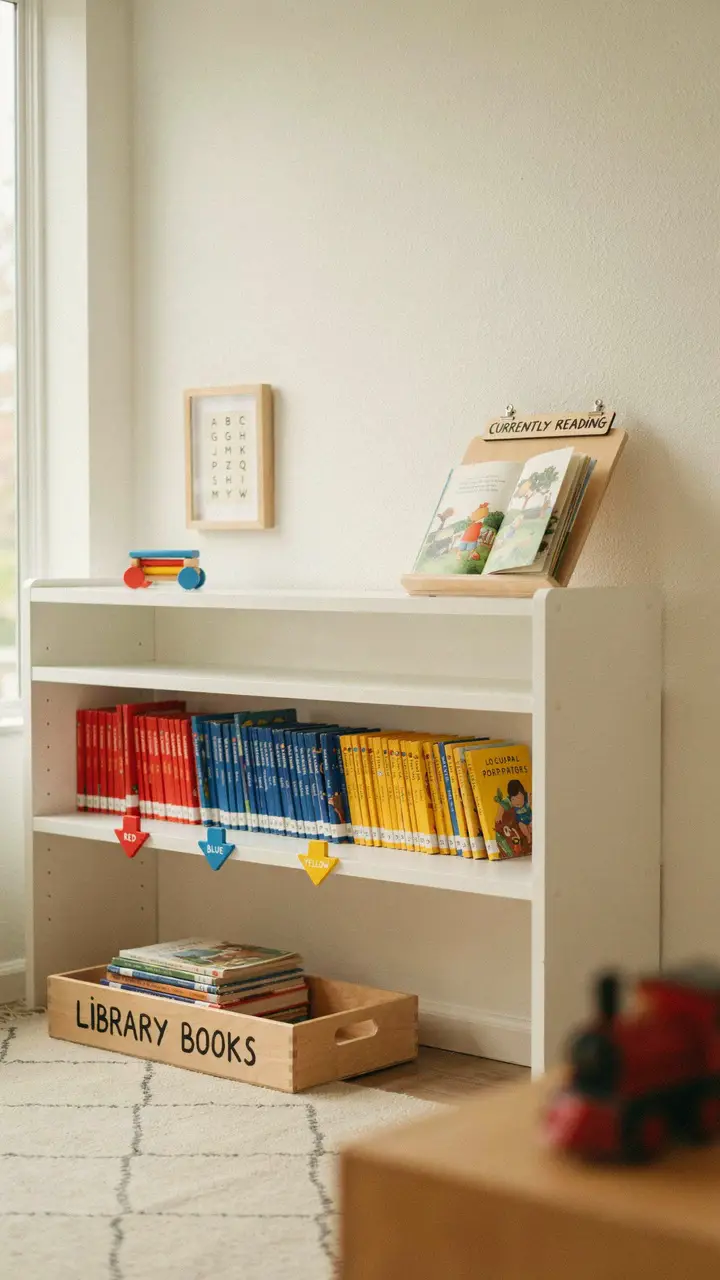
How to Recreate This Look
Shopping List:
- Low bookshelf at child height (24″–30″): $40–$120
- Small painted wooden arrows for section markers: $5–$15 (or DIY with craft wood)
- Book display stand (face-out for current book): $15–$30
- Small labeled bin for library books: $10–$20
- Acrylic or washi tape for color-coded shelf edge markers: $5–$10
Step-by-Step Instructions: - Pull all books off the shelf and sort by spine color — this is surprisingly satisfying.
- Group by color from left to right: all red-spine books, all blue-spine books, etc. (For very young readers, consider sorting by size instead.)
- Mark each color section with a small colored arrow or tape at the shelf edge.
- Install the face-out book stand for the “currently reading” display — this is the prime real estate.
- Position the library book bin at the far end of the shelf — always separate from personal books.
- Step back: a color-coded bookshelf is legitimately beautiful and much more navigable for kids.
Style Compatibility: Works with any room aesthetic — a rainbow-organized bookshelf is visually stunning against any wall color.
Budget Breakdown:
- Budget-friendly (under $100): Rearranging existing books + tape markers = $5–$15
- Mid-range ($100–$500): New low-profile bookshelf + book display stand + coordinated accessories
- Investment-worthy ($500+): Custom built-in low bookshelf with face-out sections and integrated lighting
Space Requirements: A single 36″–48″ wide low shelf works in rooms as small as 8’x10′.
Difficulty Level: Beginner — sorting books by color takes about 20 minutes.
Durability: Excellent. The color organization is self-reinforcing — it’s obvious where each book belongs.
Seasonal Adaptability: Add seasonal books to the front/current-read stand as seasons change.
Common Mistakes: Mixing library books with personal books (they get lost and returned late), making the bookshelf too high for independent browsing, and alphabetizing by author for kids — color and size organization is far more accessible for young readers.
Maintenance Tips: Re-sort monthly when books inevitably drift. Weed the collection annually — donate books no longer age-appropriate.
7. Pegboard Tool Wall for Art and Craft Supplies
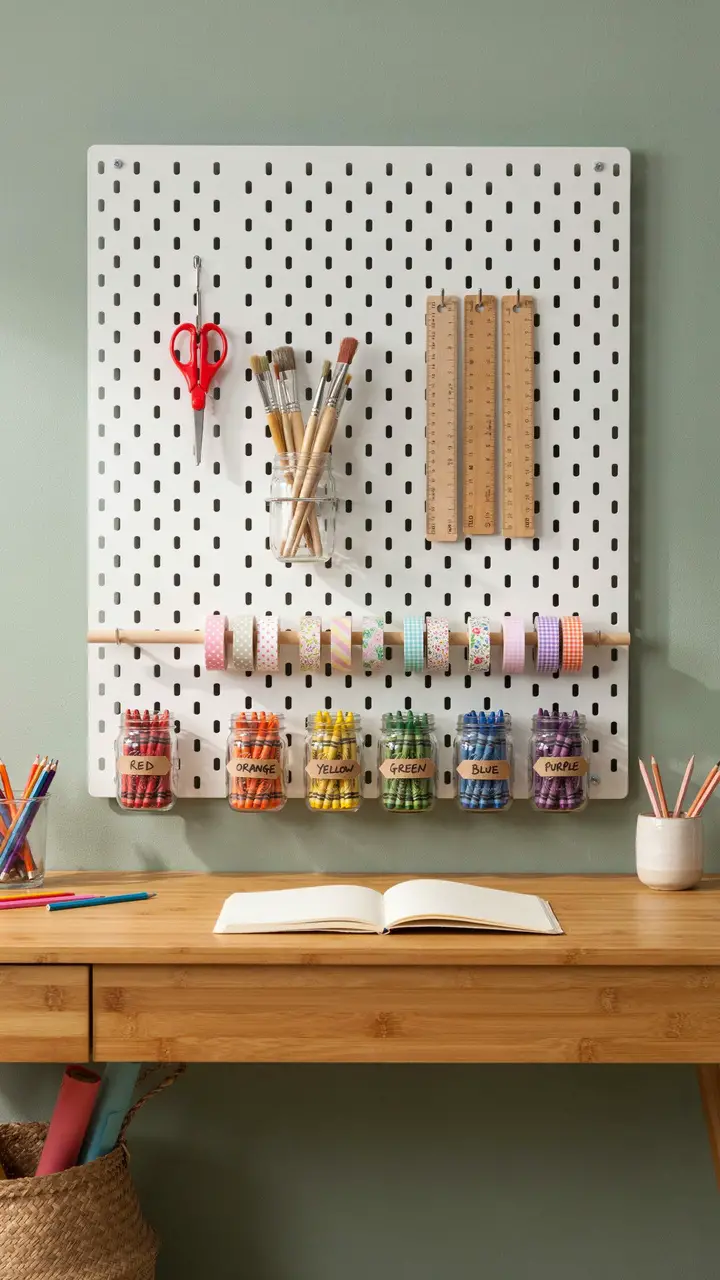
How to Recreate This Look
Shopping List:
- White pegboard (4’x4′ sheet): $20–$40
- Pegboard standoff hardware (for wall mounting): $10–$15
- Pegboard hooks assorted set: $10–$25
- Pegboard-mounted jar holders (for crayons): $15–$30
- Small jars or cups for supply storage: $10–$20
- Horizontal dowel rod for tape rolls: $3–$8
- Long narrow work table: $60–$180
- Sage green wall paint (if repainting): $15–$30
Step-by-Step Instructions: - Mount pegboard to the wall using standoff hardware (the standoffs create a gap behind the board that allows hooks to fit).
- Design your hook layout before mounting supplies — lay hooks out on the floor first to plan placement.
- Mount jar holders for crayon storage — sort crayons by color into separate jars.
- Install horizontal dowel for washi tape and tape roll storage.
- Hang scissors on designated hooks — always return to the same hook.
- Position the work table directly beneath the pegboard as an integrated creative zone.
- Add a small tray on the table for “in progress” projects.
Style Compatibility: Pegboard works in modern, industrial, farmhouse, and eclectic styles. White pegboard is the most versatile option; natural wood-tone pegboard is also beautiful.
Budget Breakdown:
- Budget-friendly (under $100): Pegboard + basic hook set + repurposed jars = $40–$60
- Mid-range ($100–$500): Full system with work table + premium hooks + coordinated jars = $150–$250
- Investment-worthy ($500+): Floor-to-ceiling pegboard system with custom shelving and integrated lighting
Space Requirements: A 4’x4′ pegboard needs approximately 16 square feet of wall space. The work table requires a clear floor area of approximately 3’x6′.
Difficulty Level: Intermediate — pegboard mounting requires drilling into studs or using proper drywall anchors.
Durability: Excellent. Pegboard is virtually indestructible. Hooks occasionally need repositioning.
Seasonal Adaptability: Rearrange hooks for seasonal craft projects — add holiday-specific supply holders in December, painting supplies in summer.
Common Mistakes: Mounting pegboard directly to the wall without standoffs (hooks won’t fit), overcrowding the pegboard (leave 30% of hooks empty for flexibility), and placing supplies too high for the child to reach independently.
Maintenance Tips: Wipe pegboard with a dry cloth monthly. Reorganize hook placement seasonally as supply needs change.
8. Rolling Cart for Mobile Organization
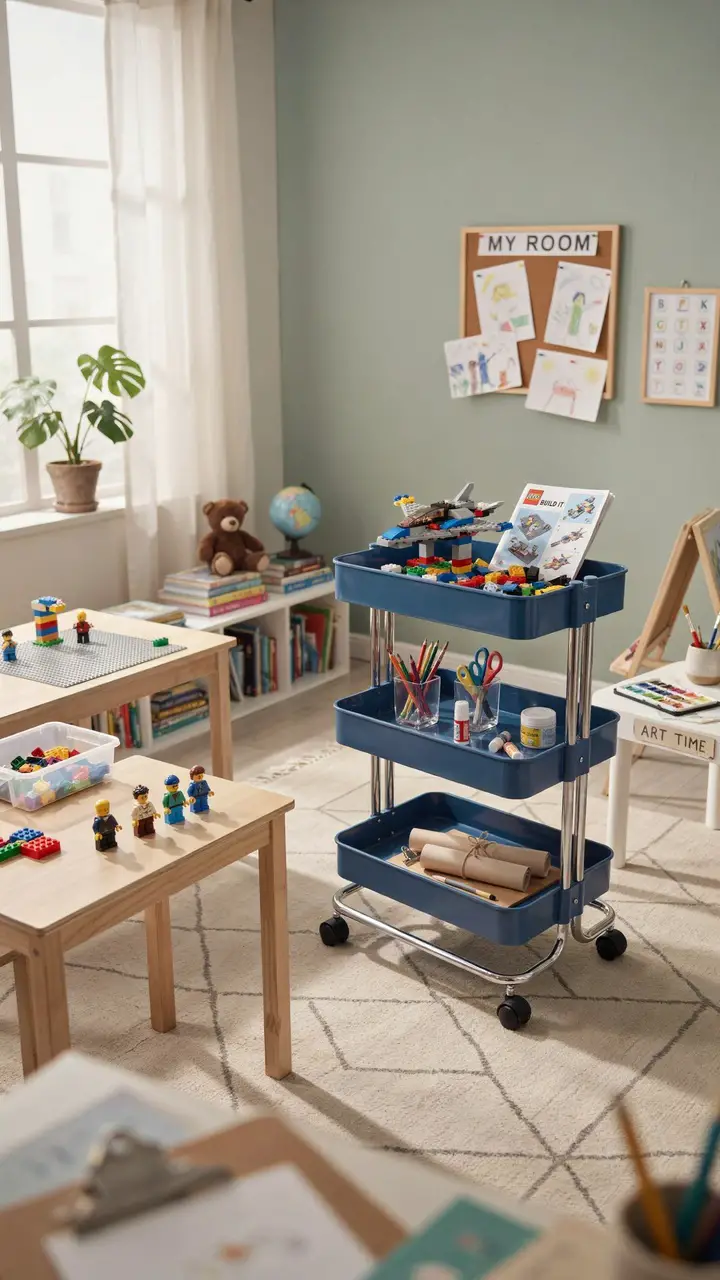
How to Recreate This Look
Shopping List:
- 3-tier rolling utility cart (like the IKEA RÅSKOG): $30–$60
- Small bins or cups for cart tier organization: $5–$15
- Adhesive chalkboard labels for each tier: $5–$10
- Cart color to coordinate with room palette: Most carts come in multiple colors
Step-by-Step Instructions: - Purchase a 3-tier cart in your room’s accent color — the IKEA RÅSKOG is the classic choice at ~$35.
- Assign each tier a purpose based on your son’s most common activity: top = current project, middle = daily supplies, bottom = paper/overflow.
- Add small bins or cups to contain supplies within tiers — loose items in a tiered cart are chaos.
- Label each tier with chalkboard adhesive labels.
- Teach your son to roll the cart to whichever activity zone he’s using — this is the key behavior that makes mobile organization work.
Style Compatibility: Rolling carts are neutral, functional, and work in virtually every playroom aesthetic.
Budget Breakdown:
- Budget-friendly (under $100): IKEA RÅSKOG + small bins = $45–$60 total
- Mid-range ($100–$500): Two carts (one for art, one for building) + premium bin system = $100–$150
- Investment-worthy ($500+): Not applicable — this is a budget-category solution.
Space Requirements: A standard 3-tier cart is approximately 14″W x 17″D x 33″H — fits in any room.
Difficulty Level: Beginner — unbox, fill, and roll.
Durability: Excellent. IKEA rolling carts are built to last and hold up to daily use.
Seasonal Adaptability: Swap cart contents seasonally — outdoor activity prep supplies in spring, holiday craft supplies in December.
Common Mistakes: Overloading tiers (the cart should be easy to push, not a workout), using bins that are too small for the items (everything falls out when rolling), and abandoning the “roll to activity zone” habit.
Maintenance Tips: Wipe down weekly. Re-sort and declutter monthly. Oil wheels if squeaking develops.
9. Toy Rotation System
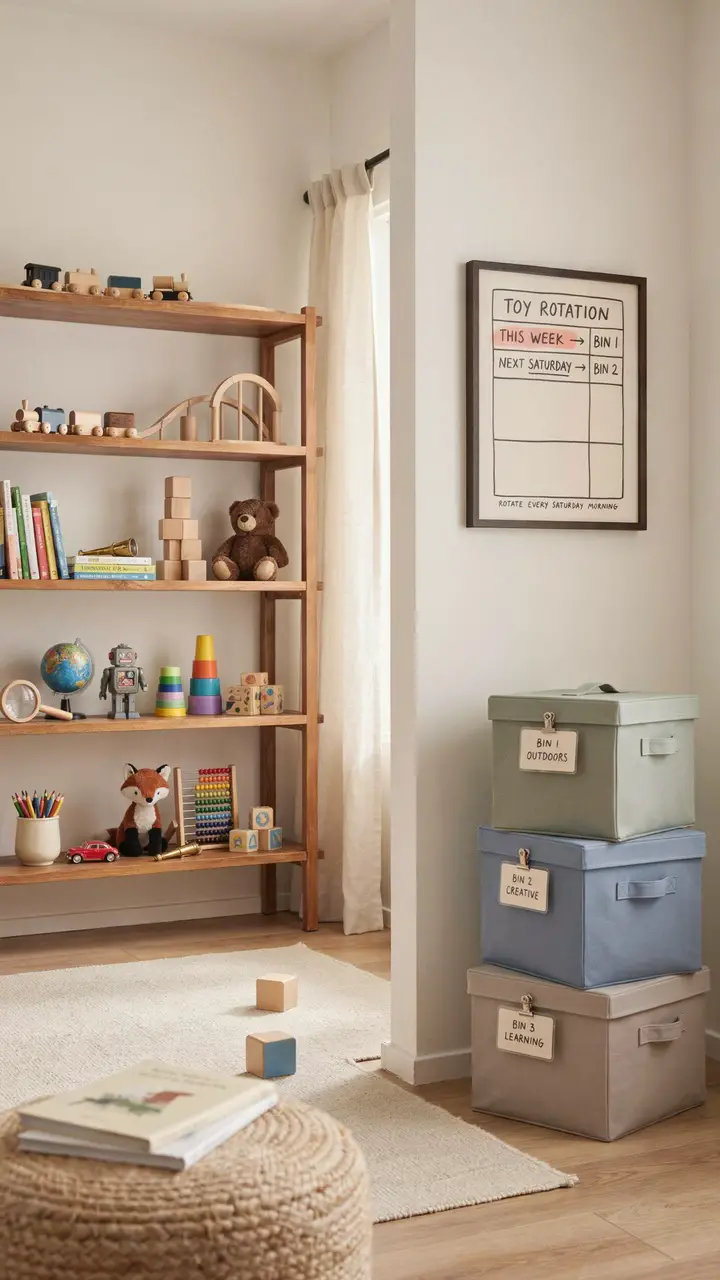
How to Recreate This Look
Shopping List:
- Large lidded storage bins (3–5 bins): $15–$30 each
- Permanent marker or label maker for bin labels: $5–$15
- Printed rotation schedule (simple calendar grid): Free
- Frame for the schedule: $5–$15
- Rolling shelf or sturdy stacking surface for bins in storage area: $30–$80
Step-by-Step Instructions: - Pull every toy out of the playroom and categorize into 4 groups: Group A (display now), Group B (rotation set 1), Group C (rotation set 2), Group D (consider donating).
- Set Group D aside for donation. Load Groups B and C into labeled bins.
- Display only Group A in the active playroom — about 20–25% of the total toy collection.
- Store rotation bins in a closet, basement, or dedicated storage area.
- Create a simple rotation schedule: “Bin B comes out every 3 weeks, Bin C comes out 3 weeks after that.”
- Post the schedule in the playroom.
- Watch in amazement as “old” toys become exciting again after being away for 6 weeks.
Style Compatibility: The rotation system is invisible in a well-executed playroom — you see only the results (a calm, curated space).
Budget Breakdown:
- Budget-friendly (under $100): Existing bins + labels + the schedule = $15–$30 for labels and bins
- Mid-range ($100–$500): New set of coordinated lidded bins + storage shelf = $100–$150
- Investment-worthy ($500+): Custom built-in storage system for the rotation bins
Space Requirements: The active playroom needs no extra space — you’re reducing what’s displayed. Rotation bins need approximately 6–10 cubic feet of external storage.
Difficulty Level: Beginner — the hardest part is the initial sort, which takes one afternoon.
Durability: This system runs indefinitely with minimal maintenance.
Seasonal Adaptability: Seasonal toys are the ultimate rotation candidates — snow gear comes in during winter, beach toys in summer.
Common Mistakes: Making the rotation groups too small (swap less frequently for better effect — 3–6 week intervals work better than weekly), not actually removing toys from sight (the “out of sight, out of mind” effect only works with physical removal), and rotating too infrequently (once a month minimum).
Maintenance Tips: Annual toy audit: anything that gets skipped during three consecutive rotations gets donated. Add new toys directly into a rotation bin rather than directly into the active display.
10. Consistent Cleanup Routines with Visual Aids
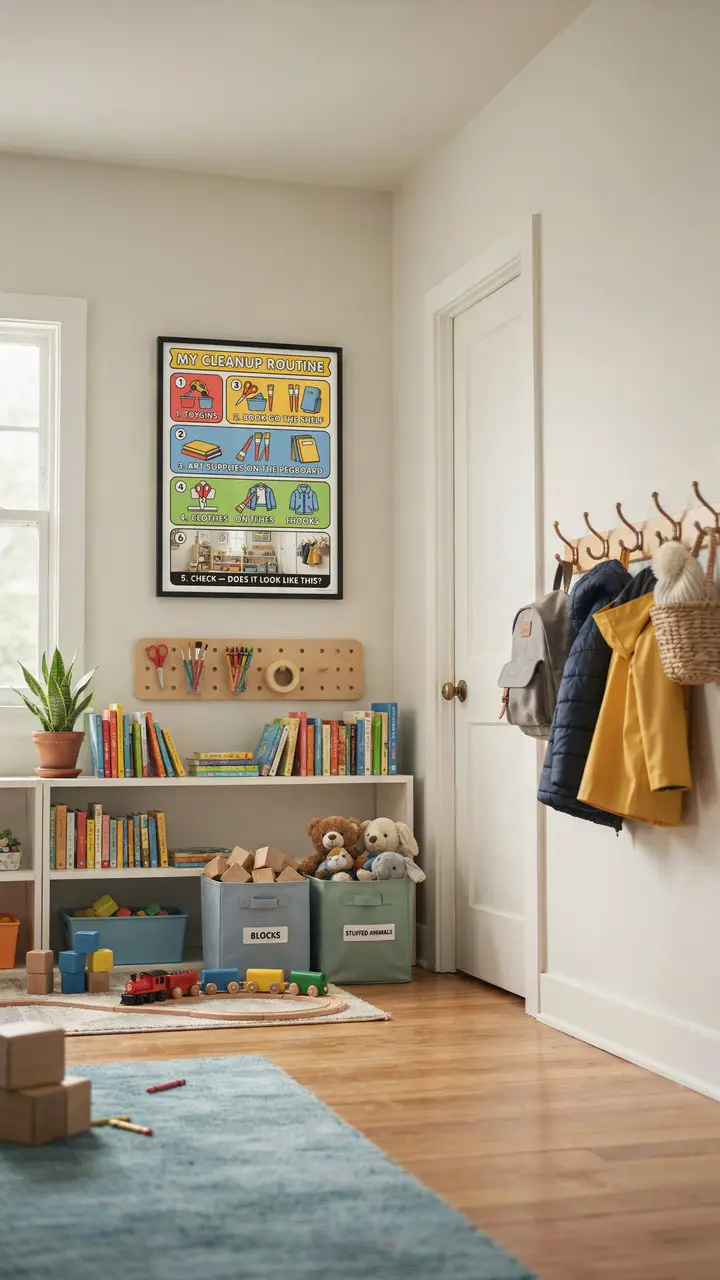
How to Recreate This Look
Shopping List:
- Laminated or printed visual cleanup chart (design in Canva for free): $0–$10 to print
- Frame for the chart: $8–$15
- Row of wall hooks beside door (5-hook set): $15–$40
- Small basket on hook for small items: $10–$20
- Dry-erase marker for any interactive elements on the chart: $3–$8
Step-by-Step Instructions: - Design the cleanup chart using free tools like Canva — include simple illustrations of each step, not just words.
- Laminate or frame the chart for durability.
- Mount at child eye level beside the playroom door.
- Go through the chart steps together the first several times so it becomes second nature.
- Install the hook row beside the door for jackets, bags, and small items.
- Practice the routine consistently — it takes approximately 3 weeks to become a habit.
- Celebrate when the room matches the “reference photo” on the chart.
Style Compatibility: Choose chart colors that coordinate with the room palette. The chart’s design style (minimalist, colorful, illustrated) should match the room’s aesthetic.
Budget Breakdown:
- Budget-friendly (under $100): Free Canva design + print at home or local print shop = $0–$10
- Mid-range ($100–$500): Professionally designed chart + framed + hook system = $50–$80
- Investment-worthy ($500+): Not applicable — visual aids are inherently a budget tool.
Space Requirements: The chart needs approximately 12″x18″ of wall space near the door. Hooks need 24″–36″ of wall space.
Difficulty Level: Beginner — design the chart, print it, hang it.
Durability: The chart lasts years. Lamination protects it from curious fingers. The habit, once established, is essentially permanent.
Seasonal Adaptability: Update the reference photo on the chart if the room layout changes significantly.
Common Mistakes: Creating a chart with too many steps (5 is the maximum for kids; 3 is even better for young children), hanging the chart too high for kids to reference during cleanup, and inconsistently enforcing the routine.
Maintenance Tips: Revisit the chart if the routine starts slipping — usually means a step needs simplification or the room layout has changed.
The Organization Secret No One Tells You
Here’s what actually works, after all the advice and systems and color-coded bins: the organization method that succeeds is always the simplest one possible for the humans who have to maintain it — especially the small ones.
Before you implement any of these systems, ask one question: Can my son do this step by himself? If the answer is no — the bin is too high, the lid is too stiff, the label is too small — the system will fail within a week. Great organization isn’t about perfection. It’s about removing the barriers to putting things away so thoroughly that putting things away becomes the path of least resistance.
Get that right, and your playroom might actually stay organized past Wednesday. And hey — miracles do happen. 🙂

Greetings, I’m Alex – an expert in the art of naming teams, groups or brands, and businesses. With years of experience as a consultant for some of the most recognized companies out there, I want to pass on my knowledge and share tips that will help you craft an unforgettable name for your project through TeamGroupNames.Com!