
You know that moment when you’re standing in your living room, stepping over a LEGO minefield, and you think — there has to be a better way?
Living with kids in a small home is a beautiful, chaotic, creative challenge, and the living room almost always ends up pulling double duty as the main hangout and the primary play zone.
The good news: you don’t need a dedicated playroom to create a space that works brilliantly for both adults and little ones.
Small-space living room playroom combos are about intention.
When every square foot has to earn its keep, smart design choices transform cluttered chaos into a room that actually functions — and even looks pretty great, BTW.
The secret is defining zones without walls, choosing furniture that multitasks, and finding storage solutions that keep toys accessible for kids but out of the visual center when company comes over.
Whether you’re working with a 200-square-foot studio living area or a compact apartment where the living room is the only communal space, these ten ideas will help you carve out a real play zone that doesn’t eat your adult space alive.
Get ready to feel genuinely excited about your floor plan again 🙂
1. Rug-Defined Play Zone
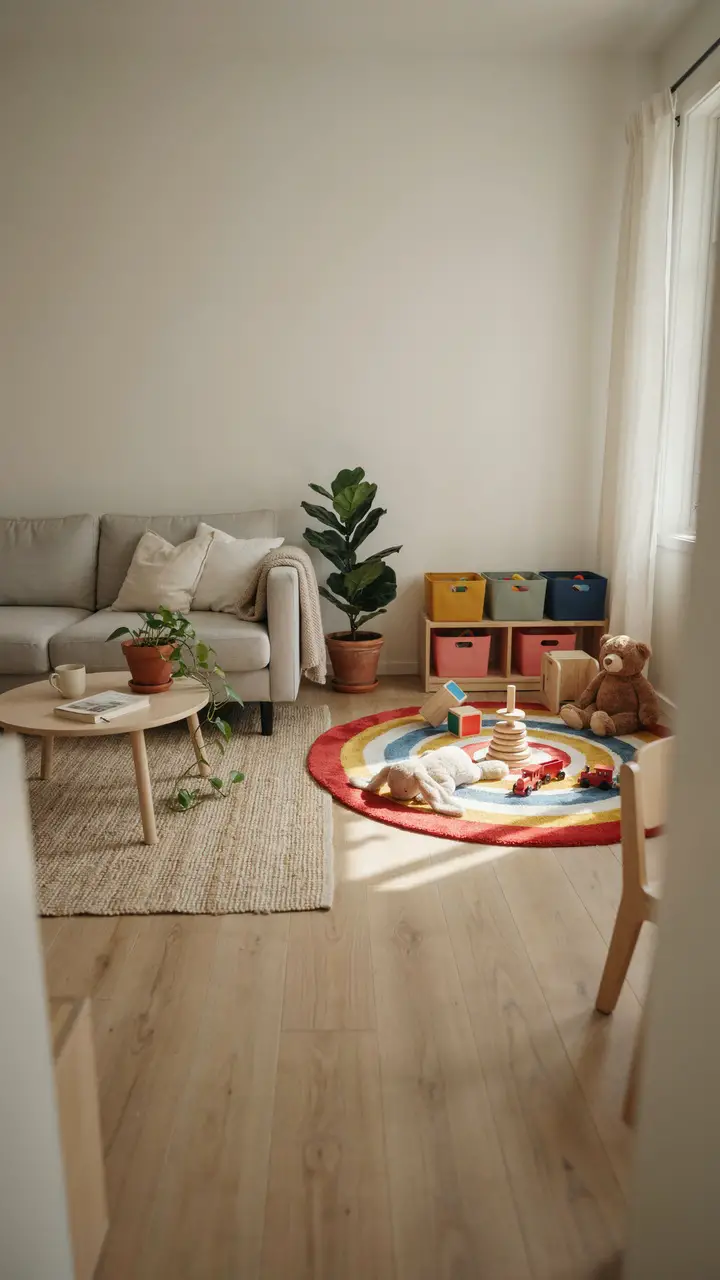
How to Recreate This Look
- Shopping list: Two rugs (one for seating area, one for play zone — both from IKEA, Target, or Wayfair, ranging $30–$150 each); low open toy shelving unit ($50–$200 at IKEA or Amazon); colorful fabric storage bins ($10–$25 each); a handful of wooden or cloth toys to display on the shelf
- Step-by-step styling instructions: Choose two rugs with different shapes or textures to visually separate zones. Place the larger rug under your sofa and coffee table. Position the smaller, brighter rug directly in the corner you’re designating for play. Arrange the low shelf directly behind or beside the rug, and stock bins with toys organized by type. Keep the play rug within arm’s reach of the sofa so you can supervise without leaving your seat.
- Style compatibility notes: Works with minimalist, Scandinavian, and modern farmhouse aesthetics. Avoid overly busy rug patterns on both rugs — let one be neutral and the other kid-friendly.
- Budget breakdown: Under $100 — two budget rugs plus a basic shelf from IKEA; $100–$500 — quality wool blend rugs plus a solid wood toy shelf; $500+ — custom built-in shelving and heirloom-quality wool rugs
- Space requirements: Works in living rooms as small as 180 square feet. The play rug can be as compact as 4×4 feet.
- Difficulty level: Beginner. No installation required — just placement and styling.
- Durability/lifestyle considerations: Choose indoor-outdoor or flatweave rugs for the play zone — they’re machine washable or easy to spot clean. Low shelves are stable and safe for toddlers to browse independently.
- Seasonal adaptability: Swap the play zone rug seasonally — a bright floral for spring/summer, a cozy plaid for fall/winter — for an instant refresh without major effort.
- Common mistakes to avoid: Don’t choose a play rug that’s too small — it should be large enough for a child to sit, play, and spread out comfortably. Don’t skip anchoring the rug with a rug pad; it prevents slipping.
- Maintenance and longevity tips: Vacuum both rugs weekly and spot clean immediately. Rotate the play rug every few months to prevent uneven wear patterns.
2. Corner Play Nook with Curtain Divider
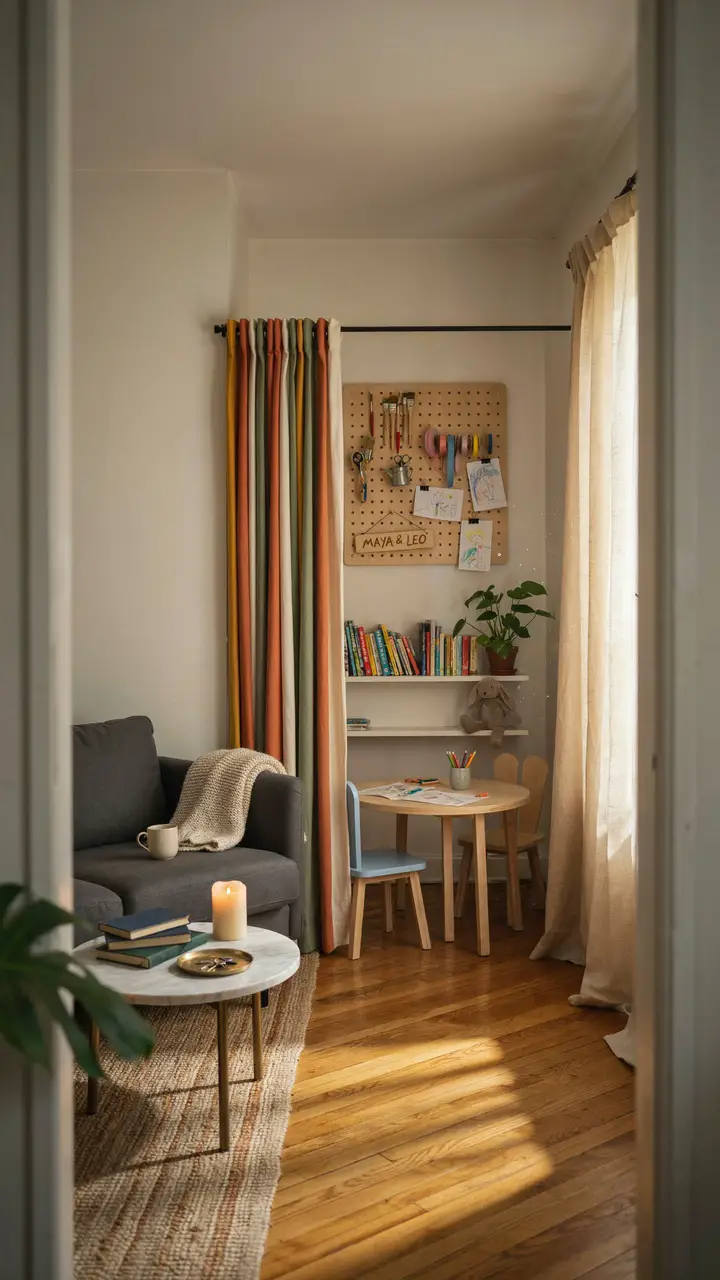
How to Recreate This Look
- Shopping list: Tension curtain rod ($15–$40); fabric curtains or a drop cloth you can hem ($20–$60); small children’s table and two chairs ($50–$150); wall-mounted pegboard ($25–$60 at IKEA); pegboard hooks and bins ($15–$30); small bookshelf ($30–$80)
- Step-by-step styling instructions: Mount a tension rod across the corner at about 7 feet high — no drilling required in most cases. Hang cheerful curtains that can be pulled fully open or closed. Inside the nook, arrange the table and chairs, mount the pegboard at child height on one wall, and position the bookshelf on the other. Keep the inside of the nook organized with labeled bins so kids can find and return toys independently.
- Style compatibility notes: Works beautifully in eclectic, boho, colorful, and playful interiors. The curtain itself can anchor the color story — choose a fabric that complements your sofa or accent pillow colors.
- Budget breakdown: Under $100 — tension rod, drop cloth curtains, thrifted table and chairs; $100–$500 — quality curtains, IKEA children’s furniture set, pegboard system; $500+ — custom curtain hardware, solid wood furniture, built-in shelving inside the nook
- Space requirements: Requires a corner space of at least 4×4 feet. The curtain divider only works in corners or along a single wall with a natural endpoint (like a bookshelf or doorframe).
- Difficulty level: Beginner to intermediate. Hanging a tension rod is easy; mounting a pegboard requires a drill and basic wall-anchor knowledge.
- Durability/lifestyle considerations: Curtains can be pulled back when the nook isn’t in active use, making the space look tidy instantly. Choose washable curtain fabric — kids will inevitably grab them with sticky hands.
- Seasonal adaptability: Swap curtains seasonally. Light linen for summer, a heavier canvas or thermal fabric for winter coziness.
- Common mistakes to avoid: Don’t choose curtains so heavy that the tension rod sags. Don’t hang the pegboard too high for your child to reach independently — it should be at their eye level.
- Maintenance and longevity tips: Machine wash curtains monthly. Wipe down the pegboard and reorganize bins every few weeks to keep the nook functional and inviting.
[ Living Room Playroom Combo Ideas]
3. Ottoman Storage as Play Zone Anchor
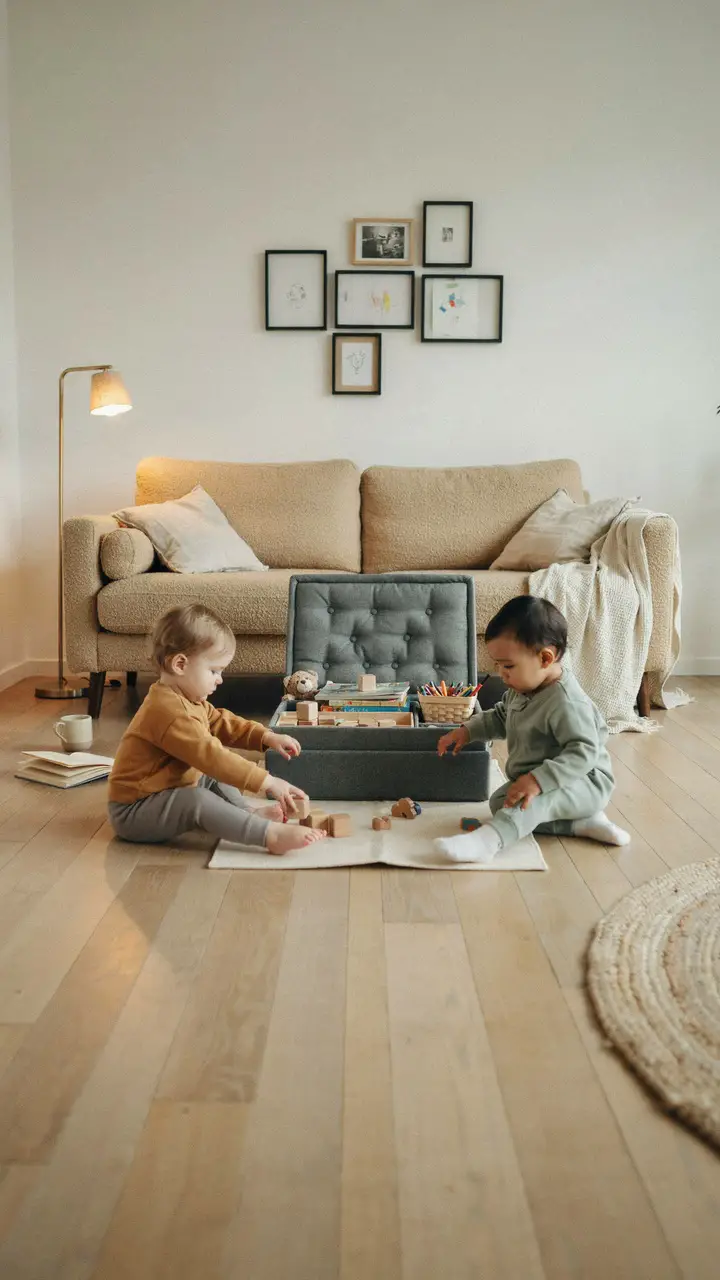
How to Recreate This Look
- Shopping list: Large storage ottoman ($80–$300 at Target, Amazon, or Pottery Barn); a removable tray to use the ottoman as a surface ($20–$50); small play mat or blanket ($30–$80); a few contained toy sets (puzzles, stacking toys, play sets that fit in storage)
- Step-by-step styling instructions: Position the storage ottoman where your coffee table would normally sit. Use it to store a rotating selection of toys — swap out every week or two so kids don’t get bored. Keep a removable tray on top so the ottoman can function as a surface for drinks and snacks during adult time. Pull out a small mat or blanket beside it as the play surface when kids need floor space.
- Style compatibility notes: Works in virtually any style — choose an ottoman in a neutral fabric that matches your sofa. Tufted ottomans lean traditional; smooth ottomans suit modern and mid-century aesthetics.
- Budget breakdown: Under $100 — basic fabric storage cube from IKEA or Target; $100–$500 — quality upholstered storage ottoman with removable tray; $500+ — custom upholstered ottoman with internal compartment dividers
- Space requirements: Works in the smallest living rooms — even a 150-square-foot space can accommodate a 30×30 inch storage ottoman as a multitasking centerpiece.
- Difficulty level: Beginner. Zero installation. Pure furniture swapping.
- Durability/lifestyle considerations: Choose an ottoman with a stain-resistant fabric (performance velvet, Crypton, or a polyester blend). Avoid light-colored upholstery unless you enjoy spending significant time spot cleaning.
- Seasonal adaptability: Swap the contents seasonally — summer gets outdoor-adjacent toys and activities; winter gets cozy sensory toys and craft supplies.
- Common mistakes to avoid: Don’t overstuff the ottoman — it should close easily without forcing. Don’t let the toy rotation go longer than 2–3 weeks or kids lose interest in what’s inside.
- Maintenance and longevity tips: Vacuum the upholstery weekly and spot clean immediately with a fabric cleaner. Check the hinges or lid mechanism every few months to ensure smooth operation.
4. Built-In Bench with Toy Storage and Play Surface
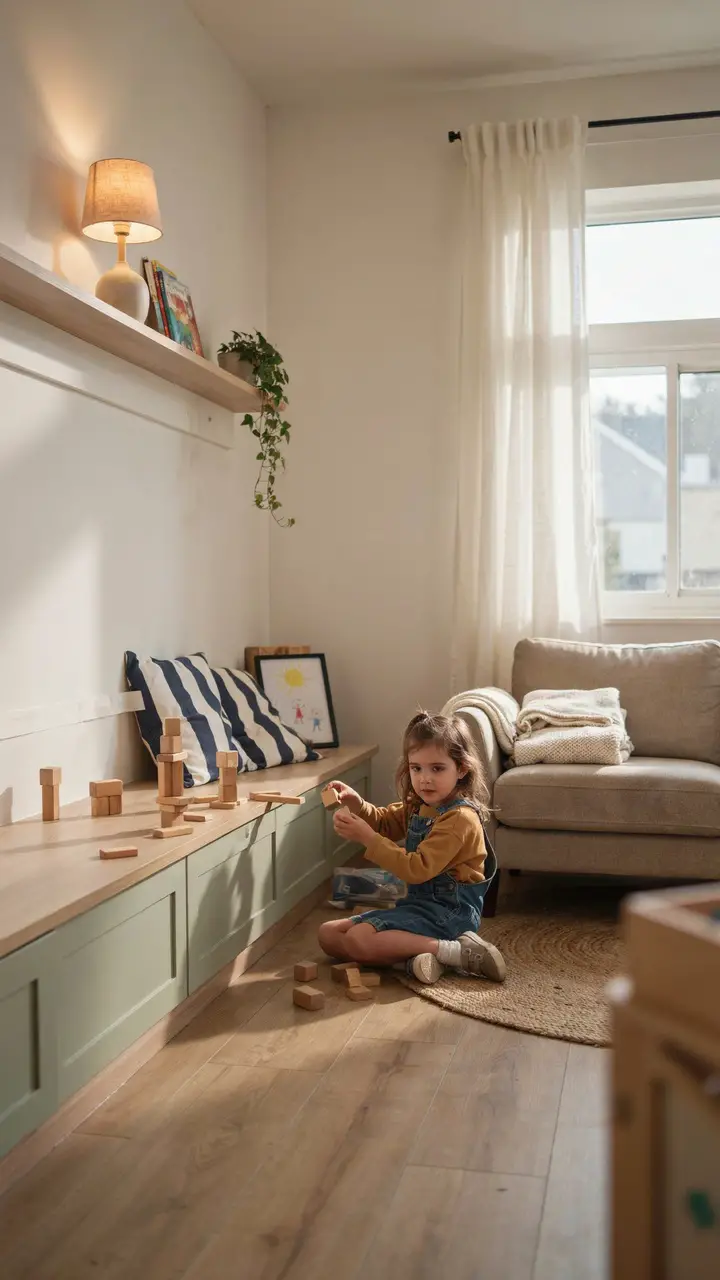
How to Recreate This Look
- Shopping list: Ready-to-assemble base cabinets ($100–$400 at IKEA); wood top cut to size ($50–$150); cushion or bench pad with washable cover ($50–$200); paint and hardware ($30–$80); floating shelves above ($20–$60 each)
- Step-by-step styling instructions: Line base cabinets along one wall and secure them to the wall studs. Cut a plywood top to span the full length and sand edges smooth. Paint the base cabinets to match your wall or trim. Add a cushion on top for seating. Organize toy categories in each cabinet — art supplies in one, building blocks in another. Mount floating shelves above for books and decorative items.
- Style compatibility notes: Built-ins work in traditional, transitional, farmhouse, and Scandinavian styles. Paint them in the same color as your walls for a seamless look, or in a contrasting color for a statement storage wall.
- Budget breakdown: Under $100 — not achievable for true built-in look; $100–$500 — IKEA hack with base cabinets, wood top, and hardware; $500+ — custom cabinetry by a carpenter
- Space requirements: Requires a wall at least 6 feet wide for this to look intentional rather than cramped. Works in living rooms as small as 200 square feet if the bench runs along the longest wall.
- Difficulty level: Intermediate to advanced. Requires basic carpentry skills, measuring, and wall-mounting know-how. Not beginner-friendly without some DIY experience.
- Durability/lifestyle considerations: Built-ins are extremely durable and ideal for high-traffic family spaces. Choose a semi-gloss paint for easy cleaning. Add soft-close hinges to protect little fingers from pinching.
- Seasonal adaptability: Swap cushion covers seasonally for a fresh look without structural changes. Reorganize cabinet contents to reflect the season — summer art projects versus winter building sets.
- Common mistakes to avoid: Don’t skip securing cabinets to the wall — freestanding base cabinets at bench height are a tipping risk. Don’t choose hardware that’s too small for little hands to grab easily.
- Maintenance and longevity tips: Wipe cabinet fronts weekly with a damp cloth. Sand and touch up paint annually in high-contact areas. Check wall anchors every six months.
[ Living Room Playroom Ideas]
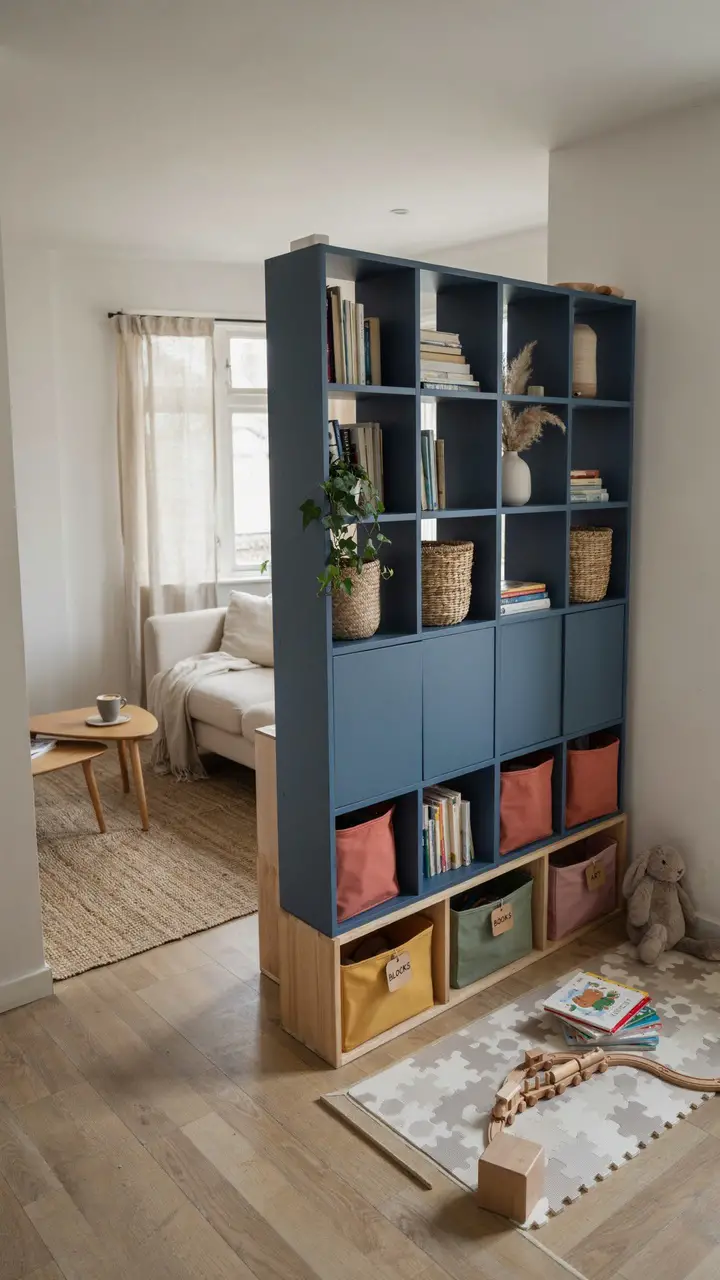
5. Modular Toy Storage as Room Divider
How to Recreate This Look
- Shopping list: IKEA KALLAX or similar modular shelving ($80–$200); cube storage inserts with doors ($10–$20 each); fabric storage bins in a coordinated color palette ($8–$15 each); paint and primer for the back panel ($15–$30); furniture anchoring kit ($15–$25)
- Step-by-step styling instructions: Position the shelving unit at a 90-degree angle from the wall, creating a natural division in the room. Anchor it to the wall or ceiling using anti-tip hardware — essential for child safety. Paint or wallpaper the back panel facing the adult side. Stock the play-facing cubes with labeled toy bins. Fill the living room-facing cubes with books, plants, and decorative objects that look great from the sofa.
- Style compatibility notes: Works in modern, contemporary, Scandinavian, and minimalist interiors. Avoid this approach in rooms with ornate traditional furniture — the geometric shelving can look out of place.
- Budget breakdown: Under $100 — basic IKEA KALLAX with inexpensive bins; $100–$500 — KALLAX with mix of door inserts, decorative bins, and painted back panel; $500+ — custom modular shelving system
- Space requirements: Requires a room at least 12 feet wide — the shelving divider eats about 12–15 inches of depth from each side. Works best in rooms that are 300+ square feet.
- Difficulty level: Intermediate. Moving and positioning heavy shelving, anchoring safely, and finishing the back panel require some effort and planning.
- Durability/lifestyle considerations: KALLAX shelving is surprisingly sturdy and handles the wear of daily toy access well. Make sure door inserts have child-safe latching mechanisms.
- Seasonal adaptability: Restyle the living room-facing side seasonally with different decorative objects, books, and plants without touching the functional play side.
- Common mistakes to avoid: Never skip the anti-tip anchoring — a free-standing shelf used as a divider is a serious safety hazard in a home with children. Don’t overfill the top of the unit where children can’t reach but items could fall.
- Maintenance and longevity tips: Dust shelves weekly. Check anti-tip hardware monthly. Reorganize the toy bins every 4–6 weeks to keep the play side functional.
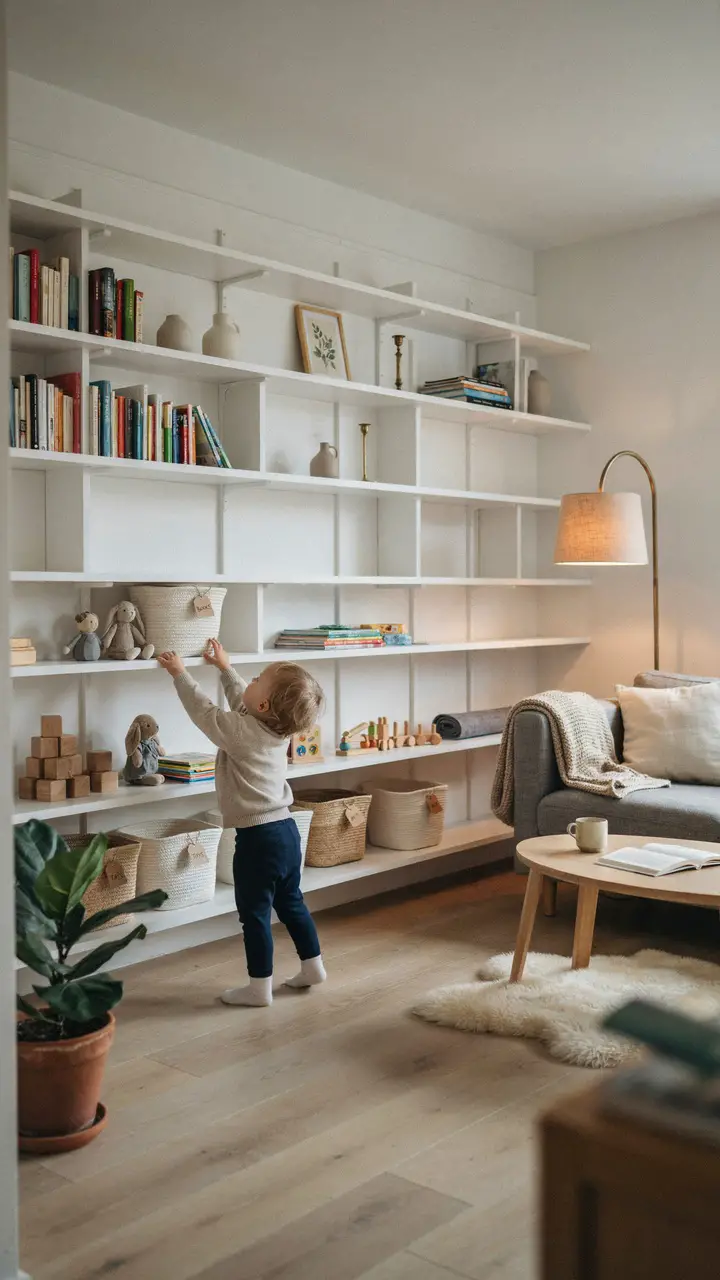
6. Small Space Toy Library System
How to Recreate This Look
- Shopping list: Floating wall shelves in varying lengths ($15–$50 each at IKEA, Target, or Amazon); wicker or fabric bins in a consistent neutral palette ($8–$20 each); label maker or handwritten tags ($10–$25); 6–8 toy “sets” that can be rotated weekly (puzzles, art kits, building sets, sensory toys)
- Step-by-step styling instructions: Mount floating shelves in a grid arrangement on one wall — mix short and long shelves for visual interest. Position lower shelves at child height (18–24 inches from floor) for toy access. Stock each bin with one toy category and label clearly. Rotate available toys every 5–7 days, keeping the rest in a closet or under the bed to prevent overwhelm. Use upper shelves for adult books and plants.
- Style compatibility notes: Works in minimalist, Montessori-inspired, Scandinavian, and modern farmhouse interiors. Choose bins in one consistent material and color family for a cohesive look.
- Budget breakdown: Under $100 — IKEA Lack shelves plus basic canvas bins; $100–$500 — quality wood floating shelves plus matching wicker or linen bins; $500+ — custom floating shelving system
- Space requirements: Requires a clear wall at least 5 feet wide and 7 feet tall. Ideal for any room size — the shelves go up, not out.
- Difficulty level: Intermediate. Mounting multiple floating shelves requires a level, stud finder, and patience for getting the alignment right.
- Durability/lifestyle considerations: This system genuinely reduces toy overwhelm and helps kids engage more deeply with fewer toys at a time. It also makes cleanup dramatically easier. Bins hide clutter instantly.
- Seasonal adaptability: Rotate holiday-themed toys into the active selection during the appropriate season. Swap decorative items on upper shelves to reflect seasons.
- Common mistakes to avoid: Don’t mount shelves without finding studs or using proper wall anchors — bins full of toys are heavier than they look. Don’t skip labeling bins; kids are much more likely to clean up when they know exactly where things go.
- Maintenance and longevity tips: Dust shelves weekly. Audit toy bins monthly — remove broken toys and anything the child has outgrown. A tidy toy library stays appealing and functional long-term.
[Living Room Playroom Combo Ideas]
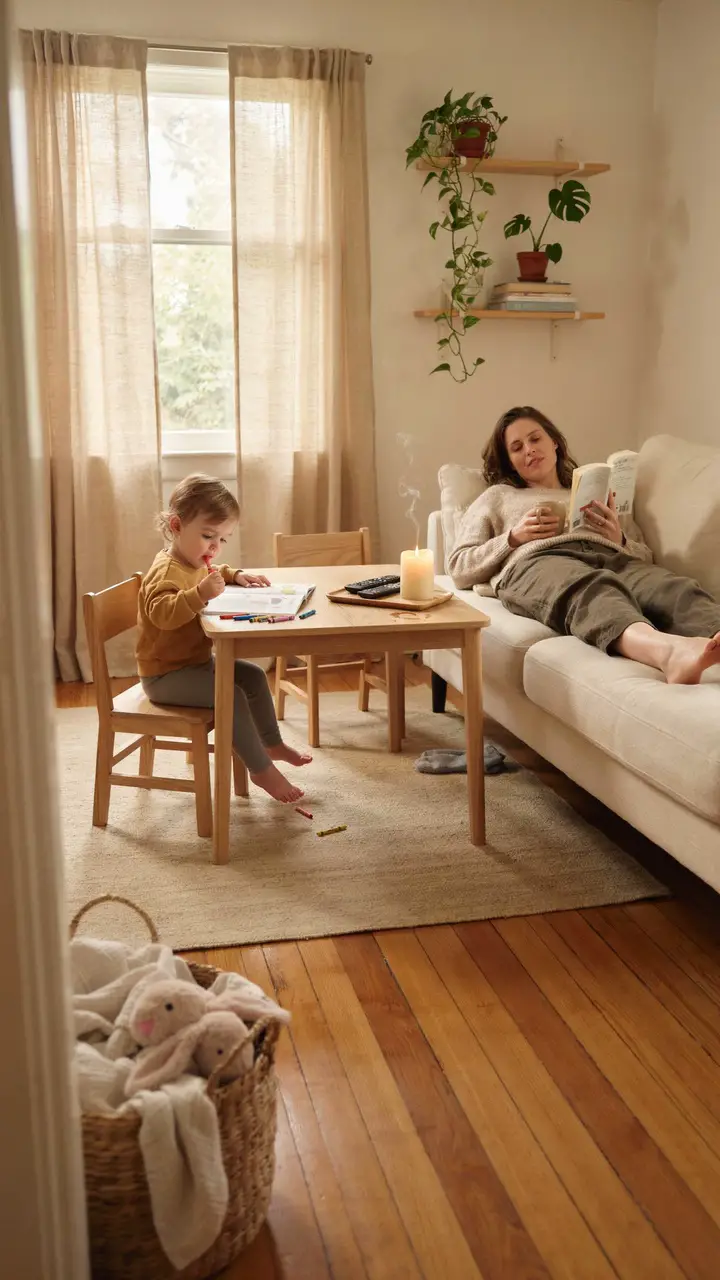
7. Multipurpose Kids’ Table as Coffee Table
How to Recreate This Look
- Shopping list: Low children’s activity table at coffee table height (look for tables around 18–20 inches tall — IKEA FLISAT is a great option at $50–$80); two matching small chairs ($25–$50 each); a small tray for adult items ($15–$30)
- Step-by-step styling instructions: Choose a children’s table that hits your sofa’s seat height or just below — this is the key to making it work as a coffee table substitute. Position it directly in front of the sofa. Keep a small decorative tray on one end for remote controls, a candle, and adult items. The opposite end stays clear for child activity. Tuck chairs under when not in use to maintain a cleaner visual line.
- Style compatibility notes: Works beautifully in Scandinavian, Montessori-inspired, natural, and casual modern interiors. A natural wood table is the most versatile option — it blends with adult furniture more readily than brightly colored plastic alternatives.
- Budget breakdown: Under $100 — IKEA FLISAT table with basic chairs; $100–$500 — quality hardwood children’s table with matching chairs; $500+ — custom-made activity table at perfect coffee table height with adult-finish details
- Space requirements: Requires at least 3 feet of clearance around the table for chairs to slide in and out. Works in living rooms as small as 150 square feet.
- Difficulty level: Beginner. No installation required.
- Durability/lifestyle considerations: Look for tables with sealed or lacquered surfaces that wipe clean easily. Avoid unfinished wood that absorbs marker and paint stains permanently.
- Seasonal adaptability: Swap activities seasonally — summer brings craft supplies and nature journals; winter brings cozy puzzle sets and playdough. Keep a seasonal rotation in the storage ottoman nearby.
- Common mistakes to avoid: Don’t choose a table so low that adults can’t reach it comfortably from the sofa. Avoid tables with sharp corners in tight spaces — look for rounded edges for safety.
- Maintenance and longevity tips: Wipe the table surface daily. Sand and re-seal or repaint annually if the finish wears. A children’s table at the right height can serve double duty until kids are school-age.
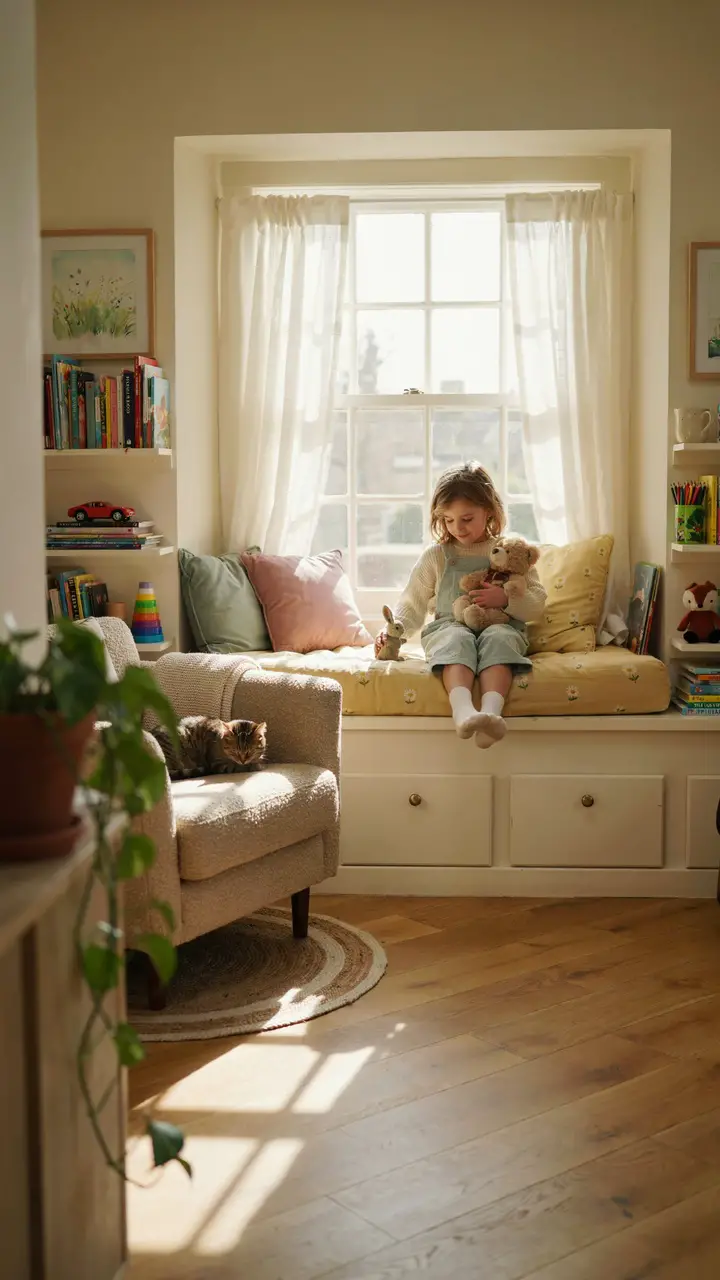
8. Window Seat Play Area
How to Recreate This Look
- Shopping list: Ready-made base cabinets to build under an existing window ($150–$400); plywood top with edge banding ($40–$100); cushion with washable cover ($60–$200); drawer hardware ($10–$30); flanking bookshelves ($50–$150 each from IKEA)
- Step-by-step styling instructions: Measure your window’s width and build or install base cabinets below it — use IKEA base cabinets as an affordable starting point. Cut a plywood top and add edge banding for a finished look. Cushion the top with a custom or ready-made bench pad. Install bookshelves on either side at child-accessible height. Stock one bookshelf with children’s books and the other with a small selection of quiet play toys — this is a calmer play zone, not a full activity station.
- Style compatibility notes: Suits cottage, traditional, farmhouse, and transitional interiors especially well. The built-in look adds significant visual polish to small spaces.
- Budget breakdown: Under $100 — not achievable for a true built-in; $100–$500 — IKEA base cabinets with plywood top, cushion, and freestanding flanking shelves; $500+ — custom millwork window seat
- Space requirements: Requires a window with at least 12 inches of floor-to-sill clearance for seating height. Works in living rooms as small as 180 square feet when placed along an existing window wall.
- Difficulty level: Intermediate. Requires measuring, carpentry, and cushion-sourcing skills.
- Durability/lifestyle considerations: Built-in window seats are extremely durable and add real character. Choose performance fabric for the cushion that resists staining, fading, and moisture.
- Seasonal adaptability: Swap cushion covers and add seasonal throw pillows for an easy seasonal refresh. A cozy window seat feels especially magical in fall and winter with a small lap blanket added.
- Common mistakes to avoid: Don’t build the seat too high — the ideal height for child and adult comfort is 17–19 inches from the floor. Don’t skip the cushion anchoring ties; loose cushions slide dangerously on a smooth plywood surface.
- Maintenance and longevity tips: Machine wash cushion covers monthly. Wipe down base cabinet fronts weekly. Check drawer slides every 6 months and lubricate if needed.
[ Living Room Playroom Ideas]
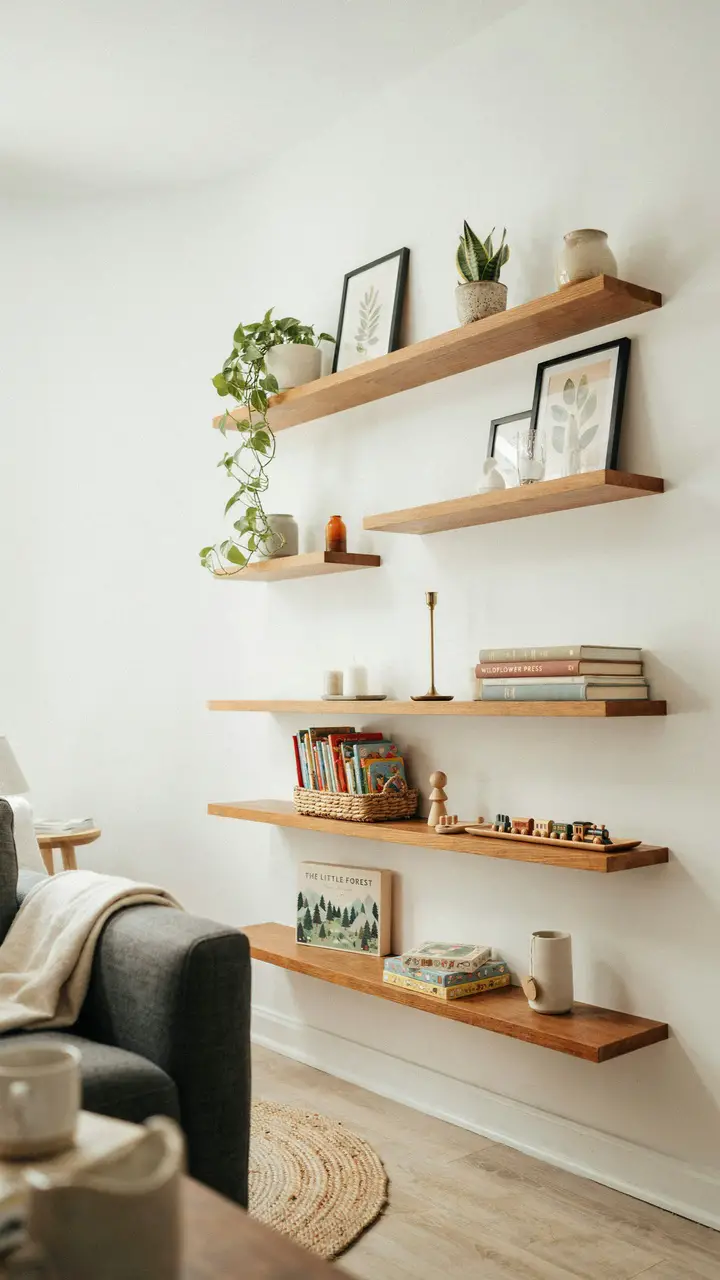
9. Floating Shelves as Display and Play Organization
How to Recreate This Look
- Shopping list: Floating shelves in walnut, oak, or painted white ($20–$60 each); a variety of natural wicker or fabric trays and baskets for toy containment ($10–$25 each); decorative objects for adult shelves (small plants, ceramics, framed prints)
- Step-by-step styling instructions: Mount shelves at varying heights — place the highest at 6–7 feet for adult décor, the lowest at 18–24 inches for child access. Style upper shelves with adult items. Keep lower shelves exclusively for kids’ items — one toy in a tray, one book basket, one small art supply container. The key is treating every toy on the lower shelf as a display object, not clutter — use beautiful trays and baskets so it looks intentional.
- Style compatibility notes: Works in virtually any style — choose shelf material to match your existing furniture. Walnut suits mid-century and boho; white suits Scandinavian and modern farmhouse; black metal brackets suit industrial and contemporary.
- Budget breakdown: Under $100 — three to four budget floating shelves from Amazon or IKEA with basic baskets; $100–$500 — quality wood floating shelves with matching wicker storage; $500+ — custom floating shelving system with integrated lighting
- Space requirements: Works on any wall at least 3 feet wide. No floor space required — this is the ultimate small-space storage solution because it goes completely vertical.
- Difficulty level: Intermediate. Requires stud-finding, leveling, and proper anchoring — especially for lower shelves where children may pull on them.
- Durability/lifestyle considerations: Floating shelves with proper wall anchoring are very stable. Use adhesive shelf liner inside baskets to prevent items from sliding. Check anchors annually.
- Seasonal adaptability: Update the adult shelves seasonally with seasonal plants and décor while keeping the lower children’s shelves functional year-round.
- Common mistakes to avoid: Don’t mount shelves without finding studs — especially lower shelves a child might grab for balance. Don’t overcrowd lower shelves; two or three clearly defined toy options are better than a packed shelf that overwhelms kids.
- Maintenance and longevity tips: Dust shelves weekly. Reorganize the toy baskets monthly. Rotate which toys are displayed every few weeks to maintain a child’s interest.
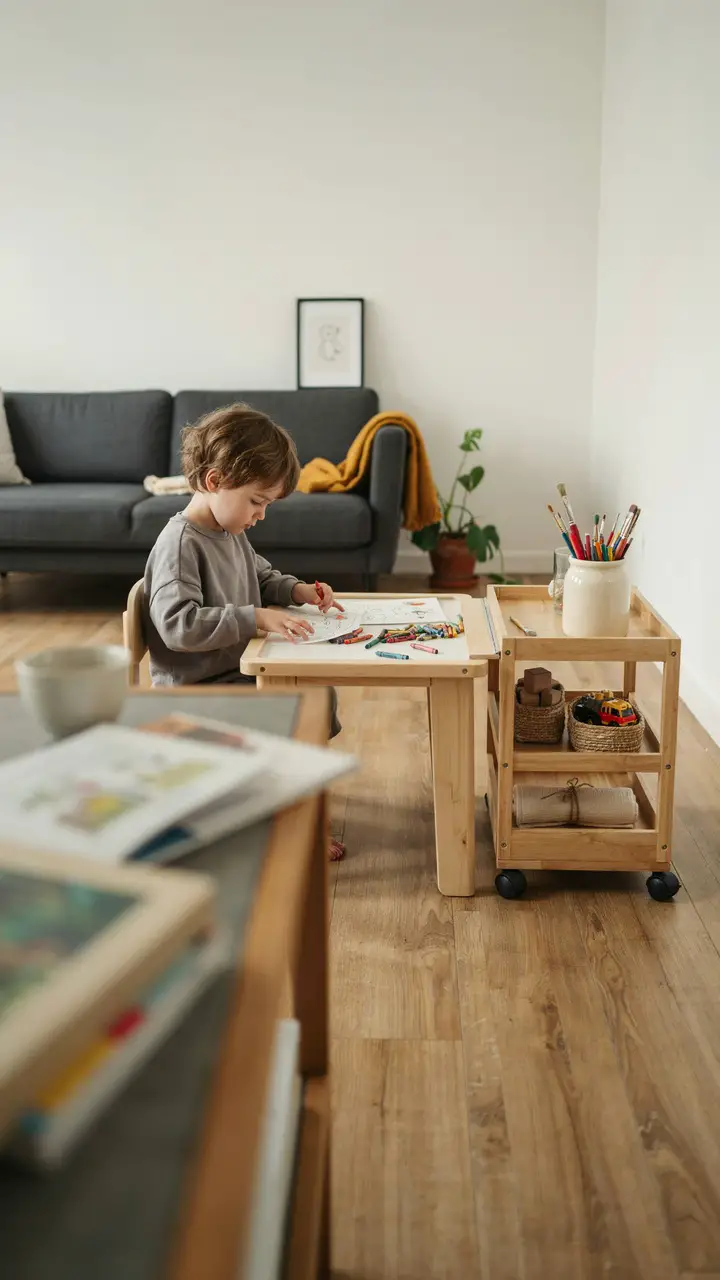
10. Convertible Play Table and Storage Cart
How to Recreate This Look
- Shopping list: Foldable children’s activity table ($40–$120); rolling tiered storage cart ($20–$60 at IKEA — the RÅSKOG cart is perfect); small containers for the cart tiers ($5–$15 each); a roll-up play mat ($25–$60)
- Step-by-step styling instructions: Set up the tiered cart as a mobile toy station — dedicate each tier to a category (art, building, imaginative play). Fold the activity table out only when in use; fold it back against the wall when done. Roll both pieces to a designated corner when company comes. The roll-up play mat lives on the bottom tier and comes out onto the floor when needed for larger play sessions.
- Style compatibility notes: Works in minimalist, Scandinavian, and modern interiors. The RÅSKOG cart in its natural metal finish suits most styles. Choose a foldable table in a natural wood tone for the most versatile look.
- Budget breakdown: Under $100 — IKEA RÅSKOG cart plus basic foldable table; $100–$500 — quality wooden foldable table plus an upgraded rolling cart with better finish; $500+ — custom-designed foldable play station with integrated storage
- Space requirements: When folded and rolled away, this entire setup takes up about 2 square feet of floor space. Perfect for living rooms under 200 square feet.
- Difficulty level: Beginner. No installation. Both pieces are freestanding and mobile.
- Durability/lifestyle considerations: The RÅSKOG cart is metal and extremely durable. Choose a foldable table with a solid locking mechanism so it doesn’t collapse mid-play. Check the lock mechanism monthly.
- Seasonal adaptability: Swap the contents of the cart tiers seasonally — summer gets outdoor-adjacent crafts and sensory play; winter gets cozy building and pretend play sets.
- Common mistakes to avoid: Don’t let the cart become a dumping ground — keep it organized with small containers for each tier. Don’t choose a foldable table that’s wobbly when open; stability is essential for safe play.
- Maintenance and longevity tips: Wipe the cart tiers weekly. Lubricate the table’s folding mechanism every few months. Edit the cart contents monthly — remove what’s not being used and replace it with something fresh.
[ Living Room Playroom Combo Ideas]
Making Your Small Space Work for Everyone
Here’s the thing nobody tells you about a living room playroom combo in a small space: once you’ve nailed the zone definition and the storage system, it actually feels more like a home than a bigger house with a separate playroom. When kids can play where the family gathers, they’re part of the life of the house — not tucked away in their own separate world. And when the design is intentional, you stop tripping over toys and start actually enjoying your living room again.
The biggest shift is in mindset. You’re not sacrificing your adult space to kids’ chaos — you’re designing a room that works for everyone, beautifully. A rug defines a zone. A curtain creates a nook. A rolling cart makes setup and cleanup effortless. None of these solutions require a renovation budget or even a full weekend to implement.
Start with one idea that feels manageable and genuinely fits your space. See how the family responds. Adjust from there. The best small-space living room playroom combo isn’t the prettiest one on Pinterest — it’s the one your family actually lives in happily every single day. <3

Greetings, I’m Alex – an expert in the art of naming teams, groups or brands, and businesses. With years of experience as a consultant for some of the most recognized companies out there, I want to pass on my knowledge and share tips that will help you craft an unforgettable name for your project through TeamGroupNames.Com!