
If you’ve ever stepped on a LEGO at 2am in the dark and briefly reconsidered all your parenting choices — you’re in the right place.
Toy storage is one of those genuinely unsolved problems of modern family life.
We buy more storage, we reorganize, we label everything, and somehow the playroom still looks like a toy store that got hit by a tornado by day three.
The difference between storage that works and storage that doesn’t isn’t the bins or the shelves — it’s how well the system actually matches how boys play. Boys tend to grab things fast, play hard, and abandon quickly.
They’re not going to carefully restack stackable storage bins before moving to the next activity. Any system that requires that much precision from a seven-year-old is going to fail on day two.
So the storage ideas here are built around the way boys actually behave: fast access, easy return, visible organization, and enough flexibility to handle the reality that collections grow, interests change, and LEGO sets always have way more pieces than you expected.
Let’s dig in.
1. Deep Open-Top Bins for Bulky Toys
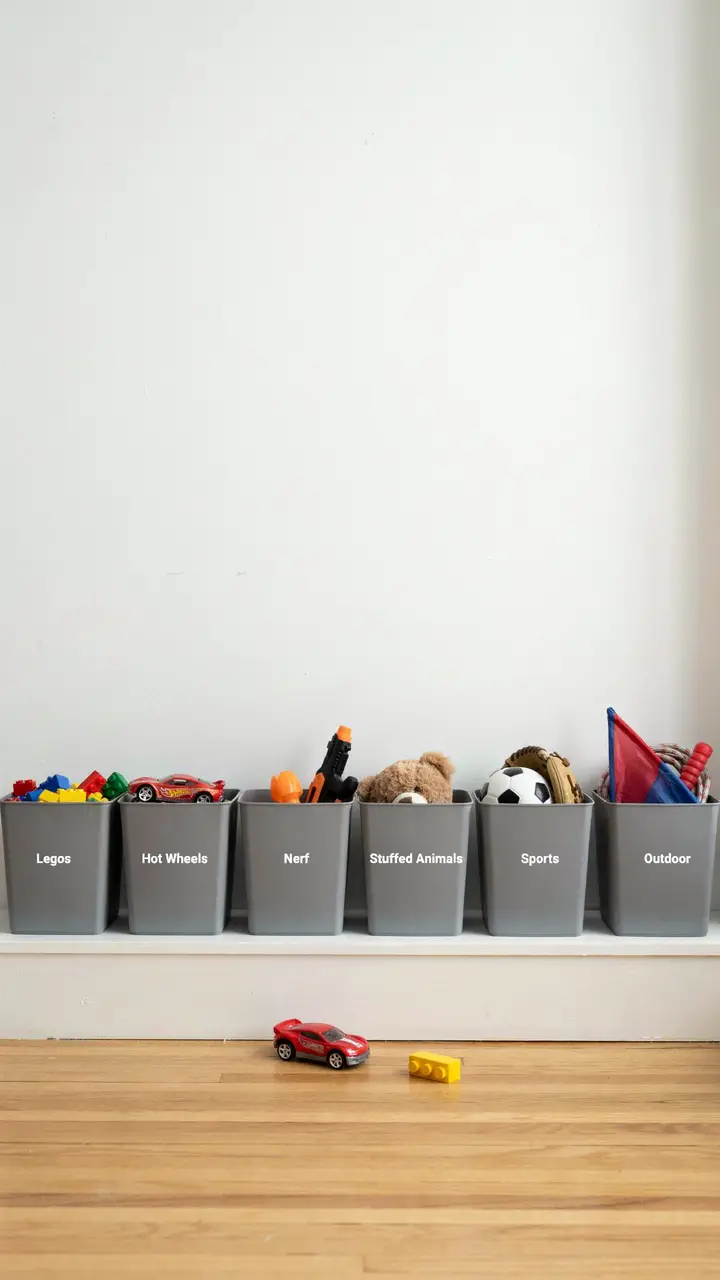
How to Recreate This Look
Shopping List:
- Deep open-top storage bins (set of 6, coordinated): $10–$25 each
- Low platform shelf (pine boards + paint): $30–$60 DIY, or $60–$150 purchased
- Bold adhesive labels or vinyl letter labels: $10–$25
- Label maker or printed label inserts: $10–$30
Step-by-Step Instructions: - Measure your wall and determine how many bins fit comfortably side by side with a few inches of clearance between each.
- Build or purchase the low platform shelf at 10″–12″ height — this raises the bins off the floor for easier access without making them too high.
- Select bins that are wide enough for bulky items and deep enough that things don’t immediately fall out when kids reach in.
- Label each bin boldly — the label should be readable from across the room.
- Sort all toys into categories and assign each category a dedicated bin.
- Introduce the system to your son: “This is where the cars live. This is where the Legos live.” Simple.
Style Compatibility: Works with any playroom aesthetic — choose bin colors that coordinate with your room palette.
Budget Breakdown:
- Budget-friendly (under $100): Six bins + DIY platform = $70–$90 total
- Mid-range ($100–$500): Quality bins + purchased low shelf unit = $150–$250
- Investment-worthy ($500+): Custom-built platform with integrated bin frame
Space Requirements: A row of six 16″-wide bins needs approximately 10 linear feet of wall space. Scale to your room.
Difficulty Level: Beginner — building the platform requires basic carpentry (cutting and painting boards); purchased shelf units require no tools.
Durability: Excellent. Open-top bins require zero precision to use — things get tossed in, they stay in. The durability of the system relies entirely on the bins’ physical quality.
Seasonal Adaptability: Swap bin labels seasonally as toy priorities change — outdoor bin gets priority in summer, craft bin in winter.
Common Mistakes: Choosing bins that are too small (overfilling makes them unusable), placing the shelf too high (kids should be able to reach the bin without tiptoe), and using lids (adds a step that boys will skip).
Maintenance Tips: Empty and sort bins fully every 3 months. Replace worn labels annually. Wipe bins inside and out monthly.
2. Wall-Mounted Pegboard Storage System
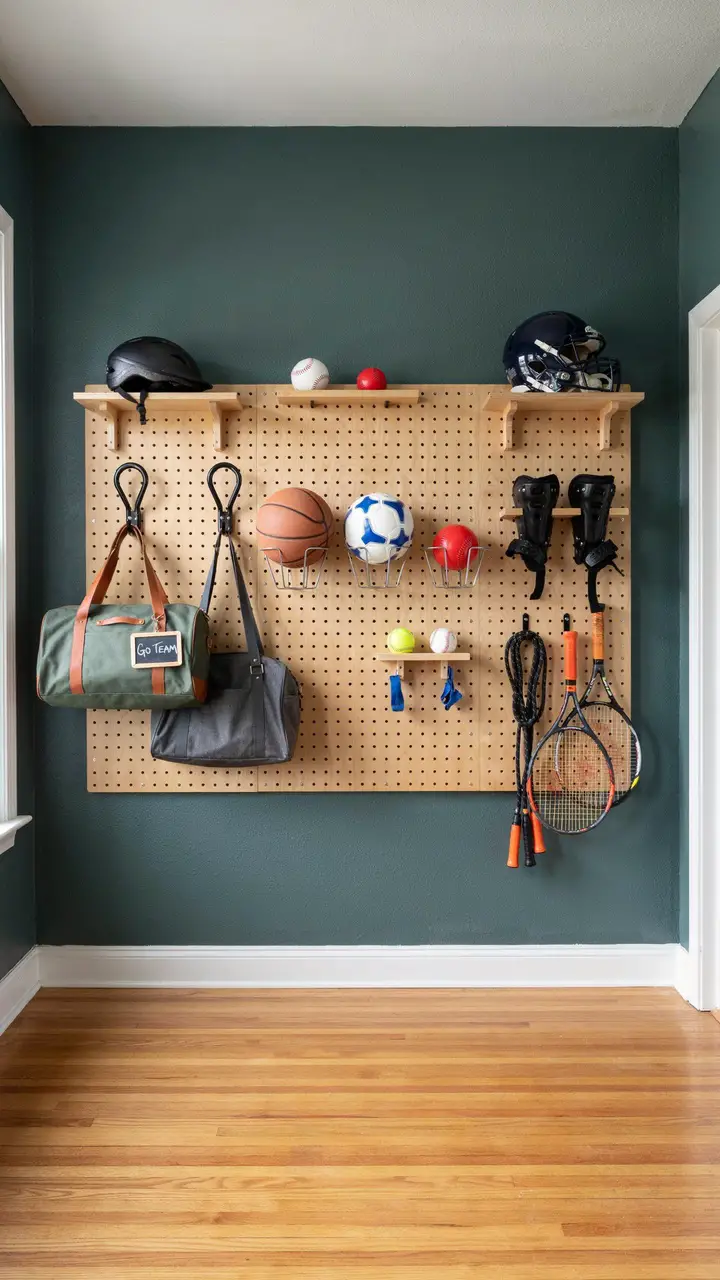
How to Recreate This Look
Shopping List:
- Birch or MDF pegboard (4’x6′ or 4’x8′ section): $25–$60
- Pegboard standoff hardware kit: $10–$15
- Large S-hooks (12-pack): $8–$15
- Wire ball cradle holders: $10–$20 for a set of 4
- Helmet brackets (pegboard-compatible): $10–$25
- Hanging bar for small gear (shin guards, gloves): $8–$15
- Pegboard-mounted shelf brackets (2–4): $8–$15 each
- Forest green wall paint: $25–$50
Step-by-Step Instructions: - Paint the accent wall first and allow to dry completely.
- Mount pegboard using standoff hardware so hooks can fit behind the board — drill into wall studs at the top and bottom of the board.
- Lay out your equipment and plan hook/holder placement before attaching anything to the board.
- Install ball cradle holders at lower heights — balls are heavy, and lower placement is safer.
- Mount the hanging bar for small gear at chest height for easy grab-and-go.
- Hang helmet brackets at upper-mid height — helmets need more vertical clearance.
- Use S-hooks for athletic bags and bulk items.
- Test: can your son grab every item without adult help? Adjust heights if needed.
Style Compatibility: Birch pegboard pairs with natural, modern, and industrial aesthetics. White or black pegboard works with virtually any style.
Budget Breakdown:
- Budget-friendly (under $100): Pegboard + basic hook set = $50–$70
- Mid-range ($100–$500): Full equipment storage system with specialized holders = $120–$200
- Investment-worthy ($500+): Custom built-in mudroom-style sports equipment wall
Space Requirements: Works on any wall section at least 4 feet wide. Allow 12″ of clearance in front of the pegboard for equipment access.
Difficulty Level: Intermediate — mounting pegboard requires finding studs and drilling.
Durability: Excellent. Pegboard with quality steel hooks handles heavy daily use. Inspect mounting hardware annually.
Seasonal Adaptability: Rearrange hooks each season to prioritize current sports equipment. Store off-season gear in labeled bins.
Common Mistakes: Mounting to drywall without studs when heavy equipment will load the board, placing hooks too close together so bags and equipment clash, and forgetting to leave the floor below the pegboard completely clear.
Maintenance Tips: Wipe pegboard with a dry cloth monthly. Replace bent hooks. Reorganize hook assignments at the start of each sports season.
3. Under-Bed Rolling Drawers
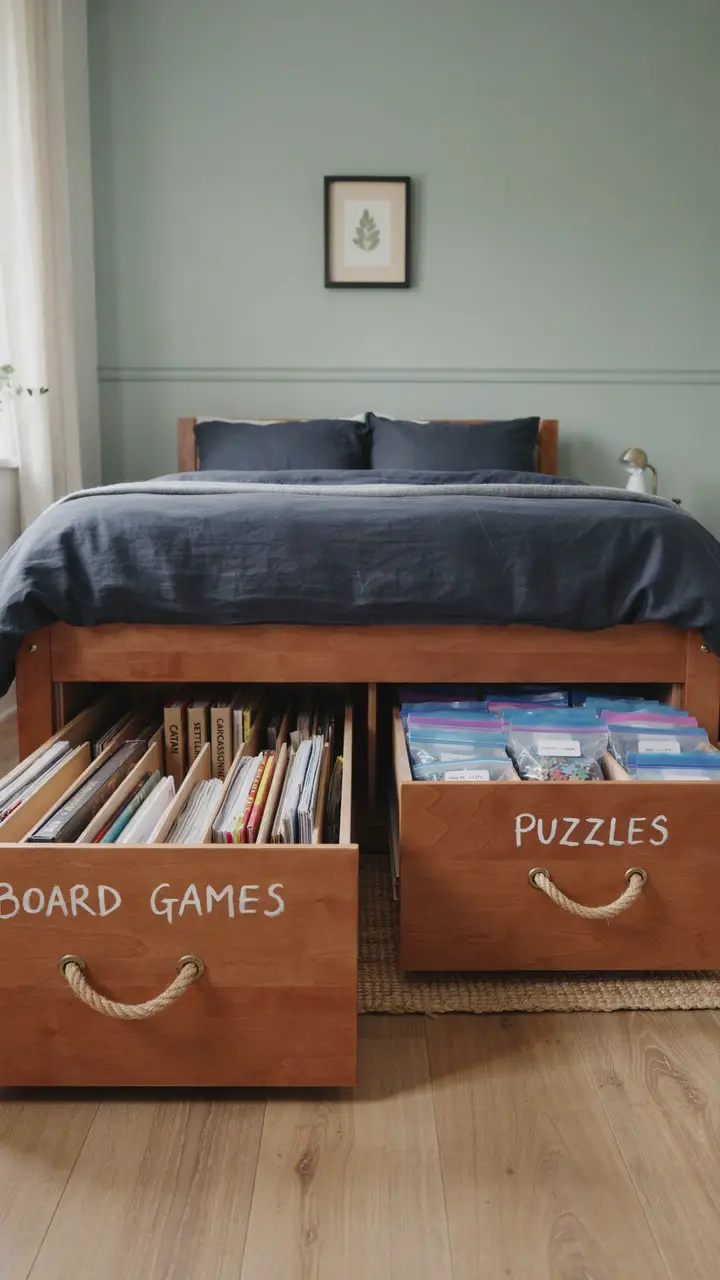
How to Recreate This Look
Shopping List:
- Bed frame with built-in storage drawers OR
- Low platform bed + under-bed rolling drawers (purchased separately): $60–$200
- Large ziplock bags (for puzzle storage inside drawers): $5–$10
- Vertical file folder organizers (for board game storage): $15–$30
- Rope or leather pull handles (if customizing drawer fronts): $10–$25
- Adhesive labels for drawer fronts: $5–$10
Step-by-Step Instructions: - Measure the clearance beneath your existing bed frame — rolling drawers typically require 8″–12″ of height clearance.
- Purchase drawers sized to fit your bed’s under-frame space.
- Store flat items in a vertical file orientation (board games, puzzle boxes) — this dramatically increases storage capacity compared to stacking.
- Transfer puzzle pieces from original boxes into labeled ziplock bags — original boxes take three times more space.
- Label both drawers on the exterior face so contents are identifiable without opening.
- Leave one drawer at least 30% empty as buffer space — completely stuffed drawers stop being used.
Style Compatibility: Works with any bed frame style. The storage is entirely invisible, so it doesn’t affect room aesthetics.
Budget Breakdown:
- Budget-friendly (under $100): Standalone under-bed rolling drawers = $60–$90
- Mid-range ($100–$500): Platform bed with built-in storage = $200–$400
- Investment-worthy ($500+): Custom storage bed with multiple drawer configurations
Space Requirements: No additional floor space required — all storage is beneath the existing bed footprint.
Difficulty Level: Beginner — rolling drawers require no installation. Storage beds require standard furniture assembly.
Durability: Good. Rolling wheels can wear over time on carpet — place a hard plastic chair mat beneath drawers if needed.
Seasonal Adaptability: Swap drawer contents seasonally — holiday games in winter, outdoor game sets in summer.
Common Mistakes: Overfilling drawers so they won’t slide, storing items that need frequent access in the second drawer (harder to reach), and forgetting to label drawers.
Maintenance Tips: Wipe drawer interiors monthly. Lubricate rolling wheels with a silicone spray annually. Re-sort contents every 3 months.
4. Vertical Book Storage with Magazine Rails
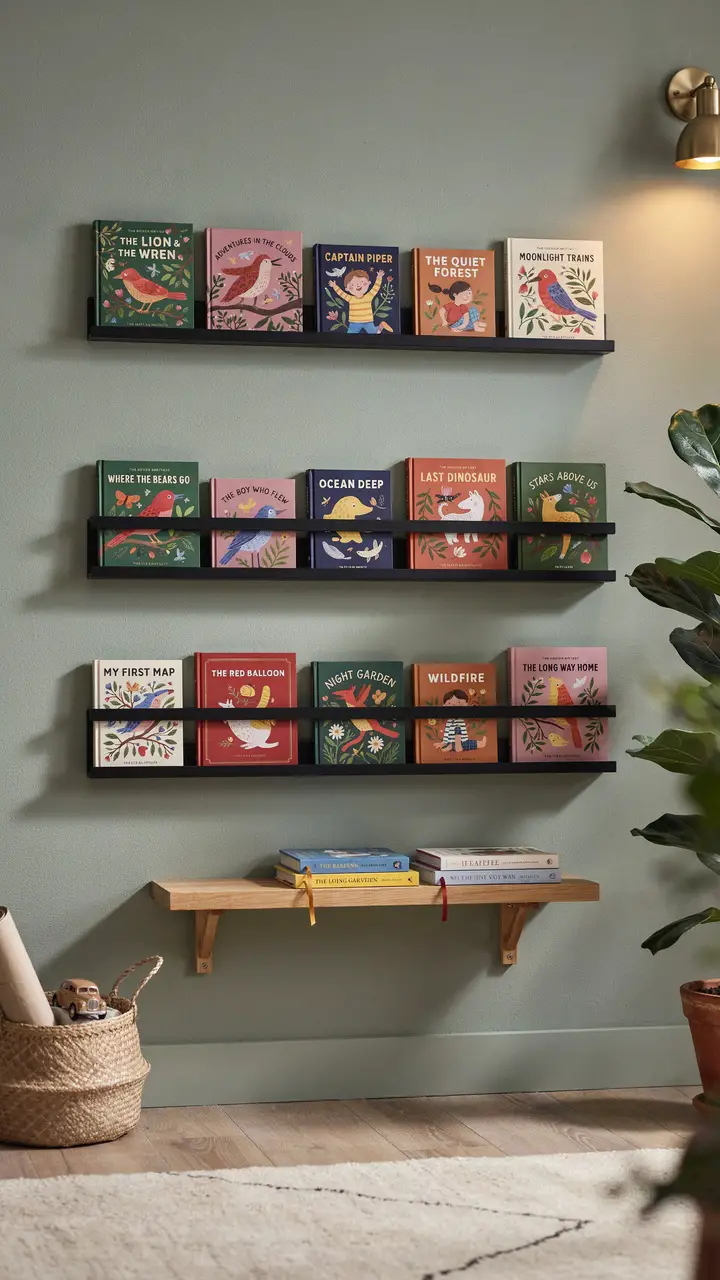
How to Recreate This Look
Shopping List:
- Metal magazine rails or picture ledge rails (set of 3): $15–$40 each
- Mounting hardware included with rails (ensure stud or anchor compatibility)
- Stud finder: $15–$25
- Level: $10–$20 (or use a smartphone app)
- Small wooden ledge for “current reads”: $15–$30
Step-by-Step Instructions: - Plan your three rail heights — 18″, 30″, and 42″ from the floor — and mark stud positions at each height.
- Mount rails into studs — books are heavier than they look. Drywall anchors work for 4–6 books; studs are better.
- Stagger rail positions left-to-right for visual interest — don’t align all three on the same vertical axis.
- Load books facing out — this is the key design decision that transforms the rails from storage into wall art.
- Mount the small wooden ledge at floor-adjacent height for “currently reading” books with bookmarks.
- Curate your book selection: 15–18 face-out books is ideal. Rotate monthly.
Style Compatibility: Works beautifully with modern, Scandinavian, and minimalist room aesthetics. The face-out books provide all the color the system needs.
Budget Breakdown:
- Budget-friendly (under $100): Three rails + existing books = $50–$80
- Mid-range ($100–$500): Premium rails + curated book collection + small ledge = $120–$200
- Investment-worthy ($500+): Custom built-in book wall with integrated rails and concealed hardware
Space Requirements: Three staggered rails work on a wall section as narrow as 3 feet. Scale rail count to wall width.
Difficulty Level: Beginner to intermediate — rail mounting requires stud finding and level installation.
Durability: Excellent. Metal rails handle daily book use. Replace any sagging rail if weight limit is exceeded.
Seasonal Adaptability: Rotate seasonal books onto the face-out display monthly.
Common Mistakes: Overloading rails (they should hold books comfortably, not strain), mounting all rails at the same horizontal position (stagger for visual interest), and displaying books with uninteresting covers face-out (show the ones with great cover art).
Maintenance Tips: Dust rails monthly. Rotate books every 4–6 weeks. Check mounting hardware annually.
5. Clear Stackable Bins for LEGO and Small Parts
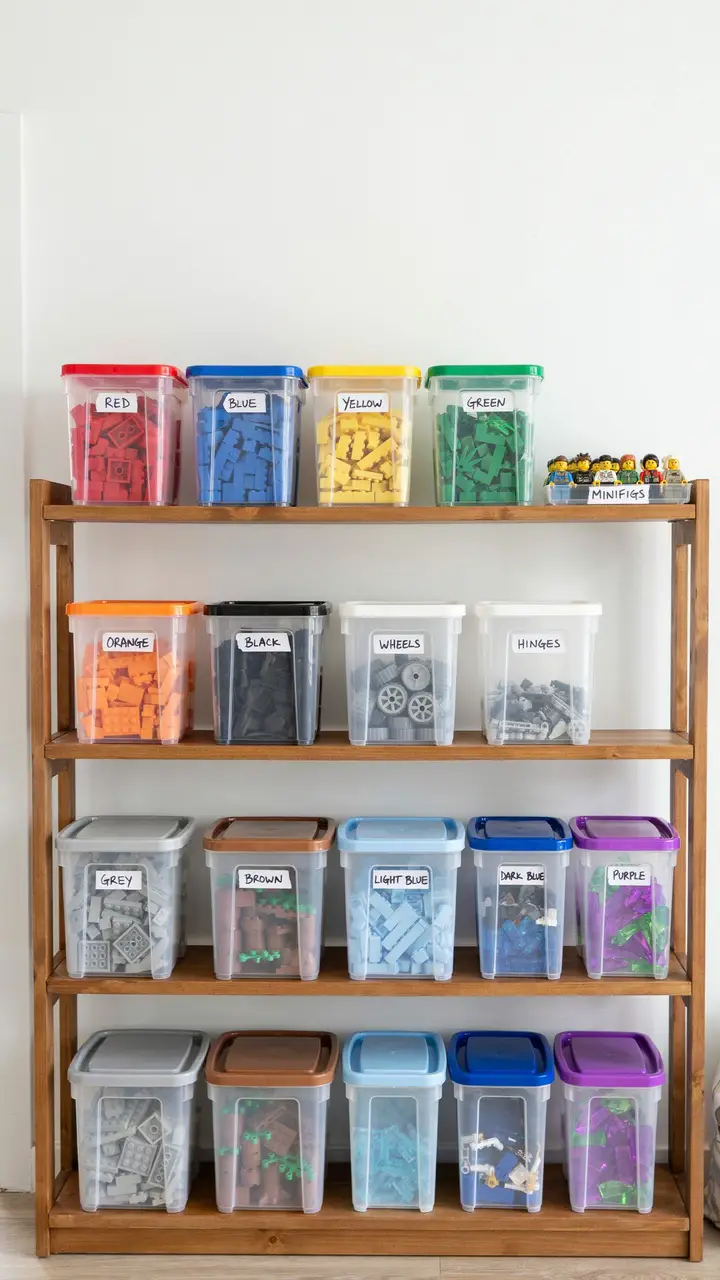
How to Recreate This Look
Shopping List:
- Clear stackable storage containers with locking lids (set of 12): $40–$100
- Color-coded lid stickers or lid paint: $5–$10
- Permanent marker or label maker for lid labels: $5–$15
- Shelving unit (deep enough to hold containers): $40–$120
- Shallow tray for minifigure display: $10–$20
- Good LED overhead lighting: $20–$50
Step-by-Step Instructions: - Sort your entire LEGO collection by color first — this takes an afternoon the first time and is absolutely worth it.
- Sort specialty pieces (wheels, windows, doors, transparent pieces, slopes) separately regardless of color.
- Keep minifigures in a separate shallow tray where they can be browsed without digging.
- Choose container sizes based on how many bricks exist in each color — don’t force rare colors into large containers.
- Color-code lids to match the contents: the red-lidded bin holds red bricks.
- Label each lid with a description: “Red,” “Blue/Purple,” “Clear/Transparent,” “Specialty Plates,” etc.
- Stack on shelving with most-used colors accessible without moving other containers.
Style Compatibility: The clear containers create a visual display of color — they look great against white or light gray walls.
Budget Breakdown:
- Budget-friendly (under $100): Basic clear containers + label maker = $50–$80
- Mid-range ($100–$500): Premium locking containers + quality shelf unit = $180–$250
- Investment-worthy ($500+): Custom LEGO drawer system (like AKRO-MILS or similar) + dedicated shelving wall
Space Requirements: 12 stacked containers on a shelf unit typically need a 24″W x 16″D x 48″H footprint.
Difficulty Level: Beginner — the system is entirely about sorting, not about construction.
Durability: Excellent. Clear containers are essentially indestructible and the lids lock securely.
Seasonal Adaptability: No seasonal changes needed — the LEGO collection doesn’t change with seasons (though it does grow constantly).
Common Mistakes: Mixing too many colors in one container (defeats the system), using opaque containers (loses the visual identification benefit), and not leaving room to expand as the collection grows.
Maintenance Tips: Annual full re-sort to catch misplaced bricks. Clean containers with warm water and mild soap twice a year.
6. Corner Shelving Unit for Maximum Footprint Use
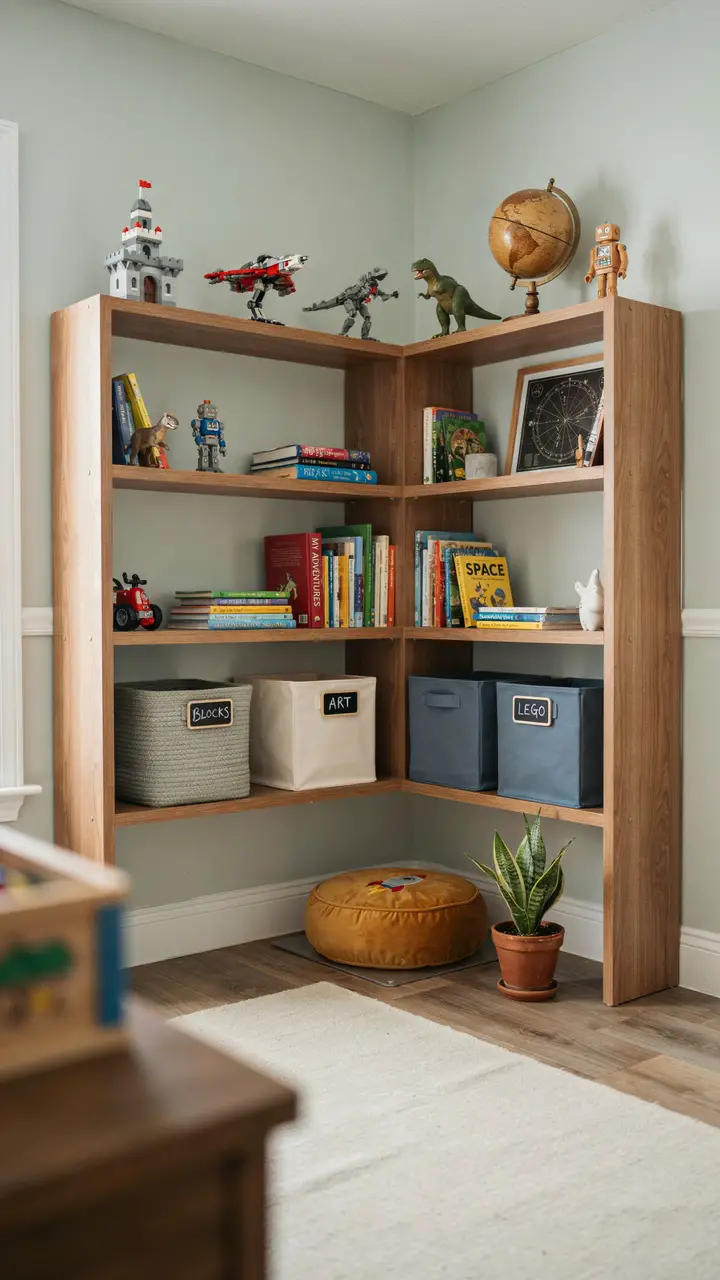
How to Recreate This Look
Shopping List:
- L-shaped corner shelving unit (or two matching units arranged at 90°): $80–$250
- Open-top bins for lower shelves: $10–$20 each
- Cushion for the corner floor zone: $20–$60
- Books and display items (existing collection)
Step-by-Step Instructions: - Measure your corner precisely — L-shaped units come in standard sizes but the exact depth matters for fitting.
- If a pre-made L-shaped unit isn’t available, purchase two matching straight units and angle them at 90° in the corner.
- Anchor both units to the wall per manufacturer instructions.
- Load the lower shelves (floor to 30″) with open-top bins containing the heaviest, most-used items.
- Load the middle shelves (30″–54″) with books and accessible medium-use items.
- Load the top shelves (54″+) with display items and rarely needed materials.
- Place the cushion in the pocket of floor space at the corner base — the natural corner walls create a cozy, semi-enclosed feel.
Style Compatibility: Corner shelving works with any style — choose the wood tone and finish that matches your room.
Budget Breakdown:
- Budget-friendly (under $100): Two IKEA KALLAX units arranged at 90° = $90–$120
- Mid-range ($100–$500): Purpose-built L-shaped corner unit = $150–$250
- Investment-worthy ($500+): Custom built-in corner shelving with integrated lighting
Space Requirements: A standard L-shaped unit typically occupies 36″–48″ along each wall. Minimum ceiling height: any.
Difficulty Level: Intermediate — assembling and anchoring large shelving units requires two people.
Durability: Excellent when properly assembled and wall-anchored. Check anchor bolts annually.
Seasonal Adaptability: Rotate bin contents seasonally, especially lower-shelf bins containing active-use items.
Common Mistakes: Not anchoring the unit to the wall (tip-over risk), choosing a unit that’s too deep for the corner dimensions, and filling the corner cushion zone with storage instead of leaving it as a usable space.
Maintenance Tips: Dust shelves weekly. Re-sort bins quarterly. Inspect wall anchors annually.
7. Hanging Canvas Storage Pockets
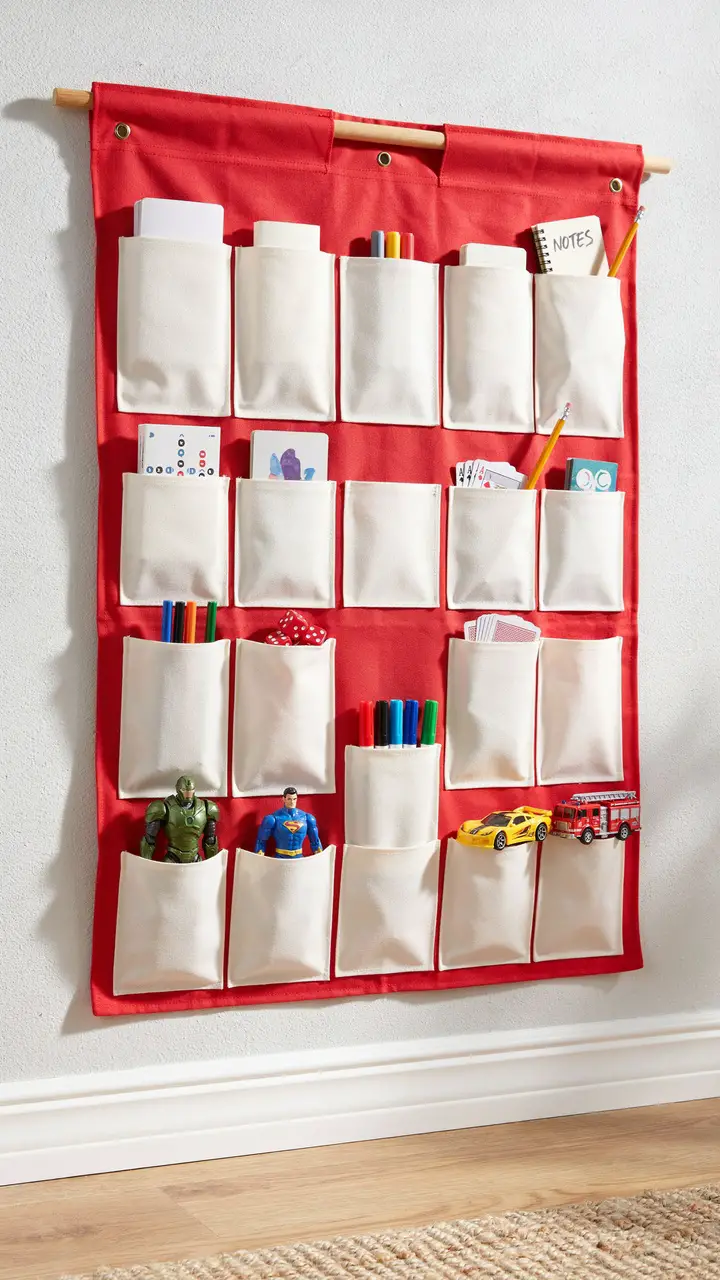
How to Recreate This Look
Shopping List:
- Canvas wall organizer with multiple pockets (20–30 pockets): $20–$50
- Wooden dowel rod (36″–48″): $5–$10
- Two wall-mounted hooks for the dowel: $5–$10
- Items to sort into pockets (existing toys, supplies): Already owned
Step-by-Step Instructions: - Mount two wall hooks at 5-foot height, spaced to match the width of your organizer.
- Thread the dowel through the organizer’s top hanging loop or rod pocket.
- Rest the dowel on the hooks.
- Sort small toys and supplies into pockets by category — keep related items in adjacent pockets.
- Start with pockets less than 50% full — leave room for easy access and retrieval.
- Teach your son where each category lives in the organizer.
Style Compatibility: Works in bright, bold, or colorful playroom aesthetics. Choose an organizer color that coordinates with your room palette.
Budget Breakdown:
- Budget-friendly (under $100): Canvas organizer + dowel + hooks = $30–$70
- Mid-range ($100–$500): Two organizers + matching dowel system for different zones = $80–$120
- Investment-worthy ($500+): Not applicable — this is inherently a budget solution.
Space Requirements: A standard 20-pocket organizer is approximately 20″W x 40″H. Works on any wall with that much clear space.
Difficulty Level: Beginner — mounting two hooks is the most technical step.
Durability: Good. Canvas organizers handle daily use but may need replacement after 2–3 years of heavy use.
Seasonal Adaptability: Swap pocket contents seasonally — summer pocket gets sunscreen and bug spray tools, winter pocket gets hand warmers and craft supplies.
Common Mistakes: Overstuffing pockets (items fall out constantly), using one organizer for items that are too big for the pockets (creates visible bulging and stress on the canvas), and hanging too high for the child to access independently.
Maintenance Tips: Machine wash periodically. Reorganize pocket contents monthly. Replace if pockets begin tearing at the seams.
8. Cube Storage Units with Mix-and-Match Inserts
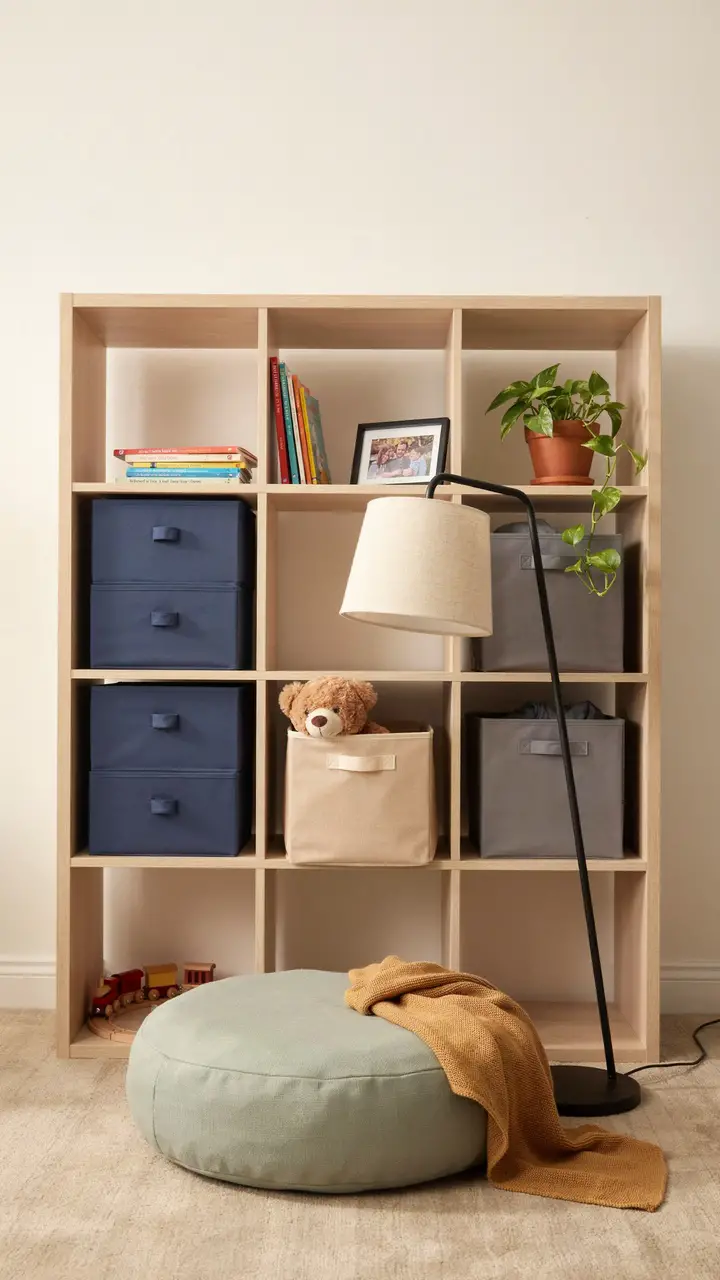
How to Recreate This Look
Shopping List:
- 4×4 cube storage unit (IKEA KALLAX or similar): $100–$200
- Fabric drawer inserts (6–8): $8–$15 each
- Pull-out basket inserts (2–3): $15–$25 each
- Small potted plant (succulent or air plant): $5–$15
- Floor cushion for reading zone: $30–$80
- Arc floor lamp: $40–$120
- Anti-tip anchor strap: $10–$20
Step-by-Step Instructions: - Assemble the cube unit per manufacturer instructions — have a second adult help with the 4×4 size.
- Anchor the unit to the wall with anti-tip straps before adding any contents.
- Plan which cubes get inserts (fabric drawers for hidden storage) and which remain open (for display).
- Install fabric drawer inserts into storage cubes and load with sorted items.
- Style open cubes with 2–3 curated items each — books + one object is a reliable formula.
- Position the reading zone in front of the unit: cushion first, then lamp.
- Step back — the mix of open and closed cubes creates a layered, intentional look.
Style Compatibility: Cube storage works in virtually every room aesthetic. Fabric insert color is where you inject your specific palette.
Budget Breakdown:
- Budget-friendly (under $100): 2×2 IKEA KALLAX ($50–$60) + 2 fabric inserts = $70–$80
- Mid-range ($100–$500): 4×4 KALLAX + full set of inserts + floor cushion + lamp = $250–$400
- Investment-worthy ($500+): Custom built-in cube storage with millwork trim and integrated lighting
Space Requirements: A 4×4 KALLAX is 57″W x 57″H x 15″D — needs approximately 5 linear feet of wall space.
Difficulty Level: Beginner — flat-pack assembly and anti-tip anchoring.
Durability: Very good. KALLAX and similar units hold up well to daily use. Fabric inserts may need replacement after 2–3 years.
Seasonal Adaptability: Swap fabric insert colors seasonally. Rotate open-cube display items with the season.
Common Mistakes: Skipping the anti-tip anchor (serious safety risk for tall units), overcrowding open cubes (the display loses its impact), and using the same type of insert in every cube (the mixed open/closed approach is what makes the unit interesting).
Maintenance Tips: Wipe laminate surface with a slightly damp cloth monthly. Rotate and restuff fabric inserts quarterly. Check anti-tip anchor annually.
9. Built-In Window Seat Storage
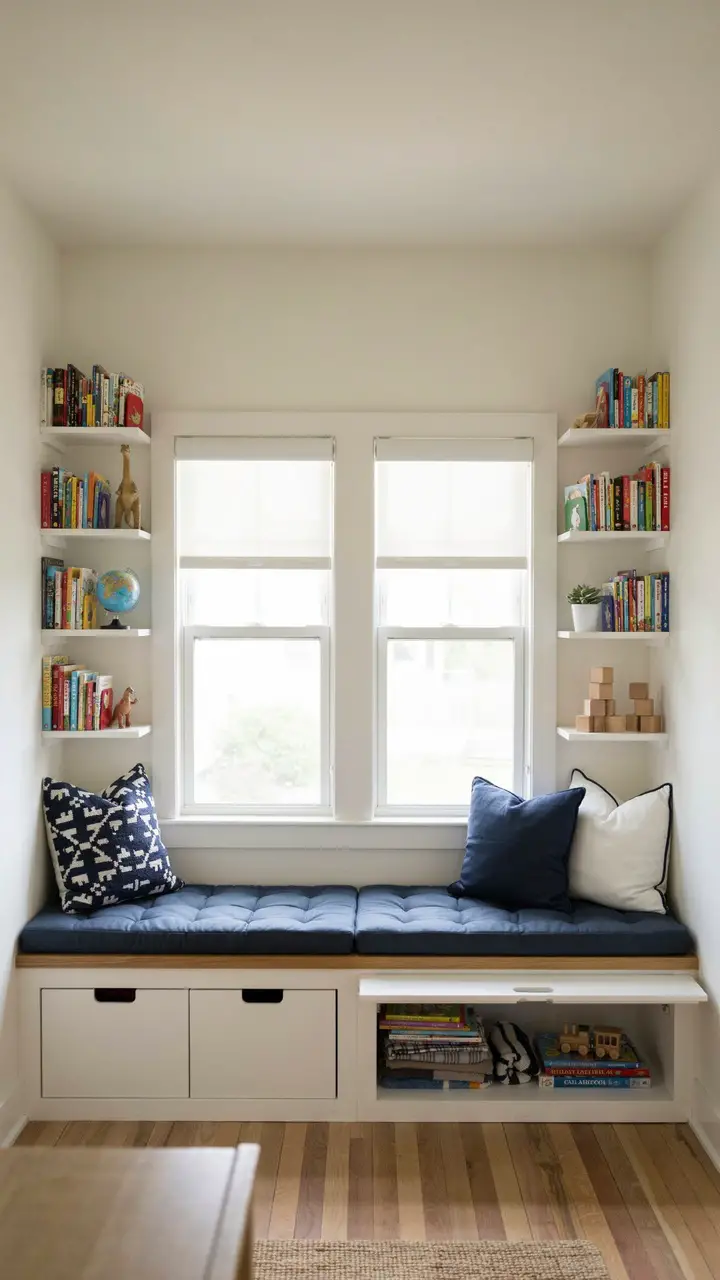
How to Recreate This Look
Shopping List:
- 2x IKEA KALLAX 2×2 units (as seat base): $50–$60 each
- 3/4″ plywood sheet (for seat top): $30–$50
- Piano hinge or lid-lift hardware: $15–$30
- Foam seat cushion (custom cut, 4″ thick): $50–$150
- Upholstery fabric for cushion: $30–$80
- Decorative throw pillows (2–3): $20–$50 each
- Flanking bookshelf units: $40–$120 each
- Roman shades for windows: $30–$80 each
Step-by-Step Instructions: - Measure the window width and confirm two KALLAX units will span it (allow for trim adjustments).
- Position KALLAX units side by side beneath the window — remove any existing baseboard if needed for fit.
- Anchor KALLAX units to the wall per anti-tip requirements.
- Cut plywood seat top to span both units plus any trim extensions needed for a flush fit.
- Install piano hinges along the back edge so the seat top lifts for storage access.
- Cut foam to match the plywood dimensions and upholster with fabric — staple gun is your friend here.
- Place the cushion on the seat and add throw pillows.
- Install flanking bookshelf units on each side and anchor to wall.
- Install Roman shades above the window seat.
Style Compatibility: Works with traditional, modern farmhouse, coastal, and transitional aesthetics. The cushion fabric is where you personalize the style.
Budget Breakdown:
- Budget-friendly (under $100): Not realistic for this project — budget for $200 minimum
- Mid-range ($100–$500): KALLAX base + DIY plywood seat + foam + fabric = $250–$400
- Investment-worthy ($500+): Custom built-in cabinetry with upholstered seat + flanking bookshelves = $800–$3,000+
Space Requirements: Requires a window with at least 4 feet of clear width and 18″–24″ of floor depth.
Difficulty Level: Intermediate to advanced — involves carpentry, upholstery, and built-in furniture execution.
Durability: Excellent. A well-built window seat lasts decades and becomes a beloved feature of the room.
Seasonal Adaptability: Swap throw pillow covers seasonally. Store seasonal items in the lift-lid storage.
Common Mistakes: Choosing a foam cushion that’s too thin (less than 4″ feels uncomfortable), building the seat height that conflicts with the window sill height, and skipping the lid lift hardware (making the seat impossible to open without fully removing the cushion).
Maintenance Tips: Rotate and fluff cushion monthly. Vacuum interior storage seasonally. Tighten hinge screws annually.
10. Labeled Toy Box with Dividers
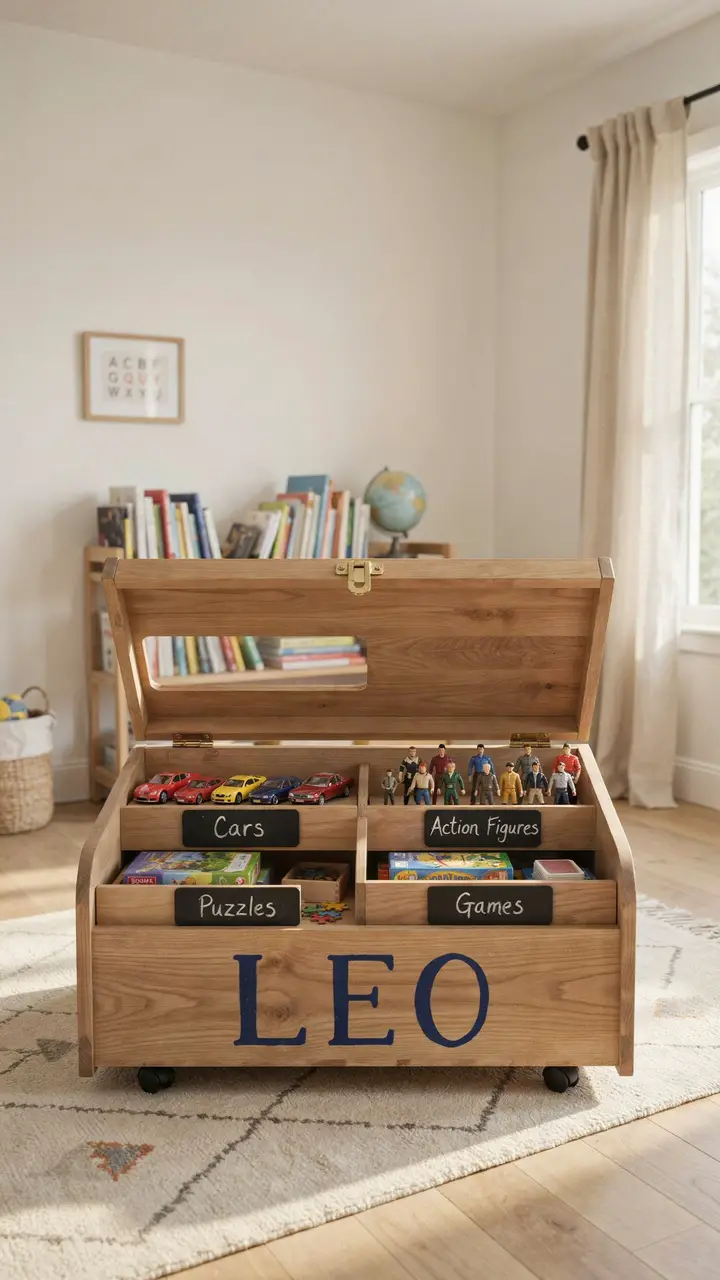
How to Recreate This Look
Shopping List:
- Large pine toy chest (30″–36″ wide): $80–$200
- Interior divider board (cut from 1/2″ plywood): $15–$30
- Small chalkboard label pieces (4): $5–$15
- Chalk marker for labels: $5–$10
- Safety lid support hardware: $10–$20
- Caster wheels (set of 4): $10–$25
- Navy paint for name lettering: $5–$10
- Letter stencils or vinyl cut letters: $5–$20
Step-by-Step Instructions: - Purchase a toy chest sized for your space — measure the available floor area first.
- Install caster wheels on the underside for mobility — critical for heavy toy chests.
- Install safety lid support hinges if not already included — this is a non-negotiable safety upgrade.
- Cut the plywood divider to span the interior width and notch it to cross the center divider, creating 4 equal compartments.
- Sand and seal the divider piece. Install using wood screws through the exterior walls.
- Mount small chalkboard label pieces to each divider section facing front.
- Write category labels with chalk marker — chalk markers are more durable than regular chalk.
- Stencil or apply vinyl name letters to the chest exterior front.
Style Compatibility: A classic pine toy chest works with traditional, farmhouse, Scandinavian, and eclectic styles. Paint it for a bold modern look; leave it natural for a warm, classic feel.
Budget Breakdown:
- Budget-friendly (under $100): Repurpose a thrifted chest + DIY dividers + labels = $40–$80
- Mid-range ($100–$500): New toy chest + dividers + casters + safety hardware = $150–$280
- Investment-worthy ($500+): Custom-built heirloom toy chest with carved name + premium hardware
Space Requirements: Most toy chests are 36″–48″ wide x 18″–24″ deep x 24″–30″ tall. Plan floor space accordingly.
Difficulty Level: Intermediate — cutting and installing the interior divider requires basic carpentry.
Durability: Excellent. A well-made pine toy chest can last a lifetime. Safety hinge and casters significantly improve the user experience.
Seasonal Adaptability: Swap out compartment labels seasonally to reflect current most-used toy categories.
Common Mistakes: Buying a chest without safety lid support (lid can slam shut on small fingers), skipping casters (full toy chests are extremely heavy to move), and over-dividing the interior so compartments become too small to be useful.
Maintenance Tips: Sand and re-seal the exterior every 2–3 years. Check hinge and caster hardware annually. Declutter compartments every 3 months.
Storage That Actually Earns Its Keep
The best storage solution for a boys’ playroom isn’t the most expensive one or the most Instagram-worthy one — it’s the one that the actual kid in your actual house will actually use every single day. Start with the system that addresses your biggest current pain point. Stepping on Legos at midnight? Start with the sorted bins. Books everywhere? Start with the face-out rails. Every thing out of reach? Start with the height-appropriate shelving.
Build from there, and don’t try to implement everything at once. A single well-chosen storage solution, properly introduced and consistently used, will do more for your playroom than a hundred storage ideas half-heartedly executed. Give it a real chance, give it a consistent month, and watch what happens to that room.
It’ll still get messy. But it’ll also get clean again. And that, honestly, is the whole goal. 🙂

Greetings, I’m Alex – an expert in the art of naming teams, groups or brands, and businesses. With years of experience as a consultant for some of the most recognized companies out there, I want to pass on my knowledge and share tips that will help you craft an unforgettable name for your project through TeamGroupNames.Com!