There’s something quietly magical about that one wall in your home that just works.
You walk in, everything has a place, the keys are where you left them (miracle!), the kids’ permission slips aren’t buried under last week’s mail, and the weekly schedule is right there in plain sight.
That’s exactly what a well-designed home command center does — and the best part? You absolutely don’t need to blow your budget to build one.
Whether you’re working with a narrow hallway, a tiny kitchen wall, a cluttered mudroom corner, or even just the side of your fridge, a command center can transform daily chaos into something that actually feels manageable.
I’ve seen people spend $15 and end up with a setup that runs their entire household like clockwork.
So grab a coffee, because we’re about to walk through ten genuinely great — and genuinely affordable — command center ideas that you can start building this weekend.
1. The Classic Corkboard + Chalkboard Combo
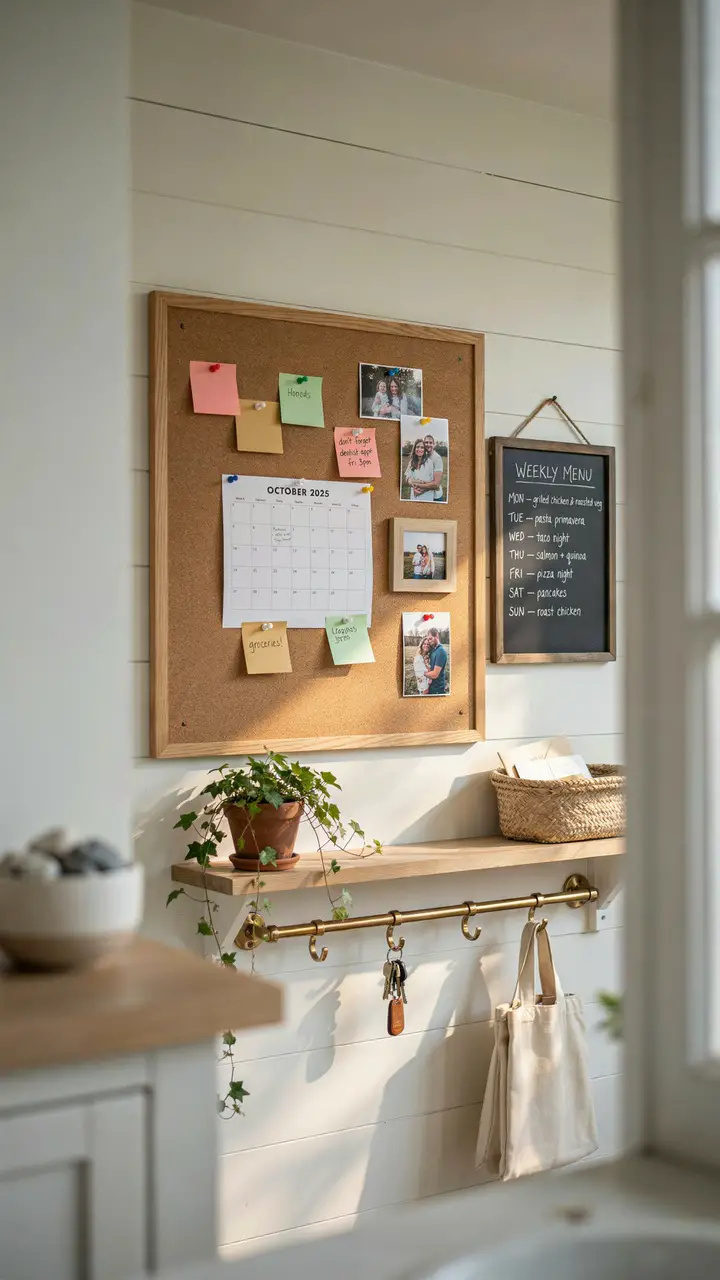
How to Recreate This Look
This is the OG command center combo — and it’s been a staple for a reason. A corkboard gives you a flexible, ever-changing display space, while a chalkboard handles rotating info like weekly menus, reminders, or grocery lists. Together, they cover basically everything a busy household needs.
Shopping List:
- Natural wood frame corkboard (16″x24″ or larger): $12–$25 at IKEA, Target, or Amazon
- Small framed chalkboard (12″x16″): $8–$18 at craft stores or thrift shops
- Floating wooden shelf (24″–36″ wide): $15–$35 at IKEA or HomeGoods
- Brass or matte black hook rail (3–5 hooks): $10–$20 at Amazon or hardware stores
- Woven basket or small tray for mail sorting: $5–$15 thrifted or from Target
- Chalk markers for neat lettering: $6–$10
Step-by-Step Styling Instructions:
- Mount your corkboard at eye level — roughly 57–60 inches from the floor to the board’s center.
- Hang the chalkboard directly adjacent (not above or below — side-by-side reads cleaner on a wall).
- Install the floating shelf about 8–10 inches below the boards.
- Attach your hook rail to the wall below the shelf, or directly onto the shelf’s underside if depth allows.
- Add a small plant, a candle, or a decorative object to the shelf to keep it from looking purely utilitarian.
- Write your first chalkboard message — something simple like the week’s meals or a motivational quote — and pin a few items to the corkboard to bring it to life immediately.
Budget Breakdown:
- Under $100: Thrift the corkboard and chalkboard frames, use Command strips instead of hardware mounting
- $100–$500: Add a matching set of bins, labeled folders, and a custom printable calendar
- $500+: Commission a built-in version with cabinetry and a custom chalkboard paint panel
Difficulty Level: Beginner. If you can hold a drill, you can do this in under two hours.
Common Mistakes to Avoid: Don’t mount everything too high — reaching up to grab keys is annoying and the whole point is daily usability. Also, resist pinning too much to the corkboard; it should communicate information, not become a visual landfill.
Seasonal Adaptability: Swap chalkboard content seasonally — back-to-school schedules in fall, holiday countdown in winter, gardening reminders in spring.
2. The Pegboard Power Wall
How to Recreate This Look
Pegboards are the most versatile surface you’ll ever mount to a wall. You can completely reconfigure them as your needs change — no holes, no guilt, no permanence. And with a fresh coat of paint, even a thrifted pegboard looks completely intentional.
Shopping List:
- Pegboard panel (24″x48″ is ideal for most walls): $15–$30 at Home Depot or Lowe’s
- Pegboard hooks and accessories kit: $10–$25 (comes with shelves, bins, and hooks)
- Spacers (to mount pegboard away from wall for hook clearance): $5–$10 in hardware section
- Spray paint in your preferred color: $5–$8
- Small metal or acrylic bins for supplies: $8–$20 at The Container Store or Dollar Tree
Step-by-Step Styling Instructions:
- Paint your pegboard before mounting — spray painting gives the cleanest finish.
- Mount with spacers so hooks have room to engage properly with the board.
- Lay out your accessories on the floor first to plan placement before committing.
- Group by function: a “communication zone” with calendar and mail bins, a “supplies zone” with pens and scissors, and a “landing zone” with hooks for bags and keys.
- Add one purely decorative element — a small plant, a framed print, or a string of warm fairy lights — to soften the utilitarian look.
Budget Breakdown:
- Under $100: Full setup achievable for $50–$70 if you source bins at the dollar store
- $100–$500: Add a custom painted pegboard with matching accessories
- $500+: Go floor-to-ceiling with a full pegboard wall system
Space Requirements: Works in spaces as narrow as 24 inches wide. Ideal for kitchens, mudrooms, and home offices.
Durability with Kids & Pets: Very durable — nothing fragile and everything repositionable if a curious toddler decides to redecorate. 🙂
Looking for more ways to bring function and personality into your family spaces? Check out these inspiring family command center ideas that work for households of every size.
3. The Fridge-Side Command Station
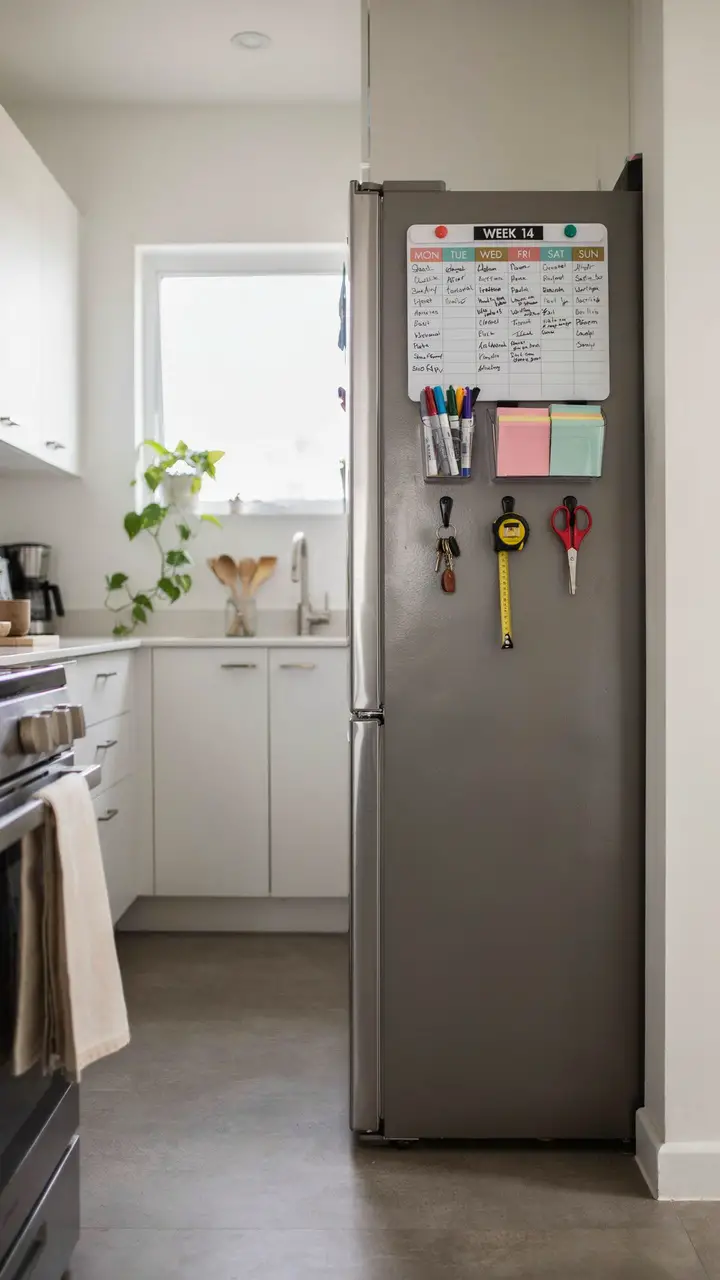
How to Recreate This Look
Renters, this one is especially for you. No drilling, no damage, no landlord anxiety. The side of your refrigerator is prime magnetic real estate that most people completely ignore. Total cost for a functional setup: under $40.
Shopping List:
- Magnetic weekly planner/whiteboard: $10–$20 on Amazon
- Magnetic bins (set of 2–3): $8–$15
- Magnetic hooks (set of 4–6): $6–$12
- Dry-erase markers: $4–$6
Step-by-Step Styling Instructions:
- Clean the fridge panel thoroughly with rubbing alcohol before attaching anything — oils cause items to slide.
- Mount the planner board first as your visual anchor at comfortable eye level.
- Position bins at one side for supplies (below the planner looks most organized).
- Use hooks for daily carry items — keys, earbuds, a small bag.
- Keep it simple: five or fewer elements will look intentional; more than that looks like a fridge explosion.
Difficulty Level: Beginner. Truly zero tools required.
Rental-Friendly: 100%. Everything comes off cleanly, and you take it with you when you move.
FYI: Magnetic surfaces don’t work on all fridge panels — French door and some stainless finishes can be non-magnetic. Test with a basic fridge magnet first before investing in accessories.
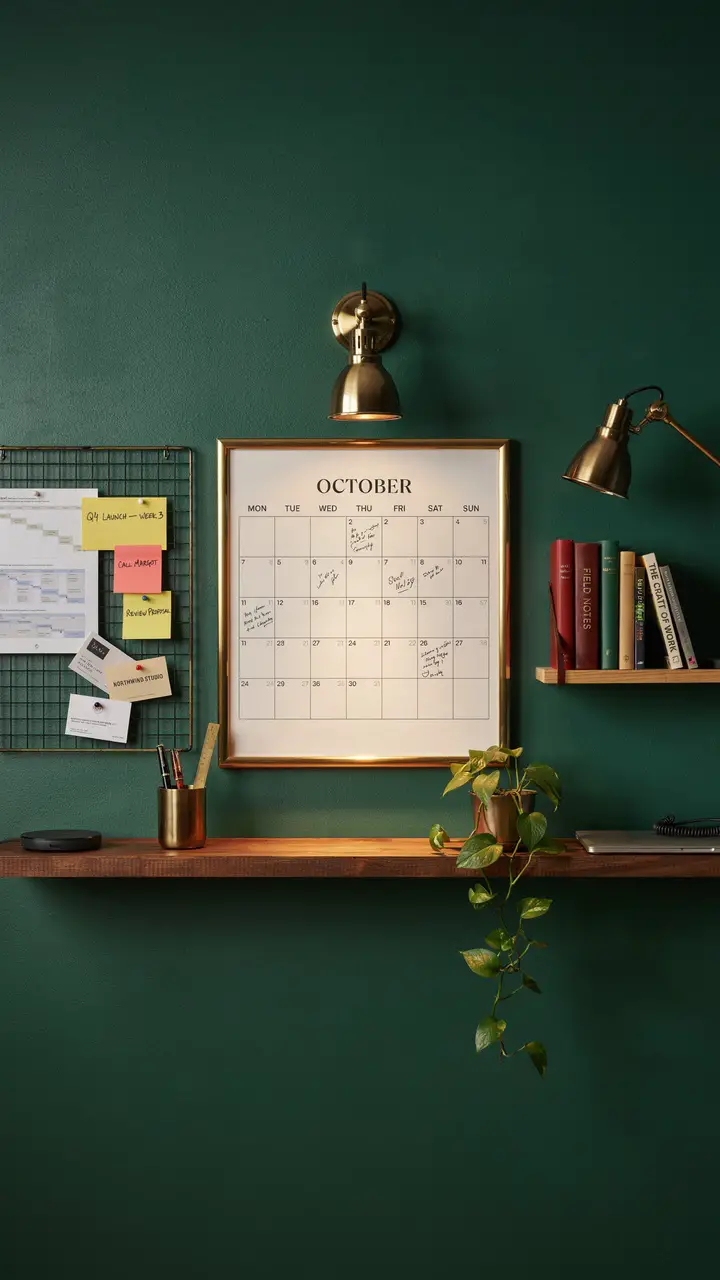
4. The Wall-Mounted Planner + Floating Shelf Duo
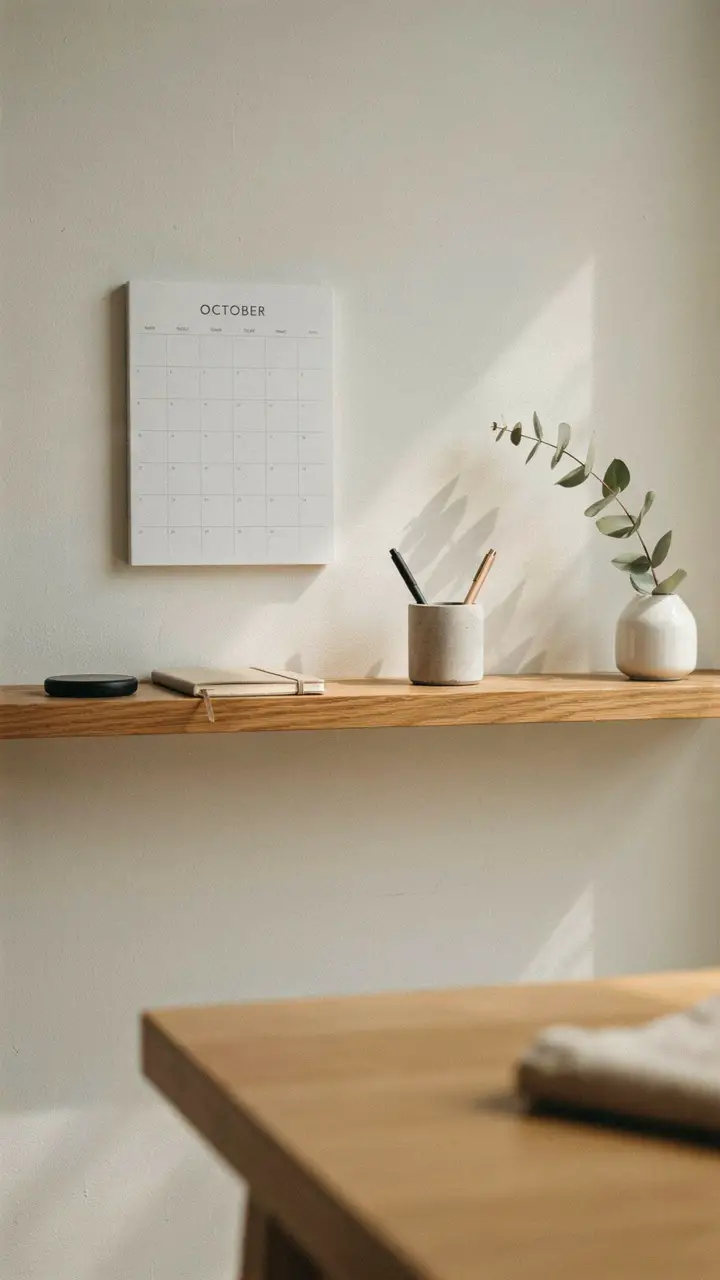
How to Recreate This Look
This setup works beautifully in home offices, bedrooms, or kitchen nooks. The planner becomes visual art, and the shelf below it gives you a functional landing zone for the supplies you actually use daily.
Shopping List:
- Framed monthly or weekly wall planner (laminated for reuse): $15–$35 on Etsy or Amazon
- Floating shelf in walnut or white (30″–36″ wide): $20–$40 at IKEA (LACK or Bergshult lines work perfectly)
- Concrete or ceramic pen holder: $8–$20 at HomeGoods or thrifted
- Small charging pad: $10–$25
- Decorative plant or dried botanical: $5–$15
Budget Breakdown:
- Under $100: Laminate a free printable planner in a thrifted frame; use any shelf you already own
- $100–$500: Invest in a quality wall planner set and matching walnut shelf
- $500+: Commission a built-in alcove with integrated shelf and lighting
Style Compatibility: Pairs beautifully with Japandi, minimalist, Scandinavian, and modern farmhouse aesthetics. Works less naturally with bohemian or maximalist spaces — unless you lean into the contrast intentionally.
5. The Entryway Mail + Key Station
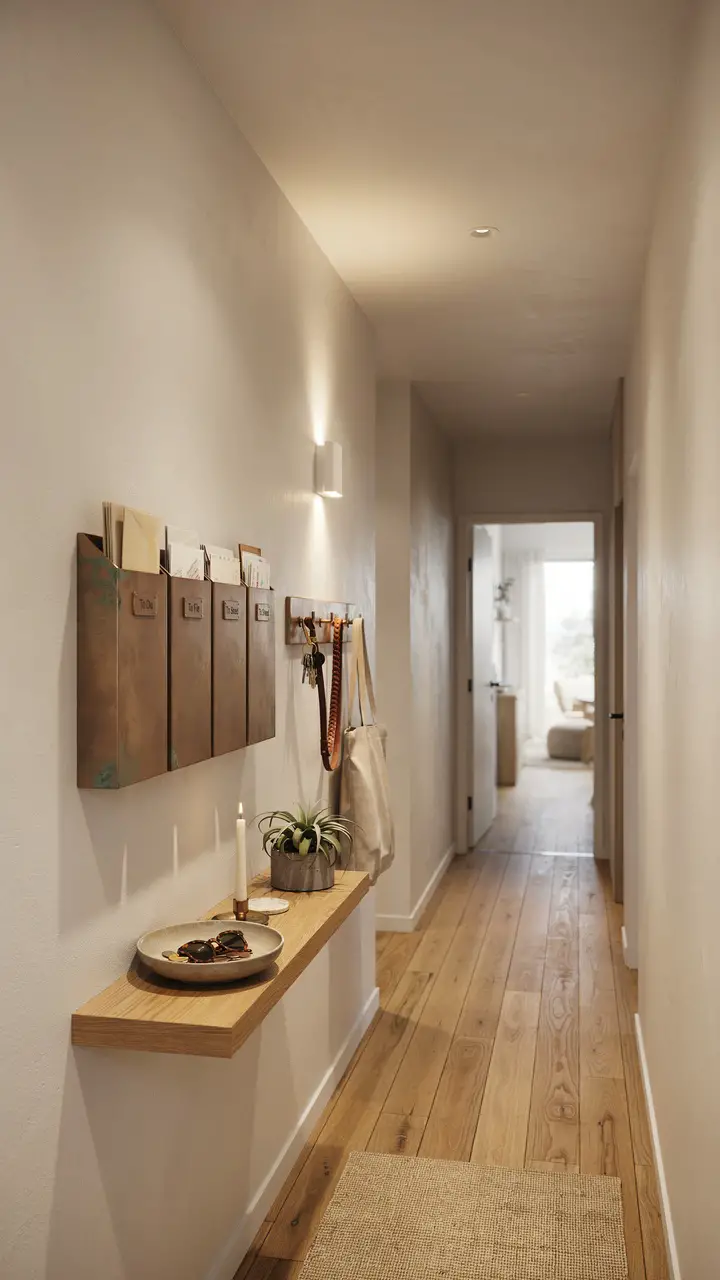
How to Recreate This Look
The entry command center solves the number one household frustration: “Where are my keys?!” Once you build this system, you will genuinely wonder how you survived without it.
Shopping List:
- Wall-mount mail organizer (2–3 tier): $15–$35 at Amazon, Target, or World Market
- Hook rail (4–6 hooks, matching finish): $10–$25
- Small floating shelf (16″–24″ wide): $15–$30
- Shallow decorative bowl for catch-all: $5–$15 thrifted
- 1–2 small decor accents (candle, plant, small print): $10–$20
Step-by-Step Styling Instructions:
- Mount the mail organizer at shoulder height so you can drop mail in without bending.
- Place the hook rail directly beside or below the mail station — you want one fluid motion when you walk in the door.
- Install the shelf at about waist height for the natural “pocket empty” zone.
- Keep the shelf surface edited: three objects maximum to avoid it becoming a dumping ground.
- Label your mail slots — even with simple masking tape labels — to reinforce the habit of actually sorting mail.
Maintenance Tip: Schedule a weekly two-minute mail purge. The system only works if the “To Shred” compartment actually gets shredded.
Want to take your organizational system to the next level throughout your whole home? These home command center ideas will give you a full picture of what’s possible in every room.
6. The Chalkboard Wall Panel Command Center
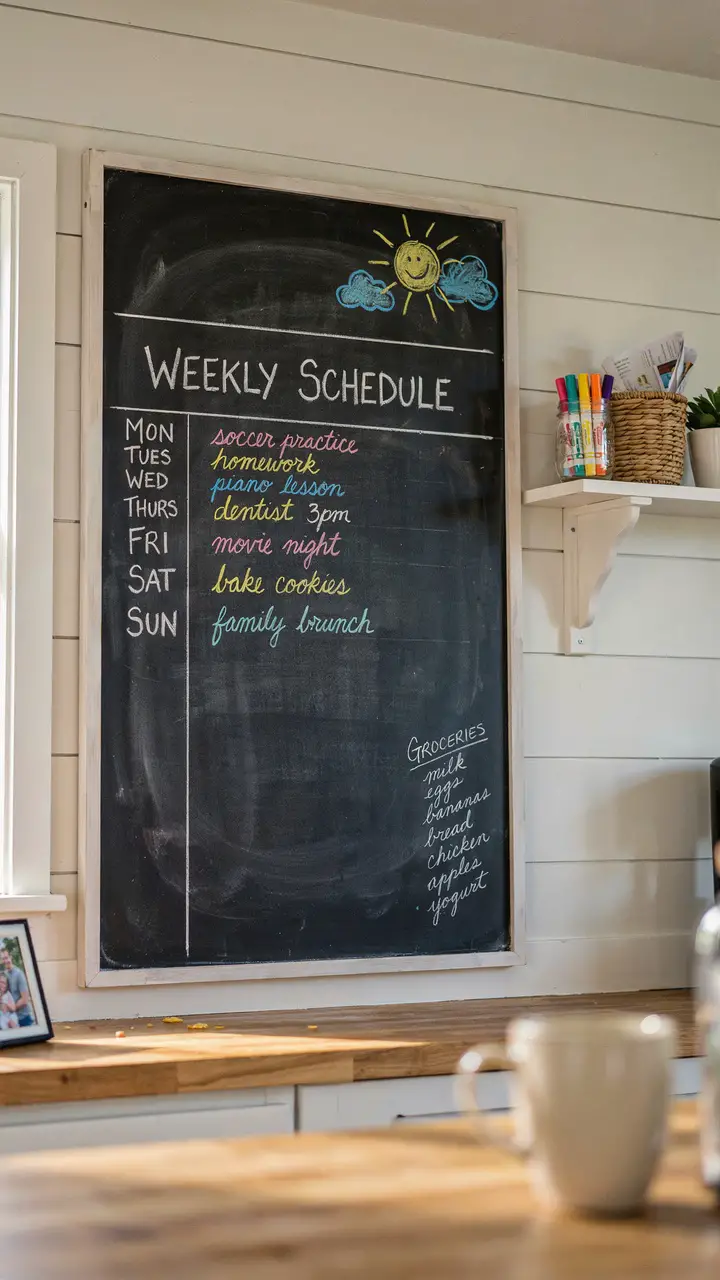
How to Recreate This Look
Chalkboard paint is genuinely one of the most transformative — and least expensive — home updates you can make. A single quart covers a 3’x5′ section and costs around $12. The result looks completely custom.
Shopping List:
- Chalkboard paint (1 quart): $10–$15 at any hardware store
- Trim pieces (optional, for a framed look): $5–$15 in lumber section
- Chalk markers in multiple colors: $8–$12
- Eraser board or microfiber cloth: $3–$5
Step-by-Step Styling Instructions:
- Tape off your section with painter’s tape to get clean edges.
- Apply two coats of chalkboard paint, allowing full drying time between coats (at least 4 hours each).
- Before first use, “season” the board: rub the side of a chalk stick across the entire surface, then erase — this prevents ghosting.
- Optionally frame the panel with thin wood trim painted white or in a complementary color for a built-in look.
- Divide your chalkboard into zones with chalk markers: schedule, grocery list, and a “free draw” corner for kids.
Difficulty Level: Beginner. No special skills required beyond basic painting.
With Kids: This might actually be your best investment — kids love contributing to the board, and it becomes a living family document rather than just a functional tool.
7. The Floating Cube Shelf Command System
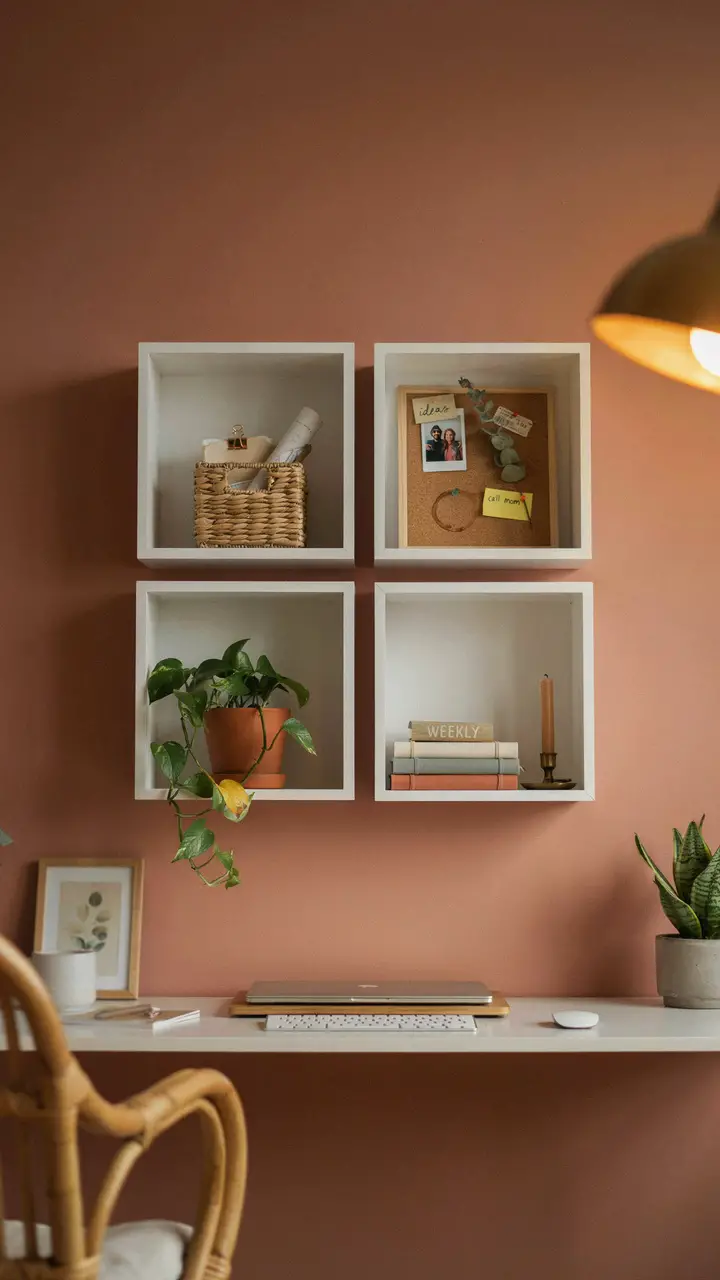
How to Recreate This Look
Cube shelves give you the flexibility to mix function and style seamlessly. Each cube becomes its own little vignette — one purely decorative, one purely practical, one a little of both.
Shopping List:
- Floating cube shelves (set of 4, IKEA Lack or similar): $25–$50
- Small wicker or fabric baskets to fit cubes: $15–$30 for a set
- Mini corkboard (to fit inside one cube): $5–$10
- Trailing plant (pothos, philodendron): $5–$15
- Coordinating notebooks for visual cohesion: $10–$20
Budget Breakdown:
- Under $100: IKEA cubes + Dollar Tree baskets + one plant = full setup
- $100–$500: Add custom-painted cubes, premium baskets, and integrated lighting
- $500+: Commission floating built-in cube shelving with custom paint
Space Requirements: You need at least 30 inches of clear wall width. Works beautifully in offices, bedrooms, and living rooms equally.
8. The Kids’ Command Center Wall
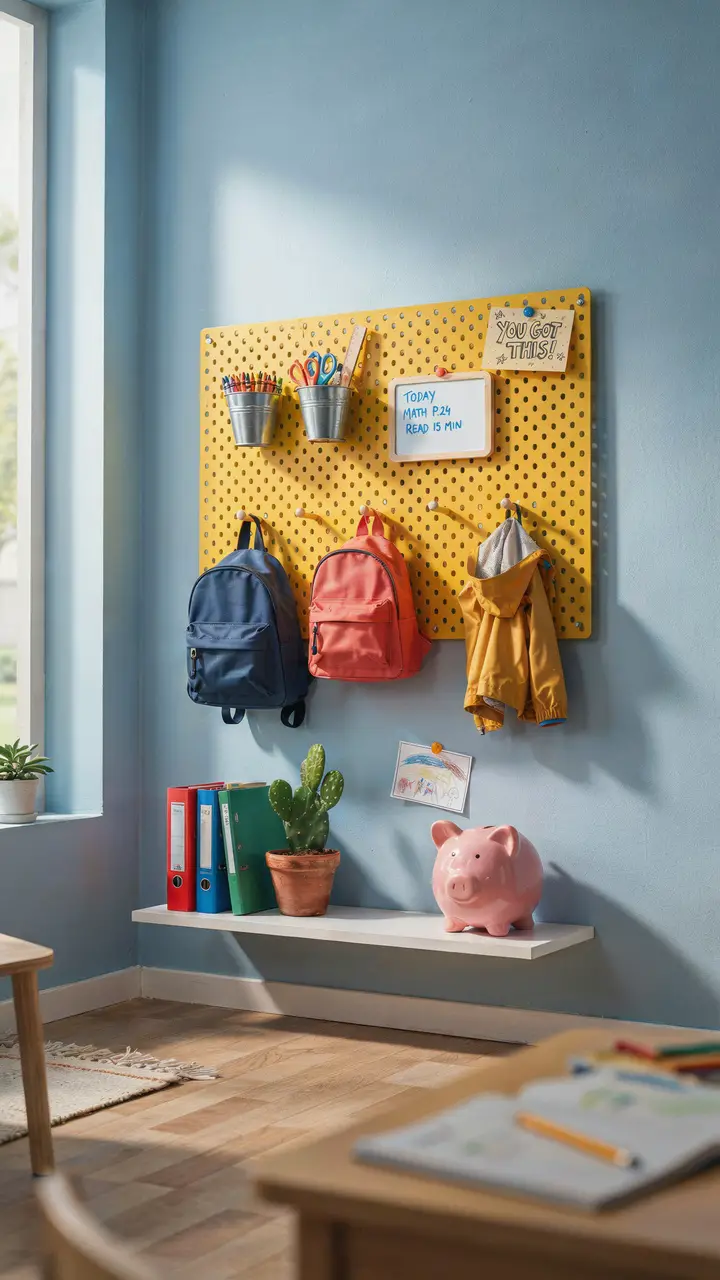
How to Recreate This Look
Kids who have their own command center develop ownership over their responsibilities — and that shift alone can transform your morning routine. Mount everything 42–48 inches from the floor so it’s genuinely within their reach.
Shopping List:
- Small pegboard (24″x24″): $12–$18 at hardware stores
- Bright spray paint in their favorite color: $5–$8
- Mini whiteboard with marker: $6–$12
- Color-coded bins or folders: $10–$20
- Low hook rail for backpacks: $10–$20
- Small motivational print: $5–$10
Step-by-Step Styling Instructions:
- Involve your child in choosing the paint color and accessories — buy-in is everything.
- Mount everything at their current height, not adult height.
- Use picture labels alongside text labels for younger children who aren’t reading yet.
- Create a simple “done for the day” checklist on the mini whiteboard (homework ✓, lunch packed ✓, shoes by door ✓).
- Keep it fun: one purely decorative element (a favorite character sticker, a small toy, a framed drawing) makes it theirs.
Durability: Very durable. Pegboard handles curious hands well; just avoid glass or ceramic elements at kid height.
If you’re creating spaces that work for the whole family, you’ll love these kids’ command center ideas with even more age-appropriate inspiration.
9. The Office Command Center Wall
How to Recreate This Look
Your home office command center should do double duty: keep you organized and make you want to sit down and get to work. A beautifully styled office wall is one of the most productive investments you can make.
Shopping List:
- Large monthly calendar frame (18″x24″): $20–$40 on Etsy or Amazon
- Grid wire memo board: $15–$30
- Floating walnut shelf (48″–60″ wide): $30–$60 at IKEA or Amazon
- Matching desk accessories (pen cup, tray, cable organizer): $20–$45
- Wall-mounted lamp or sconce: $25–$75
Budget Breakdown:
- Under $100: Free printable calendar in a thrifted frame, wire board from Amazon, existing desk supplies relocated to wall shelf
- $100–$500: Matching desk accessory set, quality floating shelf, grid board with custom inserts
- $500+: Built-in desk wall system with integrated lighting and cabinetry
Difficulty Level: Intermediate. The key is aligning multiple elements at consistent visual heights, which requires careful measuring before drilling.
Common Mistake: Spreading elements too far apart so they read as random rather than as a cohesive system. Keep everything within a 48–60 inch horizontal band for visual unity.
10. The Rental-Friendly Freestanding Command Center
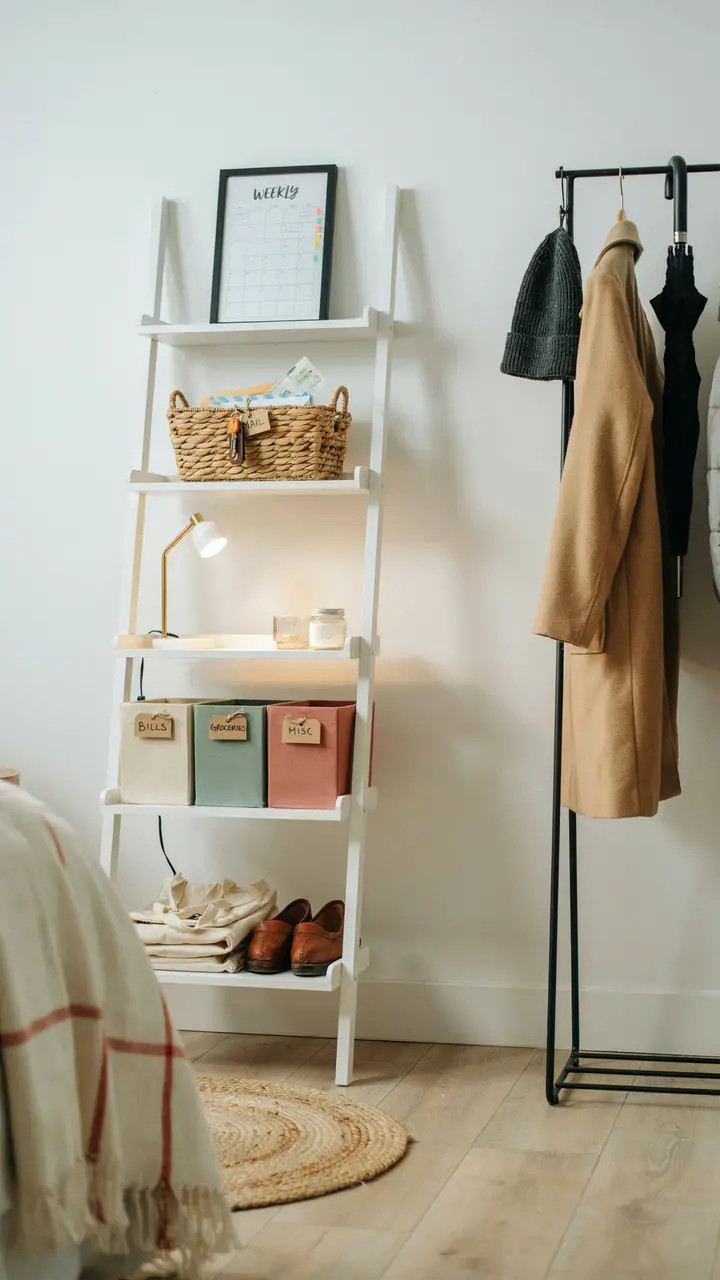
How to Recreate This Look
No drilling. No damage. No conversation with your landlord. This is the command center for every renter, every college student, every person who isn’t sure how long they’re staying somewhere — but still wants to feel at home.
Shopping List:
- Slim ladder shelf or 5-tier narrow bookshelf: $30–$60 at IKEA, Wayfair, or Amazon
- Freestanding coat rack: $20–$40
- Fabric storage bins (set of 3–4, labeled): $15–$25
- Small framed planner or whiteboard: $10–$20
- Plug-in LED desk lamp or clip lamp: $12–$25
- Small jute mat or tray for ground-level items: $8–$15
Step-by-Step Styling Instructions:
- Position the shelf in your most-used transitional zone — near the front door ideally, or the end of a hallway.
- Assign each tier a function before adding items: top = current action items, middle = supplies, lower = storage.
- Use fabric bins to conceal anything that’s functional but not pretty (cables, spare batteries, extra bags).
- Add the coat rack alongside rather than behind the shelf — together they function as a cohesive entryway.
- Style one tier with a decorative element only — a candle, a plant, a framed photo — to make it feel like a home rather than a storage unit.
Budget Breakdown:
- Under $100: Full setup achievable for $65–$90 with IKEA or Amazon basics
- $100–$500: Upgrade to higher-quality shelf with matching basket set and premium accessories
- $500+: Commission a custom freestanding unit in painted wood with integrated hooks and lighting
Rental-Friendly: Completely. Everything moves with you — which means every time you relocate, your command center comes too.
Seasonal Adaptability: Swap fabric bin contents seasonally — winter gloves and scarves in the top bin, sunscreen and sunglasses in summer. The structure never changes; only what lives inside it does.
Bringing It All Together
Here’s the honest truth about command centers: the prettiest one isn’t necessarily the most effective one. The most effective one is the one you’ll actually use every single day. So start with what genuinely frustrates you — the lost keys, the forgotten permission slips, the grocery list that never makes it to the store — and build your command center around solving that problem first.
Style it second. Make it yours. Let it evolve.
You don’t need a contractor, a designer’s budget, or even a particularly large wall. You need a clear idea of what your household actually needs, a Saturday afternoon, and the willingness to try something. Will the first version be perfect? Probably not. (Mine absolutely was not — I once mounted an entire mail center on the wrong wall and had to redo it completely because nobody walked past it.) But even an imperfect command center that gets used daily beats a beautiful one that nobody interacts with.
Your home should work for you, reflect you, and support the life you’re actively living in it. These ten ideas give you every tool you need to make that happen — for well under what you might think. Now go make something that works. <3

Greetings, I’m Alex – an expert in the art of naming teams, groups or brands, and businesses. With years of experience as a consultant for some of the most recognized companies out there, I want to pass on my knowledge and share tips that will help you craft an unforgettable name for your project through TeamGroupNames.Com!