
Here’s the thing about whimsical playrooms: the magic doesn’t live in the price tag.
It lives in the details — the unexpected toadstool stool in the corner, the fairy lights strung along a bookshelf, the hand-painted star on a storage bin that makes a child stop and say “oh.”
Those moments of delight cost almost nothing. They just require intention, a little creativity, and the willingness to look at ordinary materials with a slightly enchanted eye.
I’ve seen playrooms costing $10,000 that felt cold and styled-for-Instagram rather than genuinely magical. And I’ve seen $150 playroom transformations that left kids breathless.
The difference was never budget — it was the thoughtfulness of the design choices and whether those choices were made with a specific child’s sense of wonder in mind.
These ten whimsical indoor playroom ideas cap out at very modest cost. Most of these ideas can be executed for under $50 each.
Some cost almost nothing if you already have basic craft supplies.
I’ve included the actual price ranges so you can plan realistically, because the worst feeling in any creative project is getting halfway through and realizing you’ve overshot your budget.
That doesn’t happen when you know the numbers upfront.
Let’s make something genuinely beautiful without spending a fortune.
1. DIY Fairy Light Cloud Mobile
Cut cloud shapes from white felt or foam board, stuff with polyester fiberfill for dimension, and hang them at varying heights from the ceiling on invisible fishing line. Tuck warm mini fairy lights inside each cloud so they glow softly from within. The entire project costs $15–$25 and creates a ceiling installation that looks like it came from a high-end nursery catalog. Kids lie on the floor and watch them glow for long stretches of time — which tells you everything about how effective the effect actually is.
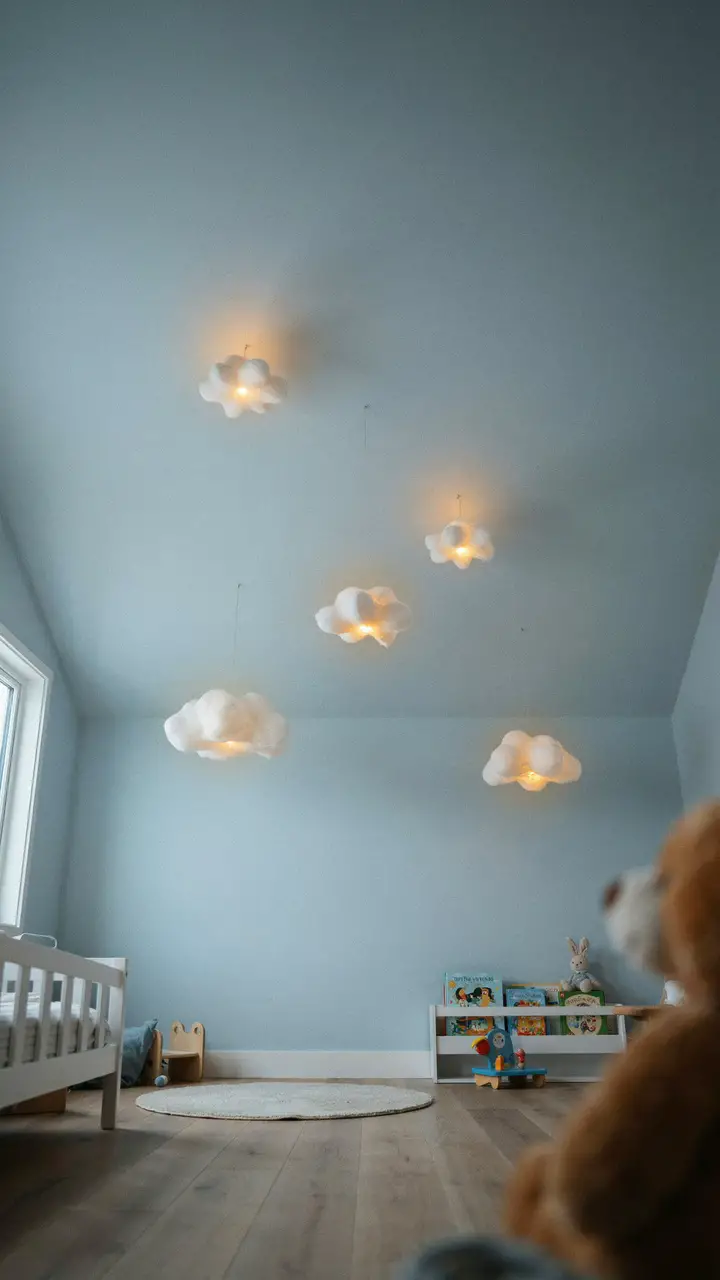
How to Recreate This Look
- Shopping list: White felt sheets ($2–$3 each, need 4–6 sheets), polyester fiberfill stuffing ($5–$8), warm mini LED string lights ($8–$15 for a strand you can portion into clouds), fishing line ($3–$5), ceiling hooks ($5–$10 for a pack), hot glue gun ($8–$12 if you don’t own one)
- Step-by-step: Cut two matching cloud shapes per cloud (approximately 10–14 inches wide). Hot glue edges together leaving a gap for stuffing. Stuff lightly with fiberfill, tuck in a small section of fairy lights with the wire exiting at the top, then glue shut. Thread fishing line through the top and tie a loop for hanging. Hang from ceiling hooks at varied heights. Power lights through a shared extension cord with a smart plug.
- Style compatibility: Works in any playroom theme — cloud mobiles are universally loved. Pairs with sky blue, white, soft gray, and pastel palettes. Works in both minimalist and maximalist rooms.
- Budget breakdown: Under $25: complete cloud mobile installation for 6 clouds. $25–$50: upgrade to larger clouds with denser stuffing + better quality fairy lights. $50–$100: add a scalloped cloud-pattern ceiling border painted in white around the mobile cluster for a more polished finish.
- Space requirements: Works in any ceiling height 7.5 ft or taller. Plan cloud placement so the lowest one hangs at approximately 5 feet from the floor — safe for children while still feeling immersive.
- Difficulty level: Beginner. Hot glue gun required but no sewing skills needed. The entire project takes 2–3 hours.
- Durability: Felt holds up well long-term. Polyester stuffing maintains shape for years. LED lights last 5+ years. Fishing line is virtually invisible and extremely strong.
- Seasonal adaptability: Add silver or gold glitter to clouds for winter holiday season. Swap to pastel-tinted clouds (blush, mint) for spring. Natural white reads beautifully year-round.
- Common mistakes: Overstuffing clouds so they lose their delicate silhouette and look lumpy. Using battery-powered lights where the battery pack becomes visible — plan the wiring route before gluing closed.
- Maintenance: Dust clouds monthly with a hair dryer on cool setting. Replace any burned-out lights by opening the cloud’s glued seam, replacing the strand, and re-gluing.
2. Painted Storybook Chalkboard Wall
A chalkboard wall painted in a large arch or window shape — not just a plain rectangle, but a beautiful arched window frame painted in white around it — creates an ever-changing interactive canvas where children draw their own storybook illustrations daily. The arched frame elevates what would otherwise look like a plain painted surface into something that feels like a portal or a storybook page. Total cost: $15–$35 depending on whether you already own brushes and tape.
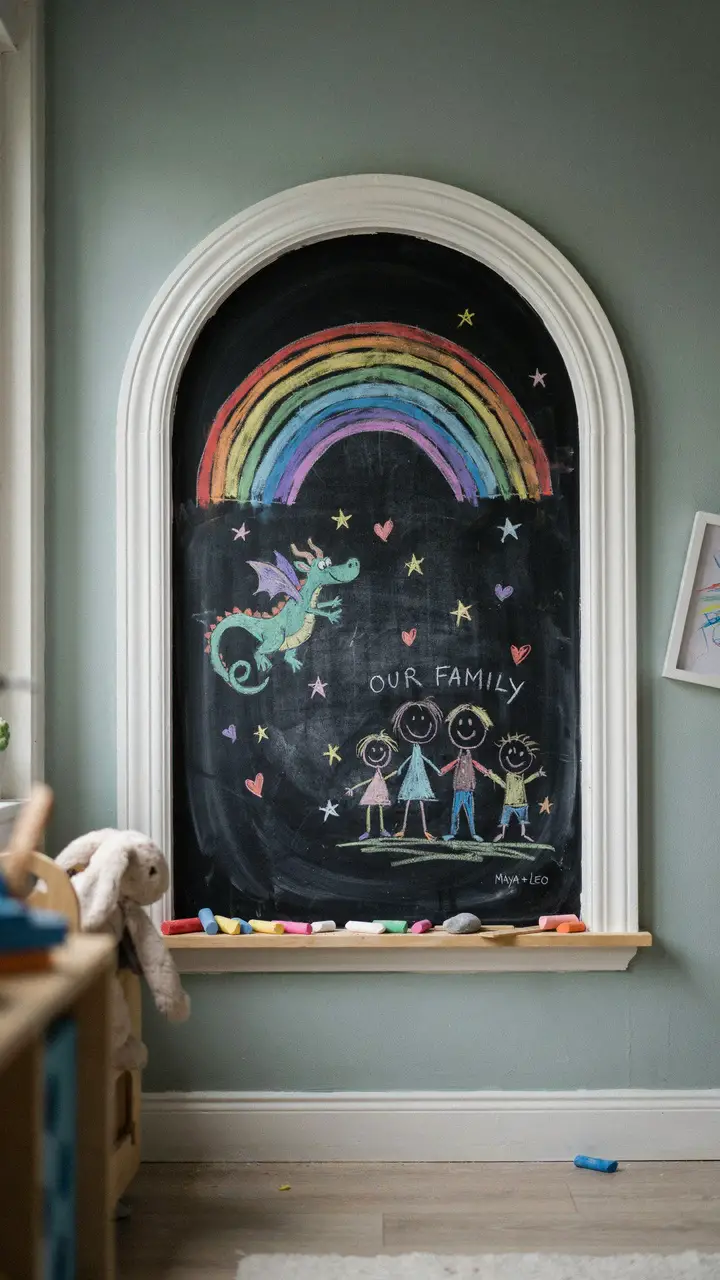
How to Recreate This Look
- Shopping list: Chalkboard paint ($10–$20 at hardware stores, one quart covers approximately 40 sq ft), white paint for arch frame (use leftover wall paint or buy a small sample, $3–$5), painter’s tape ($8–$12), arch template (draw freehand or project using a phone image projector app), chalk set in multiple colors ($5–$10), small wooden ledge for chalk storage ($8–$20)
- Step-by-step: Draw your arch shape on the wall lightly in pencil — approximately 4 ft wide, 5 ft tall arch works beautifully. Apply painter’s tape around the outside of the arch. Paint the arch interior with chalkboard paint (2–3 coats, drying completely between each). Remove tape. Paint the frame border in white using a small brush. Add chalk ledge below the arch. Condition the chalkboard before first use by rubbing chalk over the entire surface and wiping away.
- Style compatibility: Works in virtually any playroom style — the chalkboard itself provides endless flexibility. The arch frame can be painted in any color to match your room’s palette.
- Budget breakdown: Under $35: complete arched chalkboard wall with chalk and ledge. $35–$75: add a second adjacent chalkboard panel in a different shape (circle, star, rectangle). $75–$150: full-wall chalkboard treatment with multiple architectural frame details and a built-in chalk storage shelf.
- Space requirements: The arched chalkboard needs a minimum 4 ft × 5 ft wall section. Works in any room size.
- Difficulty level: Beginner. The painting itself is straightforward — chalkboard paint goes on like regular paint. The arch frame is the detail that makes it special.
- Durability: Chalkboard paint lasts 5–7 years with normal use. The drawing surface stays functional through many rounds of chalk and erasing. Refinish with one new coat of chalkboard paint if the surface begins to feel rough.
- Seasonal adaptability: The chalkboard itself adapts with every drawing. Seasonal drawing prompts (“draw your favorite winter scene!”) keep the surface fresh without any physical changes.
- Common mistakes: Skipping the conditioning step (rubbing chalk over the full surface before first use) — unconditioned chalkboards permanently ghost the first drawing, which is frustrating. Not applying enough coats — two is the minimum, three gives better coverage.
- Maintenance: Wipe with a damp sponge or cloth. Dry thoroughly after wiping — chalk and water create a paste that’s harder to remove if left to dry on the surface.
[Find more whimsical playroom ideas that work in any budget range: Whimsical Playroom Ideas]
3. Upcycled Crate Fairy Village Shelves
Wine crates, wooden produce crates, or standard craft store wooden crates arranged in a staggered wall display create instant whimsical shelving at a fraction of furniture costs. Paint each crate a different soft color — blush, mint, lavender, pale yellow — and add tiny details: a small twig arch above one crate as a “doorway,” a tiny wreath made from wire and dried flowers on another. These become the “houses” of the crate village, and children can arrange and rearrange the tiny decorative elements inside each one.
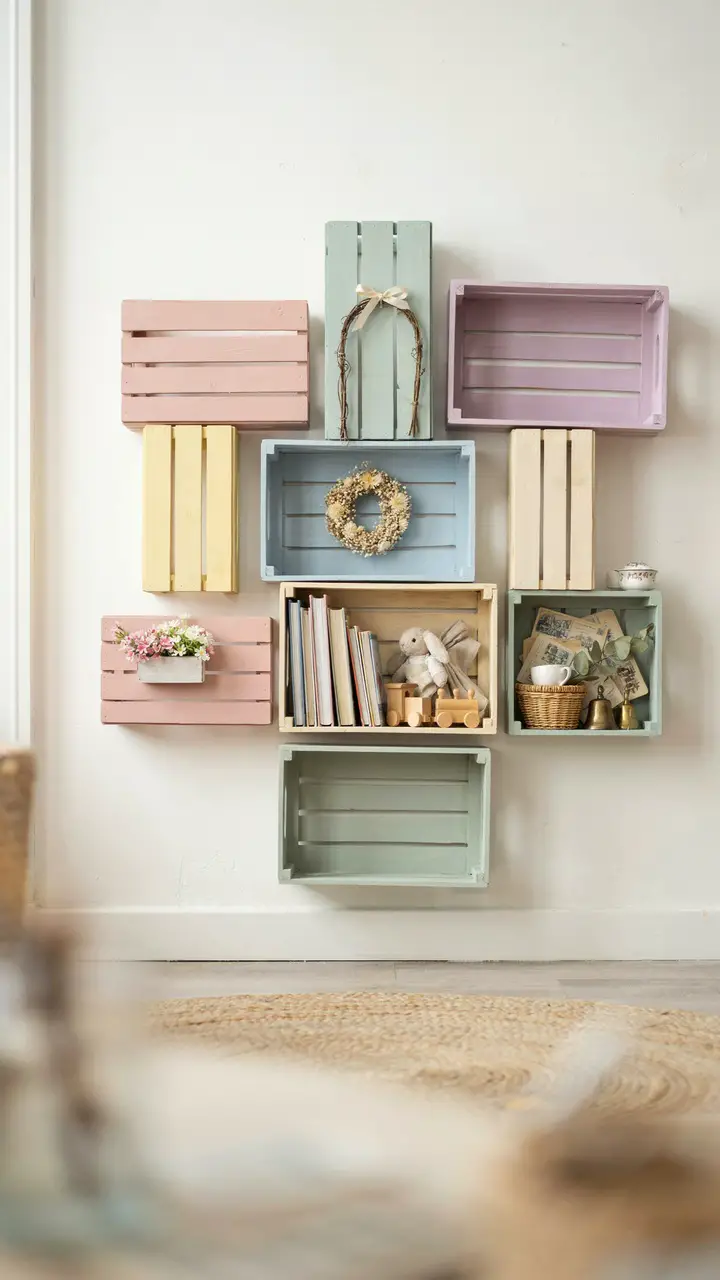
How to Recreate This Look
- Shopping list: Wooden crates ($3–$8 each at craft stores or Michaels, need 6–10), pastel chalk paint ($10–$15 per small container, 4–5 colors), small wire for twig arches ($3–$5), dried flowers for wreaths and window boxes ($5–$10), mounting hardware ($10–$20), clear wax sealant ($8–$12)
- Step-by-step: Paint each crate in a different soft pastel, letting dry completely. Add tiny decorative details — loop wire into arch shapes for doorways, glue tiny dried flowers into small frames for window boxes. Arrange crates on the floor in your desired wall composition before mounting. Mount heavier crates with proper wall anchors, lighter crates with strong picture hanging strips. Seal all painted surfaces with clear wax.
- Style compatibility: Works in cottage, fairy tale, woodland, boho, and whimsical eclectic themes. The soft pastel palette creates a gentle, approachable color story that complements any existing room color.
- Budget breakdown: Under $60: complete 8-crate village display with paint, accessories, and mounting hardware. $60–$120: add coordinated interior accessories for each crate — tiny furniture pieces, curated toys, small plants. $120–$250: commission a local woodworker to create custom crates in varying sizes with built-in detail carving.
- Space requirements: A 6-crate arrangement needs approximately 4 ft wide × 4 ft tall wall space. Scale up or down based on available wall.
- Difficulty level: Beginner. Painting and decorating the crates is genuinely fun. Mounting requires a level and appropriate hardware — intermediate for the installation step.
- Durability: Sealed painted crates last years. Tiny decorative details need occasional regluing. The display is completely reconfigurable — crates can be rearranged, added to, or repainted as interests evolve.
- Seasonal adaptability: Swap the tiny accessories inside each crate seasonally — autumn harvest items, winter miniature holiday scenes, spring flower vignettes, summer beach treasures.
- Common mistakes: Mounting too many crates at once without testing the layout on the floor first — once it’s on the wall, repositioning holes are visible. Choosing colors that are too similar between crates — each should read as its own distinct “house” color.
- Maintenance: Dust crate interiors weekly. Reapply clear wax sealant every 6–12 months. Re-glue any decorative elements that loosen with humidity changes.
4. Paper Lantern Constellation Ceiling
Chinese paper lanterns in white, navy, gold, and silver hung from the ceiling in a constellation pattern — actual astronomical constellations like Orion, the Big Dipper, or Cassiopeia mapped out in lanterns connected by thin string — create a surprisingly sophisticated and magical ceiling installation for under $40. Print a simple constellation map, scale it to your ceiling dimensions, and use it as your hanging guide. Kids learn real astronomy while playing under a ceiling that looks like the night sky brought indoors.
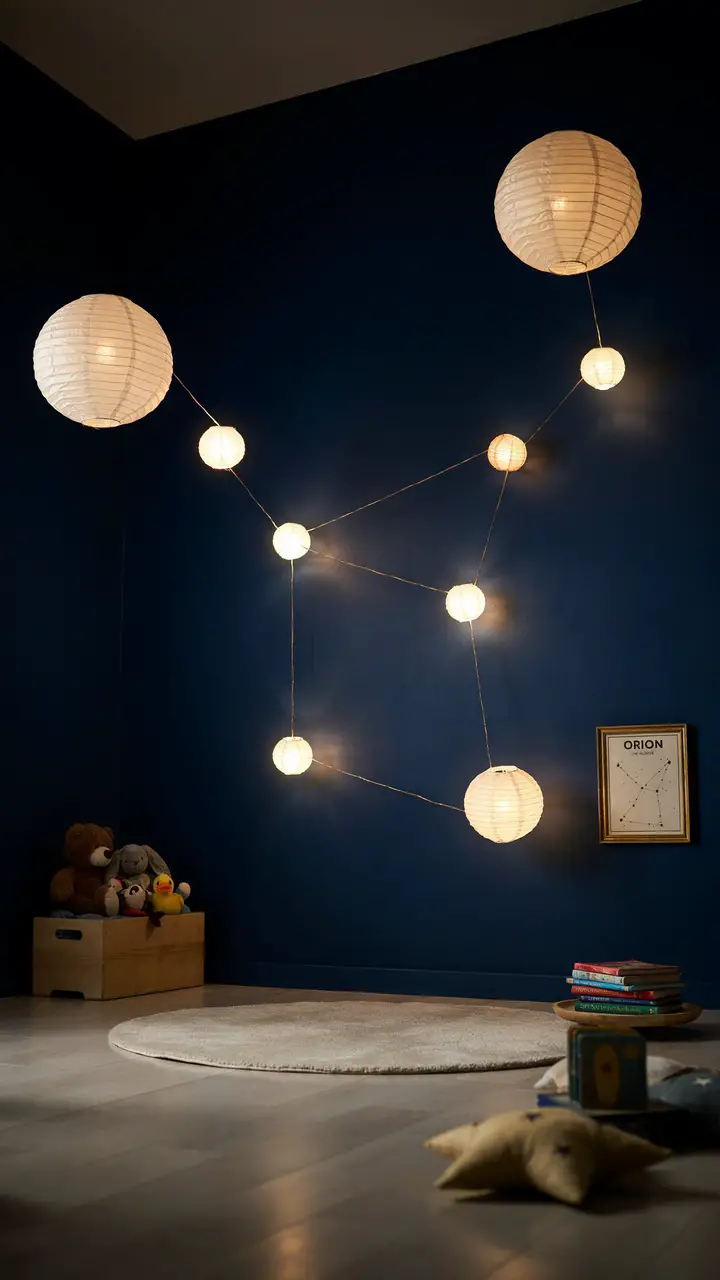
How to Recreate This Look
- Shopping list: White and gold paper lanterns in multiple sizes ($15–$25 for an assorted pack), battery-operated lantern lights or warm LED bulbs ($8–$15), thin gold string or wire ($3–$5), ceiling hooks ($5–$10 for a pack), printable constellation map (free online), navy paint for walls if desired ($25–$40 per gallon)
- Step-by-step: Print a constellation map and scale it to your ceiling dimensions. Mark ceiling hook positions using a soft pencil. Install hooks. Hang lanterns at varied heights — larger ones lower, smaller ones higher. Connect lanterns with thin gold string to show the constellation lines. Insert battery-operated lights in each lantern. Step back and assess the pattern before finalizing any positions.
- Style compatibility: Works in space, astronomy, galaxy, and magical nature themes. Navy walls create a fully immersive night sky effect. Also works against white ceilings for a lighter, more delicate interpretation.
- Budget breakdown: Under $40: paper lanterns + battery lights + hooks + gold string. $40–$80: add navy wall paint for full immersion. $80–$150: add glow-in-the-dark star accents on the walls surrounding the lantern constellation.
- Space requirements: Works in any ceiling size. Scale the constellation to fit your ceiling — larger ceilings can accommodate 2–3 constellations; smaller rooms look stunning with a single detailed one.
- Difficulty level: Beginner to intermediate. The pattern planning requires careful ceiling measurement and hook placement. The installation itself is straightforward.
- Durability: Paper lanterns are delicate but last 2–3 years with careful handling. Replace battery lights as needed. The string connections stay in place indefinitely.
- Seasonal adaptability: Swap paper lanterns seasonally — white and silver in winter, warm gold in autumn, blush in spring. The constellation pattern itself is a permanent, year-round feature.
- Common mistakes: Hanging all lanterns at exactly the same height — the varied heights create depth that makes the constellation feel three-dimensional. Choosing too many different lantern colors that muddy the constellation pattern.
- Maintenance: Dust lanterns monthly with a feather duster or hair dryer on cool setting. Replace battery lights as they dim. Re-thread any broken string connections with fresh gold wire.
[Browse our guide to indoor playroom ideas for budget-friendly transformations: Indoor Playroom Ideas]
5. Thrifted Frame Gallery of Imaginary Creatures
A gallery wall made entirely from thrift store frames — the more mismatched, the better — holding hand-drawn or printed illustrations of imaginary creatures creates a room feature that’s both budget-friendly and completely unique. Draw your own creatures (they don’t need to be professionally executed — childlike drawings have enormous charm), or print free-to-download fantasy creature illustrations from Etsy or Creative Market. Paint all the thrifted frames the same color (I love cream or gold) for a cohesive look that turns an eclectic collection into a curated gallery.
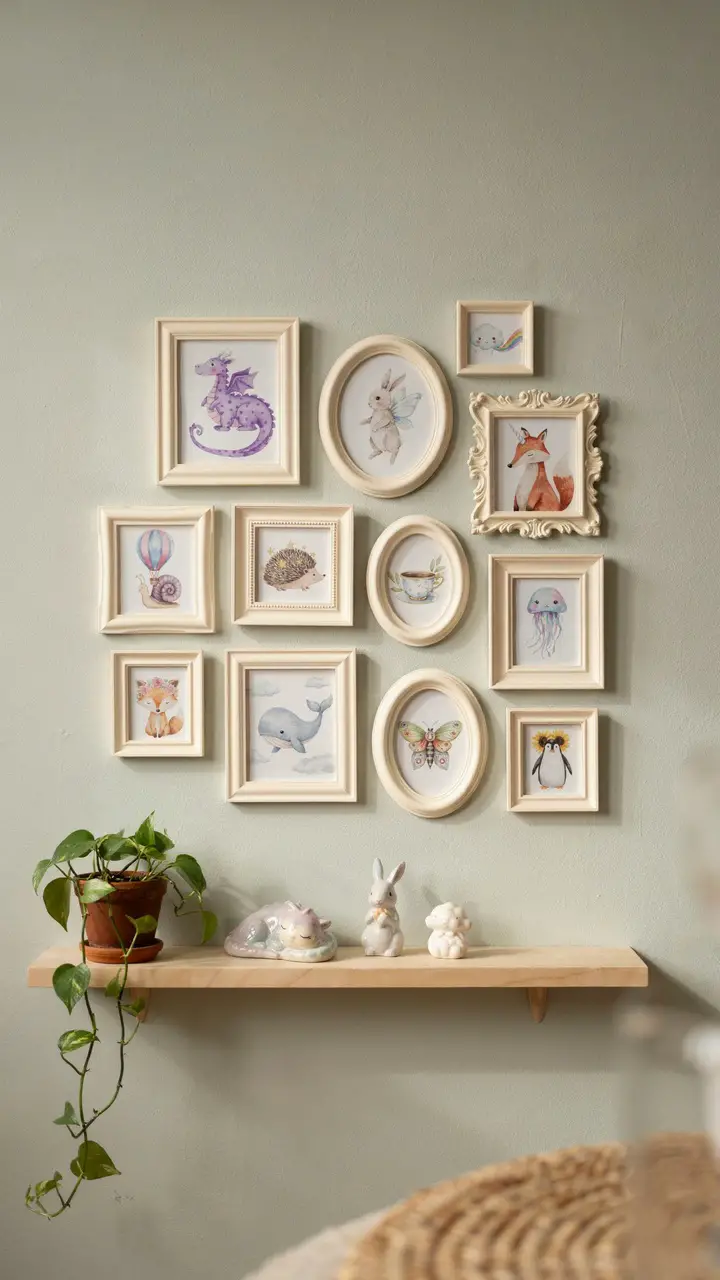
How to Recreate This Look
- Shopping list: Thrifted frames in various sizes ($0.50–$3 each at thrift stores, need 10–15), cream spray paint ($5–$8 a can, covers all frames), imaginary creature illustrations (drawn by child/parent = free; printed digital files from Etsy = $5–$15 for a set), white cardstock for prints ($5 for a ream)
- Step-by-step: Collect frames over several thrift store visits — variety in size and shape creates more visual interest than a matched set. Spray paint all frames in the same cream shade in a well-ventilated area. Print or draw illustrations sized to fit each frame. Arrange composition on the floor first. Hang frames following the composition plan, starting from the center outward.
- Style compatibility: Works in any whimsical, eclectic, or artistic theme. The cream frame unification makes even the most mismatched thrift collection look intentionally curated. Works beautifully alongside any wall color.
- Budget breakdown: Under $30: complete thrifted frame gallery with hand-drawn illustrations. $30–$60: thrifted frames + spray paint + professionally printed illustration set from Etsy. $60–$100: add a small shelf below the gallery with corresponding creature figurines for a three-dimensional storytelling extension.
- Space requirements: Gallery walls work on any wall at least 4 ft wide. Plan the total cluster to fill approximately 60–70% of the wall width.
- Difficulty level: Beginner. Frame-painting is beginner-accessible. Gallery hanging requires patience in the planning stage but no technical skill.
- Durability: Frames last indefinitely. Printed illustrations may fade in direct sunlight — use UV-protective glass where possible. The gallery composition can be refreshed at any time by adding new frames or replacing illustrations.
- Seasonal adaptability: Rotate 2–3 seasonal creature illustrations into the gallery — a harvest creature holding autumn leaves in fall, an ice dragon in winter, a flower fairy in spring.
- Common mistakes: Choosing frames in too many different finishes (silver, black, wood) before spray painting — any finish can be spray-painted, so don’t limit your thrift store finds by existing finish. Hanging frames too far apart, which breaks the gallery cluster effect.
- Maintenance: Dust frames with a dry cloth monthly. Straighten any frames that shift with normal household vibration. Replace any illustrations that fade with fresh reprints.
6. Budget Rainbow Ribbon Curtain Room Divider
A doorway or open arch hung with rainbow ribbon streamers creates a magical portal effect that kids can walk through, look through, and play with constantly. Use satin ribbons in rainbow order tied to a tension rod, cut to floor length, and hang in a doorway between the playroom and a hallway — or use it to divide zones within a larger playroom. Every time a child walks through, the ribbons part and cascade back behind them like entering another world. Total cost: $10–$20.
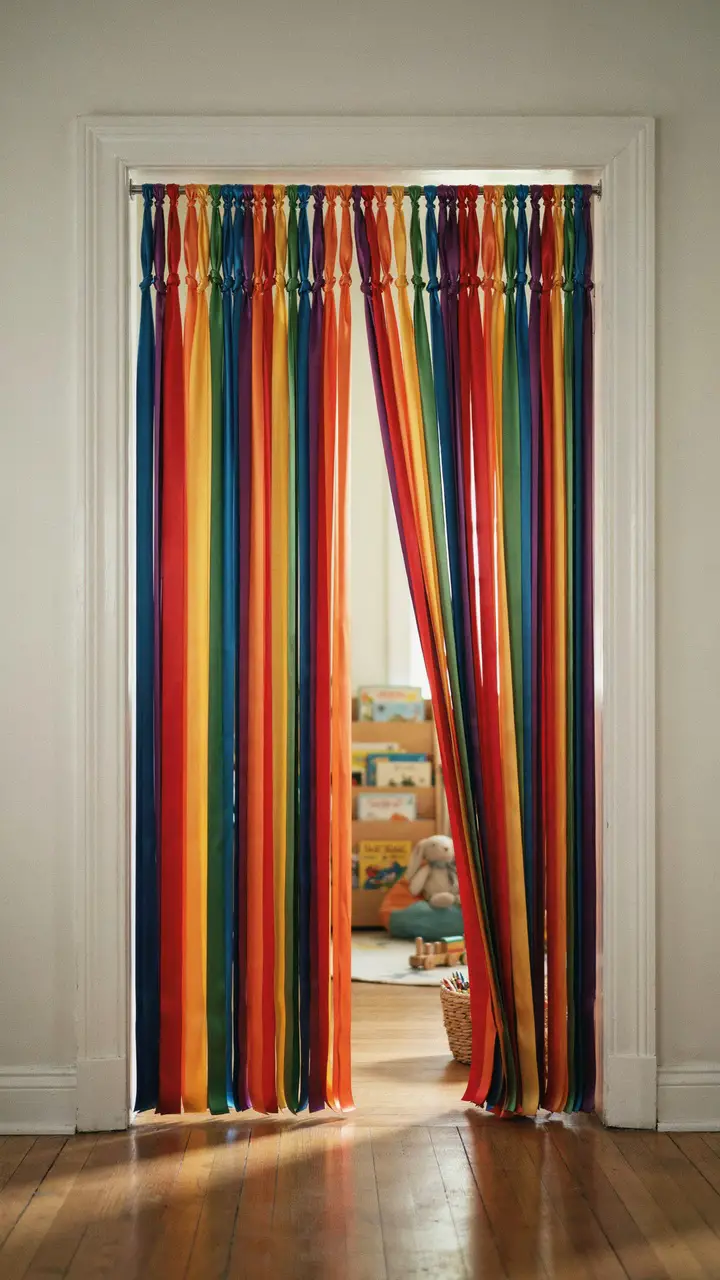
How to Recreate This Look
- Shopping list: Satin ribbon in 7 rainbow colors ($3–$5 per roll, need one roll per color = $21–$35 total; buy narrower 1/4 inch ribbon to use less per roll), tension rod ($5–$10 for a standard doorway size), scissors
- Step-by-step: Cut ribbons to floor length (measure doorway height and add 6 inches for tying). Cut approximately 8–10 ribbon lengths per color. Tie ribbons to tension rod in rainbow order (all reds together, then oranges, then yellows, etc.). Install tension rod in doorway opening. Trim any uneven ribbon ends to create a clean floor-length hem.
- Style compatibility: Works in rainbow, whimsical, fairy, and general color-themed rooms. The rainbow ribbon curtain is one of the most universally loved budget features — every child who sees one immediately wants to walk through it repeatedly. Works in any color scheme room since the rainbow contains all colors.
- Budget breakdown: Under $20: complete rainbow ribbon curtain. $20–$40: use wider satin ribbon for a more luxurious, full curtain effect. $40–$60: add a decorative rod in gold or copper to replace the basic tension rod.
- Space requirements: Works in any standard doorway (approximately 30–36 inches wide). Can also be used as a room divider on a freestanding curtain rod for open floor plans.
- Difficulty level: Beginner. The most time-consuming part is cutting even ribbon lengths. The entire project takes under an hour.
- Durability: Satin ribbon holds up well to regular use. Individual ribbons may fray at cut ends — apply a small dab of clear nail polish to each ribbon end to prevent fraying.
- Seasonal adaptability: Swap rainbow ribbons for seasonal color sets — autumn golds and deep reds, winter silvers and whites, spring pastels. Use the same tension rod year-round and simply retie with new seasonal colors.
- Common mistakes: Cutting ribbons too short — they should reach the floor for maximum drama. Too few ribbons per color leaves the curtain looking sparse; aim for at least 8 ribbons per color.
- Maintenance: Hand wash individual ribbons if they become dusty or soiled. Retie any ribbons that slip off the rod. Replace severely frayed ribbons with fresh cuts from the same ribbon roll.
[Explore creative playroom setups for kids that use color, texture, and simple materials beautifully: Creative Playroom Setups for Kids]
7. Mason Jar Terrarium Fairy Gardens
Small mason jars transformed into terrarium fairy gardens — tiny moss landscapes with miniature fairy doors, pebble paths, and miniature mushroom figurines — cost almost nothing to make and create enchanting tabletop displays that children find completely irresistible. The jars double as learning tools (basic plant care, ecosystem concepts) and imaginative play props. Make 3–5 in a coordinating series and display them on a floating shelf — they look like a miniature fairy neighborhood.
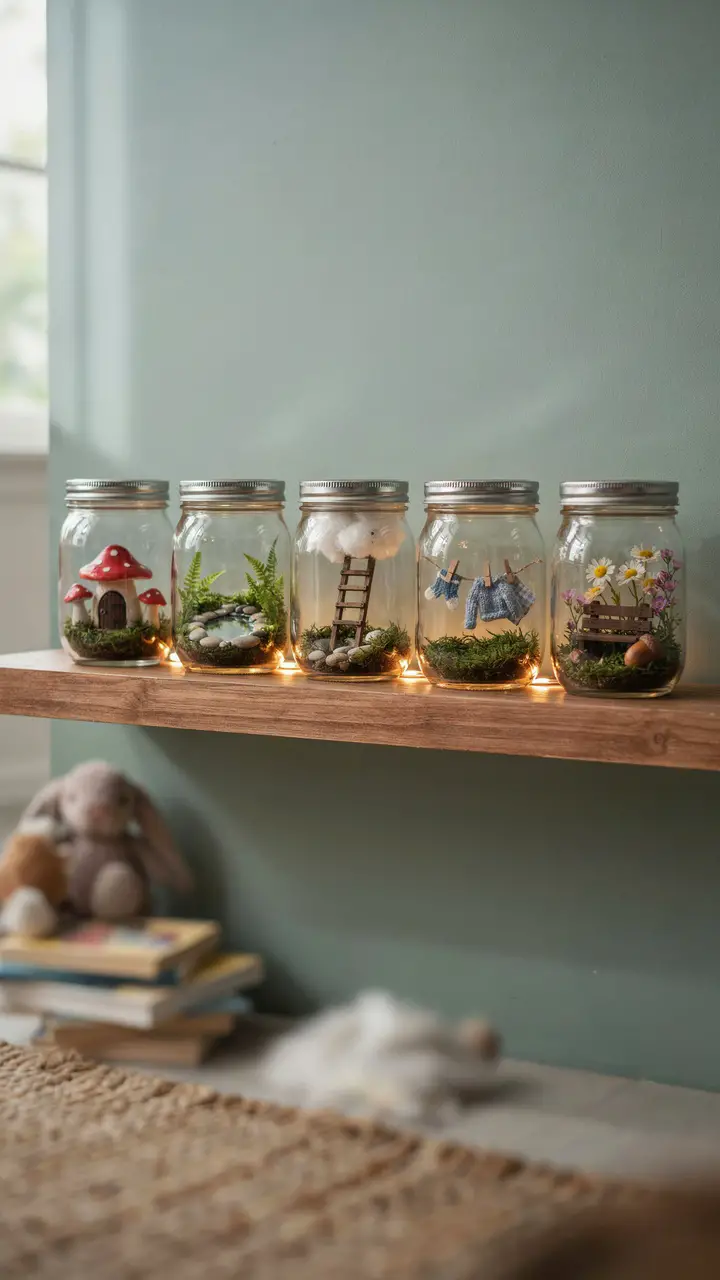
How to Recreate This Look
- Shopping list: Mason jars (wide-mouth quart size works best, $8–$12 for a pack of 6), sheet moss ($8–$12 at craft stores), miniature fairy garden accessories ($10–$20 for a starter set — mushroom houses, tiny doors, miniature animals, etc.), small pebbles ($3–$5), activated charcoal ($5–$8 for drainage layer), small ferns or air plants for living jars ($3–$6 each)
- Step-by-step: Add a thin layer of pebbles to each jar for drainage. Add a small amount of activated charcoal. Layer in potting soil or moss as the base landscape. Arrange miniature accessories to tell a tiny story in each jar. Add a small air plant or fern if desired (they thrive in closed or semi-closed jar environments). Display on shelf with the LED strip lighting below for the glowing effect.
- Style compatibility: Works beautifully in woodland, forest, fairy, and nature themes. The terrarium jars are especially powerful alongside the enchanted forest design elements — they bring the forest narrative down to a miniature, tactile scale.
- Budget breakdown: Under $30: complete 5-jar fairy garden terrarium collection. $30–$60: add quality miniature accessories from a specialty fairy garden store + living plants. $60–$100: add LED strip lighting under display shelf for the glowing effect + premium miniature accessories.
- Space requirements: A 5-jar display needs approximately 3 linear feet of shelf space. Each jar footprint is about 4 inches in diameter.
- Difficulty level: Beginner. This is an ideal parent-child craft project that children from age 4 can participate in.
- Durability: Living terrariums need occasional misting and indirect light. Moss-only terrariums require almost no maintenance. Miniature accessories last indefinitely. Jars last forever.
- Seasonal adaptability: Refresh accessories seasonally — autumn harvest miniatures in fall, icy winter scene in winter, spring flower scene in spring. Living moss and plants can stay year-round.
- Common mistakes: Overwatering living terrariums — most jar ecosystems need misting only once every 1–2 weeks. Packing too many accessories into each jar so the tiny landscape reads as cluttered rather than discoverable.
- Maintenance: Mist living terrariums weekly. Remove any dead plant material promptly. Polish jar exteriors with glass cleaner monthly to maintain clarity and visibility.
8. Glow-in-the-Dark Star Map Ceiling
Glow-in-the-dark star stickers arranged in actual constellation patterns on a dark ceiling create a bedtime magic that kids never fully tire of — lying in bed (or on a playroom floor cushion) looking up at their own personal night sky. Use a printable star map for your hemisphere to get the constellations accurate, or invent your own personal constellations by making up stories about the star patterns. The stickers cost $8–$15 and take about an hour to arrange. The magical effect lasts for years.

How to Recreate This Look
- Shopping list: Glow-in-the-dark star stickers in multiple sizes ($8–$15 at Amazon or toy stores — get at least 500 for a full ceiling), deep navy ceiling paint ($25–$40), printable star map (free from star map websites), step ladder
- Step-by-step: Paint ceiling navy blue first. While paint dries, print your star map and identify the major constellations you want to feature. Scale constellation positions to your ceiling size. Using the printout as a reference, arrange large stickers for bright stars and small stickers for faint stars. Apply constellation clusters first, then fill surrounding space with scattered individual stars. Charge stars by shining a flashlight on them before testing in darkness.
- Style compatibility: Works in space, galaxy, astronomy, and enchanted night sky themes. The navy ceiling base creates a dramatic effect. Works beautifully alongside cloud mobiles and other sky-themed elements.
- Budget breakdown: Under $40: complete glow-in-the-dark star ceiling with navy paint. $40–$80: add a constellation projector for additional real-time star display. $80–$150: commission a large printed vinyl star map ceiling decal for a more polished, accurate star chart appearance.
- Space requirements: Works on any ceiling size. More ceiling area = more immersive star sky effect.
- Difficulty level: Beginner for sticker application. Intermediate for the ceiling painting (dark paint requires good coverage technique to avoid streaks).
- Durability: Glow stickers maintain their phosphorescent quality for 3–5 years. Navy paint lasts indefinitely. Replace individual stars that lose their glow with fresh stickers.
- Seasonal adaptability: The star ceiling is a permanent, year-round feature. Add seasonal constellation story cards that reference which constellations are visible in each season from your region.
- Common mistakes: Placing all stars at the same density — real night skies have dense cluster areas and sparse areas. Varying star density creates authenticity. Not charging stars sufficiently before bedtime — they need at least 5 minutes of bright light exposure.
- Maintenance: Wipe ceiling around stars gently with a barely damp cloth if needed. Replace individual stars that fall off (they re-adhere easily if the backing is still sticky). Re-charge all stars with a UV flashlight if their glow diminishes over time.
[Find even more whimsical playroom ideas that create magic on any budget: Whimsical Playroom Ideas]
9. Painted Pebble Story Stones
A collection of painted story stones — smooth river pebbles decorated with characters, settings, and objects from fairy tales and imagination — creates one of the richest, most open-ended play resources possible at a cost of almost nothing. Children use them to tell stories, build narrative sequences, create their own fairy tale worlds, or simply arrange them in beautiful patterns. A set of 20–30 story stones in a hand-painted wooden bowl or basket looks beautiful as a display and gets used every single day.
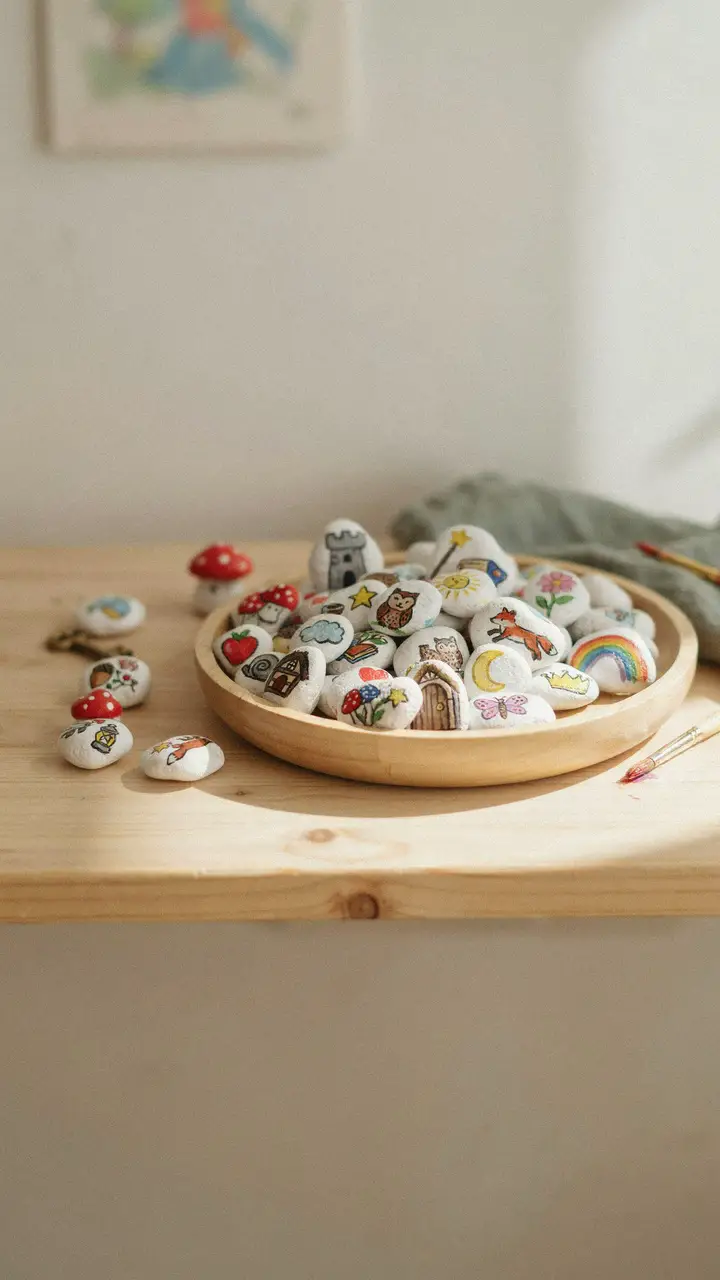
How to Recreate This Look
- Shopping list: Smooth river pebbles (collect free from nature or purchase $5–$10 per bag at craft stores), acrylic paint in multiple colors ($8–$15 for a small set), fine paintbrushes ($5–$10 for an assortment), clear sealant spray ($5–$8), wooden bowl or basket for display ($8–$20)
- Step-by-step: Wash and dry pebbles thoroughly. Paint each pebble with a single fairy tale element — keep designs simple, with clean color fills and minimal detail. Let each pebble dry completely before applying sealant. Spray all finished pebbles with 2 coats of clear sealant for durability. Display in bowl with a few arranged around the outside. Introduce children to story stone play with a demonstration story before letting them explore freely.
- Style compatibility: Works in any fairy tale, woodland, whimsical, or Montessori-inspired room. The stones look beautiful in any palette — choose paint colors to match the room’s existing color story. Pairs especially well with the mason jar terrarium display.
- Budget breakdown: Under $20: complete story stone collection if pebbles are collected from nature free. $20–$40: purchased pebble collection + quality acrylic paints + display bowl. $40–$60: add a story stone storage bag and carrying case so the stones travel to imaginative play anywhere in the home.
- Space requirements: A display bowl takes approximately 12 inches of shelf space. Works on any surface — windowsill, console, floating shelf, or coffee table.
- Difficulty level: Beginner. Simple designs work better than complex ones — thick acrylic paint, simple shapes, bold colors. A perfect rainy afternoon project to do with children.
- Durability: Sealed story stones last for years of heavy use. Re-spray with clear sealant annually to maintain durability. Individual stones can be repainted if the design chips or if children want new characters.
- Seasonal adaptability: Create seasonal story stone additions throughout the year — harvest vegetables and autumn animals for fall, snowflakes and winter animals for winter, spring flowers and baby birds for spring.
- Common mistakes: Using too fine a brush for details that can’t be maintained at pebble scale — simple bold designs read better than tiny intricate ones. Skipping the sealant — unseealed paint rubs off quickly with handling.
- Maintenance: Wipe stones with a damp cloth occasionally. Re-spray sealant annually. Store in a bowl or bag rather than loose on a shelf to prevent chips and scattering.
10. Homemade Puppet Show Theater from a Cardboard Box
A large appliance cardboard box transformed into a painted puppet theater costs essentially nothing (appliance stores often give away boxes for free) and creates one of the most used features in any budget playroom. Cut a rectangular stage opening, paint the exterior in bright colors with curtain details, a proscenium arch, and a theater name in bold letters, and add a piece of fabric inside the opening for curtains. Kids produce shows for each other, for parents, and for their stuffed animal audiences for years on end.
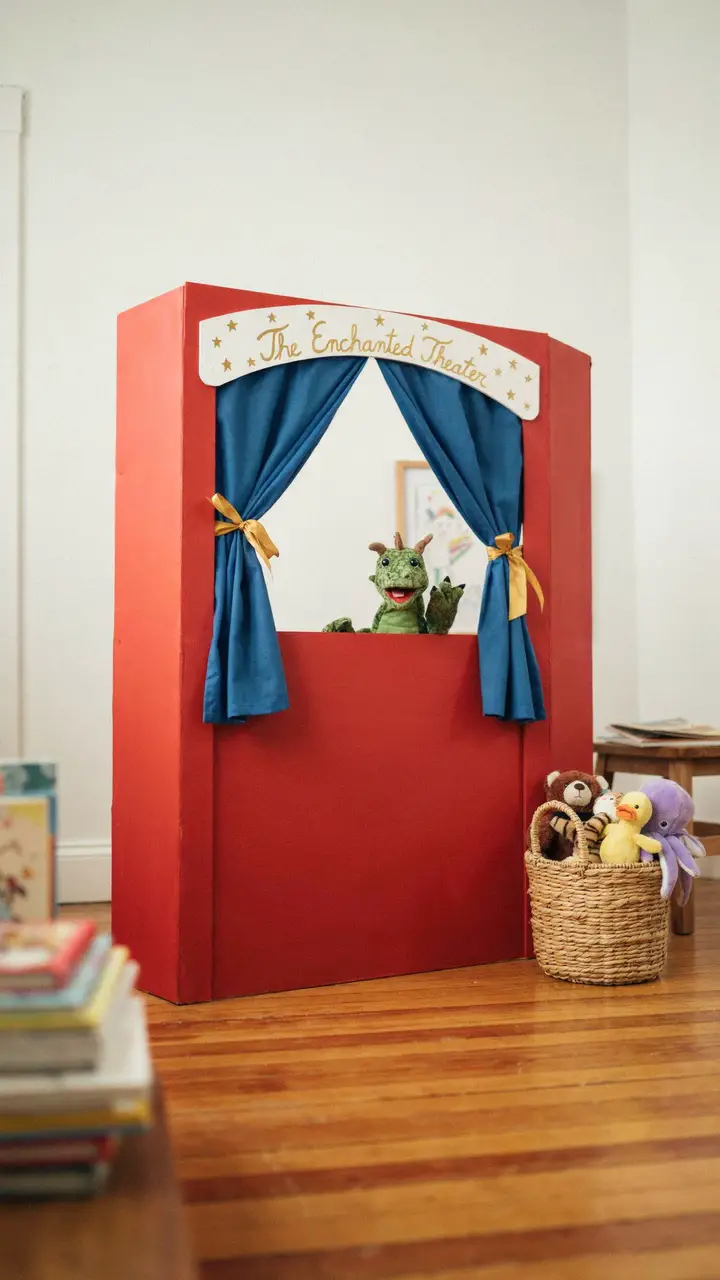
How to Recreate This Look
- Shopping list: Large cardboard appliance box (free from appliance stores), acrylic or latex paint in chosen theater colors ($8–$15 for leftover paint or small containers), craft knife for cutting the stage opening, fabric for curtains ($5–$10 for 1 yard of velvet or cotton), gold ribbon ($3–$5), puppet collection ($20–$50 for a starter set, or make hand puppets from socks for free)
- Step-by-step: Cut the box stage opening approximately 18 inches wide by 12 inches tall, positioned in the upper third of the box front. Paint entire exterior in your chosen theater colors. Add painted curtain details, arch, and theater name using a small brush. Cut fabric curtains slightly wider than the opening and attach to the top of the opening with glue or staples. Tie curtains back with ribbon. The box’s open top allows puppeteers to stand inside and operate puppets above.
- Style compatibility: Works in theatrical, fairy tale, whimsical, and all general playroom themes. The theater can be painted to match any theme — gothic castle for fairy tale rooms, colorful stripes for a circus, woodland tones for a forest theme.
- Budget breakdown: Under $25: complete puppet theater if using leftover paint + free box + sock puppets. $25–$60: premium paint colors + quality fabric curtains + basic puppet set. $60–$100: add themed backdrop panels that drop inside the theater for scene changes + a quality 10-piece puppet set.
- Space requirements: Large appliance boxes measure approximately 3×2 ft footprint. Allow additional floor space in front for the puppet audience seating area.
- Difficulty level: Beginner. The craft knife for cutting the stage opening is the only tool required. All other steps are painting and gluing.
- Durability: Cardboard theaters last 6–12 months of heavy use before needing reinforcement or replacement. Reinforce the cut edges with packing tape for longevity. When this one wears out, simply repeat with a fresh free box — the design skills carry forward.
- Seasonal adaptability: Repaint the theater seasonally with a fresh coat and new color scheme — this is one of the few features that actually benefits from a seasonal complete overhaul since the labor cost is zero.
- Common mistakes: Cutting the stage opening too small for puppet movement — minimum 18 inches wide and 12 inches tall. Choosing water-based paint that bleeds or bubbles on the cardboard — apply a thin base coat and let dry completely before adding color coats.
- Maintenance: Reinforce any weakened cardboard edges with packing tape. Touch up paint chips with original colors. Replace the theater entirely when the cardboard loses structural integrity — the process of building a new one is half the fun.
[Explore our playroom storage ideas for budget-friendly organization in whimsical rooms: Playroom Storage Ideas]
Magic on a Shoestring
The most consistent discovery across all ten of these budget ideas is that children genuinely don’t notice cost — they notice magic. A $15 cloud mobile hanging from the ceiling. A cardboard puppet theater their parent painted with stars. A bowl of story stones they helped paint on a rainy Saturday. These are the playroom features children remember most clearly decades later, precisely because they were made with love and intention rather than ordered from a catalog.
The budget constraint isn’t a limitation here. It’s the framework that pushes creative thinking toward its most interesting solutions. Start with one idea that costs under $20. Build from there. Let the room grow gradually, each new addition carefully chosen for maximum enchantment per dollar. You’ll end up with a playroom that feels more thoughtfully made than any room designed by a professional with an unlimited budget — because yours was designed with knowledge of one specific child.
That’s the kind of magic no budget can buy.

Greetings, I’m Alex – an expert in the art of naming teams, groups or brands, and businesses. With years of experience as a consultant for some of the most recognized companies out there, I want to pass on my knowledge and share tips that will help you craft an unforgettable name for your project through TeamGroupNames.Com!