
Somewhere between a child’s first couch cushion fort and their grown-up love of cozy corner cafes lies the magic of the indoor playhouse.
A playhouse inside a playroom gives children the most coveted thing in childhood: a space within a space—their own world inside your world.
Add a whimsical theme, and that little house becomes a fairy cottage, a wizard’s tower, an enchanted treehouse, or a royal castle. The stories that unfold inside are limited only by imagination.
The best whimsical indoor playhouses have one thing in common: they feel fully realized.
Not just a plywood box with a door cutout, but a space with character—a window box overflowing with faux flowers, a tiny chalkboard sign with today’s imaginary shop specials, or a peaked roof with painted shingles and a weathervane spinning in a draft.
When a playhouse has those details, children stop treating it as a toy and start treating it as a genuine destination.
Whether you’re working with a ready-made playhouse kit or starting from scratch with lumber and imagination, these ten ideas will show you how to surround an indoor playhouse with a world that makes the whole playroom feel enchanted.
And once you see what a themed playhouse does for the atmosphere of an entire room, you’ll understand why this might just be the best home investment you make all year.
1. Enchanted Fairy Cottage Playhouse
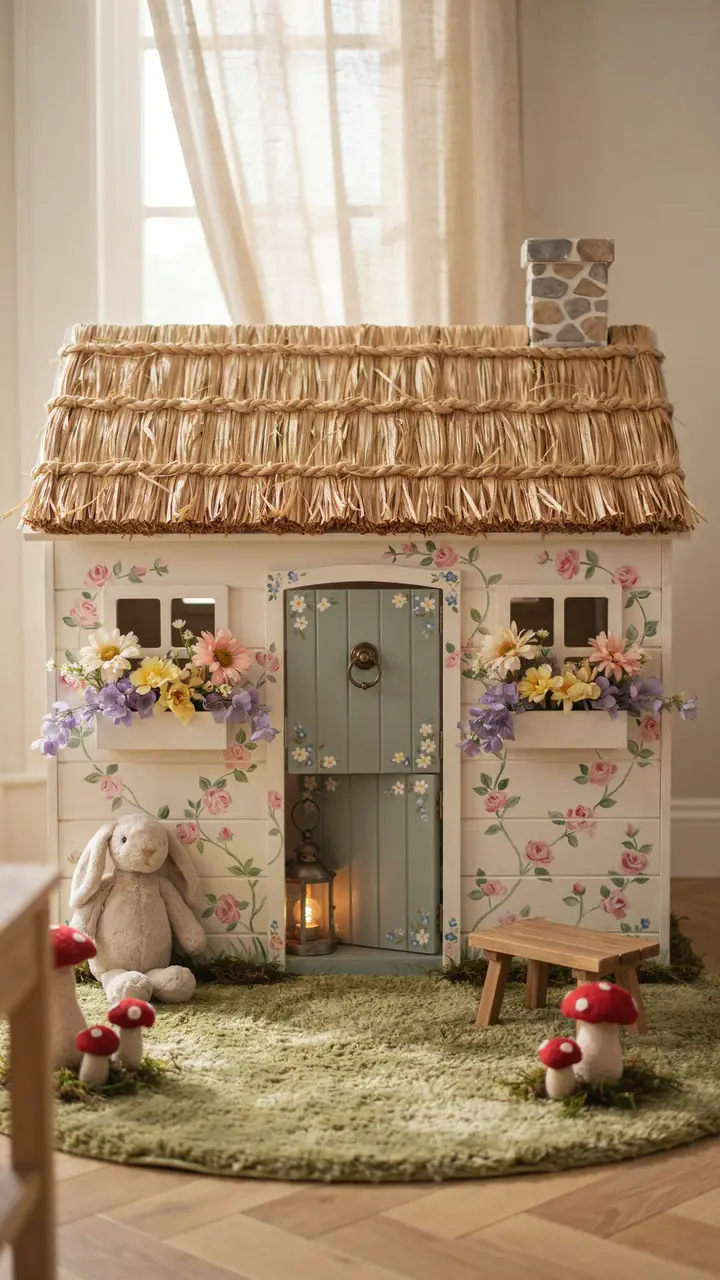
Transform a standard wooden playhouse into a fairy cottage with climbing rose vines painted up the exterior walls, faux thatched roof texture created with twisted paper-rope, window boxes overflowing with fabric wildflowers, and a Dutch door painted in sage green with a tiny brass knocker. Inside, line the walls with a hand-painted floral mural, add a low round table with two toadstool stools, and hang a tiny lantern from the ceiling. The fairy cottage thrives in rooms that can commit to the full botanical aesthetic—everywhere you look, there should be a detail that delights.
How to Recreate This Look
- Shopping list: Wooden playhouse kit ($200–$500) or plywood DIY ($80–$200), cream, sage green, pink, and green paint ($30–$60), twisted paper rope for thatching ($15–$30), fabric wildflowers ($20–$40), two window boxes ($15–$30 each), small brass-look knocker ($8–$15), toadstool stools ($30–$80 each), small round table ($20–$60), tiny plug-in or battery lantern ($15–$30), floral wall mural stencil or freehand ($15–$30)
- Step-by-step: Assemble or build the playhouse frame. Paint exterior cream. Add rose vine murals with a fine brush or stencil. Glue or pin twisted paper rope to the roof in horizontal rows to mimic thatch; paint honey gold. Paint the Dutch door sage green. Mount window boxes and fill with fabric flowers. Paint a floral interior mural. Set up toadstool stools and round table inside. Hang the lantern from the interior ceiling.
- Style compatibility: Fairy tale, botanical, cottage core, and English garden themes. Works with green, cream, pink, and gold palettes.
- Budget breakdown: Under $100 (painted cardboard playhouse + fabric flowers + DIY stools) / $100–$500 (wood kit + full paint treatment + proper accessories + lantern) / $500+ (custom-built cottage with fitted interior + professional mural + bespoke furniture)
- Space requirements: Most playhouse kits require a 4×5 foot minimum footprint. Allow 3–4 feet of open space around the exterior for the full “cottage garden” effect.
- Difficulty: Intermediate. The thatching technique and vine painting take patience but no advanced skills.
- Durability: Wood playhouses are highly durable. Fabric flowers may need occasional fluffing and replacement after 2–3 years.
- Seasonal adaptability: Swap window box flowers by season: tulips in spring, sunflowers in summer, mini pumpkins in autumn, holly in winter.
- Common mistakes: Using fabric that’s too bright for the wildflower arrangements—choose muted, vintage-toned florals for an authentic fairy tale feel rather than neon primary colors.
- Maintenance: Wipe exterior with a damp cloth as needed. Touch up painted vines where they chip. Replace paper rope thatching if sections loosen—re-glue with craft adhesive.
2. Royal Castle Keep Playhouse
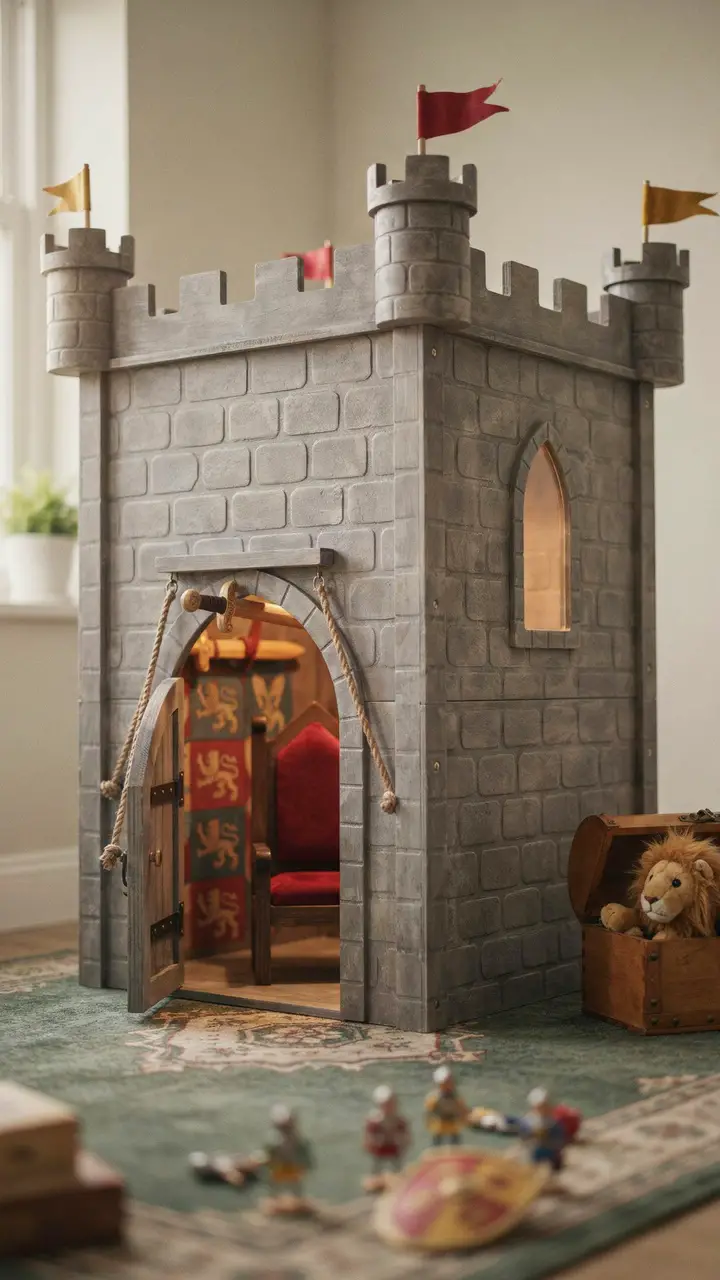
Build or buy a playhouse and transform it into a full castle keep: add cardboard or MDF battlements (alternating crenellations) along the roofline, paint the exterior in warm stone gray with a sponge-texture stone block pattern, and hang a drawbridge-style door at the entrance that lifts on rope pulleys. Inside, wallpaper the interior with a medieval tapestry-look print, add a low throne-style chair, and mount a foam sword and shield on the interior wall. The castle keep is one of the most universally appealing playhouse themes because it works for both knights and princesses, making it an ideal choice for siblings or gender-neutral rooms.
How to Recreate This Look
- Shopping list: Playhouse kit or plywood build ($100–$500), gray, charcoal, and white paint for stone texture ($25–$50), MDF or cardboard for battlements ($15–$30), rope for drawbridge pulley ($10–$20), pennant flags in gold and red ($10–$25), medieval tapestry-print peel-and-stick wallpaper ($25–$60), small throne-style chair or stool with cushion ($30–$100), foam sword and shield ($10–$25), amber LED light strip inside ($15–$30)
- Step-by-step: Assemble playhouse. Cut battlements from MDF and attach to roofline. Paint entire exterior in mid-gray base. Sponge-dab darker gray in a grid stone-block pattern. Build the drawbridge from a plywood panel hinged at the base; thread rope through pulleys to raise and lower. Apply tapestry wallpaper inside. Set up throne chair. Mount foam sword on interior wall. Run LED amber strip around interior ceiling.
- Style compatibility: Medieval, knight, princess, fantasy, and adventure themes. Works with stone gray, red, gold, and deep blue palettes.
- Budget breakdown: Under $100 (cardboard castle + basic accessories + painted finish) / $100–$500 (wood kit + MDF battlements + drawbridge + tapestry wallpaper + throne chair) / $500+ (custom-built castle with integrated pulleys + professional stone finish + fitted interior)
- Space requirements: Castle playhouse typically needs 4×5 feet minimum. The drawbridge needs 2–3 feet of clearance in front to lower fully.
- Difficulty: Intermediate to advanced for the drawbridge pulley system. Battlements and stone painting are beginner-accessible.
- Durability: Excellent in wood. Check pulley rope monthly for fraying and replace promptly. Re-paint stone texture every 2–3 years.
- Seasonal adaptability: Swap pennant flag colors seasonally. Add a fabric “winter ice” treatment with white and silver flags and LED candle lighting in winter.
- Common mistakes: Installing the drawbridge without testing the pulley system before painting—fix the mechanics first, then decorate.
- Maintenance: Tighten all rope and hardware components monthly. Sand and repaint battlements if chips appear.
3. Pirate Galleon Playhouse Ship
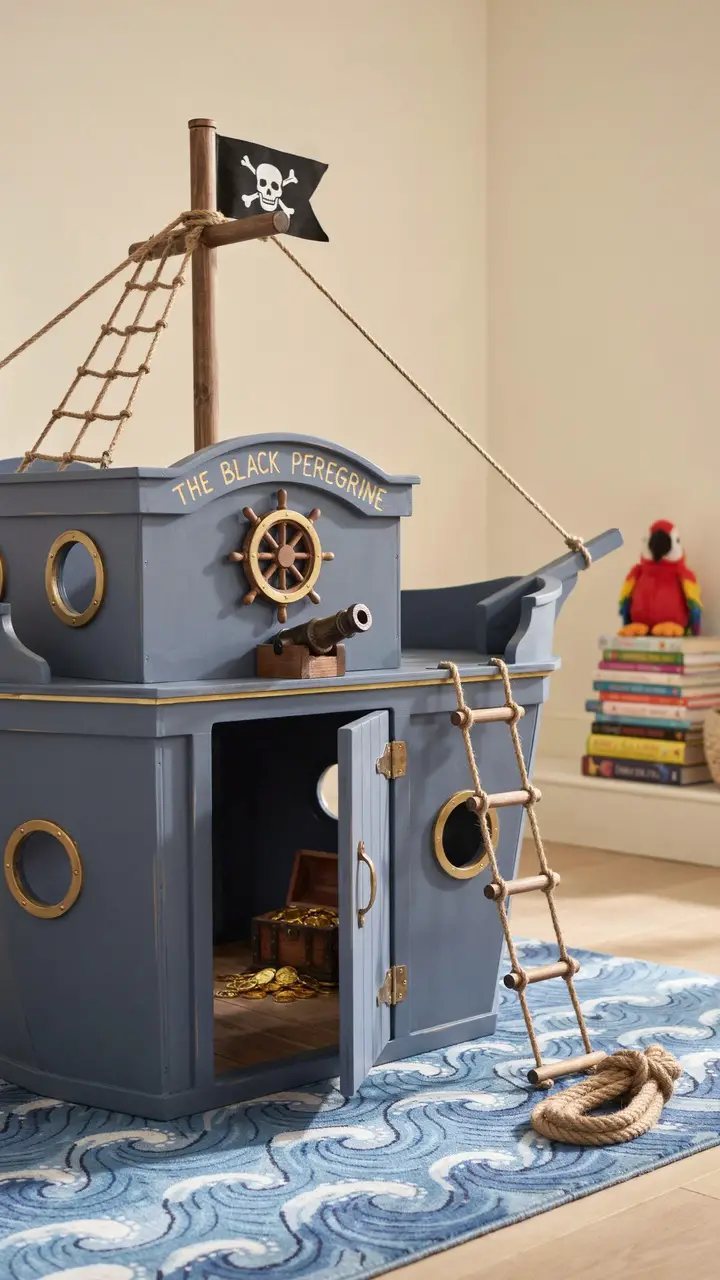
Convert a playhouse into a pirate galleon by adding a prow-shaped extension to the front, mounting a mast with rope rigging and a Jolly Roger flag overhead, and surrounding the base of the playhouse with navy “ocean” floor—a wavy blue floor mat. Paint the hull in dark navy with gold trim, cut portholes in the side panels, and add a ship wheel to the deck-level window. Inside the cabin, store dress-up pirate costumes, treasure maps, and a chest of toy gold coins. This is the playhouse theme that makes every playdate feel like a genuine adventure—no extra activities required.
How to Recreate This Look
- Shopping list: Playhouse kit or plywood build ($100–$500), navy blue and gold paint ($25–$45), MDF for prow extension ($20–$40), wooden dowel for mast ($10–$20), rope for rigging ($10–$20), Jolly Roger flag ($10–$20), ship’s wheel prop ($20–$50), blue wave-pattern floor mat ($40–$100), treasure chest with toy gold coins ($20–$50), rope ladder ($20–$40)
- Step-by-step: Assemble playhouse. Build prow extension from MDF and attach to the front panel. Paint entire exterior navy with gold trim along edges. Cut porthole circles in side walls and add acrylic inserts. Mount mast from a wooden dowel anchored to the roof. Run rope rigging from mast to corners. Fly the Jolly Roger from the mast top. Mount ship’s wheel on the front panel. Lay blue wave mat around the base. Set up the treasure chest inside.
- Style compatibility: Pirate, nautical, ocean, and adventure themes. Works with navy, black, red, and gold palettes.
- Budget breakdown: Under $100 (painted kit + DIY prow + rope rigging + basic accessories) / $100–$500 (full build + proper ship’s wheel + treasure chest + wave mat) / $500+ (custom galleon build with fitted deck + professional nautical paint + full rigging and flag set)
- Space requirements: Galleon playhouse needs 5×5 foot minimum footprint, plus 2–3 feet around for the “ocean” mat surround.
- Difficulty: Intermediate. Prow extension and mast require basic woodworking; overall painting is beginner-accessible.
- Durability: Wood construction is very durable. Rope rigging may fray with heavy play—replace with new rope as needed.
- Seasonal adaptability: Swap Jolly Roger for a seasonal flag—a harvest pennant in autumn, a snowflake flag in winter. The core navy galleon remains perfect year-round.
- Common mistakes: Skipping the prow extension and just painting the front—the prow shape is what makes the playhouse read as a ship rather than just a painted house.
- Maintenance: Check mast anchoring every 3 months. Replace rope rigging annually or when fraying becomes visible.
4. Enchanted Treehouse Playhouse in the Room
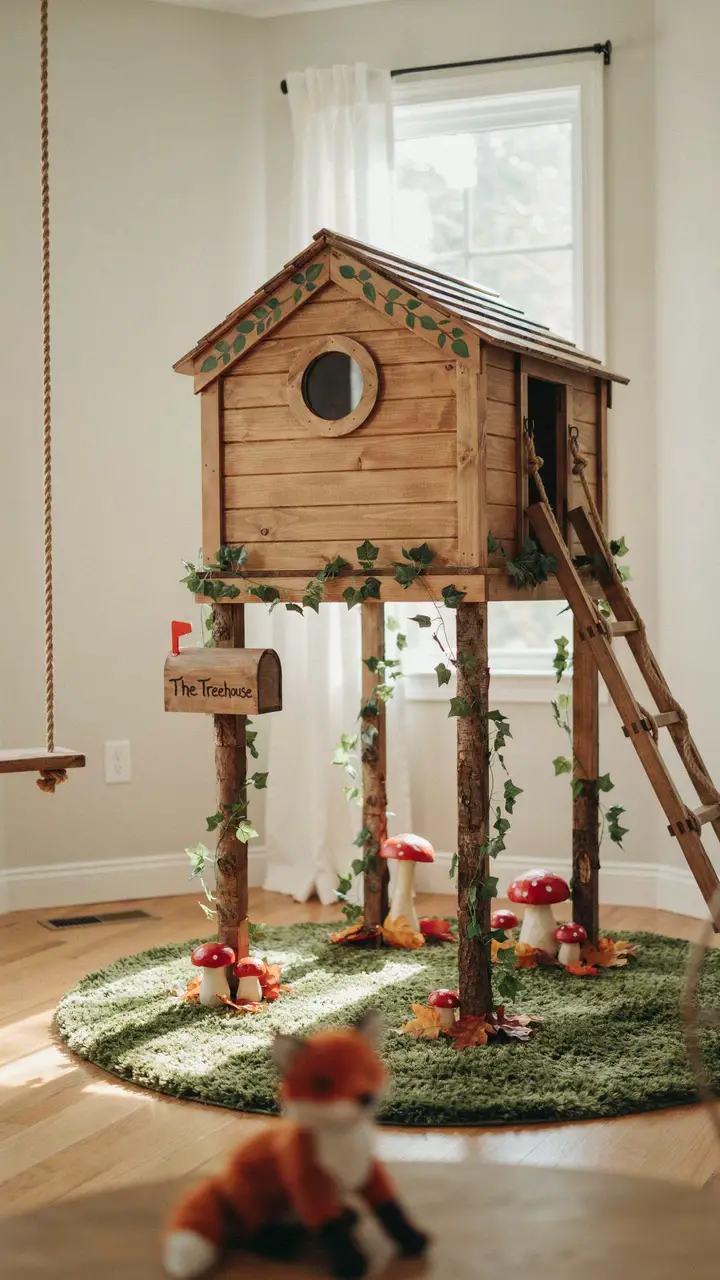
Mount a freestanding treehouse-style playhouse on elevated legs, wrapping the “trunk” legs in bark-texture contact paper, and surrounding the base with a forest floor concept: a textured green rug, mushroom decor, and faux fallen leaves. The treehouse itself sits 18–24 inches above the floor, accessed by a short rope ladder or wooden stair. Paint the exterior in natural wood tones with leaf-motif accents, hang a rope swing from a nearby ceiling-mounted hook, and add a small mailbox on the exterior labeled with your child’s name. This treehouse concept turns the entire section of the playroom into an enchanted forest clearing.
How to Recreate This Look
- Shopping list: Playhouse kit ($150–$400) or DIY plywood build ($80–$200), wooden elevated platform base or short legs ($40–$100), bark-texture contact paper ($20–$40), honey wood stain or paint ($20–$35), rope ladder ($20–$50), faux vine garlands ($20–$40), circular green shaggy rug ($40–$100), mushroom decorations ($10–$25), faux autumn leaves ($8–$20), rope swing ($25–$60), ceiling hook and hardware ($10–$20), small mailbox ($10–$20)
- Step-by-step: Build or assemble playhouse. Attach to elevated platform legs at 18–24 inches. Wrap legs in bark contact paper. Stain or paint cabin in warm wood tones. Add leaf motif accents along eaves. Drape vine garlands from corners. Attach rope ladder to platform edge. Lay green rug below with mushroom and leaf decor. Install ceiling hook and hang rope swing nearby. Mount mailbox on exterior.
- Style compatibility: Enchanted forest, woodland, fairy tale, and adventure themes. Works with green, honey brown, and earthy palettes.
- Budget breakdown: Under $100 (basic kit + bark paper + green rug + simple accessories) / $100–$500 (quality kit + elevated legs + rope ladder + vine garlands + swing) / $500+ (custom-built elevated treehouse + professional bark effect + fitted forest floor scene)
- Space requirements: Treehouse footprint plus swing zone requires approximately 8×8 feet. The elevated access needs a clear 3-foot zone for the rope ladder.
- Difficulty: Intermediate. Elevating the playhouse safely requires careful platform construction and anchoring.
- Durability: Excellent once elevated platform is properly secured. Check leg stability monthly.
- Seasonal adaptability: Swap faux leaf colors from spring green to autumn rust. In winter, add snow-spray to the cabin roof and replace leaf decor with pinecones.
- Common mistakes: Elevating the platform without properly anchoring it—it must be bolted to the floor or secured against a wall to prevent tipping.
- Maintenance: Check rope ladder knots monthly. Re-glue any bark contact paper sections that lift at edges.
5. Storybook Library Bookshop Playhouse
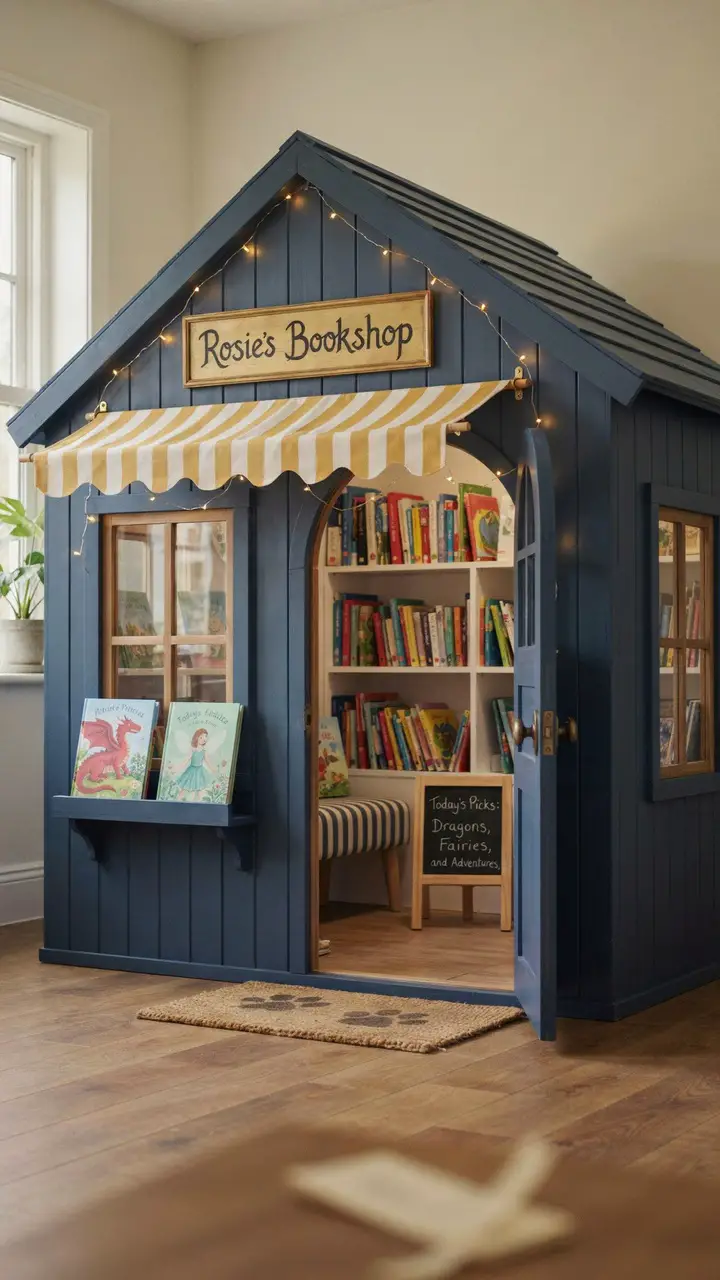
Turn a playhouse into a tiny bookshop: paint the exterior in deep navy with gold lettering reading “[Child’s Name]’s Bookshop,” install a striped fabric awning above the door, and fill the interior with forward-facing book display shelves, a low reading bench, and a small chalkboard “Today’s Picks” sign. A counter-height ledge at the window lets the child “sell” books to imaginary customers through the window—or to willing parents who want to be handed a picture book through a tiny window while pretending to pay in gold coins. The bookshop playhouse celebrates reading as a form of play, making it the cleverest overlap of the two great joys of childhood.
How to Recreate This Look
- Shopping list: Playhouse kit or build ($100–$500), deep navy and gold paint ($25–$45), striped fabric awning ($20–$40), forward-facing book display shelves to fit interior (2–3, $20–$50 each), short bench or floor cushion ($30–$80), small chalkboard sign ($10–$20), fairy light strand for awning ($15–$25), gold paint for lettering ($8–$15), letter stencil set ($5–$15)
- Step-by-step: Assemble playhouse. Paint exterior deep navy. Use gold paint and stencils to letter the bookshop name above the door. Install striped fabric awning on a tension rod or screwed-in support. Add a counter ledge at window height inside. Mount forward-facing shelves inside the playhouse. Install fairy lights along awning perimeter. Add bench inside. Position chalkboard sign at the door. Fill shelves with your child’s favorite books.
- Style compatibility: Literary, bookshop, vintage, and whimsical academic themes. Works with navy, white, gold, and warm wood palettes.
- Budget breakdown: Under $100 (painted kit + basic shelves + fabric awning + chalkboard) / $100–$500 (wood kit + quality shelves + proper awning + bench + fairy lights) / $500+ (custom-built bookshop with fitted shelving + bespoke awning + personalized signage)
- Space requirements: Playhouse needs its standard 4×5 foot footprint. The window ledge interaction requires 2–3 feet of open space in front.
- Difficulty: Beginner to intermediate. Lettering with stencils is manageable for anyone; awning installation is straightforward.
- Durability: Excellent in wood. Chalkboard lettering is easily updated as your child’s “picks” change. Fabric awning may fade—choose outdoor-grade fabric.
- Seasonal adaptability: Update the chalkboard “Today’s Picks” with season-appropriate books. Add seasonal bunting to the awning—pumpkins in fall, snowflakes in winter.
- Common mistakes: Making the interior shelves too tall for the space—measure the playhouse interior carefully before purchasing shelf units. Low, wall-mounted forward-facing shelves work best.
- Maintenance: Wipe navy exterior with a damp cloth. Re-chalk the “Today’s Picks” board as often as your child requests. Spot-clean awning fabric as needed.
6. Gingerbread House Playhouse
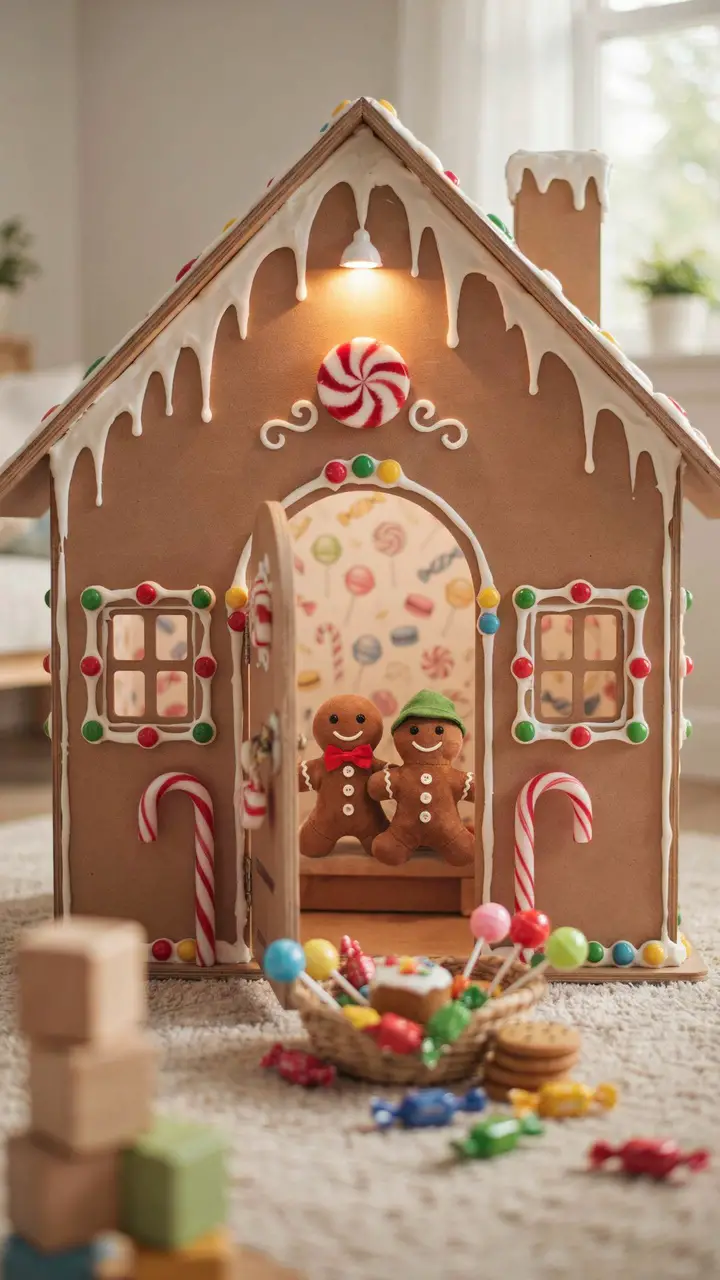
Cover a playhouse in candy-colored details to transform it into a Hansel and Gretel gingerbread cottage: paint the exterior in warm caramel and white, add craft-foam or painted wooden “candy” details—candy canes flanking the door, gumdrop-button accents along the window ledges, a peppermint swirl above the entrance—and top the roofline with white “icing drip” detail created from foam or painted rope. Inside, line the walls with a sweets-themed wallpaper, add two gingerbread-person plush toys on the bench, and fill a small basket with play-food sweets for a full candy kitchen play corner beside the house.
How to Recreate This Look
- Shopping list: Playhouse kit or build ($100–$500), caramel and white paint ($20–$40), craft foam sheets for candy cane and gumdrop details ($10–$20), foam or painted rope for icing drips ($8–$20), sweets-pattern peel-and-stick wallpaper ($20–$50), two gingerbread-person plush toys ($15–$30 each), play food sweets set ($15–$30), small basket ($8–$15), paint pens for details ($10–$20)
- Step-by-step: Assemble playhouse. Paint caramel base coat and white trim. Cut candy cane striped pieces from foam and attach beside the door. Glue gumdrop foam circles along window ledges. Paint or mount peppermint swirl detail above entry. Attach foam icing drip shapes along the roofline. Apply sweets wallpaper inside. Set up gingerbread plush toys and play food basket. Step back and admire—this one is objectively the most delightful playhouse on the list.
- Style compatibility: Fairy tale, Hansel and Gretel, candy land, and storybook themes. Works with caramel, white, red, and pastel candy palettes.
- Budget breakdown: Under $100 (painted kit + craft foam candy details + basic plush toys) / $100–$500 (wood kit + full candy treatment + sweets wallpaper + play food set) / $500+ (custom-built gingerbread cottage with 3D candy resin details + professional paint + fitted sweet interior)
- Space requirements: Standard playhouse footprint. Allow 2–3 feet in front for the play food basket and exterior candy display.
- Difficulty: Beginner. Craft foam is easy to cut and paint, and all details can be glued rather than fastened with hardware.
- Durability: Good but requires care—craft foam details may detach over time and need regluing. Repaint scuffed candy details promptly so the charm stays intact.
- Seasonal adaptability: This is the ultimate winter-holiday playhouse—add Christmas lights along the roofline in December. In other seasons, update candy colors to spring pastels or autumn harvest tones.
- Common mistakes: Applying icing drip detail before it’s fully dry—foam needs to be set fully before mounting to prevent warping.
- Maintenance: Re-glue candy details as needed with hot glue or craft adhesive. Spot-clean exterior surface with a damp cloth.
7. Flower Garden Greenhouse Playhouse
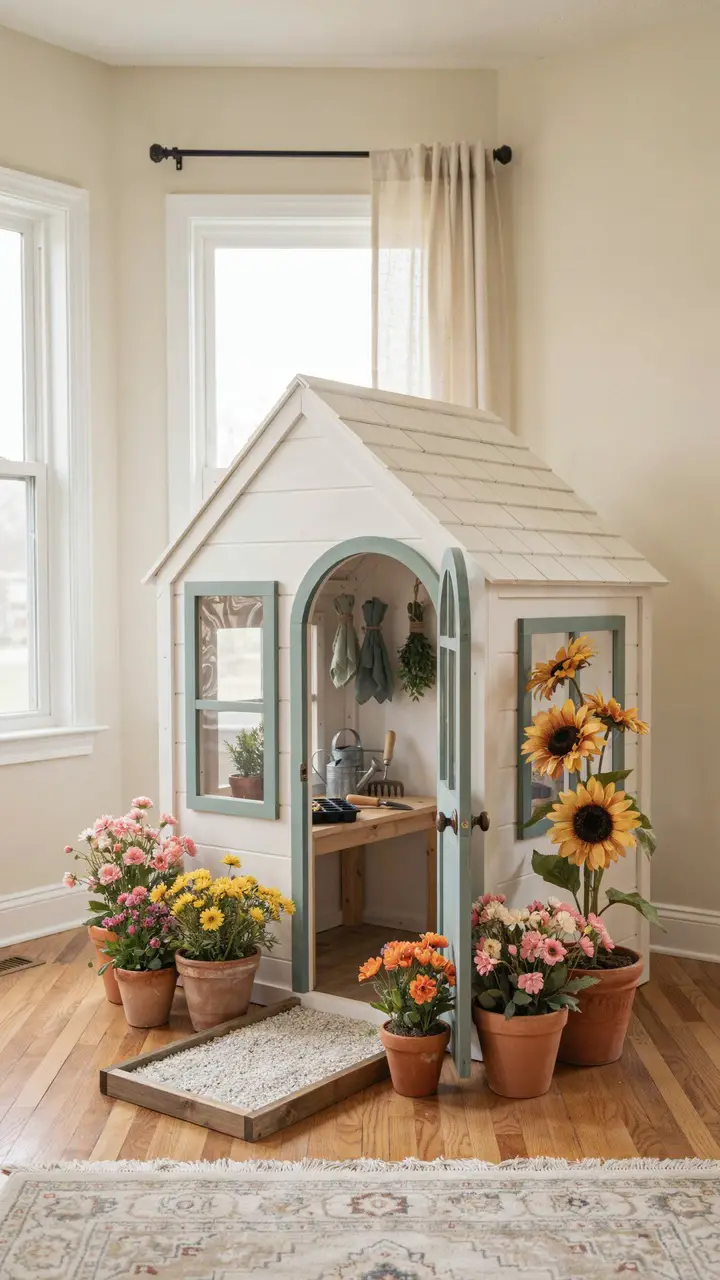
Transform a playhouse into a whimsical potting shed greenhouse: add clear acrylic panels to the window openings so they look like greenhouse glass, paint the exterior in white with sage green trim, and surround the exterior with planters overflowing with faux garden flowers. Inside, set up a “gardening station” with a child-sized potting table, play soil and seeds, miniature watering cans, and hanging fabric herb bundles from the ceiling. Outside the playhouse, create a pea-gravel path (use aquarium gravel in a bordered frame) leading to the greenhouse door, and plant oversized paper or fabric sunflowers in a tall pot beside the entrance.
How to Recreate This Look
- Shopping list: Playhouse kit ($100–$500), white and sage green paint ($20–$40), clear acrylic sheets cut to window size ($15–$35), 3–4 terracotta pots ($8–$20 each), faux garden flowers ($20–$50), child-sized potting table or small stool with surface ($30–$80), miniature watering cans ($10–$20 each), fabric herb bundles ($10–$25), oversized fabric sunflowers ($15–$30), aquarium gravel for path ($10–$20), simple wooden border strips ($10–$20)
- Step-by-step: Assemble playhouse. Paint white with sage green trim. Install clear acrylic in window openings. Arrange terracotta pots around the exterior with faux flowers. Build the gravel path by placing wooden border strips in a narrow rectangle and filling with aquarium gravel. Set up potting table inside. Hang fabric herb bundles from interior ceiling. Position sunflowers in pot beside the door.
- Style compatibility: Garden, cottage, botanical, and nature themes. Works with white, sage green, terracotta, and yellow palettes.
- Budget breakdown: Under $100 (painted kit + fake flowers + basic accessories) / $100–$500 (full greenhouse treatment + acrylic windows + potting table + full plant display) / $500+ (custom greenhouse with wood and acrylic construction + professional garden dressing)
- Space requirements: Greenhouse playhouse needs standard 4×5 foot footprint plus 3–4 feet around the exterior for the garden pot display and gravel path.
- Difficulty: Beginner to intermediate. Acrylic window fitting requires measuring precisely and cutting to size (hardware stores will cut to spec for free or a small fee).
- Durability: Excellent. Terracotta pots and faux plants are nearly indestructible. Acrylic windows are durable and shatter-resistant.
- Seasonal adaptability: Swap faux flower varieties seasonally. Add pumpkin and gourd decorations in autumn, white poinsettias in winter, daffodils in spring.
- Common mistakes: Using real gravel instead of lightweight aquarium gravel for the path—real gravel is far too heavy for an indoor floor setup and creates cleanup issues.
- Maintenance: Dust faux flowers monthly. Wipe acrylic windows with a soft cloth and mild cleaner to keep them clear.
8. Rocket Ship Spaceship Playhouse
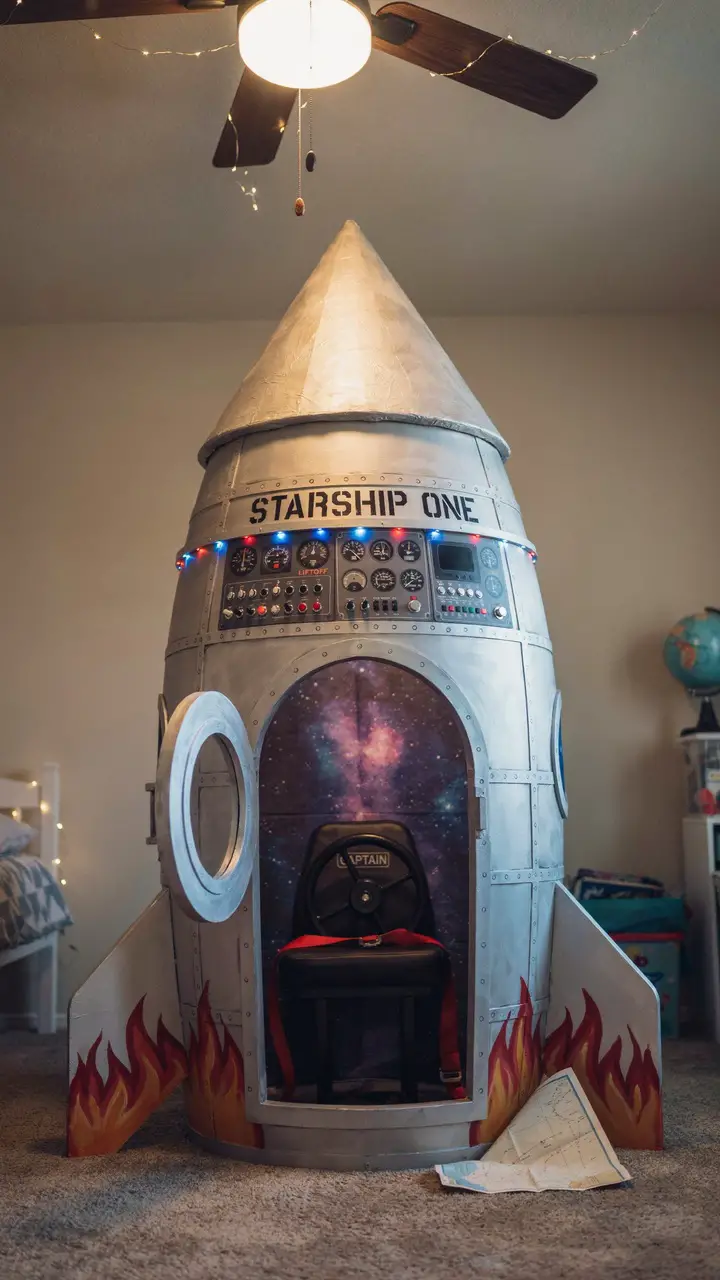
Convert the playhouse into a rocket ship: add a pointed nose cone from paper-mâché or painted foam on top of the roof, paint the exterior in silver and white with flame graphics along the base, and mount a full instrument panel on the front exterior wall. Inside, paper the walls in a galaxy print, install a captain’s chair with a seat belt prop, and mount a steering wheel (a bicycle wheel painted black) on the interior wall. Flashing LED accent lights around the instrument panel complete the launch-ready look. The rocket ship playhouse is a perennial favorite for science-obsessed children who want to be astronauts before they can tie their own shoes.
How to Recreate This Look
- Shopping list: Playhouse kit ($100–$500), silver and white paint ($20–$40), balloon and paper-mâché for nose cone ($10–$20), red/orange paint for flames ($10–$20), galaxy-print peel-and-stick wallpaper ($25–$60), captain’s chair or stool ($30–$80), bicycle wheel from thrift store ($5–$15), black paint for wheel ($5), LED accent lights in red and blue ($20–$40), painted instrument panel (freehand or printed template, $0–$20)
- Step-by-step: Assemble playhouse. Paint silver exterior with white trim. Add flame graphics along the base using orange and red paint. Paint or print instrument panel details on the front exterior. Build nose cone by inflating a large balloon, paper-mâché-ing over it, letting dry fully, deflating, and painting silver. Attach to roof peak. Apply galaxy wallpaper inside. Set up captain’s chair and steering wheel. Run LED lights along instrument panel. Attach with Velcro straps for safety.
- Style compatibility: Space, astronomy, science fiction, and STEM adventure themes. Works with silver, white, navy, and electric red/blue palettes.
- Budget breakdown: Under $100 (painted kit + DIY nose cone + galaxy wallpaper + basic accessories) / $100–$500 (quality kit + full silver treatment + LED lights + captain’s chair + proper steering wheel) / $500+ (custom rocket shell construction + professional space graphics + integrated lighting and sound)
- Space requirements: Standard playhouse footprint. The nose cone adds vertical height—ensure ceiling clearance is sufficient (typically fine in 8-foot rooms).
- Difficulty: Intermediate. Nose cone construction requires paper-mâché patience; all other elements are beginner-accessible.
- Durability: Paper-mâché nose cone is surprisingly durable when sealed. Re-seal annually to maintain integrity.
- Seasonal adaptability: The space theme is timeless—no seasonal adjustment needed. Add meteor shower string lights in any season for a new atmospheric effect.
- Common mistakes: Attaching the nose cone before the paper-mâché is completely dry—it will sag and lose its pointed shape. Full drying takes 48–72 hours.
- Maintenance: Check nose cone attachment to roof monthly. Touch up silver paint chips on the exterior as they occur.
9. Wizard’s Cottage Apothecary Playhouse
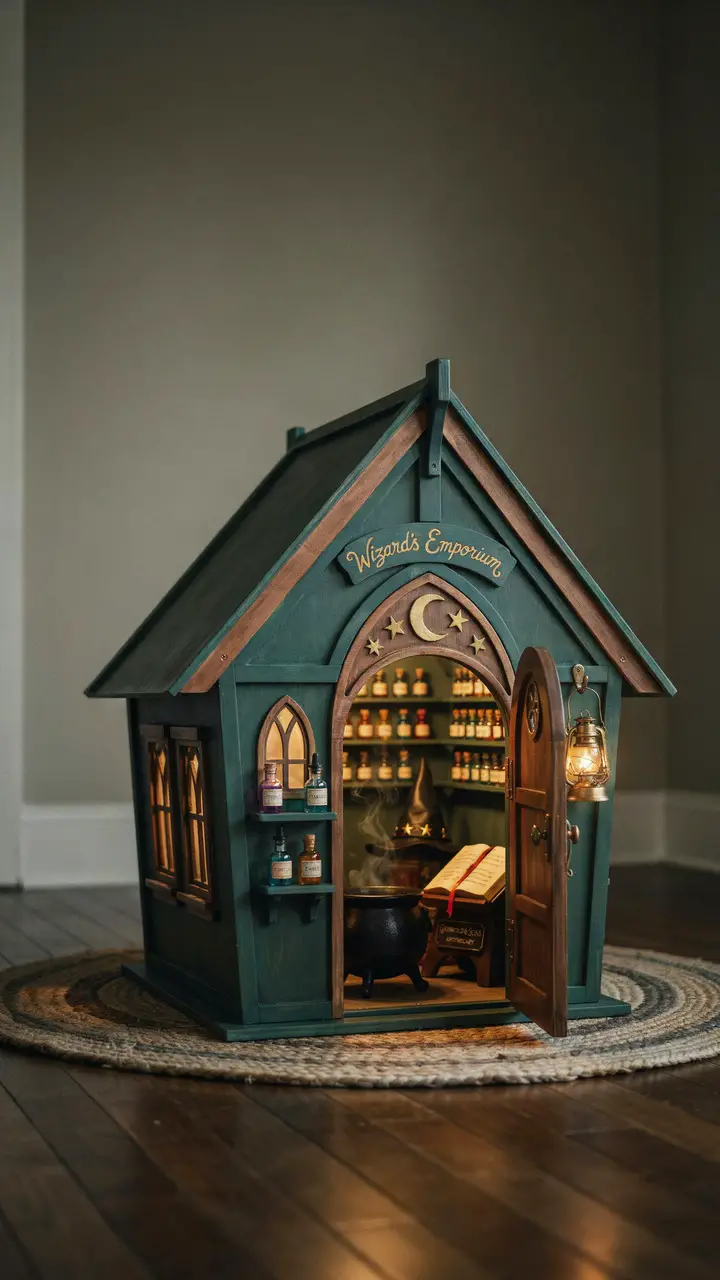
Turn the playhouse into a wizard’s cottage apothecary: paint the exterior in deep forest green with copper/gold trim and a moon-and-star motif above the door, install faux potion bottle shelving in the window display, and hang a sign reading “Wizard’s Emporium” in a curling font. Inside, line the walls with rows of labeled potion bottles (filled with colored water, glitter, or sand), add a small cauldron play set, and mount a wizard’s hat on a stand in the corner. Children can brew potions, fill prescriptions for imaginary ailments, and consult their spell book—stored in a mini lectern beside the cauldron.
How to Recreate This Look
- Shopping list: Playhouse kit ($100–$500), deep forest green, copper, and gold paint ($25–$45), small bottles in various shapes ($15–$30 for a set), colored water, glitter, or colored sand for bottles ($10–$20), “Wizard’s Emporium” sign ($10–$20 DIY or purchased), black cauldron toy or prop ($15–$30), wizard hat ($10–$20), wooden stand for hat ($10–$15), small lectern or book stand ($15–$30), blank journal for spell book ($10–$15), amber LED lantern ($15–$30)
- Step-by-step: Assemble playhouse. Paint deep forest green exterior with copper/gold trim. Paint moon and star motif above door. Make or purchase the emporium sign. Fill bottles with colored water or glitter solutions; label them with handwritten potion names. Mount interior shelves for bottle display. Set up cauldron, wizard hat stand, and lectern with spell book inside. Hang amber lantern from interior ceiling. Arrange window display with bottles and small moon-phase poster.
- Style compatibility: Wizard, fantasy, magic, and whimsical academic themes. Works with forest green, deep purple, copper, and gold palettes.
- Budget breakdown: Under $100 (painted kit + DIY potion bottles + basic accessories) / $100–$500 (full paint treatment + quality bottles + cauldron + lantern + lectern) / $500+ (custom wizard cottage construction + professional signage + bespoke potion bottle collection)
- Space requirements: Standard playhouse footprint. Allow 2–3 feet in front for the window display and entrance approach.
- Difficulty: Beginner to intermediate. Potion bottle making is beginner-accessible and enormously fun to do WITH children as part of the setup.
- Durability: Excellent. Sealed bottles with colored water keep their color for months (add a few drops of dish soap to prevent growth). Replace with fresh solutions annually.
- Seasonal adaptability: Update the potion bottle labels by season: pumpkin spice potions in autumn, snowflake serum in winter, spring growth elixir in spring.
- Common mistakes: Using real glass bottles for the potion display inside a children’s playroom—always use plastic or acrylic bottles for safety.
- Maintenance: Refresh colored water bottles annually. Dust interior shelves and bottles monthly. Touch up copper and gold trim paint as it chips.
10. Enchanted Puppet Theatre Playhouse
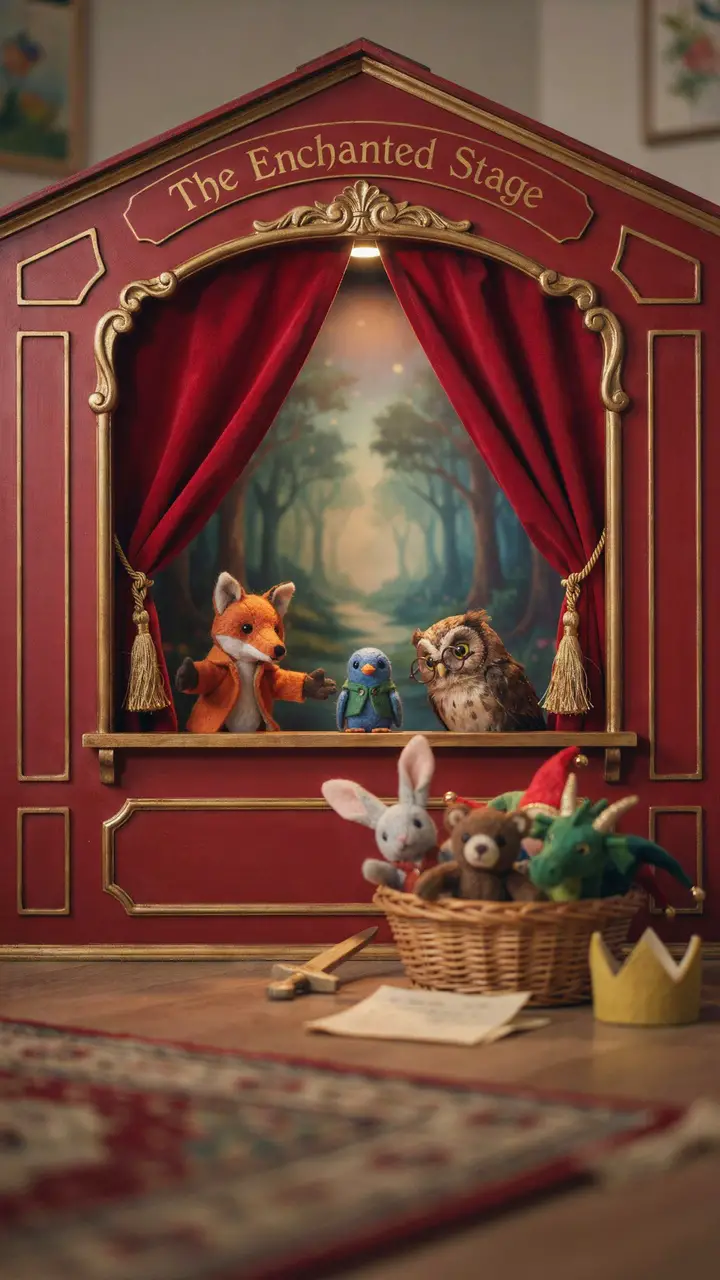
Convert the front of the playhouse into an interactive puppet theatre: frame the main window with a painted proscenium arch, hang a velvet curtain (tied back with gold cord), and build a small interior stage ledge below the window where puppets perform. Store the puppets in a dedicated basket inside the playhouse, and paint a backdrop mural on the interior back wall—a magical forest, a castle, or a night sky—that peeks through behind each performance. The playhouse itself becomes the backstage, and the window becomes the stage, giving children a purpose-built performance venue they’ll return to constantly.
How to Recreate This Look
- Shopping list: Playhouse kit ($100–$500), deep red and gold paint ($25–$45), velvet ribbon or small curtain panels in red ($15–$30), gold cord tie-backs ($8–$15), MDF for proscenium arch detail ($15–$30), wooden stage ledge ($15–$25), a set of 5–8 hand or finger puppets ($20–$50), backdrop mural paint for interior ($15–$30), storage basket ($10–$20), gold lettering stencil ($8–$15), amber LED spotlight (clip light works perfectly, $15–$30)
- Step-by-step: Assemble playhouse. Paint exterior deep red with gold trim. Stencil “The Enchanted Stage” above the window. Build and paint proscenium arch from MDF; attach around window frame. Install velvet curtain panels on tension rods inside the window opening with gold tie-backs. Add stage ledge inside the window sill. Paint enchanted forest mural on the interior back wall. Set up puppet storage basket. Position amber clip spotlight aimed at the stage window.
- Style compatibility: Theatre, performance, fairy tale, and creative arts themes. Works with red, gold, and deep jewel-tone palettes.
- Budget breakdown: Under $100 (painted kit + DIY arch + fabric curtains + basic puppet set) / $100–$500 (full red-and-gold treatment + velvet curtains + proper arch + quality puppets + amber light) / $500+ (custom theatre facade construction + professional mural + bespoke puppet collection + theatrical lighting)
- Space requirements: Standard playhouse footprint. Allow 3–4 feet of open floor space in front of the window for the “audience” seating area.
- Difficulty: Intermediate. Proscenium arch construction requires basic MDF cutting; all painting and curtain work is beginner-accessible.
- Durability: Excellent once built. Velvet curtains may fade slightly with strong light—rotate them if fading becomes noticeable.
- Seasonal adaptability: Swap the interior backdrop mural by repainting or adding a seasonal poster backdrop: winter wonderland, spring garden, Halloween haunted castle.
- Common mistakes: Making the stage ledge too narrow to hold puppets stably—it needs at least 4 inches of depth for puppets to stand without falling forward.
- Maintenance: Machine wash velvet curtains quarterly. Dust the stage ledge and interior weekly. Replace worn puppet characters as needed.
The Playhouse Is the Thing
Here’s what every parent discovers about a great indoor playhouse: it doesn’t just occupy children—it anchors the entire room. Once a playhouse exists in a playroom, everything else in the space starts to relate to it. The rug becomes the road leading to it, the shelves become the surrounding neighborhood, and the open floor becomes the yard where adventures spill out from inside.
A whimsical playhouse takes that anchoring power and turns it into something genuinely extraordinary. When children walk into a room and see a candy-colored gingerbread cottage or a silver-and-flame rocket ship or a deep green wizard’s emporium, they don’t just see a toy—they see an invitation. A beginning. A “what if.” And from “what if” comes every story, every game, every afternoon that goes by in a blur because they were so deeply in their own imagined world that time simply ceased to matter.
That kind of play—imaginative, immersive, and self-directed—is exactly what childhood is for. Building a playhouse that supports it is one of the most worthwhile things you can do with a weekend, a can of paint, and a genuine belief that magic belongs inside the home.

Greetings, I’m Alex – an expert in the art of naming teams, groups or brands, and businesses. With years of experience as a consultant for some of the most recognized companies out there, I want to pass on my knowledge and share tips that will help you craft an unforgettable name for your project through TeamGroupNames.Com!